_GOTOBOTTOM
Constructive Feedback
For in-progress or completed build photos. Give and get contructive feedback!
Tamiya's M151A2 Ford Mutt
panzer_fan
Visit this Community
Ontario, Canada
Joined: March 25, 2003
KitMaker: 427 posts
Armorama: 348 posts
Posted: Tuesday, April 08, 2003 - 02:58 PM UTC
Hi guys,
I have started to work onTamiya's Ford Mutt. The pictures are from early stages. I thought it would be nice to share my projects with you, even though there's not too much I can show you at the moment. Below you can find the link that'll take you to the pictures. Please let me know what you think. This si my first vehicle ever.
M151A2 Ford Mutt
AJLaFleche
Visit this Community
Massachusetts, United States
Joined: May 05, 2002
KitMaker: 8,074 posts
Armorama: 3,293 posts
Posted: Tuesday, April 08, 2003 - 03:37 PM UTC
Sebastian,
I'd paint the chassis parts the base color of the vehicle, an olive green/olive drab. The drive shaft and engine should be a dark metalic color and the exhaust a srusted mtal color. Next, devise a emplate to block off the spaces under the seats if you want anyone to look underneath and cut this from sheet stock. . Of course, if you do this, you will stop your OOB building and move up to a detailed kit.
Al
slodder
Visit this Community
North Carolina, United States
Joined: February 22, 2002
KitMaker: 11,718 posts
Armorama: 7,138 posts
Posted: Wednesday, April 09, 2003 - 12:53 AM UTC
panzer_fan - this is no cut on your work my comment is more on the kit itself. Looking at the molding of this one reminds me more of Italeri vs Tamiya.
What is your impression of the overall molding detail? To me it looks a bit sparse.
AJLaFleche
Visit this Community
Massachusetts, United States
Joined: May 05, 2002
KitMaker: 8,074 posts
Armorama: 3,293 posts
Posted: Wednesday, April 09, 2003 - 01:40 AM UTC
I built a whole pack of MUTTs some time ago. The kit is simple but it's cheap. The M-60 needs to be replaced since it has no detailing to the flash suppressor. A signal stalk should be added to the steering wheel colunm and gas, brake and clutch pedals should be added. The hole for the air intake extension should be filled if not using that part and the spaces uner the seats should be filled with sheet stock. I've read elsewhere that the suspension should be adjusted. The guard for the exhaust extension is incorrect as molded (see http://groups.msn.com/armorama/alalbum.msnw?Page=4 " TARGET="_blank"> http://groups.msn.com/armorama/alalbum.msnw?Page=4 ). It is a fun and easy kit to build, however and captures the flavor of the vehicle.
kkeefe
Visit this Community
Massachusetts, United States
Joined: May 12, 2002
KitMaker: 1,416 posts
Armorama: 0 posts
Posted: Wednesday, April 09, 2003 - 01:50 AM UTC
I agree that it is a fun and easy kit to build.

This model was discussed awhile back here on Armorama, but I can't find it. The rear suspension does need to be beefed up with I believe .030" thick discs, as it sits too low in the rear end. Check out Gunnie's Guntruck Studios web site (link is around here someplace) for more details.

Most important tho.... have fun with it! It is a great little kit IMMHO.
GunTruck
Visit this Community
California, United States
Joined: December 01, 2001
KitMaker: 5,885 posts
Armorama: 3,799 posts
Posted: Wednesday, April 09, 2003 - 02:49 AM UTC
Panzer Fan - this is what I normally do the the Tamiya (AP Bayardi too because the conversion was cast using Tamiya's body pan) M151 to improve the look of the rear suspension:


The underside during construction. As Al mentioned above, I'll add simple details to the underside of the Battery Box and Fuel Tank that is missing in the Tamiya kit. Really easy to do. As Kevin mentioned, I do punch out three .010" discs of sheet styrene to insert into the two holes cast on the body pan where the rear suspension springs locate - before gluing in the springs themselves. They cannot be seen in the end result - but do raise the rear suspension up enough that the wheels do not come in contact with the sides and tops of the rear wheelhouse.


As Al mentioned above about drilling out the lightening holes in the tire rims; I like to replace the wheels altogether with pairs taken from AFV Club's 105mm Howitzer kit. The holes are already open. Fitting them to a M151 is easy - using the Drums supplied in the AFV Club kit.
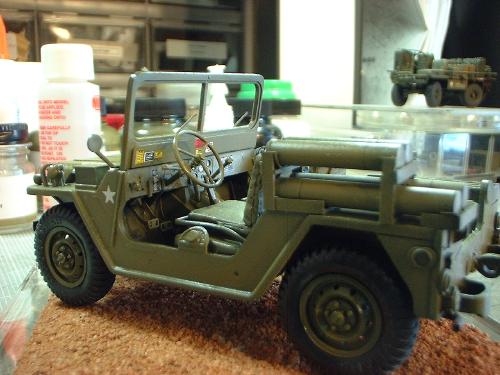


My Davy Crockett Transporter/Launcher M151A1D truck is glossed to protect decals and markings in the above photo. It is here to show what the result of inserting the punched discs to raise the rear suspension looks like when the tires are fitted to the model. This method works for all the 1:35th scale M151 models out there that suffer from this problem.

Hope this helps.

Gunnie
panzer_fan
Visit this Community
Ontario, Canada
Joined: March 25, 2003
KitMaker: 427 posts
Armorama: 348 posts
Posted: Wednesday, April 09, 2003 - 08:10 AM UTC
slodder,
Sorry for the delay. I find the moulding detail very good, I could even say impressive, but keep in mind that this is my first Tamiya kit. So far I dealt with Italeri and crappy Revell. I cannot make a comparison between two Tamiya kits yet. Sorry.
panzer_fan
Visit this Community
Ontario, Canada
Joined: March 25, 2003
KitMaker: 427 posts
Armorama: 348 posts
Posted: Wednesday, April 09, 2003 - 08:17 AM UTC
Thank you GunTruck for the pictures and tips. May I ask you how did you paint it? Actually, this is the first time when I'll paint a model, so I don't know how should I do it. I am also afraid of messing the hours of modelling, by a poor painting job.
slodder
Visit this Community
North Carolina, United States
Joined: February 22, 2002
KitMaker: 11,718 posts
Armorama: 7,138 posts
Posted: Wednesday, April 09, 2003 - 09:15 AM UTC
Thanks panzer_fan - I appreciate the update.
GunTruck
Visit this Community
California, United States
Joined: December 01, 2001
KitMaker: 5,885 posts
Armorama: 3,799 posts
Posted: Wednesday, April 09, 2003 - 10:17 AM UTC

Quoted Text

Thank you GunTruck for the pictures and tips. May I ask you how did you paint it? Actually, this is the first time when I'll paint a model, so I don't know how should I do it. I am also afraid of messing the hours of modelling, by a poor painting job.


I airbrush all of my models. I don't know if you have one, and are experienced with it, but I recommend it highly. For specific painting issues/problems - just Private Message me or e-mail me and I'll help you out as much as I can.

I go into too much detail sometimes in these threads, but if you click on the link below my "signature" it'll take you to my site where I go into greater details about painting and color selections. The Soviet T-55A tank is a good place to get this information.

Gunnie
blaster76
Visit this Community
Texas, United States
Joined: September 15, 2002
KitMaker: 8,985 posts
Armorama: 3,034 posts
Posted: Wednesday, April 09, 2003 - 07:27 PM UTC
I built one of these little jewels straight out of box for a diorama. glad to know about raising the rear suspension before getting too involved with second
panzer_fan
Visit this Community
Ontario, Canada
Joined: March 25, 2003
KitMaker: 427 posts
Armorama: 348 posts
Posted: Thursday, April 10, 2003 - 12:30 AM UTC
Thank you very much guys for all your help. I'll keep you posted as I make progress on building the little one.
panzer_fan
Visit this Community
Ontario, Canada
Joined: March 25, 2003
KitMaker: 427 posts
Armorama: 348 posts
Posted: Sunday, April 13, 2003 - 01:49 PM UTC
Hi guys,
Below is the link to some more pictures with the MUTT. Check them out. I know is not much, but I am working very slow, since I have no rush at all.
Tamiya M151 A2
 _GOTOTOP