Marder IIIH Interior painting.
United States
Joined: July 21, 2008
KitMaker: 15 posts
Armorama: 14 posts
Posted: Saturday, July 26, 2008 - 10:08 AM UTC
Hi All. I am currently working on my first build in about 30+ years. Picked up a Dragon Marder IIIH last weekend. To this point I have been working on different sub-assemblies of the kit and am almost ready to place the interior pieces in the hull. The drivers compartment will be somewhat visible due to the open nature of the turret, and I plan to build the hatch over the transmission in the open position.
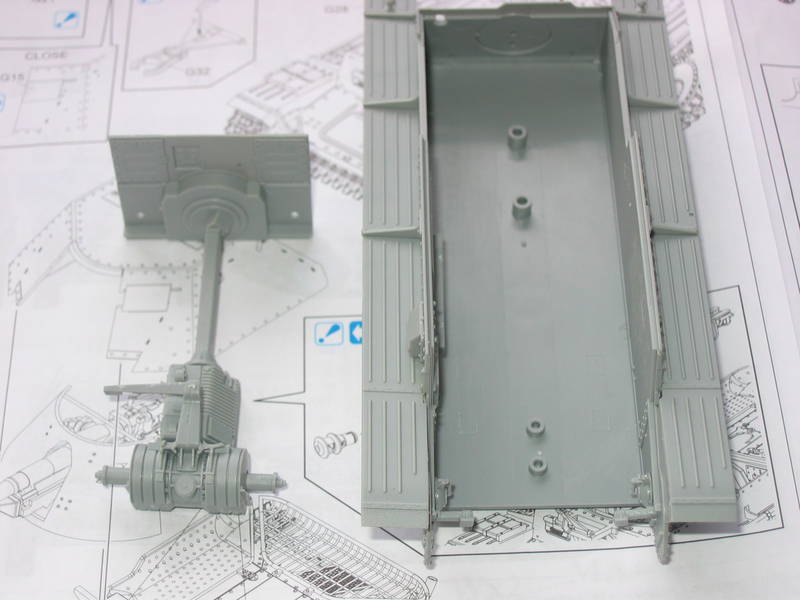
I am looking for advice on how to paint the interior, in particular the transmission and gearbox assemblies shown in the above image. From what I have gathered from these forums so far the interior walls would have been off white, the floor a reddish brown, and other pieces of equipment green. I am not a stickler for historical accuracy, but I'd like to at least be in the right ball park.
Any advice and suggestions would be appreciated.
California, United States
Joined: October 21, 2007
KitMaker: 3,684 posts
Armorama: 2,938 posts
Posted: Saturday, July 26, 2008 - 11:50 AM UTC
Hi Mark, and welcome to Armorama!
Great choice of subject matter (I have a soft spot for the 38(t) series)! I'm by far no expert, but I believe the interior was usually a buff (off-white), with the transmission/final drive a green-gray color, just as you said. I think the reddish/brown on the floor was caused more by wear and tear, and of course a lot of your final coloring will depend on how much you are going to weather it.
I find that interiors are a great place to practice new techniques and usually build/paint/weather them even if I'm going to leave the hatches closed.
Your build is looking great so far, hopefully you'll be posting more progress!
United States
Joined: July 21, 2008
KitMaker: 15 posts
Armorama: 14 posts
Posted: Sunday, July 27, 2008 - 02:36 PM UTC
I got the interior assembled and painted this weekend. I took your advice James and used the interior as an opportunity to try out basic washing and dry brushing techniques. Learned a couple of useful things, like thinner is better for washes, without having to worry about the mistakes being too visible.
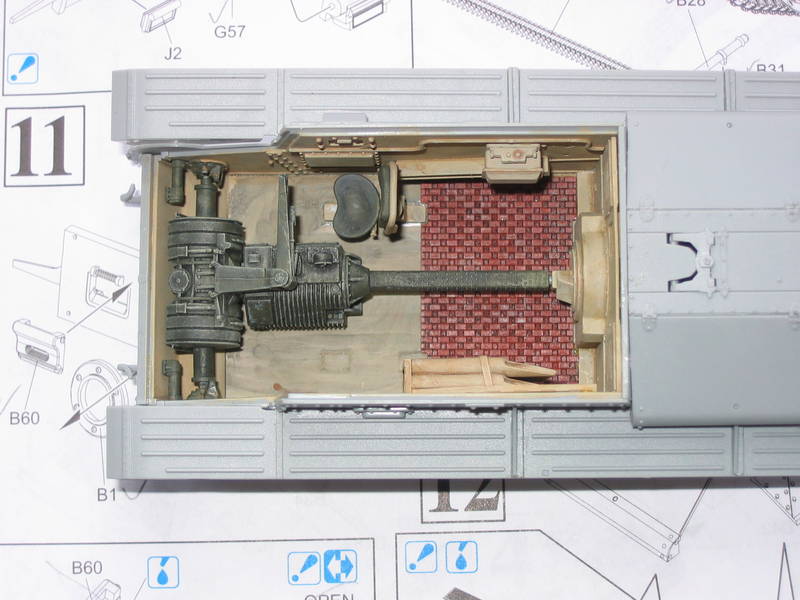
Of course by the time I finish the kit the interior will be pretty difficult to view. Kinda a shame since there are some nice details in there.
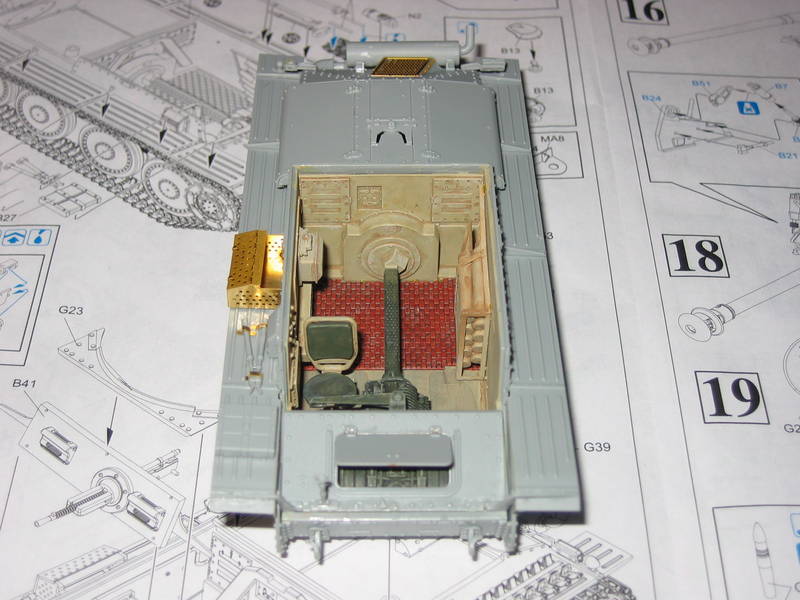
Last time I built models they were all inexpensive Revel and Monogram kits. This Dragon kit is a lot of fun. But man-oh-man some of those PE assemblies push the limits of my eyeballs. Fun stuff though.
Removed by original poster on 07/28/08 - 01:40:13 (GMT).
California, United States
Joined: October 21, 2007
KitMaker: 3,684 posts
Armorama: 2,938 posts
Posted: Sunday, July 27, 2008 - 03:08 PM UTC
Off to a great start, Mark! I usually go for a heavy first wash also, though I clean most of it away by dabbing a cloth and using a brush with clean thinner. Looking forward to more progress

Illinois, United States
Joined: November 04, 2007
KitMaker: 396 posts
Armorama: 325 posts
Posted: Sunday, July 27, 2008 - 04:21 PM UTC
Marc, nicely done, good shading. I'm always interested is seeing the interior layout of various 38T vehicles. So many different vehicles made from the 38T, different interior layouts are nice to see. I'll follow your build to see where you take this thing.
Joe
Florida, United States
Joined: March 01, 2008
KitMaker: 529 posts
Armorama: 143 posts
Posted: Monday, July 28, 2008 - 01:28 AM UTC
Mark, you're off to an excellent start (you seem to have a good handle on the P.E. parts.. I finished this model several weeks ago and had a hard time with them). As you mentioned, the interior details are hard to see once you've finished the build. Please keep us posted with your progess!!
Current projects:
Revell F-15E (1:48)
United States
Joined: July 21, 2008
KitMaker: 15 posts
Armorama: 14 posts
Posted: Monday, July 28, 2008 - 03:08 AM UTC
Thanks for the positive comments everyone. Don't hesitate to provide constructive criticism. I am looking to improve.
I brush painted the interior because I found out that I needed to replace the air line on my old Badger air brush. Still waiting on the new parts. Assuming I can quickly regain confidence with the air brush I'll use it for the base coat on the exterior. I am also working with acrylics at the moment. For the last 20 years or so my primary modeling experience has been in 1/285 scale. Very different painting skill set required at 1/35 scale

. But the basics are the same.
As for the PE parts, I am very glad that my nearsightedness allows me to still see small things close up. Using a machinists 6" steel ruler helps a lot with shaping the parts. It's perfectly flat and has a precision ground edge and true right angles at the corners. I also picked up a pair of high quality flat nosed tweezers that I will only use with small parts like these. Still, there were a couple of hinged parts that I simply decided to pass on for this build. Just too tedious at my current skill level. It was quite apparent that they would have turned out looking heavily "battle damaged".
Fun stuff.
Maryland, United States
Joined: May 04, 2007
KitMaker: 1,132 posts
Armorama: 1,123 posts
Posted: Wednesday, July 30, 2008 - 02:29 PM UTC
Nice looking interior Mark, did a fantastic job after being gone for a while! Looking forward to your next updates.
Welcome to Armorama! Cheers -
Tim
Current projects:
AFV 8.8cm Flak 18 (35088) (paint stage)
Academy Warrior MCV (OIF) (final touches...then paint)
Next up:
Revell A-6E Intruder (?)
New Jersey, United States
Joined: February 02, 2008
KitMaker: 1,388 posts
Armorama: 1,325 posts
Posted: Wednesday, July 30, 2008 - 02:39 PM UTC
yours looks worlds better than mine
Modelling is not just a hobby, it's an addiction.

#041
Kobenhavn, Denmark
Joined: July 20, 2006
KitMaker: 10,069 posts
Armorama: 4,677 posts
Posted: Thursday, July 31, 2008 - 11:34 PM UTC
First of all, welcome to the forum and to the hobby, Mark.
Your Marder looks really cool so far.
It seems like you have painted the interior in a sand colour, but maybe that is just the pictures. Anyway, it looks very good and is (could be) probably a dirty off white. So under all circumstances I think it looks very good.
I believe the interior of the superstructure should be the same colour as the outside. In this case probably sand/dark yellow colour. See the picture below as inspiration although I know it is not exactly the same version of the Marder as yours.
I have also added a few pictures from my references as inspiration for the outside finish of your Marder.
How many decal opitions are included in the kit?


Campaign'oholic - 252+ campaigns completed
Indiana, United States
Joined: May 14, 2007
KitMaker: 3,117 posts
Armorama: 564 posts
Posted: Friday, August 01, 2008 - 03:17 PM UTC
Nice build. It is looking good and going together well. You are doing a really good job on the PE. The colors look like they are correct. The red-brown color is most likely primer, as oposed to wear and tear.
Jesper, it is a good kit-one you would really enjoy.
"Treat 'em Rough", Current Builds--Wingnut Rumpler
I am frequently seen with blood shot eyes from staying up past my nap time to get the right colour scheme on my latest WWI model?
United States
Joined: July 21, 2008
KitMaker: 15 posts
Armorama: 14 posts
Posted: Monday, August 04, 2008 - 02:48 AM UTC
Thanks for the encouragement everyone. Made some more progress this weekend. Started on the main gun assembly. I'll post more pics shortly.
You are correct Jesper, I went with a light sandy color for the interior. I tried white on some practice pieces but even after 3 coats the coverage was pretty spotty. Since I am going to use the model in a Tunisian Dio I figured that the interior would have likely been dusty anyway. At least that is my rationalization, and I am sticking with it...

.
The kit came with 4 decal sets. Tunisia, Italy, Russia and Normandy (I think).
I also got the replacement parts for my old airbrush last weekend. So now it is time to start brushing up my my spray painting skills, so to speak.
Rhode Island, United States
Joined: July 17, 2008
KitMaker: 38 posts
Armorama: 38 posts
Posted: Monday, August 04, 2008 - 03:42 AM UTC
GJ on that interior. Looking great.
Illinois, United States
Joined: March 16, 2002
KitMaker: 1,331 posts
Armorama: 569 posts
Posted: Monday, August 04, 2008 - 04:32 AM UTC
GOOD GRIEF! You don't touch a model for 30 yrs. and then show up with this little gem !! Maybe my shrink is wrong, and those feelings of inadequacy have a basis in reality


Very nice work. I think the interior looks good, and you did a spot on job with the PE that I can see. That stuff can drive you crazy. Welcome back to the hobby, and I can't wait to see more of your progress.

Cheers,
Mike
United States
Joined: July 21, 2008
KitMaker: 15 posts
Armorama: 14 posts
Posted: Saturday, August 23, 2008 - 07:36 AM UTC
Been making progress over the last couple weeks. Really having fun with this kit. The instructions however are a bit spotty in areas. Fortunately I took a cautious approach checked ahead in the instructions for potential conflicts. A few of the PE parts proved too challenging so I skipped 'em. No historical accuracy awards for me on this build

.
So here are the final subassemblies ready for painting.
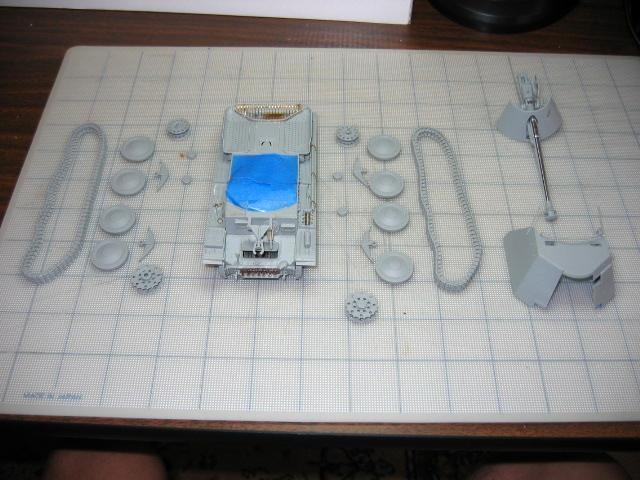
I figured it would be easier to paint the gun and the interior of the gun shield as separate parts.
The subassemblies were airbrushed with Tamyia's Desert Yellow.
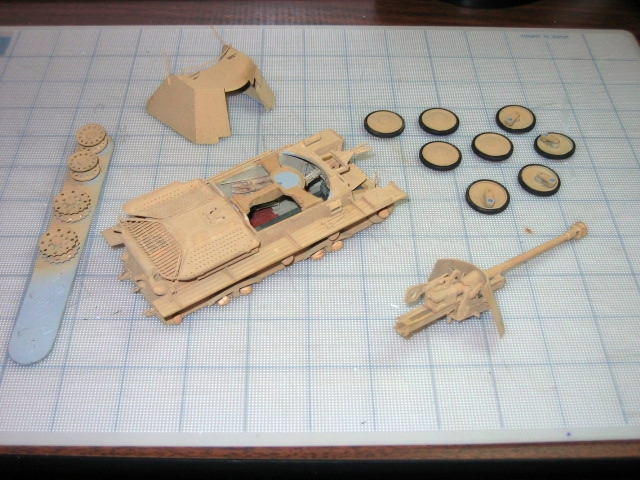
At this stage I noticed that there were a number of areas which were heavily shadowed and would have to be touched up by brush.
United States
Joined: July 21, 2008
KitMaker: 15 posts
Armorama: 14 posts
Posted: Saturday, August 23, 2008 - 07:48 AM UTC
Here are the results after my first pass at weathering with everything assembled. All the washes and dry brushing were done using inexpensive acrylics from a local arts&crafts store. I debated spraying with future first, but decided not to for this build.
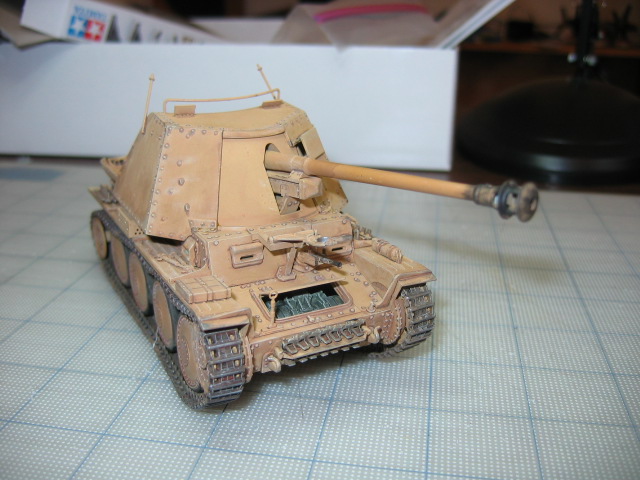
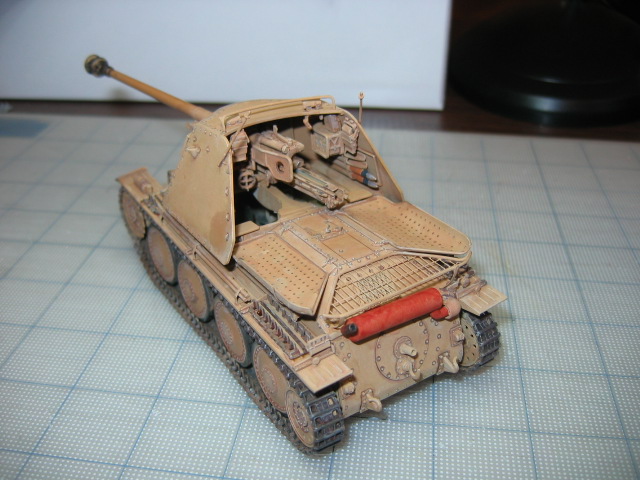
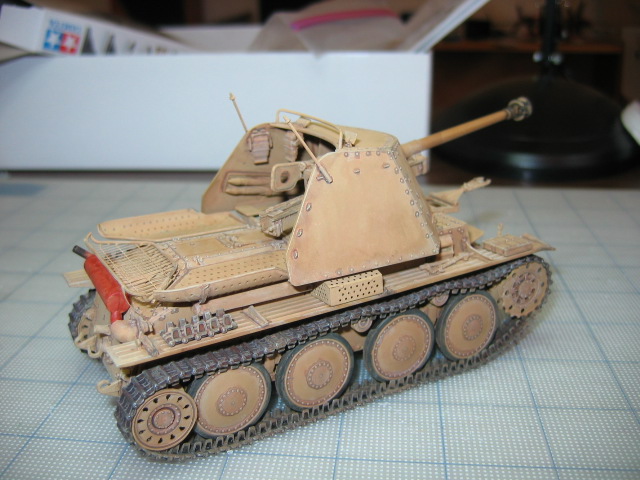
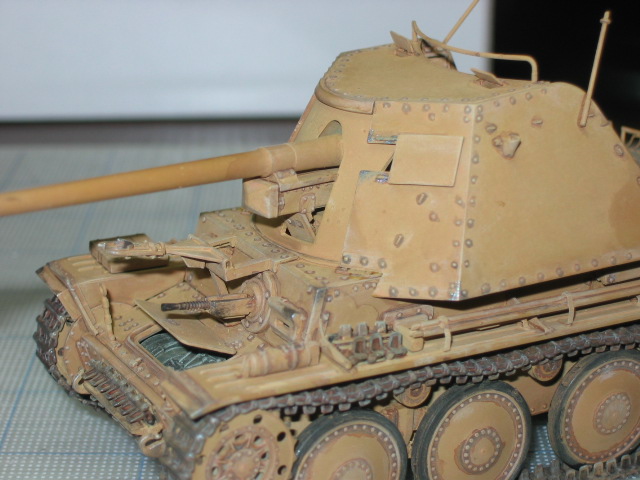
The color of the exhaust is not nearly so jarring as it appears in the photos. Still I think I'll tone it down, perhaps a dark wash and a little "dust".
Any and all comments, suggestions, criticisms are welcome. I am treating this build very much as a learning experience, so I appreciate feedback.
Now for the next step I have to figure out how to paint the figures and work out an idea for a Dio.
Florida, United States
Joined: March 01, 2008
KitMaker: 529 posts
Armorama: 143 posts
Posted: Saturday, August 23, 2008 - 01:44 PM UTC
Absolutely stunning!! Love the weathering job that you applied (not too excesive and a bit subtle).
Current projects:
Revell F-15E (1:48)
Ontario, Canada
Joined: September 18, 2005
KitMaker: 1,226 posts
Armorama: 819 posts
Posted: Saturday, August 23, 2008 - 01:50 PM UTC
Looks really good! I was just looking at the instructions and the reviews while wondering what scheme I might build.
Darryl
blackpoolkennels.com
Do not meddle in the affairs of dragons, for you are crunchy and taste good with ketchup.
Virginia, United States
Joined: February 05, 2002
KitMaker: 6,149 posts
Armorama: 4,573 posts
Posted: Saturday, August 23, 2008 - 03:29 PM UTC
Mark-- very nice. What color did you paint the muffler?
thanks
DJ
DJ Judge
COL (R), USA
"Tanker Boots do not a Tanker Make."
United States
Joined: July 21, 2008
KitMaker: 15 posts
Armorama: 14 posts
Posted: Saturday, August 23, 2008 - 03:37 PM UTC
Quoted Text
Absolutely stunning!! Love the weathering job that you applied (not too excesive and a bit subtle).
That is an interesting observation. After I was done it looked to the eye like there was very little effect from my weathering. I was assuming that I'd going back for a second pass. But in the photos the weathering looks more apparent than by eye. Probably a combination of the flash and the close up views. I think that I will definitely use my camera more to give me a different perspective on my efforts.
United States
Joined: July 21, 2008
KitMaker: 15 posts
Armorama: 14 posts
Posted: Saturday, August 23, 2008 - 03:42 PM UTC
Quoted Text
Mark-- very nice. What color did you paint the muffler?
thanks
DJ
Hi DJ. I used Burnt Sienna on the muffler. Under room lights it is more of a reddish brown color, and a bit more subdued than the photo shows. In the pics it kinda reminds me of a Baboons rear end

. Definitely gotta tone that down a bit.

#003
Donegal, Ireland
Joined: May 14, 2002
KitMaker: 9,763 posts
Armorama: 7,444 posts
Posted: Sunday, August 24, 2008 - 01:57 AM UTC
Quoted Text
But in the photos the weathering looks more apparent than by eye. Probably a combination of the flash and the close up views. I think that I will definitely use my camera more to give me a different perspective on my efforts.
Hi Mark. Using the flash for taking photos is not the best option. A few small lights pointed at it, or even better .... outside on an overcast day ... with no flash, will give the best representation of the colours used. Its hard to critic the colours after your description above.
The build though, is excellent ..considering its your first in 30 years, and its not one of the easiest builds out there. Really great how you broke down the assemblies for painting. It looks like your next kits will be no problem builds and with your abilities, the paint work will soon shine as well.

IPMS Stockholm
"The problem with common sense, is that it is not that common"
United States
Joined: July 21, 2008
KitMaker: 15 posts
Armorama: 14 posts
Posted: Sunday, August 24, 2008 - 04:33 AM UTC
Quoted Text
Quoted Text
But in the photos the weathering looks more apparent than by eye. Probably a combination of the flash and the close up views. I think that I will definitely use my camera more to give me a different perspective on my efforts.
Hi Mark. Using the flash for taking photos is not the best option. A few small lights pointed at it, or even better .... outside on an overcast day ... with no flash, will give the best representation of the colours used. Its hard to critic the colours after your description above.
The build though, is excellent ..considering its your first in 30 years, and its not one of the easiest builds out there. Really great how you broke down the assemblies for painting. It looks like your next kits will be no problem builds and with your abilities, the paint work will soon shine as well. 
Thanks for the kind words Frank. As for the colors in the photos..... did I mention that I have a mix of incandescent, fluorescent and halogen lights in my hobby room? Now that would not throw off the colors any huh! Natural light outdoors would probably work best.
So far I am quite happy with the results, and it has been a lot of fun. For now I think I'll let this kit sit for a bit while I move on to the figures and plan out a Dio.


