Kabayan ka-galing eh.............
i'm learning a lot from this guy..........
Constructive Feedback
For in-progress or completed build photos. Give and get contructive feedback!
For in-progress or completed build photos. Give and get contructive feedback!
Hosted by Darren Baker, Dave O'Meara
M-26 dragon and panther
jubelum

Joined: May 28, 2007
KitMaker: 124 posts
Armorama: 111 posts

Posted: Monday, October 20, 2008 - 09:34 PM UTC
rogula

Joined: September 29, 2008
KitMaker: 56 posts
Armorama: 53 posts

Posted: Monday, October 20, 2008 - 09:40 PM UTC
The worn tires are a great feature! Coming along nicely, can't wait to see the finished result!

Outerarm

Joined: September 20, 2007
KitMaker: 240 posts
Armorama: 233 posts

Posted: Tuesday, October 21, 2008 - 02:00 AM UTC
Coming along nicely, Ed. Looking forward to more!
Cheers,
Ian
Cheers,
Ian

liberator

Joined: May 15, 2004
KitMaker: 1,086 posts
Armorama: 783 posts

Posted: Monday, November 17, 2008 - 04:49 PM UTC
hi everyone and thanks again for the kind words. i'm doing the base for my project. i have to show the mud and tiled pavement. it's my first time to do an almost complete environment for a project. well i guess once in awhile we get serious on what we're working. i managed to find some material for the pavement effect. found a wood plank and rice nylon sack for the base. cut the plank to 1' x 2' enough space to put the M26 and panther together. glued and painted it black...kindly check out the pictures....


the groundwork/base is not yet done. details and weathering to follow.

closed up of the german tow bar and M26's trailer hook. a 'field modification' union is made of styrene sprue, soldering lead and german tow link from panther.

M26 and it's almost done...


comments and suggestions are welcome. thanks and enjoy viewing, ed


the groundwork/base is not yet done. details and weathering to follow.

closed up of the german tow bar and M26's trailer hook. a 'field modification' union is made of styrene sprue, soldering lead and german tow link from panther.

M26 and it's almost done...


comments and suggestions are welcome. thanks and enjoy viewing, ed


liberator

Joined: May 15, 2004
KitMaker: 1,086 posts
Armorama: 783 posts

Posted: Tuesday, December 09, 2008 - 12:45 PM UTC
hi everyone, closed up shot of the linkage on the recovery vehicle and the captured tank. both tow bars were used with modified connector plus additional cable to secure both vehicles.


comments and suggestions are welcome. thank you. ed


comments and suggestions are welcome. thank you. ed

Posted: Tuesday, December 09, 2008 - 01:33 PM UTC
Superb progress so far, and highly inspirational. It's been to long since I build a Dragon Wagon, and I have been itching to do another one recently..
Ed, don't forget to add some grease to the fifth wheel of the DW...
Thanks for showing it
Henk
Ed, don't forget to add some grease to the fifth wheel of the DW...

Thanks for showing it
Henk

liberator

Joined: May 15, 2004
KitMaker: 1,086 posts
Armorama: 783 posts

Posted: Friday, December 26, 2008 - 01:12 AM UTC
Happy Holidays and hi to everyone, this long holiday gave me time to do some modelling. and here's what i've done so far. i added 2 willys jeeps and parked then on the side.the reference picture show us 2 parked jeeps on the side. i have the early tamiya willys jeep and build another one to complete the scene. weathering is kind of tricky...specially how to replicate the wet and dry tarp of the vehicles. i sprayed the jeeps with light sand and hand painted the matt olive drab,black and smoke acrylic paint on the wet area. it's a hit or miss effect..i'm still testing other ways..check out the pictures....


comments and suggestions are welcome. thanks for viewing. ed


comments and suggestions are welcome. thanks for viewing. ed


marsiascout

Joined: March 24, 2008
KitMaker: 1,247 posts
Armorama: 913 posts

Posted: Friday, December 26, 2008 - 05:57 AM UTC
Nice idea! I only have 2 tips:
First: If a vehicle gets dusty, not the entire one will be dusty. So the sides and back, but not the entire top will be covered in dust.
Second: I think the clean spots are wet spots. If so, water would run into deeper places and places in the middle, not in the sides.
Lars
First: If a vehicle gets dusty, not the entire one will be dusty. So the sides and back, but not the entire top will be covered in dust.
Second: I think the clean spots are wet spots. If so, water would run into deeper places and places in the middle, not in the sides.
Lars

newfish

Joined: June 23, 2008
KitMaker: 2,329 posts
Armorama: 2,110 posts

Posted: Friday, December 26, 2008 - 06:19 AM UTC
great idea are the jeeps tamiya?
its looking great on the orignal picture it looks wet you still need to make the dioaram look more "wet" like using varnish and create water marks
its still a great diorama i rally want to build a dragon wagon.

its looking great on the orignal picture it looks wet you still need to make the dioaram look more "wet" like using varnish and create water marks

its still a great diorama i rally want to build a dragon wagon.


Bratushka

Joined: May 09, 2008
KitMaker: 1,019 posts
Armorama: 657 posts

Posted: Friday, December 26, 2008 - 08:17 AM UTC
Hi Ed. On the Jeeps, I think you got the wet canvas look on the first jeep right as canvas does get very dark, almost black when soaked. The mud/dust looks a little too artificial, like a painted panel on the back because it is so even in color and especially thickness with only the edges being irregular . As you say- it's tricky to get it right. I like the uneven texture on the sides better. But, there again the uniformity of the color makes it look dry like dust rather than wet. I am sure you will master the look you are after. The tank and the Dragon Wagon are superb!!!!!!!

liberator

Joined: May 15, 2004
KitMaker: 1,086 posts
Armorama: 783 posts

Posted: Sunday, April 12, 2009 - 04:07 PM UTC
hi guys, Happy Easter to all...finally i'm done with the project....here are some pictures...lots of pictures..enjoy viewing.


thanks and enjoy viewing. ed


thanks and enjoy viewing. ed


marsiascout

Joined: March 24, 2008
KitMaker: 1,247 posts
Armorama: 913 posts

Posted: Sunday, April 12, 2009 - 10:00 PM UTC
These models are very nice!
But again, I would change the tarps of the jeeps. Water would get in the deeper parts and not on the outersides.
Lars
But again, I would change the tarps of the jeeps. Water would get in the deeper parts and not on the outersides.
Lars
padawan_82

Joined: December 10, 2008
KitMaker: 817 posts
Armorama: 555 posts

Posted: Sunday, April 12, 2009 - 10:41 PM UTC
love the scene, i think your dio has turned out really well, i think the guys are right about the jeeps though, although i'm not complaining i'm no master at weathering yet so i don't feel it's right of me to say change this or change that when i haven't mastered this technique myself. but i like what you've done it's very ambitious. Ant 


liberator

Joined: May 15, 2004
KitMaker: 1,086 posts
Armorama: 783 posts

Posted: Monday, April 13, 2009 - 05:27 AM UTC
hi guys, thanks for the tips.. the soaked canvass usually have a longer time drying on the edges because of the extra fabric and heavy reinforced weaving on its sides. adding dirt and heavy fabric..water also logs on tubular frames. surely the middle part of the canvass top is much easier to dry. due to its flat thin surface. i've driven vehicles with canvass top and saw this effect. except if it was loosely installed and water would stay longer in the middle..like a basin. probably the effect would be different on cold..wet winter climate.  ..i guess we will have to leave this one on the mythbusters. thanks and enjoy viewing. ed
 ..i guess we will have to leave this one on the mythbusters. thanks and enjoy viewing. ed
Chucho69

Joined: April 20, 2009
KitMaker: 3 posts
Armorama: 2 posts

Posted: Sunday, April 19, 2009 - 01:36 PM UTC
Super trabajo, sobre todo muy inspirativo, gracias por compartir tus avances, pregunta: no habrá manera de que pongas como le hiciste para simular el lodo.???
Atte.
Chucho
Veracruz, Mexico
Atte.
Chucho
Veracruz, Mexico

Bratushka

Joined: May 09, 2008
KitMaker: 1,019 posts
Armorama: 657 posts

Posted: Monday, April 20, 2009 - 04:46 PM UTC
As I looked at your Jeeps again I remembered something I had done to a car model once. I had made a diorama for a friend who raced dirt track stock cars many years ago. I built a garage scene with replicas of a couple of his old cars, numbers and all. He had said many times that he wanted to find an old cast off stock car from that era he could rescue and restore. As part of the diorama I built a replica of such a car and weathered it as if it had been abandoned in a field for years. I won;t go into all the details, but one of the final finishing things I did was gave it a very heavy spray of Floquil Dust enamel paint mixed with some other colors at the top edges of the roof, along the edges of the hood and top of the fenders with my airbrush. Before it dried I quickly switched over to a wash consistency mix of the same stuff and then standing back a good bit, misted the hell out of the car doing my best to simulate rain. It did a hell of a job running and streaking the dust color down the sides and along the contours of the model. I was absolutely tickled to death on how it came out. The main thing was the effect came out looking very natural. The car was painted enamel and then cleared with an acrylic flat which also helped diffuse the weathering filter/wash. Another thing I did was blow weathering powder up from the bottom of the model. I have a Paasche Air Eraser which I put weathering powder in and blow it at low pressure. It creates a very natural looking pattern of dust, dirt, or whatever and gets it into places that are difficult with a brush or swab. He was almost moved to tears when I gave him the thing. I didn't have a camera at the time so I never got any pictures of it. This was before I joined Armorama anyway. Maybe there's a way to adapt this idea if you ever do another diorama like this one.

liberator

Joined: May 15, 2004
KitMaker: 1,086 posts
Armorama: 783 posts

Posted: Monday, April 20, 2009 - 05:14 PM UTC
muchos gracias..jesus, best way to put mud in your tires and side body panels is...spraying them with light sand tamiya paint....in cans. give special attention on the distance between the paint spray and the model kit. to get the spotty effect move a little further away from the kit and press the button half way to give a spitting effect . if you press it all the way down...it might ruin the effect. do some testing before spraying on the kit. for the chunky mud use any kind of putty and a spatula for applicator. i used automotive putty and primer paint for the groundwork. use rollers for track marks. lugged tires from old tractor toys will do. thanks again. ed 


liberator

Joined: May 15, 2004
KitMaker: 1,086 posts
Armorama: 783 posts

Posted: Monday, April 20, 2009 - 05:27 PM UTC
thanks jim for the tip. surely will try that on my next project. thanks again. ed 

Chucho69

Joined: April 20, 2009
KitMaker: 3 posts
Armorama: 2 posts

Posted: Monday, May 04, 2009 - 01:57 PM UTC
Saludos Ed, Muchas gracias pr contestar....i really aprecited that you answered my post, i guess your answer would help me in my work (an M3 Lee "Lend Lease" in russian service) right now, i',m worrking with the suspenssion so i'm putting the mud on it....so i can send you or post here photos of it....???
atte.
Jesus Herrera Quiroz
Veracruz, Mexico
Pd Sorry for my english
atte.
Jesus Herrera Quiroz
Veracruz, Mexico
Pd Sorry for my english

jimz66

Joined: December 15, 2006
KitMaker: 1,165 posts
Armorama: 1,105 posts

Posted: Monday, May 04, 2009 - 04:01 PM UTC
Very nice work Ed. Very nice indeed. Well done and thanks for sharing.
tjkelly

Joined: May 04, 2007
KitMaker: 1,132 posts
Armorama: 1,123 posts

Posted: Tuesday, May 05, 2009 - 04:04 AM UTC
Excellent work Ed! Nicely done, thanks again for sharing your build. Your progress photos and notes / tips are fantastic! Looking forward to your next 'project'!
Cheers -
Tim
Cheers -
Tim


liberator

Joined: May 15, 2004
KitMaker: 1,086 posts
Armorama: 783 posts

Posted: Friday, May 15, 2009 - 11:10 PM UTC
thanks guys for the nice words....really appreciated them. check this out...

i saw this while surfing. as soon i gather up all the kits and things needed..i'll start posting some progress. this will take awhile. i'm still doing something else right now..as soon as i'm half way done..i'll start posting them also.
i saw somebody else did this..LCM and dragon...except the LCM was placed the other way around. i'm not sure how or why did they rest the front side on the bed..while the extra weight was on the rear..hanging.
off topic....can you tell me if dragon or tamiya manufactured this kit.....? got this from...www.afrikakorp.com website. thanks to them.

Shot at 2009-05-04
a friend modeller said they did the other version but needed extensive conversion. i'm doing an afrika korp combo. will show you later on as soon as i'm half way done. thanks all for the tip. edssarao

i saw this while surfing. as soon i gather up all the kits and things needed..i'll start posting some progress. this will take awhile. i'm still doing something else right now..as soon as i'm half way done..i'll start posting them also.
i saw somebody else did this..LCM and dragon...except the LCM was placed the other way around. i'm not sure how or why did they rest the front side on the bed..while the extra weight was on the rear..hanging.
off topic....can you tell me if dragon or tamiya manufactured this kit.....? got this from...www.afrikakorp.com website. thanks to them.

Shot at 2009-05-04
a friend modeller said they did the other version but needed extensive conversion. i'm doing an afrika korp combo. will show you later on as soon as i'm half way done. thanks all for the tip. edssarao

newfish

Joined: June 23, 2008
KitMaker: 2,329 posts
Armorama: 2,110 posts

Posted: Saturday, May 16, 2009 - 12:34 AM UTC
Hey man great work!. MY club chairman built A dragon wagon with one on!
It looks mint!

It looks mint!

Posted: Saturday, May 16, 2009 - 02:39 AM UTC
Superb Ed, I really like the finished project, with the jeeps to set it off.
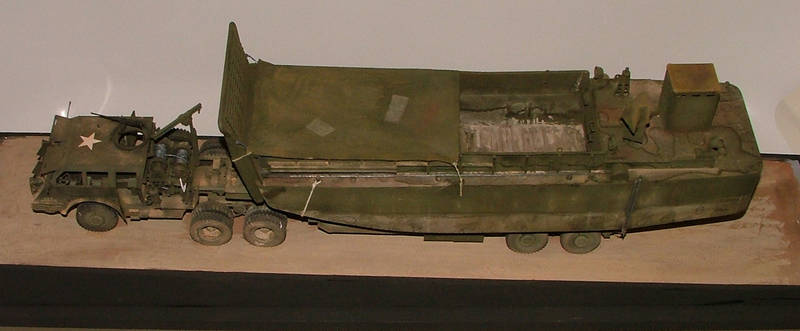
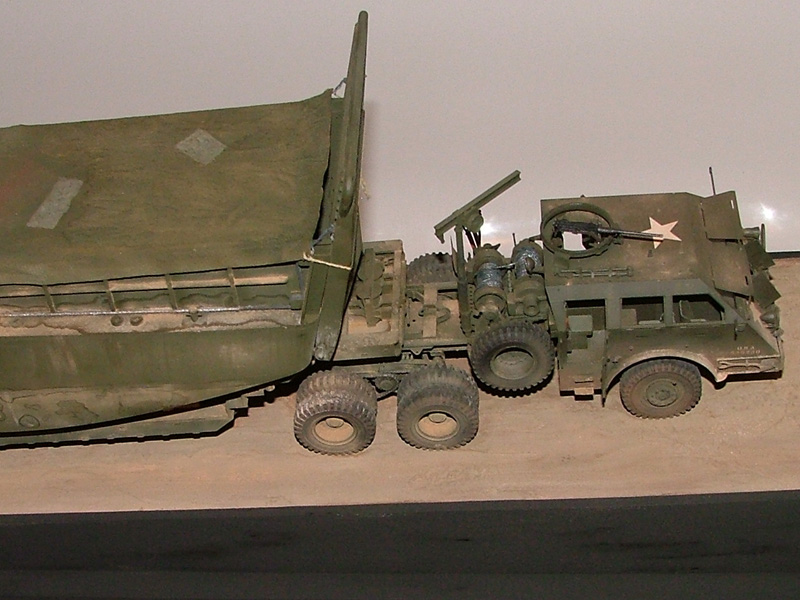
The front would be weighted down by stores, which were transported at the same time. It looks to me that the reason for placing the LCM facing forward, was to reduce the overhang on the rear, because the propellers and rudders would not foul the neck of the trailer. A number of pictures in the Dragon Wagon book by Ampersand show the LCM's in either position.
This is the one I did last year. I used the Trumpeter LCM, which is considered to be too high (although not excessively so).

Quoted Text
i saw somebody else did this..LCM and dragon...except the LCM was placed the other way around. i'm not sure how or why did they rest the front side on the bed..while the extra weight was on the rear..hanging.
The front would be weighted down by stores, which were transported at the same time. It looks to me that the reason for placing the LCM facing forward, was to reduce the overhang on the rear, because the propellers and rudders would not foul the neck of the trailer. A number of pictures in the Dragon Wagon book by Ampersand show the LCM's in either position.
This is the one I did last year. I used the Trumpeter LCM, which is considered to be too high (although not excessively so).


 |


