Hi all,
I've been surfing this website for quite some time but never become a member or posted anything. I've modeling for some time but only recently have my skills improved - thanks mainly to Model Military International and this website.
Anyway, I thought it was time to post some photos of my first ever Dragon build, the venerable King Tiger, kit no. 6254 (Battle of the Bulge).
I got on ok with the kit, but spent some really frustrating hours building it - yearning for the less complicated and easier to build Tamiya models. THE MOST frustrating thing was attaching all the roads wheels and merrily gluing the idler wheel in place, only to realise once all the Magic Tracks were made that the idler wheel needed to be loose to adjust the track tension! Much cursing. I figured that it would have to do.
Just one more thing, these are my early build photos (build in progress). I'm not a rivet counter and I really don't care if my models have the wrong type of tracks or colour paint. When I model, I do it for enjoyment and to try and create the right artistic feel (lets face it, no-one else looks at the finished product other than obliging family members...
So please feel free to offer productive feedback on how I can improve my painting skills, thanks!!
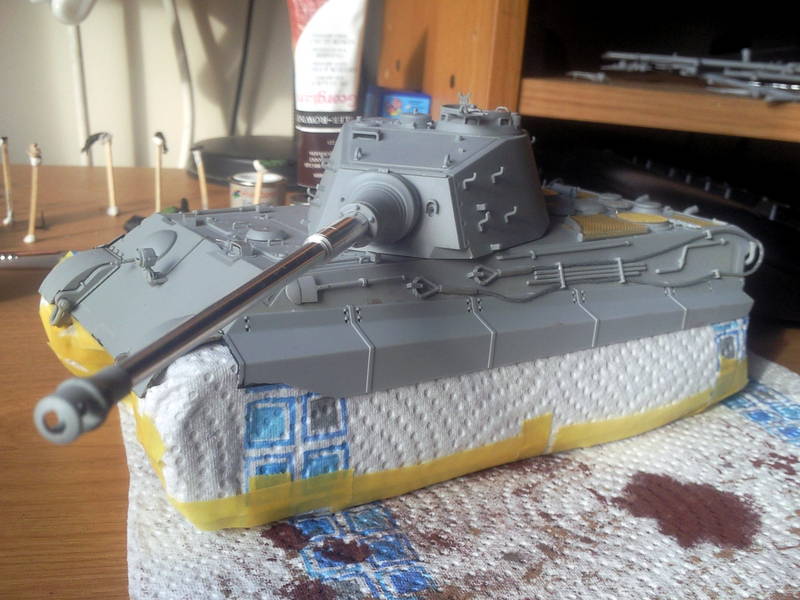
Ready for the turret and hull to be painted
Constructive Feedback
For in-progress or completed build photos. Give and get contructive feedback!
Hosted by Darren Baker, Dave O'Meara
My First Dragon Build... argh!
Penfold
England - East Midlands, United Kingdom
Joined: October 23, 2009
KitMaker: 33 posts
Armorama: 33 posts
Joined: October 23, 2009
KitMaker: 33 posts
Armorama: 33 posts
Posted: Friday, October 23, 2009 - 02:51 AM UTC
Penfold
England - East Midlands, United Kingdom
Joined: October 23, 2009
KitMaker: 33 posts
Armorama: 33 posts
Joined: October 23, 2009
KitMaker: 33 posts
Armorama: 33 posts
Posted: Friday, October 23, 2009 - 02:53 AM UTC
PS, how on earth do you get the photos to appear on this Forum?? Thanks
TacFireGuru
Colorado, United States
Joined: December 25, 2004
KitMaker: 3,770 posts
Armorama: 2,263 posts
Joined: December 25, 2004
KitMaker: 3,770 posts
Armorama: 2,263 posts
Posted: Friday, October 23, 2009 - 03:03 AM UTC
Uh....drop the Kitmaker gallery and get one from photobucket.
I tried three times to pull your pics from the site's gallery and kept getting the "red X."
Mike
EDIT
Fouth time is the charm; select the picture you want (so that it is larger. At the bottom it shows "Linked Thumbnail ." To the far right, there is a little icon that looks like a picture frame and a broken link if chain. Click that. That will get you code for "HTML Code." Cut and paste that code into your post.
Penfold
England - East Midlands, United Kingdom
Joined: October 23, 2009
KitMaker: 33 posts
Armorama: 33 posts
Joined: October 23, 2009
KitMaker: 33 posts
Armorama: 33 posts
Posted: Friday, October 23, 2009 - 03:36 AM UTC
Geat, thanks Mike!
dioman13
Indiana, United States
Joined: August 19, 2007
KitMaker: 2,184 posts
Armorama: 1,468 posts
Joined: August 19, 2007
KitMaker: 2,184 posts
Armorama: 1,468 posts
Posted: Friday, October 23, 2009 - 04:43 AM UTC
Those tracks look real good to me. Seems like the tank is coming along nicly too. By the way, did Atila the hun leave the head in passing by And enjoyment is why we all build, not for any other reason unless it is your buisness. That would have a tendicy to be a job then .
trackpads
England - South East, United Kingdom
Joined: December 17, 2008
KitMaker: 330 posts
Armorama: 284 posts
Joined: December 17, 2008
KitMaker: 330 posts
Armorama: 284 posts
Posted: Friday, October 23, 2009 - 05:27 AM UTC
That is looking nice Penfold,the running gear looks great,and a nice clean build on top as well,And i agree with you on the reason you model i am the same nice work mate.
trackpads
trackpads
Penfold
England - East Midlands, United Kingdom
Joined: October 23, 2009
KitMaker: 33 posts
Armorama: 33 posts
Joined: October 23, 2009
KitMaker: 33 posts
Armorama: 33 posts
Posted: Friday, October 23, 2009 - 06:27 AM UTC
Thanks guys for the kind comments, really appreciate it. Feels a bit weird posting stuff online for the first time!
I've been building this Tiger for about 3 or 4 months, so I guessed that having a blog will give me some impetus to get it going!
Yeah - Atila's head is there (or some German dude that came with the tank), and his body parts are all nicely spread out in the background of that photo , it wasn't a good day for him!
I'm intending to build a Dio with this lot, this will be my first ever proper diorama (I tried one previously with an AT AT from Star Wars. DIO FAIL.
So trying to paint the figures as I go along, might put some photos of them up a bit later. I'm a proper NOOB figure painter so go easy on me!
Penfold
England - East Midlands, United Kingdom
Joined: October 23, 2009
KitMaker: 33 posts
Armorama: 33 posts
Joined: October 23, 2009
KitMaker: 33 posts
Armorama: 33 posts
Posted: Friday, October 23, 2009 - 08:45 AM UTC
Well, the KT is now primed. Tamiya Rattle can job - nice, easy and quick!
To pre-shade or not to pre-shade? I haven't yet made up my mind whether this is worthwhile.
Tojo72
North Carolina, United States
Joined: June 06, 2006
KitMaker: 4,691 posts
Armorama: 3,509 posts
Joined: June 06, 2006
KitMaker: 4,691 posts
Armorama: 3,509 posts
Posted: Friday, October 23, 2009 - 10:16 AM UTC
The tracks and road wheels look great,some people miss that bare metal on the wheels,nice detail.
bobbyh
Texas, United States
Joined: September 09, 2009
KitMaker: 433 posts
Armorama: 167 posts
Joined: September 09, 2009
KitMaker: 433 posts
Armorama: 167 posts
Posted: Friday, October 23, 2009 - 05:20 PM UTC
Nice work Dave. I build / paint with the same attitude. Looks great, so far. Keep up the good work. I have a Dragon 1/35 Scud-b, that is a rough product that I was working on, that I had to put to the side for a little bit. I'll come back to it. Cheers - Bobby
WikingPanther
New Jersey, United States
Joined: August 12, 2008
KitMaker: 40 posts
Armorama: 39 posts
Joined: August 12, 2008
KitMaker: 40 posts
Armorama: 39 posts
Posted: Friday, October 23, 2009 - 07:14 PM UTC
great job! ive done a few DML king tigers myself, there beautiful kits. i love your tracks tone.
Penfold
England - East Midlands, United Kingdom
Joined: October 23, 2009
KitMaker: 33 posts
Armorama: 33 posts
Joined: October 23, 2009
KitMaker: 33 posts
Armorama: 33 posts
Posted: Friday, October 23, 2009 - 09:29 PM UTC
Thanks guys for the kind comments.
Yeah, this DML build has been a bit love/hate affair. I love the fine detail and the crispness of the moulding. But I hate how the daunting the build has felt at times!! Although there is a great sense of achievement once it is finally done - this is my first time working with a metal tow rope for example and I didn't know how it was gonna turn out.
I really like the Magic Tracks, much better than cleaning separate track links off a sprue and then gluing them together.
I've just bought Revells 1/35 Jadgtiger off ebay (the repackaged DML version), so it will be interesting to see what this is like when it arrives...
elph
Seoul, Korea / 대한민국
Joined: November 13, 2005
KitMaker: 319 posts
Armorama: 266 posts
Joined: November 13, 2005
KitMaker: 319 posts
Armorama: 266 posts
Posted: Saturday, October 24, 2009 - 01:31 AM UTC
Wow!...you really like magic tracks, a lot of people hate them. I don't mind them myself, but they can be frustrating at times. Anyway, best of luck with the build and I hope it turns out alright.
RattraP
Singapore / 新加坡
Joined: July 22, 2009
KitMaker: 14 posts
Armorama: 13 posts
Joined: July 22, 2009
KitMaker: 14 posts
Armorama: 13 posts
Posted: Saturday, October 24, 2009 - 04:53 AM UTC
Hi Penfold
Cool men....really like your "big cat"....though not completed
I just joined as member recently...
Like your Attitude towards scale modelling....
Hope to see more of your work in progress and pick up a few skills from U on e way...
Cool men....really like your "big cat"....though not completed
I just joined as member recently...
Like your Attitude towards scale modelling....
Hope to see more of your work in progress and pick up a few skills from U on e way...
Penfold
England - East Midlands, United Kingdom
Joined: October 23, 2009
KitMaker: 33 posts
Armorama: 33 posts
Joined: October 23, 2009
KitMaker: 33 posts
Armorama: 33 posts
Posted: Saturday, October 24, 2009 - 07:36 AM UTC
Thanks Rex,
Not sure people could learn much from me to be honest, but I'll share any techniques if anyone wants to know!
Will keep you posted on the Big Kat, got a busy week this week so progress may be slow, but will post more pictures as I paint the beast!
Not sure people could learn much from me to be honest, but I'll share any techniques if anyone wants to know!
Will keep you posted on the Big Kat, got a busy week this week so progress may be slow, but will post more pictures as I paint the beast!
alewar
Canelones, Uruguay
Joined: December 27, 2006
KitMaker: 773 posts
Armorama: 765 posts
Joined: December 27, 2006
KitMaker: 773 posts
Armorama: 765 posts
Posted: Tuesday, October 27, 2009 - 01:33 AM UTC
I like the job that yo do with the chains!!
Penfold
England - East Midlands, United Kingdom
Joined: October 23, 2009
KitMaker: 33 posts
Armorama: 33 posts
Joined: October 23, 2009
KitMaker: 33 posts
Armorama: 33 posts
Posted: Tuesday, November 24, 2009 - 08:43 AM UTC
Hi all,
Well some update photos for ya. I aurbrush with an Aztec A435 (I think) and I think my nozzle is knackered. I tried to do the cammo free hand but I just got loads of splatter. I tried adjusting the the air pressure down and thinning the paint more (using Vallejo Model Air paints) but didn't seem to make any difference.
Hence below my free-hand disaster attempt at painting this model!!
So I decided that a better approach might be to mask the model and then try again painting it!
By the way, the colours are all pretty much an approximate match to the suggestions in the Dragon instructions. I just kinda mixed them up and splashed them on - I figure that weathering will alter them anyway, but I've tried to get somewhere close to the suggested colours.
Penfold
England - East Midlands, United Kingdom
Joined: October 23, 2009
KitMaker: 33 posts
Armorama: 33 posts
Joined: October 23, 2009
KitMaker: 33 posts
Armorama: 33 posts
Posted: Tuesday, November 24, 2009 - 08:54 AM UTC
I used white-tack to ,mask the model with Tamiya masking tape. The white tack is not oil based so it doesn't mark the model. But it will pull off Photo Etch so care needs to be taken when putting it on. I'm sure there is an easier way of masking a model, but I haven't figured it out yet.
Next stage, whack on the tri-colour cammo scheme and look at how horrible it all looks! I hate this stage, the model looks so toy like and all neat and clean. Urgh! It's at this stage that I tend to loose at bit of enthusiasm because I still thinks I have loads more to do. But I suppose you just have to keep on plugging away!
Next stage - add some chips! Not the edible variety (although how good is a chippy?! Nothing beats a good sausage and chips from the local , anyway, I digress).
Again, the whole chipping process for me is a bit of a steep learning curve. I try and put it on high traffic areas and generally a bit all over the model. I use 3 methods:
1. A useless old brush for a bit of dry brushing and random small chips
2. A bit of a scourer pad for more randomness
3. A small thin brush for scratches (i.e. side armour to simulate when going through foliage etc)
I work on the theory that a tank in a combat zone is a bullet and small arms magnet, also they're not too fussy about where they drive. All this leaves it's mark on the vehicle. Remember, I don't go for ultra realism, just something that looks right - and every model is a learning curve for me so pointers are welcome.
Subsequent layers of washes and pin washed will hopefully tone this all down.
Tonyfr
Ohio, United States
Joined: June 12, 2009
KitMaker: 516 posts
Armorama: 391 posts
Joined: June 12, 2009
KitMaker: 516 posts
Armorama: 391 posts
Posted: Tuesday, November 24, 2009 - 08:54 AM UTC
While I sense your frustration, I think it looks really good. The creator is the worst critic.
I put in a new fire place and mantel. There is one spot every time I see it makes me want to tear it down and start over. However, no one notices it. My father-in-law who has been doing wood working for 50+ years, did not notice. I am sure your build will turn out great.
Tony
PS: There must be a Dragon learning curve. I have never built one. There have been some posts about first builds I have read. I have one on the table still wrap.
EDIT: added PS
Penfold
England - East Midlands, United Kingdom
Joined: October 23, 2009
KitMaker: 33 posts
Armorama: 33 posts
Joined: October 23, 2009
KitMaker: 33 posts
Armorama: 33 posts
Posted: Tuesday, November 24, 2009 - 09:03 AM UTC
Hi Tony,
Thanks for that! I hope it does turn out ok!
I forgot to add that a layer of Johnsons Klear (Future Floor Polish) has also been slapped on at this point to protect the base layer. Some detailed painting has also been done - although I've realised that some of the tools on the side are actually wood, and not steel as I have depicted them (the long poles). Does anyone know what those tools are for?
I want to weather and modulate the look of tools a bit more by adding some highlights.
I've just finished adding my 'dot method' oil paint wash so will post photos of that soon. Also a pin wash has now gone on.
Penfold
England - East Midlands, United Kingdom
Joined: October 23, 2009
KitMaker: 33 posts
Armorama: 33 posts
Joined: October 23, 2009
KitMaker: 33 posts
Armorama: 33 posts
Posted: Tuesday, November 24, 2009 - 09:18 AM UTC
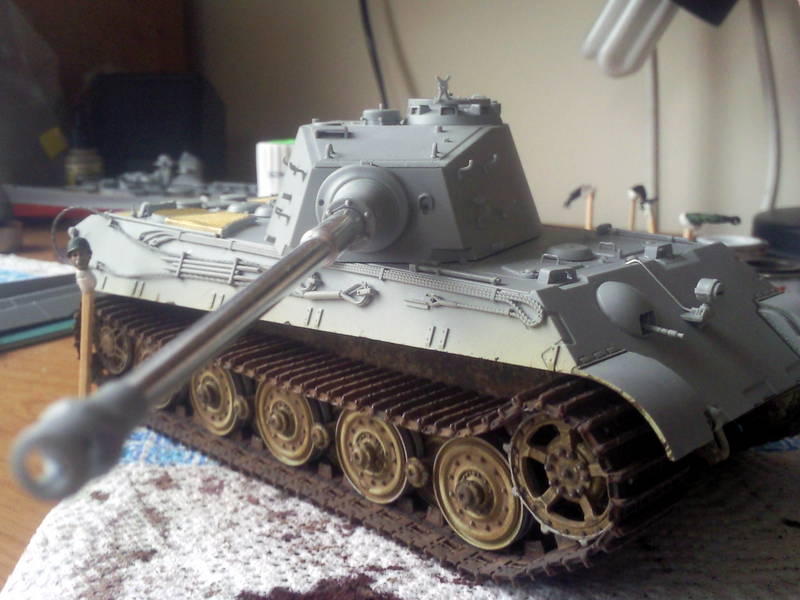
Ok - so here goes. All these photos have just been taken is low light conditions with my mobile phone so they don't really do the colours justice or show up the streaking from the 'dot method' that well. I will try and take some better ones during daylight. Hopefully you get the idea.
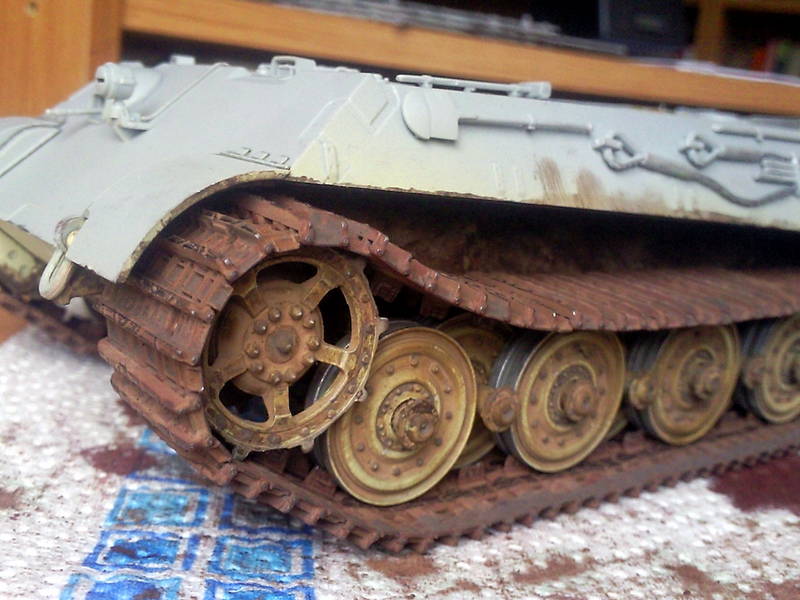
My take on the dot method involves using Daler Rowney and Winsor & Newton oil paints dotted all over the model, then I use Humbrol thinners to wash the model and hopefully the end result is a pleasing streaking effect from rain etc... I am by nature quite impatient at this point and don't spend hours doing it like some other guys.
I also just started to paint the tow ropes with CMK pigments, so a bit more work needs doing on these.
By the way, I only opted to model tank '223' because that was one of the only set of decals on the DML sheet that wasn't 3 separate decals - it was 1 easy decal. I have no idea if the real 223 looked like this at all!!
youpey
New Jersey, United States
Joined: March 11, 2008
KitMaker: 528 posts
Armorama: 468 posts
Joined: March 11, 2008
KitMaker: 528 posts
Armorama: 468 posts
Posted: Tuesday, November 24, 2009 - 11:53 AM UTC
what did you use to get the tracks rusty like that
JimMrr
Ontario, Canada
Joined: January 03, 2007
KitMaker: 1,505 posts
Armorama: 382 posts
Joined: January 03, 2007
KitMaker: 1,505 posts
Armorama: 382 posts
Posted: Tuesday, November 24, 2009 - 12:18 PM UTC
I think this Konigtiger looks GREAT...especially your running gear ..
Penfold
England - East Midlands, United Kingdom
Joined: October 23, 2009
KitMaker: 33 posts
Armorama: 33 posts
Joined: October 23, 2009
KitMaker: 33 posts
Armorama: 33 posts
Posted: Tuesday, November 24, 2009 - 11:27 PM UTC
Quoted Text
what did you use to get the tracks rusty like that
Hi guys, thanks for the nice comments!
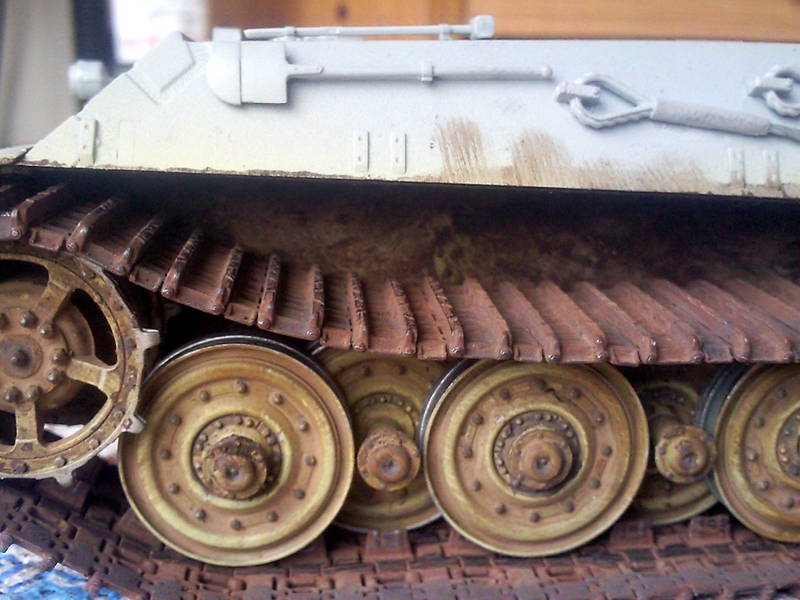
The tracks were a bit of an experiment for me - with every model I'm continually learning and I have to say I'm really pleased with how these ones turned out. Although getting them that way was quite frustrating and took ages until I was finally happy with the look.
From what I can remember I:-
1. Primed with Tamiya rattlecan, standard grey colour.
2. Used my airbrush to put down a base layer of brown paint, I think it was Vallejo Khaki Brown or something similar.
3. Used CMK Pigments to lay down a light rust coat layer (Their Star Dust range - Light Rust) with a hint of dark rust randomly mixed in when I felt like it to give the tracks some colour variation. The pigment was mixed with Tamiya thinner.
4. It looked too rusty for me at this point, so I then started attacking the tracks with some Mig Pigments, again mixed with Tamiya thinner. I liberally spread on a layer of Dark Mud and a a splattering of Europe Dust. The effect was quite subtle - probably because all the rust pigment was dissolving a bit and mixing in with it. But I quite liked how this turned out.
5. They still didn't look right so I used Mig Dark Mud on the outer edge of the tracks. I did this to give the impression that where the wheels made contact with the tracks is lighter due to wear, and the on the outer edge is darker with more ingrained mud because of less wear.
6. To simulate contact with the wheels I ran a graphite pencil along the tracks to give it a sheen.
7. I also ran the graphite pencil over all the raised detail on the tracks.
8. I did all the painting with the tracks off the tank - the tracks were in 3 sections per side, then assembled it all just before I took those photos.
I've potentially done it all the wrong way around with doing the tracks first, because now I have to weather the tank to match the tracks a bit. But I'm hoping I can pull it off, if not, I'll do it different for the next model!!
Penfold
England - East Midlands, United Kingdom
Joined: October 23, 2009
KitMaker: 33 posts
Armorama: 33 posts
Joined: October 23, 2009
KitMaker: 33 posts
Armorama: 33 posts
Posted: Tuesday, November 24, 2009 - 11:40 PM UTC
Quoted Text
PS: There must be a Dragon learning curve. I have never built one. There have been some posts about first builds I have read. I have one on the table still wrap.
EDIT: added PS
Hi Tony - yeah, I think there is a Dragon learning curve. For me the kit was so complex and the sheer number of parts felt a bit overwhelming. I'm also quite new to using PE. I found it to be quite easy to feel a bit intimidated when I first opened the box.
But I grew to love the kit (despite the minor annoyances - i.e. gluing the idler wheel when it should have been free till later stages in the build. I wish Dragon had made that clear!! ) because of the attention to detail and I really do love the Magic Tracks, I wish all models came with them!!
Having said that I've craved an easier build and I'm also in the process of building a Tamiya 7.5cm Pak40 as well - which only took me a day to build. So much easier, but not as fine molding quality as the DML (but the kit is about 30 odd years old!!).