Stefan,
As I will be starting mine in a week or two, shall I post it here too?
You're dead right about the MG barrel brackets not being on the rear of the turret. As for the range poles, I believe these were stowed inside the turret along one side. However, if your tank has already been used as artillery in a fire mission the chances are they are now outside, wedged behind any convenient stowage on the sides or back of the vehicle, since we all know how neatly WW2 vehicles were re-packed between missions! There should be four of them, 6 feet long, with each foot painted alternating red or white, and one end should have a metal spike. If stowed loose on the deck, I'd be surprised if they still had all four...
Tom
Hosted by Darren Baker
M36B1 - kitbash
Posted: Thursday, January 21, 2010 - 06:15 AM UTC
Posted: Thursday, January 21, 2010 - 07:47 PM UTC
Sure, post right ahead! I don't mind.  Seems I started an M36B1 mania on Armorama...
Thanks for the Info on the range poles, these would sure color up the stowage.
Cheers
Stef
 Seems I started an M36B1 mania on Armorama...
Thanks for the Info on the range poles, these would sure color up the stowage.
Cheers
Stef
Posted: Sunday, February 14, 2010 - 08:42 AM UTC
Allright, got some paint on this one. First some black primer (Tamiya XF-1) and then some OD (Tamiya's lightened with XF-60 dark yellow). Then a coat of future, decals and some matt varnish (with a little brown).


Next up the tracks, stowage and weathering.
Cheers!
Stefan
Next up the tracks, stowage and weathering.
Cheers!
Stefan
Posted: Sunday, February 14, 2010 - 08:46 AM UTC
looking great, keep it up! 

Posted: Monday, February 15, 2010 - 01:05 AM UTC
Stefan,
That's looking really good! I picked up an injury a week ago, which has slowed me down a lot, but I'll be getting into my build in the next few weeks I hope. I'm looking to model that pic of the M36B1 seen in a German town, with all the crew sticking their heads out and pointing guns at the camera...
Tom

RotorHead67

Joined: May 07, 2003
KitMaker: 1,174 posts
Armorama: 772 posts

Posted: Wednesday, February 24, 2010 - 06:09 PM UTC
Stefan:
It's looking Great, nice start for your base colors so far. Now its looking the part..... keep up the dillagence. The finish is near.
Todd
It's looking Great, nice start for your base colors so far. Now its looking the part..... keep up the dillagence. The finish is near.

Todd
Posted: Wednesday, February 24, 2010 - 07:25 PM UTC
Thank you all!
I am kind of stalled with this build at the moment due to restricted time in the cave and other projects having priority on the finish line. But I sure will finish it!
Tom, hope you're doing better! Get well soon!
Cheers
Stefan
I am kind of stalled with this build at the moment due to restricted time in the cave and other projects having priority on the finish line. But I sure will finish it!

Tom, hope you're doing better! Get well soon!
Cheers
Stefan
Posted: Thursday, February 25, 2010 - 02:59 AM UTC
Stefan,
Thanks for the kind wishes - I'm adapting to my broken leg now. I spent yesterday getting back in the swing with Italeri's Puma, and will have a crack at the rather more complex M36B1 build next. (It took a while to sort out hobby supplies that normally live at my workbench into a portable bag of goodies that can come to me, so the fun can begin! Sadly, airbrushing will have to wait a few more weeks when hopefully I'll get a much smaller cast that can "travel".) On the plus side I now have another Campaign entry (Axis of Armor) nearly done...
Progress & pictures to follow soon...
Tom
Posted: Sunday, March 14, 2010 - 07:59 AM UTC
Hello all!
Thought I'd post some new pics just to show you I'm still at it. Now and then... Life's gotten in the way lately.
Base and detail paint, a few washes, tracks added and started on the stowage. After the stowage I'll add some mud.
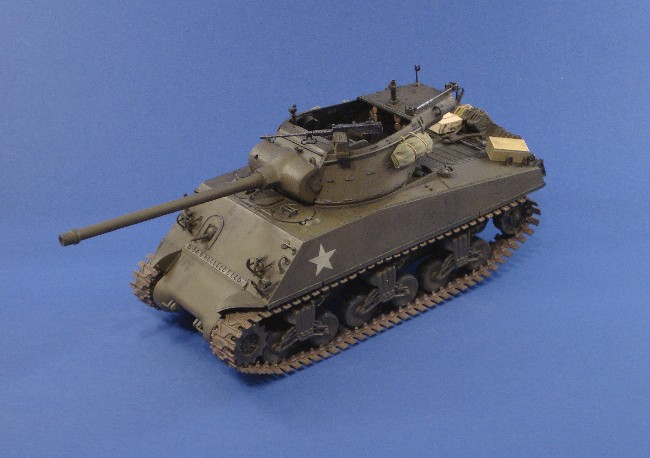
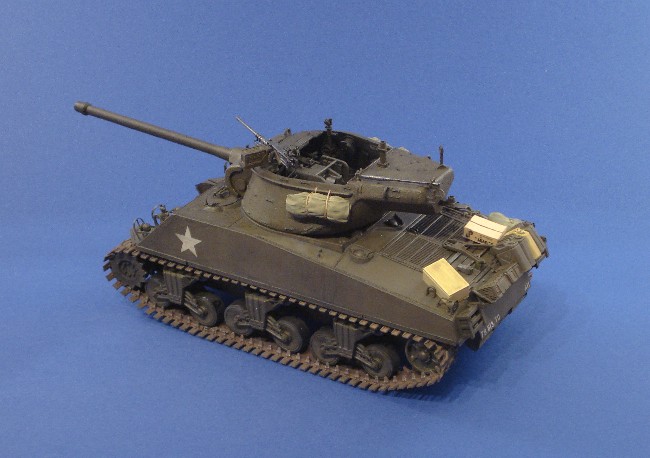
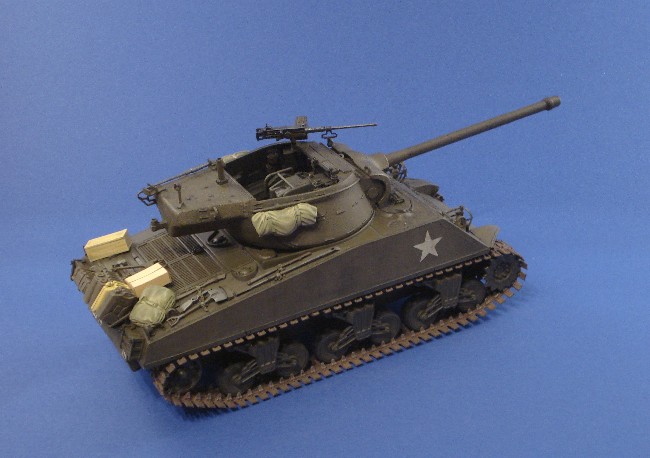
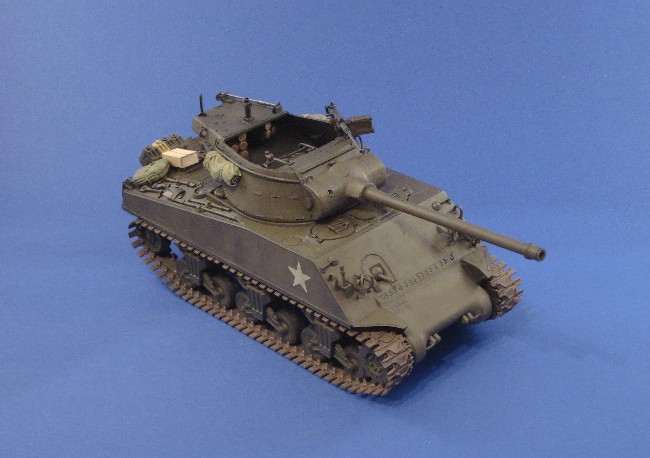
Cheers and thanks for comments!
Stefan
Thought I'd post some new pics just to show you I'm still at it. Now and then... Life's gotten in the way lately.

Base and detail paint, a few washes, tracks added and started on the stowage. After the stowage I'll add some mud.


Cheers and thanks for comments!
Stefan

The3rdPlacer

Joined: July 29, 2008
KitMaker: 430 posts
Armorama: 407 posts

Posted: Thursday, April 01, 2010 - 01:46 AM UTC
Looking good Stefan, you might brake off some of those track extenders for a slight beat up look. Nice paint too.
Ryan
Ryan
Posted: Sunday, April 04, 2010 - 04:52 AM UTC
Thanks Ryan, I know what you mean but I didn't want to mess with the Tamiya Vinyl... These were issued late in the war so they were fairly new allthrough their time.
So, I finished weathering and I'm calling this one done unless any of y'all see anything that has to be done. Thanks for any comments!


Cheers!
Stefan
So, I finished weathering and I'm calling this one done unless any of y'all see anything that has to be done. Thanks for any comments!


Cheers!
Stefan
Posted: Thursday, April 29, 2010 - 05:58 AM UTC
Hey, folks,
This thread went cold after Stefan finished his build, but he did invite the rest of us to add our own builds as a comparison blog, so here goes.
My M36B1 is the old Italeri kkit with a heap of scratchbuilt details. I find the basic kit isn't too bad, but it needs a lot of help to enter the 21st century. Anyhow, here's some shots of the turret so far. I've built the internal stuff based on several web builds. Of note is the turret floor - Italeri provided a complete basket in their turret but it ain't right, so I copied the Academy one in Evergreen plastic. The microphones idea came from a build on USARMYMODELS.com. I haven't finished with the outside of the turret yet as I don't want to risk damage when joining the halves after painting the inside...


The ammo bins need covers, and I have some canteens to add to the loader's side (by the fire extringuisher) after painting.
(Note that I am building this for the Tank Killers campaign, so expect a little double-posting!)
Interior build to come...
Regards,
Tom
This thread went cold after Stefan finished his build, but he did invite the rest of us to add our own builds as a comparison blog, so here goes.
My M36B1 is the old Italeri kkit with a heap of scratchbuilt details. I find the basic kit isn't too bad, but it needs a lot of help to enter the 21st century. Anyhow, here's some shots of the turret so far. I've built the internal stuff based on several web builds. Of note is the turret floor - Italeri provided a complete basket in their turret but it ain't right, so I copied the Academy one in Evergreen plastic. The microphones idea came from a build on USARMYMODELS.com. I haven't finished with the outside of the turret yet as I don't want to risk damage when joining the halves after painting the inside...


The ammo bins need covers, and I have some canteens to add to the loader's side (by the fire extringuisher) after painting.
(Note that I am building this for the Tank Killers campaign, so expect a little double-posting!)
Interior build to come...
Regards,
Tom
Posted: Friday, April 30, 2010 - 04:38 AM UTC
Wow, impressive scratch work there Tom! Looks like you're getting a bit more involved than I am...
Hey, I was thinking, we could do a double feature on modeling the M36B1 once you're done with it. Maybe Todd will join us? Would be interesting maybe to see the different approaches next to each other.
Cheers and keep us updated!
Stefan
Hey, I was thinking, we could do a double feature on modeling the M36B1 once you're done with it. Maybe Todd will join us? Would be interesting maybe to see the different approaches next to each other.
Cheers and keep us updated!
Stefan
Posted: Saturday, May 01, 2010 - 04:40 AM UTC
Stefan,
If the turret looks complicated, wait til I post pics of the hull interior! (I should invest in Evergreen Plastics shares...)
I'd like to do a feature article on this - it would be very interesting. However, that means I really ought to do it right and invest in some tracks with duckbills instead of the vynil T54E1 track I was planning to use.
I'm beginning to worry that I won't make the deadline for the Tank Killers campaign...
Tom
Posted: Tuesday, May 11, 2010 - 03:59 AM UTC
Right, it's time for the latest instalment of my build. (Apologies if you've already seen these images in the Tank Killers campaign thread...) I primed the turret interior in black, then painted it in "scale" OD (75% Tamiya XF-62 OD and 25% Tamiya XF-57 Buff). Note that I masked off tthe outsides as I still need to detail it once the halves are joined. The details were picked out in a variety of paints, and the floor was washed with a grime mix before dry-brushing with Earth.


The hull also received a load of work, including a mostly scratch-built interior. (The gearbox was a resin casting from the Academy parts, and the ammo cans are Verlinden. The 5-gallon cans are from a Tamiya set, as are the M3 "grease gun" SMGs.)


This was then primed white before detail painting. A little dry-brushing with Earth and Pollyscale's Grimy Black gave it a bit of that "lived-in" look...


On the outside I added casting numbers on the hull top and the underside of the nose from Slaters 1.5mm alphabets. I also added bolt heads cut from Plastruct hex rod for the transmission on each side and bolts on the suspension mounts.

The bogies were similarly detailed with hex rod "bolts" drilled in from underneath, and bolt heads added to the skids once they had been thinned a bit with a file & knife. The final detail was to cut the axles so I could snap in the wheels after painting. (I learned this trick ages ago for Italeri Shermans. Glue up the rocking arms and bogies as normal making sure the axles are firmly glued, then cut the axles so only a small stump remains at each side to fit into the holes in the wheels. Round the stumps a bit to ease installation, which is best aided by slipping two bits of thick paper against the stumps and slide the wheel in between them to keep the paint from scratching.)


Next up is detailing the exterior!
Tom


The hull also received a load of work, including a mostly scratch-built interior. (The gearbox was a resin casting from the Academy parts, and the ammo cans are Verlinden. The 5-gallon cans are from a Tamiya set, as are the M3 "grease gun" SMGs.)


This was then primed white before detail painting. A little dry-brushing with Earth and Pollyscale's Grimy Black gave it a bit of that "lived-in" look...


On the outside I added casting numbers on the hull top and the underside of the nose from Slaters 1.5mm alphabets. I also added bolt heads cut from Plastruct hex rod for the transmission on each side and bolts on the suspension mounts.

The bogies were similarly detailed with hex rod "bolts" drilled in from underneath, and bolt heads added to the skids once they had been thinned a bit with a file & knife. The final detail was to cut the axles so I could snap in the wheels after painting. (I learned this trick ages ago for Italeri Shermans. Glue up the rocking arms and bogies as normal making sure the axles are firmly glued, then cut the axles so only a small stump remains at each side to fit into the holes in the wheels. Round the stumps a bit to ease installation, which is best aided by slipping two bits of thick paper against the stumps and slide the wheel in between them to keep the paint from scratching.)


Next up is detailing the exterior!
Tom

PantherF

Joined: June 10, 2005
KitMaker: 6,188 posts
Armorama: 5,960 posts

Posted: Tuesday, May 11, 2010 - 04:18 AM UTC
INSANE detailing! I signed up for the upcoming Sherman campaign ... maybe I'll finally build an M36 of some variant.
It'll never be close to this! WOW, makes me feel like a true beginner.
- Jeff
It'll never be close to this! WOW, makes me feel like a true beginner.

- Jeff
Posted: Tuesday, May 11, 2010 - 04:50 AM UTC
Jeff,
I do have to admit I've got a bad case of AMS... Which M36 kit are you looking to build? The Academy one comes with a pretty good hull interior compared to AFV Club, but the AFV Club one comes with most of the turret details that I scratch-built. (A simple but expensive upgrade would be to put the AFV Club turret on the Academy hull...)
I came back into armour after years in the model train wilderness, where my scratch-building skills were as nothing compared to folks who built whole steam engines from brass bar stock! And I won't even talk about the ones who build wooden cars from real wood. At least plastic tends to do what you tell it.
Still, to balance the scratch-building I do have serious skills weaknesses regarding weathering and figure painting.
Tom
Posted: Tuesday, May 11, 2010 - 08:05 PM UTC
Tom, great work! The interior is amazing. I sure don't have the patience (or the skill) for that much scratch work. BTW, what's your method for weld seams?
I would add some cast texture to the gun mantlet, turret bustle and tranny cover, they look a bit too clean at the moment.
Looking forward to your method for the gas lid chains, you mentioned them earlier in the thread but I couldn't find a good way to scratch them.
Cheers!
Stefan
I would add some cast texture to the gun mantlet, turret bustle and tranny cover, they look a bit too clean at the moment.
Looking forward to your method for the gas lid chains, you mentioned them earlier in the thread but I couldn't find a good way to scratch them.
Cheers!
Stefan
Posted: Tuesday, May 11, 2010 - 10:32 PM UTC
Stefan,
Glad you're still looking in on this one! I'll certainly be adding Mr Surfacer on all the cast parts once I get them glued together - I just haven't got round to it yet. (I had to paint the mantlet because it had to be installed before the halves get glued, but I'll overcoat it in surfacer & repaint with the rest of the exterior...)
As for welds, I've added some .010 x .030 plastic strip that will be softened down with liquid cement before getting "textured" with the blunt end of a needle file. I hope the results will look like the prominent welds seen on some turrets once I paint them. (Note that I made sure they will overlap the joints so I don't have to add filler!) The hull welds I'm not too sure about. Italeri provides a weld as well as a trench next to it, so I may have to remove their weld before adding a bit of rod in the trench that I then texture up. (You can tell I've been putting this decision off, can't you...)
Gas-cap chains... I have never found a decent way to do these in scale. All the aftermarket stuff I've seen is too big, and the only good-looking ones I have seen were moulded onto the hull by the manufacturer. Besides, they are so fine as to be nearly invisible in period photos, so in the past I just haven't bothered. Any suggestions?
Tom
Posted: Wednesday, May 12, 2010 - 12:36 AM UTC
Quoted Text
Gas-cap chains... I have never found a decent way to do these in scale. All the aftermarket stuff I've seen is too big, and the only good-looking ones I have seen were moulded onto the hull by the manufacturer. Besides, they are so fine as to be nearly invisible in period photos, so in the past I just haven't bothered. Any suggestions?
Oops! that was Todd who mentioned it... Maybe he will chime in on that?

 Personally I left them off as well after several unlucky tries.
Cheers!
Stefan

RotorHead67

Joined: May 07, 2003
KitMaker: 1,174 posts
Armorama: 772 posts

Posted: Wednesday, June 02, 2010 - 02:00 PM UTC
Quoted Text
Wow, impressive scratch work there Tom! Looks like you're getting a bit more involved than I am...
Hey, I was thinking, we could do a double feature on modeling the M36B1 once you're done with it. Maybe Todd will join us? Would be interesting maybe to see the different approaches next to each other.
Cheers and keep us updated!
Stefan
Stefan:
First a Due SALUTE to your build.
 It turned out great!!! I love the weathering you achieved, it looks the part. I owe you all in this blog an Apology for my non involvement for my own blog in this thread. My Military duty has taken my time away from the "man Room", so my plastic smashing has been delinquent, but have faith I have not forgotten. I will hold true to my word and complete an M36 of my own. This has been an excellent venture. Tom you get a toast as well, your scratch skills are to be commended. The depth at which we build is all relative but the, results are all worth it. I will add to this thread with my own M36 and we can all compare notes. Until next time,,, keep spreadin the glue. Cheers to all!!
RotorHead67

Joined: May 07, 2003
KitMaker: 1,174 posts
Armorama: 772 posts

Posted: Monday, June 07, 2010 - 03:54 PM UTC
Quoted Text
Quoted TextGas-cap chains... I have never found a decent way to do these in scale. All the aftermarket stuff I've seen is too big, and the only good-looking ones I have seen were moulded onto the hull by the manufacturer. Besides, they are so fine as to be nearly invisible in period photos, so in the past I just haven't bothered. Any suggestions?
Oops! that was Todd who mentioned it... Maybe he will chime in on that?
Personally I left them off as well after several unlucky tries.
Cheers!
Stefan
Tom:
I found that the best way to do the gascap chains is any PE set from Eduard. I agree they're really not 3D but the links are there in form. After shifting the connection pose, to the cap and handle they look pretty convincing after the painted finish. I use these parts on all of my sherman builds, and any type of sherman chassis vehicle can use the update. I have (3) shermans on the bench now and they are all receiving the treatment. I think Aber and Modelworks do some as well. Good Luck

Posted: Tuesday, June 08, 2010 - 11:56 PM UTC
Todd,
Thanks - I'll have to take another look at the PE chains. (Now that the Tank Killers campaign is over, I also need to re-start work on my M36B1...)
Hopefully I'll have progress to post soon!
Tom
Thanks - I'll have to take another look at the PE chains. (Now that the Tank Killers campaign is over, I also need to re-start work on my M36B1...)
Hopefully I'll have progress to post soon!
Tom
 |


