Thanks, guys
@Paul; I am looking forward to seeing your Oddball Sherm. Classic.
@Michael; That drain hole is going to drive me nuts until I figure something out! I don't remember where I got the wire from. Sorry. It's just twisted wire that the insulation has been pulled off of and I take a strand when I need it. The calipers say its .15mm. I hope that helps.
@ Scott; It looks good. Nice work so far.
Chris
Campaigns
Where Armorama group builds can be discussed, organized, and updates posted.
Where Armorama group builds can be discussed, organized, and updates posted.
Hosted by Darren Baker, Richard S.
Sherman Campaign
cdharwins

Joined: October 28, 2006
KitMaker: 491 posts
Armorama: 462 posts

Posted: Saturday, July 31, 2010 - 04:19 AM UTC
thebear

Joined: November 15, 2002
KitMaker: 3,960 posts
Armorama: 3,579 posts

Posted: Saturday, July 31, 2010 - 05:38 AM UTC
Hi Chris ...very nice work on the weld beads and chains ..I do agree that the drain holes are kinda big .. might try filling them with stretched sprue and redrilling a bit smaller ...but that`s up to you ...
Scott nice work ..some close ups would be nice when you get a chance ..
I got a bit done this week but nothing really worth pictures quite yet ..I did have a fit problem with my front hatches that has me scratching my head a bit ,but I think I got it figured out .... Started work on the turret stowage box and that too has me scrambling for my references (which don`t really help too much ) I added a lip around the edges and I think I might need some work on the hinges ..I`ll post some pictures as soon as I get more done ..
Still haven`t decided if I`m going to add more of a casting effect to the hull and turret yet ..suggestions guys!!
Rick
thebear

Joined: November 15, 2002
KitMaker: 3,960 posts
Armorama: 3,579 posts

Posted: Saturday, July 31, 2010 - 10:38 AM UTC
Pretty much finished the stowage box for the turret ..I found a picture of one of these boxes on a Crusader and I noticed the lip around the edge so I added some stretched sprue glued along the sides ...I then added some tamiya extra thin glue and made the weld bead . When this was dry I added some putty to the sides to fill in any round shape that the sprue might have left and then sanded it smooth ...I also added the bottom section of the hinge from a thin plastruct strip.. It looks a little rough under the high magnification but to the naked eye it looks okay .. The hinge isn't quite the same as the picture (piano hinge) but I sure there were differnt types used .


Rick


Rick
Posted: Saturday, July 31, 2010 - 11:24 AM UTC
Lots of great stuff going on here folks.
Al

Al


HONEYCUT

Joined: May 07, 2003
KitMaker: 4,002 posts
Armorama: 2,947 posts

Posted: Saturday, July 31, 2010 - 01:35 PM UTC
Quoted Text
Brad, you've got a lot going on! I'm definitely interested in seeing your Tasca M4A1, especially the changes you made. I'm leaning toward that being my second build for the campaign. Do you have any tips on the tweaks you made?
Hey Michael
Here are a couple of shots of alterations I have made to the kit.
The siren guard and cable, made from brass bar and fuse wire respectively.

The brass bar packaging.

The bottom of the rear plate needed to be rounded and the rivets removed to realise the welded (and more common) version of the hull, as shown by the far tank.

The rear plate was renewed and a putty used (MagicSculpt) to recreate the rounded look under the engine access doors.

Added the spring (copper wire) for the aerial mount; it can be bent over like the real thing (!)

Textured the turret with Mr. Surfacer 500. Carved the channels for more accurate weld bead patterns on the applique armour plate. FIlled these channels with putty which I could then add weld detail to.

The kit hatch springs were remade in wire for a more accurate look.

Oh and before I forget, there is some quite fine chain that can be sourced; perhaps a model railroad shop is the best for this... I have used this for my filler caps

Brad

HONEYCUT

Joined: May 07, 2003
KitMaker: 4,002 posts
Armorama: 2,947 posts

Posted: Saturday, July 31, 2010 - 01:45 PM UTC
These shots are for Alwyn's benefit specifically, but I like 'em enough to put here for all 
70th TB.

A close up of the closest tank.

There is much conjecture as to what the markings on the turret say, so much so that a special Bison decals set for the 70th TB D-Day included two possibilities...


And here is the shot that shows the layout of markings across the top of the gunshield..

Brad

70th TB.

A close up of the closest tank.

There is much conjecture as to what the markings on the turret say, so much so that a special Bison decals set for the 70th TB D-Day included two possibilities...


And here is the shot that shows the layout of markings across the top of the gunshield..

Brad
thebear

Joined: November 15, 2002
KitMaker: 3,960 posts
Armorama: 3,579 posts

Posted: Saturday, July 31, 2010 - 02:11 PM UTC
10 links per mm ..that sure is small chain ..best I've found was 7 links per mm.
.Great work Brad!
.Great work Brad!

cdharwins

Joined: October 28, 2006
KitMaker: 491 posts
Armorama: 462 posts

Posted: Saturday, July 31, 2010 - 02:21 PM UTC
Brad, Beautiful job on those hatch springs. I like the aerial and siren guard, too. Gotta love those tiny details.
Posted: Saturday, July 31, 2010 - 02:22 PM UTC
Greeting Everyone!
I take the relative quite as an indication that everyone was to busy building to post any updates.
@Justen; Your welds, handles and chains look really good. I guess I should have mentioned the danger of the glue over melting/softening of the plastic rod when making the welds. Bottom-line is that your shermie is shaping up nicely keep up the great work!!
@Brad; It looks like you have a full plate with all them yummy shermies! I ran across some of you’re postings a couple of years ago and always look forward to them. I even saved a couple of pictures of a pistol port you did that I’ll be using as inspiration on this project.
@Chris; Nice work on your A3. I like that modified weld technique. I kind of thought of scraping down the styrene rod, but opted not to this time around, but since yours turned out so nice I’ll defiantly give it a try the next time. Also likening them casting numbers and will be adding some myself.
@Scott; Nice clean build on that A2. How was attaching the muzzle break to the gun tube? That always seemed a somewhat of a problem area to me. I would to bring to your attention the rear hull lifting rings. Now it maybe the picture but it looks to me that you attached them at the same angle as the hull plate they are sitting on. They should sit straight up and down and not at an angle. This should be an easy fix if you chose to do so. All and all vary nice build you got there!!
@Richard; Great detail work on the turret storage box. Looking forward to following this build through out this campaign.
I take the relative quite as an indication that everyone was to busy building to post any updates.

@Justen; Your welds, handles and chains look really good. I guess I should have mentioned the danger of the glue over melting/softening of the plastic rod when making the welds. Bottom-line is that your shermie is shaping up nicely keep up the great work!!
@Brad; It looks like you have a full plate with all them yummy shermies! I ran across some of you’re postings a couple of years ago and always look forward to them. I even saved a couple of pictures of a pistol port you did that I’ll be using as inspiration on this project.
@Chris; Nice work on your A3. I like that modified weld technique. I kind of thought of scraping down the styrene rod, but opted not to this time around, but since yours turned out so nice I’ll defiantly give it a try the next time. Also likening them casting numbers and will be adding some myself.
@Scott; Nice clean build on that A2. How was attaching the muzzle break to the gun tube? That always seemed a somewhat of a problem area to me. I would to bring to your attention the rear hull lifting rings. Now it maybe the picture but it looks to me that you attached them at the same angle as the hull plate they are sitting on. They should sit straight up and down and not at an angle. This should be an easy fix if you chose to do so. All and all vary nice build you got there!!
@Richard; Great detail work on the turret storage box. Looking forward to following this build through out this campaign.
Posted: Saturday, July 31, 2010 - 02:27 PM UTC
Battlewagon M4A3E8 ETO: Part 4-What a Bloody Mess!!
Actually that would be a muddy mess!!
Since I’m basing this build off of a photo that shows heavy accumulation of mud I decided to give my Sherman a heavy coat of mud in the suspension areas. I understand many builders prefer not to do this feeling that inclusion of such a heavy effect is meant to hide poor building technique. For myself I follow the idea that armored vehicles move more through terrain, then over it and therefore become caked in mud and dirt. After reading about this technique in the recently published book “Modeling US Armor of World War 2” by Steven Zaloga, I figured I would give it a shot.
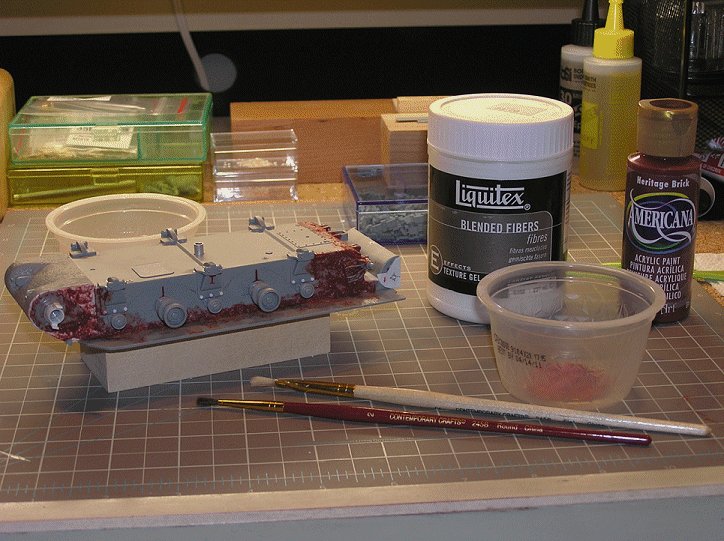
The picture below shows the materials used for applying a coat of mud. Both the Liquitex and paint are acrylic and therefore easy to use and was purchased at Michael’s craft store. The Liquitex ran about twenty dollars and the size shown should last a lifetime. When applied it is white in color then dries more on the clear side making it hard to see when adding layers. By adding just a drop or two of the Heritage Brick acrylic paint makes it easier to see, but any color will work.
This Mud was applied in three layers. The first layer was to see how workable the Liquitex would be on the plastic of the kit, which was quite easy. One good thing about using this is that once dry, after about 24 hours, you can sand it and carve it with a hobby knife to further shape it. The second layer was applied before attaching the bogy assemblies.
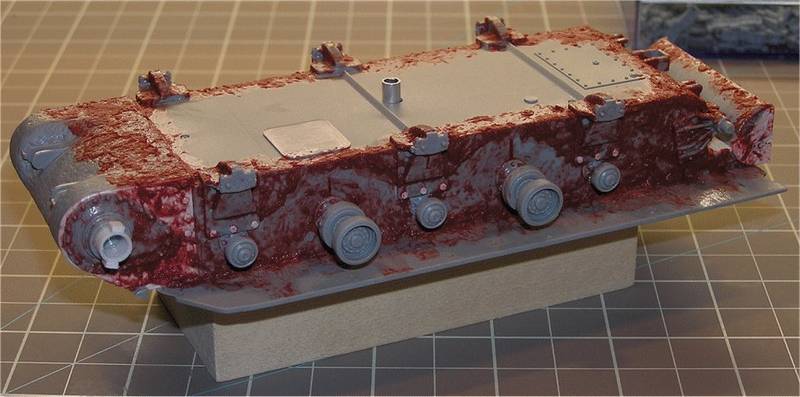
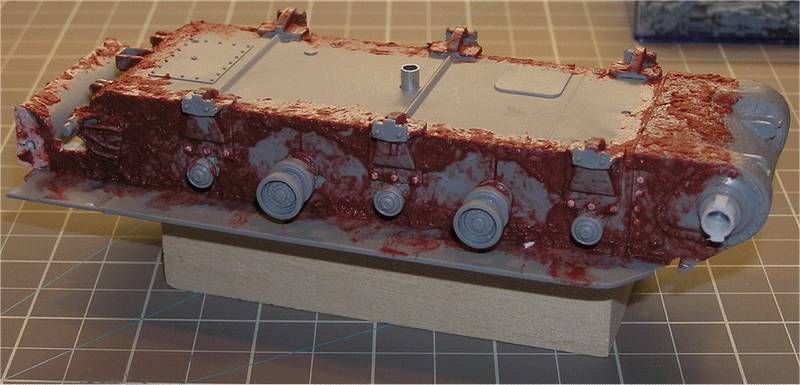
Once the second layer was dry and the bogies were attached, the third layer was applied. Attention was paid to adding accumulation on the upper surfaces of the bogies as shown in the reference photo.
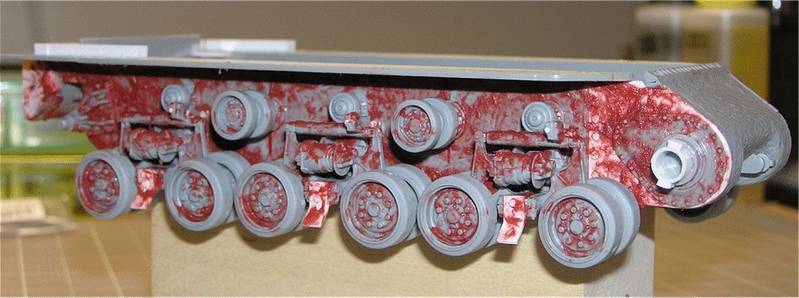

Once the tracks are assembled and attached, a fourth layer will be applied for final effect. This mud effect will be painted and weathered accordingly during the finishing process. Also built during this process was the exhaust deflector with styrene details added.
While it looks like the model is ruined, once painted it should look quite realistic…I hope. Like with all new techniques, first practice this on a throw away kit to get the feel for it, but it is really quite easy to effectively accomplish.
Actually that would be a muddy mess!!
Since I’m basing this build off of a photo that shows heavy accumulation of mud I decided to give my Sherman a heavy coat of mud in the suspension areas. I understand many builders prefer not to do this feeling that inclusion of such a heavy effect is meant to hide poor building technique. For myself I follow the idea that armored vehicles move more through terrain, then over it and therefore become caked in mud and dirt. After reading about this technique in the recently published book “Modeling US Armor of World War 2” by Steven Zaloga, I figured I would give it a shot.
The picture below shows the materials used for applying a coat of mud. Both the Liquitex and paint are acrylic and therefore easy to use and was purchased at Michael’s craft store. The Liquitex ran about twenty dollars and the size shown should last a lifetime. When applied it is white in color then dries more on the clear side making it hard to see when adding layers. By adding just a drop or two of the Heritage Brick acrylic paint makes it easier to see, but any color will work.

This Mud was applied in three layers. The first layer was to see how workable the Liquitex would be on the plastic of the kit, which was quite easy. One good thing about using this is that once dry, after about 24 hours, you can sand it and carve it with a hobby knife to further shape it. The second layer was applied before attaching the bogy assemblies.


Once the second layer was dry and the bogies were attached, the third layer was applied. Attention was paid to adding accumulation on the upper surfaces of the bogies as shown in the reference photo.


Once the tracks are assembled and attached, a fourth layer will be applied for final effect. This mud effect will be painted and weathered accordingly during the finishing process. Also built during this process was the exhaust deflector with styrene details added.
While it looks like the model is ruined, once painted it should look quite realistic…I hope.
 Like with all new techniques, first practice this on a throw away kit to get the feel for it, but it is really quite easy to effectively accomplish.
 ltb073

Joined: March 08, 2010
KitMaker: 3,662 posts
Armorama: 3,078 posts

Posted: Saturday, July 31, 2010 - 02:44 PM UTC
Some nice looking builds coming along here guys keep up the good work.
@ Eric your tutorials of your build are excellent, although some are more detailed then I would care to try at my current skill level. But I still read then and may incorporate some of them in future builds. Thanks for taking your time to explain them.
@ Eric your tutorials of your build are excellent, although some are more detailed then I would care to try at my current skill level. But I still read then and may incorporate some of them in future builds. Thanks for taking your time to explain them.


ppawlak1

Joined: March 14, 2006
KitMaker: 1,973 posts
Armorama: 1,843 posts

Posted: Saturday, July 31, 2010 - 10:43 PM UTC
@ Brad, - just fantastic attention to detail !  The springs, welds, aerial, it is all just awesome. Keep posting your great work !
@ Eric, - I love the way you've added the mud to the hull there, fantastic stuff. I'm learning a lot from your posts, and your Shermie is coming along brilliantly !
@ Scott - nice work there mate, you're not that far away from paint
@ Richard - super work on the Box. Looking forward to what you post next !
Keep posting guys, there are some awesome build here, what a great Campaign !!
Cheers
Paul
 The springs, welds, aerial, it is all just awesome. Keep posting your great work !
@ Eric, - I love the way you've added the mud to the hull there, fantastic stuff. I'm learning a lot from your posts, and your Shermie is coming along brilliantly !

@ Scott - nice work there mate, you're not that far away from paint

@ Richard - super work on the Box. Looking forward to what you post next !
Keep posting guys, there are some awesome build here, what a great Campaign !!
Cheers
Paul

MrDrummy

Joined: October 17, 2009
KitMaker: 86 posts
Armorama: 82 posts

Posted: Sunday, August 01, 2010 - 07:32 AM UTC
NIce work, everyone! I'm learning so much from y'all!
@Eric-- Cool stuff! For mud on my first build I did white glue and cut up a bit of railroad "Field Grass" into it. Is that basically what the Liquitex is?
Still haven't seen my Aber PE yet. How long does it usually take TankRat to send stuff? It's been well over a week now....
@Eric-- Cool stuff! For mud on my first build I did white glue and cut up a bit of railroad "Field Grass" into it. Is that basically what the Liquitex is?
Still haven't seen my Aber PE yet. How long does it usually take TankRat to send stuff? It's been well over a week now....

AgentG

Joined: December 21, 2008
KitMaker: 1,109 posts
Armorama: 1,095 posts

Posted: Sunday, August 01, 2010 - 10:12 AM UTC
Everybodies builds are looking good so far!
I started mine today, I switched gears a bit. I'm using DML's M4A2 and adding all the mods to replicate a D Company, 3rd Tank Battalion vehicle on Iwo Jima. I started the rebar rail around the engine deck with .020 rod, and cleaned up the resin wading stack pieces.
I'll have pics up shortly.
G
I started mine today, I switched gears a bit. I'm using DML's M4A2 and adding all the mods to replicate a D Company, 3rd Tank Battalion vehicle on Iwo Jima. I started the rebar rail around the engine deck with .020 rod, and cleaned up the resin wading stack pieces.
I'll have pics up shortly.
G

AgentG

Joined: December 21, 2008
KitMaker: 1,109 posts
Armorama: 1,095 posts

Posted: Sunday, August 01, 2010 - 10:40 AM UTC
Ok, here's a couple of in progress shots as promised.


G


G

AgentG

Joined: December 21, 2008
KitMaker: 1,109 posts
Armorama: 1,095 posts

Posted: Sunday, August 01, 2010 - 05:04 PM UTC
Here's the completed rail.


G


G

ppawlak1

Joined: March 14, 2006
KitMaker: 1,973 posts
Armorama: 1,843 posts

Posted: Sunday, August 01, 2010 - 08:35 PM UTC
Lovely work on those rails Wayne 
What references are you using ?
Paul

What references are you using ?
Paul

ppawlak1

Joined: March 14, 2006
KitMaker: 1,973 posts
Armorama: 1,843 posts

Posted: Sunday, August 01, 2010 - 09:50 PM UTC
Ok Guys, I know I haven't been pulling my weight here  But I've finally finished my LVT-4 over at the Pacific Campaign, so I need to get my act together
As I memtioned earlier, I'm doing the new Dragon IC Hybrud, but I also need to get the Formations OddBall conversion finished for the Movie & TV Campaign. Time is running out so I need to get this one build. I'll post it's build here as well as in that Campaign.
When finished I have that IC and a few other Shermies to get done...
The description of the Formations conversion is as follows:
"An extensive Conversion to create the famous tank from a 1970's movie. Includes all the unique details to create "Oddball's" M4A3. Including 76mm gun, loud speaker, spare track links, air cooled .50 cal MG barrel, front and rear fenders, exhaust deflector, and mixed wheel set. The kit also includes a full compliment of Formation's Sherman details to build as accurate a representation as possible, such as our tools, hatches, complete turret assembly, track skids, headlights, and lenses . Shown on and scaled to Tamiya's M4A3 kits, but can be built with Italeri or Dragon M4A3s as a donor."
Some pics from the website :


Here is the Tamiya base kit as well as the 'ripper' Formations Resin bits :

I should get a start in the next few days, one of my biggest challenges is going to be to match the paint to the Movie vehilces (no where near OD ).
).
I have some ideas on that front...
Any tips on the build apart from the normal weld beads, handles etc ?
Cheers
Paul
 But I've finally finished my LVT-4 over at the Pacific Campaign, so I need to get my act together
As I memtioned earlier, I'm doing the new Dragon IC Hybrud, but I also need to get the Formations OddBall conversion finished for the Movie & TV Campaign. Time is running out so I need to get this one build. I'll post it's build here as well as in that Campaign.
When finished I have that IC and a few other Shermies to get done...
The description of the Formations conversion is as follows:
"An extensive Conversion to create the famous tank from a 1970's movie. Includes all the unique details to create "Oddball's" M4A3. Including 76mm gun, loud speaker, spare track links, air cooled .50 cal MG barrel, front and rear fenders, exhaust deflector, and mixed wheel set. The kit also includes a full compliment of Formation's Sherman details to build as accurate a representation as possible, such as our tools, hatches, complete turret assembly, track skids, headlights, and lenses . Shown on and scaled to Tamiya's M4A3 kits, but can be built with Italeri or Dragon M4A3s as a donor."
Some pics from the website :


Here is the Tamiya base kit as well as the 'ripper' Formations Resin bits :

I should get a start in the next few days, one of my biggest challenges is going to be to match the paint to the Movie vehilces (no where near OD
 ).
).I have some ideas on that front...
Any tips on the build apart from the normal weld beads, handles etc ?
Cheers
Paul
Posted: Monday, August 02, 2010 - 02:08 AM UTC
Wayne, is that a 55-gallon drum recycled as a wading stack? Gotta love the ingenuity of the Motor Pool... Neat build!
Tom
Tom

AgentG

Joined: December 21, 2008
KitMaker: 1,109 posts
Armorama: 1,095 posts

Posted: Monday, August 02, 2010 - 03:40 AM UTC
Thanks Guys!
Paul- I'm using Squadron's "Tank Warfare on Iwo Jima" as a reference. I'm building "DEMAGOG" a D Co. tank.
I picked up some Evergreen .020 rod, used the corresponding size drill and went at it. It was a bit frustrating, however thin CA and accelerator saved the day.
Tom- The SeeBees actually devised this. There's a cool shot in the book of a 3rd Bat. tank testing the field mod.
Now I need to add the applique armor that was welded on by the motor pool.
G

MrDrummy

Joined: October 17, 2009
KitMaker: 86 posts
Armorama: 82 posts

Posted: Monday, August 02, 2010 - 05:41 AM UTC
Wayne-
That's some sharp scratch building, dude! That rail really looks the part!
That's some sharp scratch building, dude! That rail really looks the part!
MVisser

Joined: December 14, 2006
KitMaker: 2,679 posts
Armorama: 313 posts

Posted: Monday, August 02, 2010 - 07:46 AM UTC
Uhmmm where to put it,
A sherman which only served in the Korean war...
I'll put it here in hope some of you guys can help me with some detail work.
I'm building the Dragon M4A3 HVSS POA CWS H5 flamethrower Sherman
I will use some extra sets on this one, AFV club suspension and tracks. And a lot of extras from newer dragon Sherman kits.


Martin
A sherman which only served in the Korean war...
I'll put it here in hope some of you guys can help me with some detail work.
I'm building the Dragon M4A3 HVSS POA CWS H5 flamethrower Sherman
I will use some extra sets on this one, AFV club suspension and tracks. And a lot of extras from newer dragon Sherman kits.


Martin
Posted: Monday, August 02, 2010 - 08:35 AM UTC
G, please tell me that drum still had its original liquid contents stencils visible - that would look so cool.
Martin, is that a real cast-metal gun mantlet? Talk about true-to-prototype!
Tom
Martin, is that a real cast-metal gun mantlet? Talk about true-to-prototype!
Tom

mopnglo

Joined: January 07, 2006
KitMaker: 452 posts
Armorama: 271 posts

Posted: Monday, August 02, 2010 - 08:42 AM UTC
Brad, thanks a lot for the great info on the M4A1 build! It's extremely helpful. That aerial mount is awesome!
Eric, I'm looking forward to seeing you paint that mud! I bet it will really transform into a very muddy tank.
Wayne, great, unique feature to add. Great scratch building!
Martin, very cool subject!
Eric, I'm looking forward to seeing you paint that mud! I bet it will really transform into a very muddy tank.
Wayne, great, unique feature to add. Great scratch building!
Martin, very cool subject!

AgentG

Joined: December 21, 2008
KitMaker: 1,109 posts
Armorama: 1,095 posts

Posted: Monday, August 02, 2010 - 01:01 PM UTC
Had the whole day off to myself!
Here's my take on USMC applique armor. References show the plates were square, and did not have the heavy welds visible in the ETO Shermans. In fact it's hard to see the welds at all in period photos. You can see the different colors of paint used to touch up after the plates were mounted.


G
Here's my take on USMC applique armor. References show the plates were square, and did not have the heavy welds visible in the ETO Shermans. In fact it's hard to see the welds at all in period photos. You can see the different colors of paint used to touch up after the plates were mounted.


G
 |


