I have posted a couple of progress pics of the Chieftain at -
http://groups.msn.com/Armorama/kiwidaveskollection.msnw?action=ShowPhoto&PhotoID=12589
I cant make the pic post work!
Regards Dave
Constructive Feedback
For in-progress or completed build photos. Give and get contructive feedback!
Hosted by Darren Baker, Dave O'Meara
Chieftain
KiwiDave
Wellington, New Zealand
Joined: January 14, 2003
KitMaker: 248 posts
Armorama: 0 posts
Joined: January 14, 2003
KitMaker: 248 posts
Armorama: 0 posts
Posted: Friday, August 08, 2003 - 05:20 PM UTC
Venom
Alessandria, Italy
Joined: July 28, 2003
KitMaker: 720 posts
Armorama: 0 posts
Joined: July 28, 2003
KitMaker: 720 posts
Armorama: 0 posts
Posted: Friday, August 08, 2003 - 05:31 PM UTC
Very nice model, Tamiya Trumpeter?
put also the photos when you have it finished
Regards
put also the photos when you have it finished
Regards
ahueger
Nordrhein-Westfalen, Germany
Joined: December 01, 2001
KitMaker: 217 posts
Armorama: 214 posts
Joined: December 01, 2001
KitMaker: 217 posts
Armorama: 214 posts
Posted: Friday, August 08, 2003 - 06:13 PM UTC
Dave,
awsome detail there. This is one of my alltime favourites. What conversions did you use? Will you post a construction article, I'd really like to learn more about your kit ....
Andreas
awsome detail there. This is one of my alltime favourites. What conversions did you use? Will you post a construction article, I'd really like to learn more about your kit ....
Andreas
vlady
Bucuresti, Romania
Joined: September 06, 2002
KitMaker: 534 posts
Armorama: 0 posts
Joined: September 06, 2002
KitMaker: 534 posts
Armorama: 0 posts
Posted: Friday, August 08, 2003 - 09:51 PM UTC
well, i looks great so far. about the pics, ask twisted to put them on for u. we does this quite often. waiting to see it finished
WeWillHold
Wisconsin, United States
Joined: April 17, 2002
KitMaker: 2,314 posts
Armorama: 1,905 posts
Joined: April 17, 2002
KitMaker: 2,314 posts
Armorama: 1,905 posts
Posted: Friday, August 08, 2003 - 10:26 PM UTC
Here are Kiwi's pics----very very impressive.
On the left is the Tamiya 'blob'. In the centre a scratchbuilt aluminium bracket, and on the right a scratchbuilt bracket with scratchbuilt extinguisher. The extinguisher clips into the bracket the same as the real thing. After painting as seperate parts a retaining strap will be fitted to the extinguisher.
vlady
Bucuresti, Romania
Joined: September 06, 2002
KitMaker: 534 posts
Armorama: 0 posts
Joined: September 06, 2002
KitMaker: 534 posts
Armorama: 0 posts
Posted: Friday, August 08, 2003 - 10:42 PM UTC
see, i told u that somebody will help u with the pics. it wasn't twisted but it was wwwill
andy007
Wellington, New Zealand
Joined: May 01, 2002
KitMaker: 2,088 posts
Armorama: 1,257 posts
Joined: May 01, 2002
KitMaker: 2,088 posts
Armorama: 1,257 posts
Posted: Friday, August 08, 2003 - 10:46 PM UTC
Dave,
It looks very nice it is good to see another kiwi posting and geting involved on Armorama.
Alpenflage
Massachusetts, United States
Joined: May 21, 2003
KitMaker: 1,120 posts
Armorama: 1,002 posts
Joined: May 21, 2003
KitMaker: 1,120 posts
Armorama: 1,002 posts
Posted: Saturday, August 09, 2003 - 05:56 AM UTC
Kiwi. Nice work here. Pics show off all the work you put into it. Will look good once painted. This Tamiya kit is actually not that bad as a base kit, perfect for updating. Looking forward to seeing more pics and you proceed !
Cheers, mate !
Robert
Cheers, mate !
Robert
KiwiDave
Wellington, New Zealand
Joined: January 14, 2003
KitMaker: 248 posts
Armorama: 0 posts
Joined: January 14, 2003
KitMaker: 248 posts
Armorama: 0 posts
Posted: Saturday, August 09, 2003 - 01:00 PM UTC
Thanks for the kind comments chaps and Vlad. Ta for posting the pics WWW - you make it look soooo easy.
The kit is Tamiya, the resin Castoff - see my review - and everything else is scratchbuilt.
The kit is not bad at all despite some of the comments that are made about it. However it is NOT a Mk5. If Tamiya simply changed the box to read Mk3 it is a perfectly passable, if basic, model. ( And given my attitude toward Tamiya that is praise indeed!)
Because the Chieftain underwent a constant upgrade programme I am not sure what I will call mine. The base kit is a Mk3, and I have a pic of a BATUS tank with a serial close to the kit one so I have basically followed the spec of that photo.
Still to do are the mesh grilles on the engine covers and the 'mantlet' cover. Then it will have to be dismantled for painting - as posed it has many bits just tacked in place.
Regards Dave
Regards Dave
The kit is Tamiya, the resin Castoff - see my review - and everything else is scratchbuilt.
The kit is not bad at all despite some of the comments that are made about it. However it is NOT a Mk5. If Tamiya simply changed the box to read Mk3 it is a perfectly passable, if basic, model. ( And given my attitude toward Tamiya that is praise indeed!)
Because the Chieftain underwent a constant upgrade programme I am not sure what I will call mine. The base kit is a Mk3, and I have a pic of a BATUS tank with a serial close to the kit one so I have basically followed the spec of that photo.
Still to do are the mesh grilles on the engine covers and the 'mantlet' cover. Then it will have to be dismantled for painting - as posed it has many bits just tacked in place.
Regards Dave
Regards Dave
mikeli125
England - North West, United Kingdom
Joined: December 24, 2002
KitMaker: 2,595 posts
Armorama: 1,209 posts
Joined: December 24, 2002
KitMaker: 2,595 posts
Armorama: 1,209 posts
Posted: Sunday, August 10, 2003 - 09:58 AM UTC
nice one dave,
really clean build not knowing much about the different variants which one
is it and it'd be fantastic to see it in berlin brigade colours might drive you
a bit mental though heres a link to the info on it
[url]http://.emlra.org/techtalk/berlin_brigade.htm/url]
really clean build not knowing much about the different variants which one
is it and it'd be fantastic to see it in berlin brigade colours might drive you
a bit mental though heres a link to the info on it
[url]http://.emlra.org/techtalk/berlin_brigade.htm/url]
KiwiDave
Wellington, New Zealand
Joined: January 14, 2003
KitMaker: 248 posts
Armorama: 0 posts
Joined: January 14, 2003
KitMaker: 248 posts
Armorama: 0 posts
Posted: Sunday, August 10, 2003 - 12:10 PM UTC
Thanks Mike. A lot of the ref pics I have used are BB 'cos its easier to see the details on the light colours as opposed to the standard green/black.
I did consider a BB scheme but got a headache from just planning the masking so gave it away. I am going for the BATUS sand/green as it will look different and also be a bit brighter than the European scheme.
Regards Dave
I did consider a BB scheme but got a headache from just planning the masking so gave it away. I am going for the BATUS sand/green as it will look different and also be a bit brighter than the European scheme.
Regards Dave
mikeli125
England - North West, United Kingdom
Joined: December 24, 2002
KitMaker: 2,595 posts
Armorama: 1,209 posts
Joined: December 24, 2002
KitMaker: 2,595 posts
Armorama: 1,209 posts
Posted: Monday, August 11, 2003 - 04:17 AM UTC
sounds good dave the batus cammo is nice looking as patterens go looking forward to seeing it done
Trackjam
Ontario, Canada
Joined: April 12, 2002
KitMaker: 831 posts
Armorama: 614 posts
Joined: April 12, 2002
KitMaker: 831 posts
Armorama: 614 posts
Posted: Tuesday, August 12, 2003 - 06:38 AM UTC
Lovely work. It seems almost a shame to paint it. I'm sure your finished paroduct will be great. Look forward to seeing it when it is done.
GunTruck
California, United States
Joined: December 01, 2001
KitMaker: 5,885 posts
Armorama: 3,799 posts
Joined: December 01, 2001
KitMaker: 5,885 posts
Armorama: 3,799 posts
Posted: Tuesday, August 12, 2003 - 06:43 AM UTC
Quoted Text
Lovely work. It seems almost a shame to paint it. I'm sure your finished paroduct will be great. Look forward to seeing it when it is done.
Me too - I'm looking forward to seeing the finished result.
Gunnie
AJLaFleche
Massachusetts, United States
Joined: May 05, 2002
KitMaker: 8,074 posts
Armorama: 3,293 posts
Joined: May 05, 2002
KitMaker: 8,074 posts
Armorama: 3,293 posts
Posted: Tuesday, August 12, 2003 - 07:15 AM UTC
Nice looking tank so far. Looks llike quite the update project, as well.
KiwiDave
Wellington, New Zealand
Joined: January 14, 2003
KitMaker: 248 posts
Armorama: 0 posts
Joined: January 14, 2003
KitMaker: 248 posts
Armorama: 0 posts
Posted: Tuesday, August 12, 2003 - 10:51 AM UTC
Thanks chaps.
The painting bit is the worry. I only really enjoy the research and build stage. Painting is a real pain to me - in an ideal world I would just build and hand it over to someone else to paint! I have the added problem of working out how to do a soft edged two-colour scheme without an airbrush.
Will post the finished article but still have some building to do. Just finished the engine cover mesh grilles, working on the sideskirts at present - 34 wire tiedowns and then the styrene mounting lugs.
Regards Dave
GunTruck
California, United States
Joined: December 01, 2001
KitMaker: 5,885 posts
Armorama: 3,799 posts
Joined: December 01, 2001
KitMaker: 5,885 posts
Armorama: 3,799 posts
Posted: Tuesday, August 12, 2003 - 11:01 AM UTC
Quoted Text
The painting bit is the worry. I only really enjoy the research and build stage. Painting is a real pain to me - in an ideal world I would just build and hand it over to someone else to paint! I have the added problem of working out how to do a soft edged two-colour scheme without an airbrush
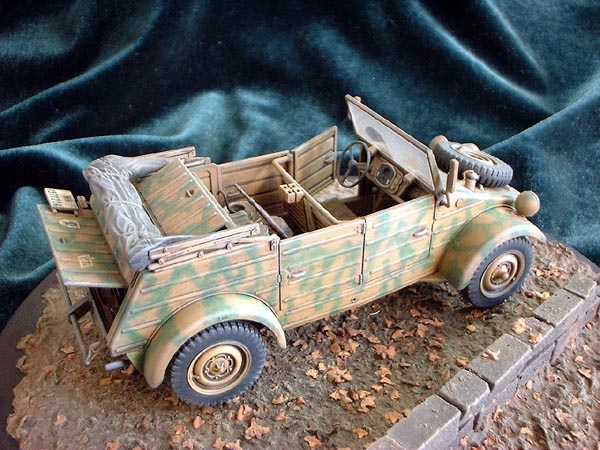
Dave - I'm not sure of which colors you're going to use, but I've had success with pastels in the past. It will be time-intensive, but I've done it successfully with dark colors over light ones.
I did this one awhile back. The green striping and portions of the dark yellow were done with pastels and stumps. Much more difficult because of the small size and restricted surface area of the Kubelwagen. Handled properly you can rival an airbrushed effect - and not blow away all of your pastel chalk in sealing the model. No special techniques required - just a steady hand and willingness to stick it through to the end.
A suggestion...
Gunnie
Trackjam
Ontario, Canada
Joined: April 12, 2002
KitMaker: 831 posts
Armorama: 614 posts
Joined: April 12, 2002
KitMaker: 831 posts
Armorama: 614 posts
Posted: Tuesday, August 12, 2003 - 01:18 PM UTC
Quoted Text
Thanks chaps.
The painting bit is the worry. I only really enjoy the research and build stage. Painting is a real pain to me - in an ideal world I would just build and hand it over to someone else to paint! I have the added problem of working out how to do a soft edged two-colour scheme without an airbrush.
I have the same problem with painting. I'm not particularly good at it and the paint tends to hide some of the detail work. you know its there and the hard core modellers know its there, but the casual observer can't tell it from an OOTB model.
KiwiDave
Wellington, New Zealand
Joined: January 14, 2003
KitMaker: 248 posts
Armorama: 0 posts
Joined: January 14, 2003
KitMaker: 248 posts
Armorama: 0 posts
Posted: Tuesday, August 12, 2003 - 01:40 PM UTC
Good idea Gunnie. Problem with the Chieftain is all the extra lumpy bits I've added!
I have an idea that I am working on at present and if I can get a decent result I wil be sharing it round.
Might just have a try with the pastels as well though.....
Yea Paul I had that problem with the Centurion. First armour model and unpainted it was all details and after painting it was just green.
Regards Dave