Hi everyone!
I'm new in KitMaker and this is my first post in this site. At first, I want to apologise my vocabulary, but try to catch the point.
I started to build this Panther #302 of 1st SS Panzer Regiment LAH abandoned in Ardennes at about a week ago. Kit is built from Tamiyas late Panther G (#35176) with CMK interior and engine compartment sets, plus some Aber photo-etch and Friul tracks. So it is going to be one pain in the ass build. Progress is going to be slow because of family, work and other stuff, but I try to find some time for this.
According to reference material and picture, I think that this tank is abandoned by engine failure. Engine decks hatch is been taken off and some tools are layin around the tank, so it is highly likely that crew has tried to repair broken vehicle but has been chased away or captured by US troops. That is one possible story around this image of the tank I'm planning to build.
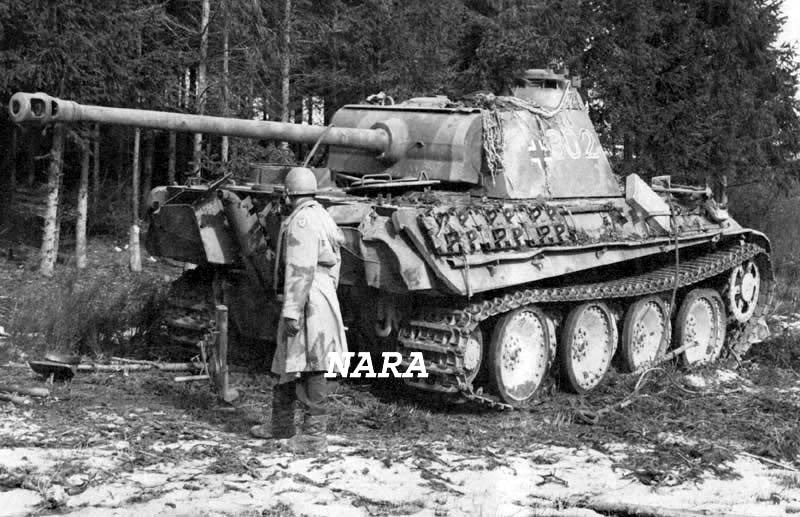
Correct if you know better the story of this tank on this photo, this whole story is only quessing.
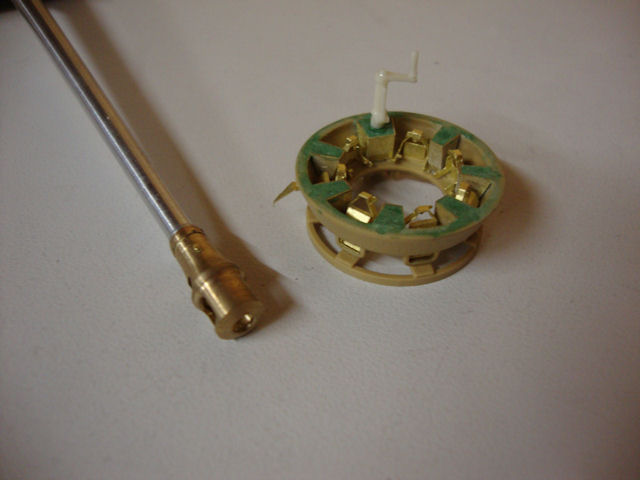
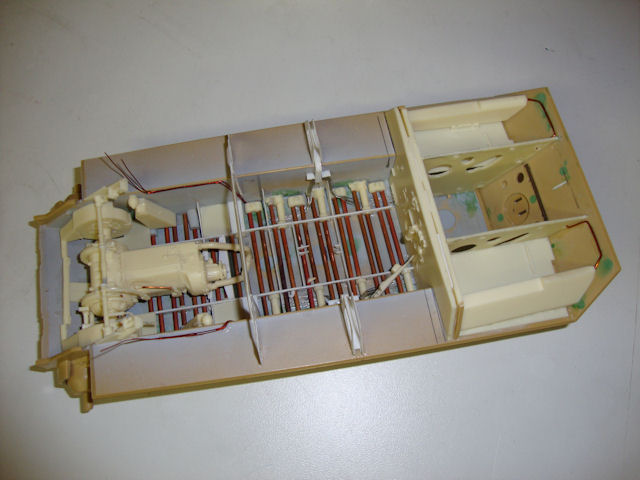
Building started by modifying the Tamiya's bottom hull for the CMK interior and engine compartment sets. I used only some of the parts CMK is providing, for example the floorplates of the kit are solid, so I cut off and used only the springs bearing housings and made the springs from copper wire. Firewall and engine compartment walls are from CMK, as well as engine, transmission and other parts that are accurate enough. Some of the parts are modified and some, for example longiudinal support frames, crossmembers and bulkheads are made from scratch. Here is the progress so far:
Engine and transmission is only dry fitted on their places, they will be painted separetly and then glued on place. The interior of the Panther is quite complex and needs to be dry fitted many times to make sure it fits and looks good.
Here you can clearly see the longitudinal supports and bulkhead.
The reason why I did not detail bearing housings in drivers compartment is that, they would not be seen at direction, so it is unessesary to do those. To be honest, most of the interior is very hard to see at eny direction, so, is this all worth it, I dont know, as long as you know its there it comforts your mind.
Next thing is to add those lubrication pipings at the bottom of fighting compartment, finish up transmission and make the turret driving assembly with its driveshafts. So, stay tuned
Hosted by Darren Baker
1st SS LAH Panther G late in Ardennes
juse85
Finland
Joined: September 03, 2010
KitMaker: 8 posts
Armorama: 8 posts
Joined: September 03, 2010
KitMaker: 8 posts
Armorama: 8 posts
Posted: Friday, September 03, 2010 - 06:29 AM UTC
Rambo44
New Brunswick, Canada
Joined: November 27, 2008
KitMaker: 55 posts
Armorama: 54 posts
Joined: November 27, 2008
KitMaker: 55 posts
Armorama: 54 posts
Posted: Friday, September 03, 2010 - 09:21 AM UTC
First off...welcome to Armorama.I'm sure you're going to love this site as it has an answer to all of your armor questions and its also a great place to show your work to the entire world(well...almost the entire world).
Great star to your Panther build,nice scratch building of the bulkheads.Looking forward to seeing more of your progress.Keep it up,
Ron.
Great star to your Panther build,nice scratch building of the bulkheads.Looking forward to seeing more of your progress.Keep it up,
Ron.
Posted: Friday, September 03, 2010 - 09:38 AM UTC
Hi Juuso. Great way to open up a new account here ... and welcome.
I love what you´ve done so far. I have the three CMK panther interior kits, so I´ll be watching this thread and your progress. Its a pity more of the interior wont be seen on the finished model.
Big-John
Ohio, United States
Joined: August 12, 2010
KitMaker: 731 posts
Armorama: 711 posts
Joined: August 12, 2010
KitMaker: 731 posts
Armorama: 711 posts
Posted: Friday, September 03, 2010 - 10:27 AM UTC
Welcome aboard!!
That panther looks great already, I am going to subscribe to this thread so I can keep an eye on the progres!
juse85
Finland
Joined: September 03, 2010
KitMaker: 8 posts
Armorama: 8 posts
Joined: September 03, 2010
KitMaker: 8 posts
Armorama: 8 posts
Posted: Sunday, September 05, 2010 - 02:13 PM UTC
Small update from recent progress:
First of all, thanks for the comments. It is nice that someone is interested on my build log...
Only small progress have been made, turret traversing differential with driveshafts and lubrication pipings for bearing housings. As you can see I didn't do pipings under the drivers compartment, because it wouldn't been seen from anywhere. Small floor sections at the front and drivers seat, ammo boxes and all the other stuff blocks the way to see them, so it was totally unnessesary to do those.
Next was the turret traversing differential and driveshafts. This sub-assembly is only dryfitted into its place and will be painted separetly. It was made straight from the parts that CMK is providing and building itself was straightforward, as you make sure that transmission can't move from its place at all. To achieve that, I drilled 0.5mm holes through the sides of the hull into the clutch housings. Then pressing the 0.5mm copper wire in these holes, so tranny won't move anywhere and assembling is... not easy, but much easier.
When I studied the instruction prior to the start of the build, I discovered that it is much easier to make small sub-assemblies on this Panther interior to ease the painting sequence. Although it will make painting easier, it is one headache to build whole interior with this method. Especially in this case when the interior set is made from poly-urethene, so there won't be any alignment holes or almost anything where to rest the parts. But this is the case with every PUR kits, thats why it it is important to focus on each step of the build.
Next thing is to complete the transmission with all of its small details...
CHESTERNIMITZ
Vizcaya, Spain / España
Joined: March 01, 2009
KitMaker: 96 posts
Armorama: 95 posts
Joined: March 01, 2009
KitMaker: 96 posts
Armorama: 95 posts
Posted: Monday, September 13, 2010 - 02:41 AM UTC
It is very very good level of detail inside the tank.
PanzerEd
Northern Ireland, United Kingdom
Joined: January 14, 2006
KitMaker: 432 posts
Armorama: 402 posts
Joined: January 14, 2006
KitMaker: 432 posts
Armorama: 402 posts
Posted: Monday, September 13, 2010 - 10:27 AM UTC
Hi Juuso,
Welcome to Armorama.
There are lots of people on here who are a great source of info for our builds.
I would recommend getting hold of a book called "The Devil's Adjutant" by Michael Reynolds. There are not too many photos in the book but it is extremely accurate using after action reports from US and German archives. Unit strengths,movements, personnel. Virually everything is covered.
The book really lets your mind take in all that was going on in the battles fought by Kampf Gruppe Peiper, which your tank belonged to.
I built a Tamiya Panther G early version a few years ago depicting a tank from the same unit. I might be inclined to make another after watching your progress so far. I think I will leave the interior though.
Keep up the good work and keep those posts coming.
Des
Welcome to Armorama.
There are lots of people on here who are a great source of info for our builds.
I would recommend getting hold of a book called "The Devil's Adjutant" by Michael Reynolds. There are not too many photos in the book but it is extremely accurate using after action reports from US and German archives. Unit strengths,movements, personnel. Virually everything is covered.
The book really lets your mind take in all that was going on in the battles fought by Kampf Gruppe Peiper, which your tank belonged to.
I built a Tamiya Panther G early version a few years ago depicting a tank from the same unit. I might be inclined to make another after watching your progress so far. I think I will leave the interior though.
Keep up the good work and keep those posts coming.
Des
juse85
Finland
Joined: September 03, 2010
KitMaker: 8 posts
Armorama: 8 posts
Joined: September 03, 2010
KitMaker: 8 posts
Armorama: 8 posts
Posted: Wednesday, November 03, 2010 - 08:17 AM UTC
Hi everyone, and thanks for comments...
First of all, I apologise that I haven't updated for a long time. My second child was born few days after the last post and my first son is only 10,5 months old, so its been quite busy here...
But some progress is made between sleepless nights. Turret is ready for painting at last.
Turret is made in sections, like whole interior of this tank, then those sections will be painted separately and assembled after that. These pictures dont show the turret traversing mechanisms, but those are made and test fitted in place, and everything looks okay.
Here is picture of muzzle brake and commanders cupola:
CMK cupola was quite ok, but I decided to use Tamiya part modded with some Aber parts. Because the CMK parts are made of PUR, it is often very painful and long process to take all of the resin flashes away, so I tried to make cupola from kits own part and it came out quite nice. Hatch lever is from CMK kit, periscopes and other stuff from Aber. Also the escape hatch was detailed with Aber parts.
Aber gun barrel is absolutely fantastic and well detailed piece of art. Every little detail is depicted nicely, and it went together easily, so I recommend it to everyone...
Not much new with lower hull, pessure lines installed and transmission is taking its shape, should be ready soon. Then the next job is to make the engine deck and finish engine bay and engine for paint. After that, finishing of lower hull interior and moving to the outside of tank. Interior making is so time consuming and sometimes fustrating job, that it is pleasure to get hands "dirty" with exterior. Stay tuned...
vonMarshall
United Kingdom
Joined: July 30, 2010
KitMaker: 192 posts
Armorama: 165 posts
Joined: July 30, 2010
KitMaker: 192 posts
Armorama: 165 posts
Posted: Wednesday, November 03, 2010 - 09:09 AM UTC
Quoted Text
My second child was born few days after the last post and my first son is only 10,5 months old,
Congatulations! That is quick work!
Loving your work on the Panther too. Looking forward to seeing some paint go down. Will you start paining bits as you go or wait until all the subassemblies are done?
juse85
Finland
Joined: September 03, 2010
KitMaker: 8 posts
Armorama: 8 posts
Joined: September 03, 2010
KitMaker: 8 posts
Armorama: 8 posts
Posted: Wednesday, November 03, 2010 - 09:52 AM UTC
I'll wait till all subassemblies are done and then paint whole thing together. I like to make things that way, it is easier to mix colors to match each others, in other words -no big color variations between for example turret and hull interiors.
There is only one disadvantage in this method. Painting process takes a lot of time especially in this kind of targets, such as interior is. There is lot of different colors. And, that's not all, after interior I wrap all up and finish the exterior - and another painting stage starts.....
SDavies
England - South East, United Kingdom
Joined: January 09, 2010
KitMaker: 979 posts
Armorama: 959 posts
Joined: January 09, 2010
KitMaker: 979 posts
Armorama: 959 posts
Posted: Wednesday, November 03, 2010 - 10:13 AM UTC
Really well done so far
I will follow this build with interest
Steven
I will follow this build with interest
Steven
juse85
Finland
Joined: September 03, 2010
KitMaker: 8 posts
Armorama: 8 posts
Joined: September 03, 2010
KitMaker: 8 posts
Armorama: 8 posts
Posted: Sunday, November 07, 2010 - 07:39 AM UTC
Thanks Steven!!
Some quick update:
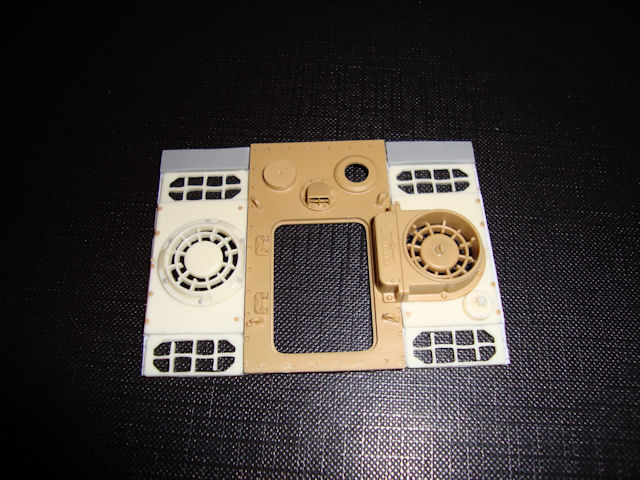
Rear deck now assembled. Don't know how wise it was to cut the original deck in pieces, but done what is done. My main reason to that was to simulate it was made from panels bolted to supporting frame, rather than made from solid piece of steel. The idea was to leave small gaps between panels and to make them look bit more realistic than this absolutely straight edged deck. Sometimes it needs to overshoot roughness to achieve realism. I don't know the right words to explaine it but hope you catch the point. And in last hand the viewer decides was it worth the effort...
Piece is made from different parts as you all may see. center piece and fighting compartment heater unit are from Tamiya and side panels and grills from CMK kit. To fit them together needed some major modifications to underside of the deck. So I made there three support frames from 0,3 mm styrene sheets and attached these bits and pieces on those at right heights.
In CMK kit, panels are designed to be off from the vehicle, so where attachment bolts should be, there are only holes for bolts and bolt heads had to put in their places. I cut boltheads from different scrap models from past years and glued them in places.
I still have to fit those vent meshes and covering slats at right side vents and also to make fuel tank ventilation pipe at back right corner.
I've also made some progress at engine bay, still to make are the exhaust pipes and couple of brackets to the firewall and thats it.
Kelley
Georgia, United States
Joined: November 21, 2002
KitMaker: 1,966 posts
Armorama: 1,635 posts
Joined: November 21, 2002
KitMaker: 1,966 posts
Armorama: 1,635 posts
Posted: Monday, November 08, 2010 - 05:24 AM UTC
Juuso,
Your build is looking good so far!
I have a couple of comments regarding the unit of this tank. It's very doubtful that this Panther was from the 1rst SS. The two most likely candidates are the 2nd Pz. Div. and the Fuhrer Grenadier Brigade. Check out the link below for a discussion about this.
http://www.network54.com/Forum/47207/thread/1005058531/Question+about+a+famous+Ardennes+Panther+photo
Regards,
Mike
juse85
Finland
Joined: September 03, 2010
KitMaker: 8 posts
Armorama: 8 posts
Joined: September 03, 2010
KitMaker: 8 posts
Armorama: 8 posts
Posted: Monday, November 08, 2010 - 08:13 AM UTC
Thank you about the info Mike, you might be right. In fact, now when you said that I read that forum and it seems that #302 belonged to 2nd Panzer Division. Every fact supports that.
This is facinating picture and it seems that I am not the only one believed blindly that this panther belonged in LAH division. That mantlets hard edged and rest of tanks soft edged pattern makes me wonder what was the story behind that...
One I don't know and it disturbs me very much is that, why this panther was abandoned there??? It shows some signs that it was mechanical failure and crew was trying to fix it (for example the jack is standing there like it was used for something).
But one thing I am confident about it is that this tank was not belonged in LAH division.