_GOTOBOTTOM
Armor/AFV: Axis - WWII
Armor and ground forces of the Axis forces during World War II.
Hosted by Darren Baker
Pz.Kpfw.IV Ausf.G (Backdated Academy Ausf.H)
gremlinz
Visit this Community
Hamilton, New Zealand
Joined: February 07, 2009
KitMaker: 795 posts
Armorama: 743 posts
Posted: Tuesday, September 07, 2010 - 06:43 PM UTC
I decided to chuck my hat into the ring on the Pz.Kpfw.IV Campaign so I'm going with this one that I started at the beginning of August. I'm at the point where I'm about to start painting so this is where I welcome any and all input on anything I may have missed so I can change it before it's too late to go on.


( for those interested in finding out everything that's gone into it so far the full blog from day one is HERE on my own site )


This started as an old Academy PzKpfw.IV Ausf.H with the schurzen. I used that kit as it was only supposed to be a play around with different zimmerit techniques ( which is why it has some done in modelling clay, some in putty and some with Mr. Surfacer ) but I got carried away. I'm prone to that.


So anyway long story short it ended up backdated to a late Ausf.G ( April/May 1943 production ) with zimmerit and schurzen added at a field workshop in late October and will be set on a snow laden diorama in late February 1944 whilst on the retreat from Korsun. It has also had earlier mine damage with the two front right road wheels replaced with later model ones and the shurzen rail twisted and two plates missing ( modeled on a photo where the only real damage was to the roadwheels and fender ).


At this time it will tentatively be set with two other vehicles at a bridge crossing with two vehicles waiting while one gingerly tests the bridge limits. The figures are in the very early stages with a lot of resculpting to do and I'll be adding a set of the DML winter panzer riders to fill it out as well. The stowage on the wagon is also not yet set in concrete.


So if anyone can see anything I've missed sing out so I can change it ( keeping in mind I know the overall dimensions of the Academy kit are a bit out but it's too late to go that far back and change it now ). I still have to add an Armorscale L48 barrel and muzzle brake, the plastic barrel is there loose for now. I've also tried mixing up the schurzen ( #4 right swapped with #2 left ) but I don't like it so will be going back to their proper places.

The main summary of changes made so far are ;

- zimmerit added ( well duh )
- schurzen remade, rails remade, mounts and rails thinned
- fenders thinned, front fenders detailed, retaining springs added
- spare track bar resized, bolt holes added, chains added
- headlight moved, conduit added, fire-extinguisher resized and moved
- tools clamps, hinges and locking pins detailed, crowbar added
- Ausf.H "W" tow hooks replaced with Ausf.G "S" shaped ones
- spare wheel locker reshaped into an Ausf.G style one
- fuel filler caps added to the rear plate and left side of the hull
- sprockets, idlers and hubcaps replaced with Ausf.G style ones
- aerial moved to the right front and mount changed
- turret schurzen thinned, door latches added
- turret side hatches redone and handles added
- cupola vison block added inside, hatch latches and head pad added
- stowage bin detailed, hasp and staples and padlock added
- tow cable hooks added on the rear plate
- tow bar added and MG barrels hollowed
- commander's Stg.43 backdated to an Mkb.42


I also added an engine, not that you can really see much but you can see enough to know there's something in there. It's just made from wood and plasticard scraps and bits from the spares box.

The tracks are just the Academy individual link set that they sell separately, mainly as I had several sets of them around.


Plasticbattle
#003
Visit this Community
Donegal, Ireland
Joined: May 14, 2002
KitMaker: 9,763 posts
Armorama: 7,444 posts
Posted: Wednesday, September 08, 2010 - 01:23 AM UTC
Hi Dean. Looking good. All your changes and then the extras like figures and cart take the focus. The fact thats Academy´s old ausf.H is hardly noticable. When these details are all painted, it will look even better. Loking forward to more updates.
gremlinz
Visit this Community
Hamilton, New Zealand
Joined: February 07, 2009
KitMaker: 795 posts
Armorama: 743 posts
Posted: Wednesday, September 08, 2010 - 09:46 AM UTC
Hi Frank, cheers for that. The next stage is weather dependent, so the figures will be getting worked on until the next warm, sunny day.
padawan_82
Visit this Community
United Kingdom
Joined: December 10, 2008
KitMaker: 817 posts
Armorama: 555 posts
Posted: Wednesday, September 08, 2010 - 02:47 PM UTC
like the changes you've made Dean, it really improves the look of the kit, i've also got the Academy H with schurzen, i started updating mine with the tamiya on vehicle equipment set, and will be replacing the running gear with tristar. the kit went on hold due to other builds taking over lol but seeing this i might have another crack at mine keep up the good work mate!
Ant.
gremlinz
Visit this Community
Hamilton, New Zealand
Joined: February 07, 2009
KitMaker: 795 posts
Armorama: 743 posts
Posted: Thursday, September 09, 2010 - 10:01 AM UTC
I've actually got another Academy Ausf.H in the stash ( they were hard to rest at $10USD each ) and I'm tempted to turn it into an earlier Ausf.G and use a set of Tristar running gear and the DML Ausf.G tool set. I'd like to see how it came out planned from the start.

This one ended up as a G as I got a set of Tamiya running gear donated early into the build and I'd already attached the suspension. The Tamiya running gear is from their later version of the Ausf.H, not the older one that the Academy is a copy of so although the sprocket and idler fit okay the road wheels and return rollers need some work to get them to fit. If I had used the Tamiya suspension it probably wouldn't have been as much of a problem.

It's not a terrible kit, it's just lacking in detail. I will say this though, the front hull schurzen mounts will not fit as instructed. I had to rebuild both completely as they are too short and bring the rail in too close to the body. You also need to resize/replace/move the fire-extinguisher as it's too big and too far back so there is no way you can get the schurzen mount on with it where they say to put it.
padawan_82
Visit this Community
United Kingdom
Joined: December 10, 2008
KitMaker: 817 posts
Armorama: 555 posts
Posted: Thursday, September 09, 2010 - 05:45 PM UTC
yeah i know what you mean about the fire extinguisher, that's why i settled on the tamiya on vehicle equipment set. thanks for the heads up on the schurzen, i'll have to tackle that one when i get to it
Ant.
gremlinz
Visit this Community
Hamilton, New Zealand
Joined: February 07, 2009
KitMaker: 795 posts
Armorama: 743 posts
Posted: Friday, September 10, 2010 - 10:52 AM UTC
If you haven't got to them yet the only other area I struck a serious fit problem with was the side doors on the turret. I glued the hinges in before assembling the turret and then added the doors a few days later and discovered that everything was out of square so had to cut away one set of hinges on each side and then glue the doors into place and rebuild the missing hinge. It would have been a lot easier to have put the hinges and doors in together at the same time, lined them all up and then filled the resulting gap between the hinge and the turret wall.
firstcircle
Visit this Community
England - South East, United Kingdom
Joined: November 19, 2008
KitMaker: 2,249 posts
Armorama: 2,007 posts
Posted: Friday, September 10, 2010 - 01:36 PM UTC
It's looking good, lots of work put in, and I like the sound of your intention to have lots of figures on it, I hope you do get around to it.


Quoted Text

So if anyone can see anything I've missed


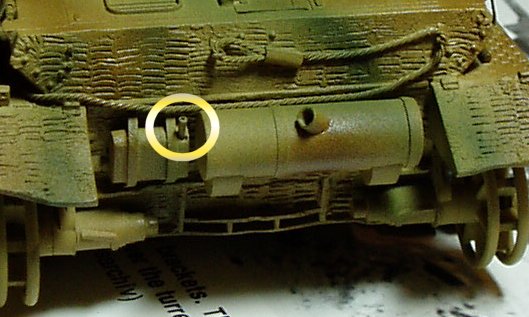
This thing to the left of the main exhaust, held on with the two vertical straps is, I think, the muffler for the two stroke engine that rotates the turret, and I think it ought to have an exhaust pipe sticking out the top right; yours seems to have a kind of blob on the bottom right. Ahem, I just so happen to have pointed this out to someone else before, so have a ready made photo illustrating it:

That model is meant to be an Ausf H, but you can also see this on the back of Ausf Gs in PzKpfw IV In Action.

Not sure if it is already glued on, but the main exhaust looks to be taking a bit a trip over to the right hand side, right off that left hand mounting bracket. I can see that the big close up photo of the rear is older though as you have zimmerit added to the backplate in one of the photos, and added the cable hooks, so maybe you fixed this already.

Underneath that, to the left and right of the towing bracket thing, either side of where you've added those bolts, I think you're missing a couple of vertical stiffening plates, they would be pretty easy to add with a bit of plastic strip (in fact you can see them in the same photo above). I think the lack of those is a later H and J feature.

Finally, it looks like you have the pre-air filter thingy mounted on the right hand track guard, you could do without it for a G as it was only fitted post May 1943, though there is one photo of a G with it fitted in the Hilary Doyle New Vanguard book.

Anyway, hope you're OK with the nitpick.
padawan_82
Visit this Community
United Kingdom
Joined: December 10, 2008
KitMaker: 817 posts
Armorama: 555 posts
Posted: Friday, September 10, 2010 - 02:45 PM UTC
Dean:
just checked my Pz IV H and doh! i've already added the hinges on the turret side doors ah well i'll have to see if i can remedy it
with mine being a H, i'm debating whether to add zim or not, seeing as this is a cheap Academy kit rather than a state of the art dragon kit, i might give it a crack, whilst i'm not to far into the build.

Matthew:
thanks for the info about the exhaust and the muffler, my exhaust is also drifting off the left bracket, this will have to be fixed, so i'm glad i've been notified of this early, would have hated to have finished the build added primer and paint only to realise i gotta rip the exhaust off and reposition the thing thanks. Ant
gremlinz
Visit this Community
Hamilton, New Zealand
Joined: February 07, 2009
KitMaker: 795 posts
Armorama: 743 posts
Posted: Friday, September 10, 2010 - 08:20 PM UTC

Quoted Text

It's looking good, lots of work put in, and I like the sound of your intention to have lots of figures on it, I hope you do get around to it.


Quoted Text

So if anyone can see anything I've missed


This thing to the left of the main exhaust, held on with the two vertical straps is, I think, the muffler for the two stroke engine that rotates the turret, and I think it ought to have an exhaust pipe sticking out the top right; yours seems to have a kind of blob on the bottom right. Ahem, I just so happen to have pointed this out to someone else before, so have a ready made photo illustrating it:

That model is meant to be an Ausf H, but you can also see this on the back of Ausf Gs in PzKpfw IV In Action.

Not sure if it is already glued on, but the main exhaust looks to be taking a bit a trip over to the right hand side, right off that left hand mounting bracket. I can see that the big close up photo of the rear is older though as you have zimmerit added to the backplate in one of the photos, and added the cable hooks, so maybe you fixed this already.

Underneath that, to the left and right of the towing bracket thing, either side of where you've added those bolts, I think you're missing a couple of vertical stiffening plates, they would be pretty easy to add with a bit of plastic strip (in fact you can see them in the same photo above). I think the lack of those is a later H and J feature.

Finally, it looks like you have the pre-air filter thingy mounted on the right hand track guard, you could do without it for a G as it was only fitted post May 1943, though there is one photo of a G with it fitted in the Hilary Doyle New Vanguard book.

Anyway, hope you're OK with the nitpick.


Thanks Matthew,feel free to be as picky as you like, I'm my own worse critic and anything I've missed I'd like to know about early ratehr than later. I'd missed the auxilliary motor muffler exhaust ppe completely, likewise the stiffening ribs. From photos it looks as if some Ausf G had the exhaust on the bottom and some on the top. I'll go with the top working on the theory that if the Ausf.Hs had it then it was most likely a change that came about on the later Ausf.Gs.

The pre-air filter was added to the final production Ausf.G in May 1943 so I decided to add it to help date it to that time period when the G was officially becomin the H. The aerial was moved around the same time but you can find pictures showing the filter in place and the aerial still at the front so I went with that simply as I wanted the front aerial there to instantly denote it as a G.

The problem with the Academy muffler isn't that it's too far to the right but rather that it is too small overall. I needs to go further to the right, further to the left and be larger in diameter as photos show them being the same hieght as the join in the rear plate but the Academy one sits 2mm lower. I've built a replacement one but haven't put it on yet as I'm waiting to make sure there is nothing else to change then I'll do all the alterations in one go.

These are two photos of a G showing what I mean -


gremlinz
Visit this Community
Hamilton, New Zealand
Joined: February 07, 2009
KitMaker: 795 posts
Armorama: 743 posts
Posted: Friday, September 10, 2010 - 08:39 PM UTC

Quoted Text

Dean:
just checked my Pz IV H and doh! i've already added the hinges on the turret side doors ah well i'll have to see if i can remedy it
with mine being a H, i'm debating whether to add zim or not, seeing as this is a cheap Academy kit rather than a state of the art dragon kit, i might give it a crack, whilst i'm not to far into the build.

Matthew:
thanks for the info about the exhaust and the muffler, my exhaust is also drifting off the left bracket, this will have to be fixed, so i'm glad i've been notified of this early, would have hated to have finished the build added primer and paint only to realise i gotta rip the exhaust off and reposition the thing thanks. Ant


An early H wouldn't have zimmerit unless field applied as the H entered production in late May of 1943 so at least three months before factory zimmerit appeared. The Academy kit has the cast return rollers and later style schurzen which dates it to October or later however. If you're using the Tristar running gear you could change the rollers to the rubber tyred ones for an earlier model though if you wanted, but the schurzen rails would have to be explained as an upgrade.

There are a couple of other things with the Academy kit too if building an H. The side vision ports on the hull for the driver and RO were dropped on the H with only the very first ones having them, and the Academy kit doesn't have the proper reinforced final drive housings of the H, just undersized Ausf.H style front half with the rear half looking like no version. I already had mine in place when the decision to backdate to a G was made so I rebuilt the rear half of mine and added the Ausf.G armoured covers at the front. With the sprockets on nothing else can be seen so I can live with that.
firstcircle
Visit this Community
England - South East, United Kingdom
Joined: November 19, 2008
KitMaker: 2,249 posts
Armorama: 2,007 posts
Posted: Friday, September 10, 2010 - 10:50 PM UTC

Quoted Text

From photos it looks as if some Ausf G had the exhaust on the bottom and some on the top. I'll go with the top working on the theory that if the Ausf.Hs had it then it was most likely a change that came about on the later Ausf.Gs.


Agreed; the photo you posted of the G with the pipe at the bottom of the muffler is of 83072, which according to the Osprey book dates from Sept 42.

On the main muffler, you say you've scratch built one - I always thought a nice touch would be to try to make one from a piece of metal, like a coke can or the like, so you can put a nice realistic dent in it, opportunity for a bit of streched paint work with a bit of subtle rust bubbling up through it. . . actually, on reflection, yours looks like it could do with a bit more rust than that . . . !
gremlinz
Visit this Community
Hamilton, New Zealand
Joined: February 07, 2009
KitMaker: 795 posts
Armorama: 743 posts
Posted: Friday, September 10, 2010 - 11:08 PM UTC

Quoted Text


Quoted Text

From photos it looks as if some Ausf G had the exhaust on the bottom and some on the top. I'll go with the top working on the theory that if the Ausf.Hs had it then it was most likely a change that came about on the later Ausf.Gs.


Agreed; the photo you posted of the G with the pipe at the bottom of the muffler is of 83072, which according to the Osprey book dates from Sept 42.

On the main muffler, you say you've scratch built one - I always thought a nice touch would be to try to make one from a piece of metal, like a coke can or the like, so you can put a nice realistic dent in it, opportunity for a bit of streched paint work with a bit of subtle rust bubbling up through it. . . actually, on reflection, yours looks like it could do with a bit more rust than that . . . !


Now why didn't I think of that, that would have been an interesting one to try. I built it out of a piece of rolled 0.25mm plasticard that was thinned down a bit so I could add a couple of dents. I've just pulled the Academy one off to add the pipe to the auxilliary motor exhaust and discovered that the one I built is the right diameter now but a bit too long so now I have to trim it down about 2mm, so if that doesn't go smoothly I might try another one out of metal.
gremlinz
Visit this Community
Hamilton, New Zealand
Joined: February 07, 2009
KitMaker: 795 posts
Armorama: 743 posts
Posted: Wednesday, September 15, 2010 - 12:11 AM UTC
Finally got a decent break in the weather today so got the base coats on. I'll get photos up tomorrow. Arse end has been fixed up with the strengthening ribs added, auxilliary motor exhaust pipe added, new muffler on. Got the primer on a few days ago and chucked the base coats, camo and filter on today. It's going to be whitewashed so I didn't get too fussy with the base coats as all it needs to do is be there for the areas where the whitewash will be worn away.
Dirkpitt289
Visit this Community
New Jersey, United States
Joined: May 24, 2008
KitMaker: 346 posts
Armorama: 38 posts
Posted: Wednesday, September 15, 2010 - 03:59 AM UTC
That is some amazing modeling. Thanks for sharing and I look forward to seeing more
gremlinz
Visit this Community
Hamilton, New Zealand
Joined: February 07, 2009
KitMaker: 795 posts
Armorama: 743 posts
Posted: Wednesday, September 15, 2010 - 08:57 PM UTC


Rightyho, base coats are on. I wanted to go with the soft edged camo seen on a lot of Pz.Kpfw.IVs of the period, particularly those of 12th SS Hitlerjurgen, though this one will be a 3.Pz.Div. vehicle. I also didn’t get too carried away with being perfect as this will be getting a whitewash so the camo is mainly there to be seen in the areas that get worn away with the final weathering.


I've added those few small parts identified above, plus a lifting eye on the gun mantlet and the new muffler is in place. I realised after doing this that the bow MG got twisted around after it was glued so the periscope hole is now out of place, so I'm going to fill that and drill a new one and while I'm at it I'm not over the moon with the level of detail in the MG34 Panzerlauf so I'm going to cut it off and scratchbuild a better one to replace it with.


The schurzen and running gear still needs to be painted but with only a few hours of good light and weather to do it in I decided to just get the main part done while I could so that I can move on with it and fit in the schurzen and wheels when the weather suits. With the running gear off you can also see the cheat with the final drive housings. The Academy ones are undersized and the wrong shape but as only the front edge and the back can be seen I rebuilt the backs and just covered the front edge with the Ausf.G armoured covers rather than completely rebuild them.


I need to clean the excess paint off the aerial ( yes it’s meant to be bent, most photos of Gs with schurzen and the front mounted aerial show them bent ) and after that is a coat of Future the decals, painting the tools, cupola pad, etc, then another coat of Klear and onto the oil washes. Once all that is done it will darken up and bit and look like it should. Then I’ll go and cover it all up anyway by painting it white.

Kuno-Von-Dodenburg
Visit this Community
England - North, United Kingdom
Joined: February 20, 2007
KitMaker: 1,453 posts
Armorama: 1,319 posts
Posted: Wednesday, September 15, 2010 - 09:48 PM UTC
Hi Dean,

Coming along nicely, and I like what you have planned as a final dio layout with all the figures and that cart. Camo looks top-notch.

- Steve
gremlinz
Visit this Community
Hamilton, New Zealand
Joined: February 07, 2009
KitMaker: 795 posts
Armorama: 743 posts
Posted: Thursday, September 16, 2010 - 06:11 PM UTC
Cheers for that. I just ordered some Archer dry transfers for it so I'll have to spend some time on the wagon and the figures for the next week or so till they get here.
gremlinz
Visit this Community
Hamilton, New Zealand
Joined: February 07, 2009
KitMaker: 795 posts
Armorama: 743 posts
Posted: Tuesday, November 23, 2010 - 07:29 PM UTC
Time for an overdue update.

It looks like this won't make it for the deadline for the Workhorse campaign. I struck a problem with the markings ( You can read the details of that HERE if you want ) which meant it got put on hold for five weeks.

And we're abandonging big city life to go live in a small town that has a population smaller than the roll at my daughter's highschool which was planned for early next year but has now been bought forward to next month when we found a house we wanted but had to take it earlier to get it.

So into the box this goes making my build tally for this year seven and oh, seven started, zero finished. I'm on a roll.

On the bright side the new house has a large self contained third lounge that will become my office and hobby room so no more competing for the dining table which will hopefully mean several of these half finished builds will get completed next year.
 _GOTOTOP