_GOTOBOTTOM
Constructive Feedback
For in-progress or completed build photos. Give and get contructive feedback!
Another no brainer - M60A1 Rise/Passive dozer
Heatseeker64
Visit this Community
New South Wales, Australia
Joined: October 05, 2008
KitMaker: 307 posts
Armorama: 305 posts
Posted: Saturday, October 30, 2010 - 10:19 PM UTC
Well, I got the M109 sitting on wheels with a coat of paint and decals ( http://armorama.com/forums/165793&page=1 ), so I thought I'd rummage through the shelves to see what else was lurking.

I found the Academy USMC M60A1 Patton Rise/Passive with M9 dozer, and upon opening the box I found a hastily assembled hull and turret and a set of AFV Club track.

I remember exactly when I bought this kit - it was 102 years ago and I was staying in a hotel after starting a new job.

I wanted a kit for those solitary nights but the project bogged down very quickly when I saw the huge motorisation holes - particularly around the drive sprocket mountings ... this kit would need more than a hobby knife and some glue, and later research revealed it needed some plumbing for the dozer blade, which was the main reason I was attracted to the kit!

I think a few years later I tossed the AFV Club track in to the box after I found it at a swap meet.

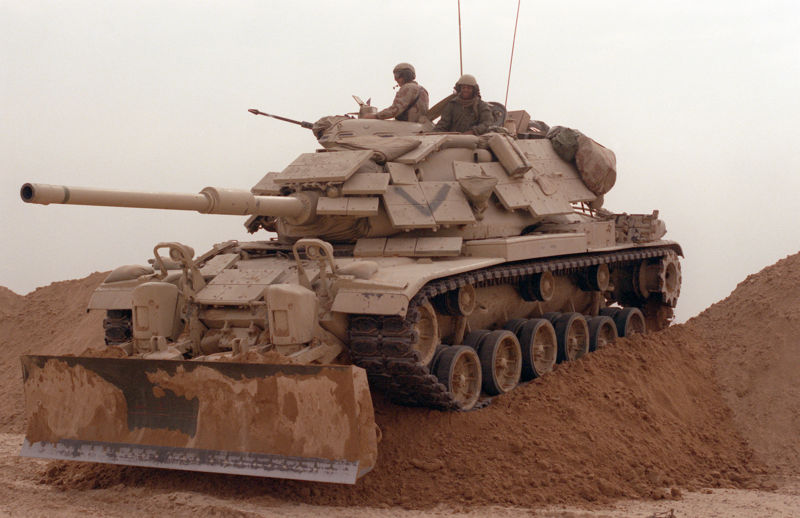
I don't know anything about the accuracy merits of the kit, and I really don't care - it looks like an M60, the tracks seemed to be its biggest shortcoming and it will look cool with all that reactive armour and the blade.

I found a great reference snap in this very site from Treadhead12 (yep, them front hull blocks will also need some re-fitting):


I picked up where I left off by blanking the holes from the inside with some card (I also removed the port side rear bin for the hydraulics box, which left another hole that needed filling):


Once the glue had set, I set to work with putty and milliput:


A dab of Mr Surfacer can hide - or reveal - a multitude of sins:


Obviously with the armour going on, a heap of holes in the turret were superfluous:


The "basic building blocks" now sound, I set to work adding some details ... the dozer is a nifty little "kit within a kit" which I eventually glued solid into the raised position, although I am looking for another reason to build another of these - it was fun!:

I was agonising over exactly where the mount was positioned on the front, but then I figured it it was attached to the tow points, so I removed the shackles and had the perfect positioners in place:


There were a few little blemishes to fill, bit nothing serious - I opted to set the blade in place because the moulded plastic shafts looked a tad flimsy, but I would like to build another blade with brass rod attachments:


Got a coat of Mr Surfacer on the turret and the start of some reactive armour in place ... not the vacant space on the left rear fender for a scratch built hydraulic unit:


Next challenge will be how the front plate armour was configured - the stock part just don't fit!:


Sabot
Joined: December 18, 2001
KitMaker: 12,596 posts
Armorama: 9,071 posts
Posted: Sunday, October 31, 2010 - 01:52 AM UTC
You're looking good so far. Here's a modeler who built an earlier version of that tank with dozer blade. I had posted some scans of the TM with the hydraulics. He's got some good WIP shots and did a bang up job. It may be of some help to you.
http://cs.finescale.com/FSMCS/forums/p/115091/1147856.aspx#1147856
Heatseeker64
Visit this Community
New South Wales, Australia
Joined: October 05, 2008
KitMaker: 307 posts
Armorama: 305 posts
Posted: Sunday, October 31, 2010 - 08:36 AM UTC

Quoted Text

You're looking good so far. Here's a modeler who built an earlier version of that tank with dozer blade. I had posted some scans of the TM with the hydraulics. He's got some good WIP shots and did a bang up job. It may be of some help to you.
http://cs.finescale.com/FSMCS/forums/p/115091/1147856.aspx#1147856


Yes, excellent reference, which - if I may be so bold - reproduce here, along with some other pics I found:


It's amazing what esoteric information can be found on the www!
Heatseeker64
Visit this Community
New South Wales, Australia
Joined: October 05, 2008
KitMaker: 307 posts
Armorama: 305 posts
Posted: Tuesday, November 02, 2010 - 01:04 AM UTC
Got a few things done today and thought I was roaring ahead:


I installed the armour from stock standard parts as per the kit instructions, but nothing about the turret looked right.

The side panels were parallel to the turret walls, whereas, on the real tank they "flair" out from the bottom and are hard up against the turret at the top. And all of the panels on the front were awry. Meanwhile the panels around the turret cheeks were hard up against the armour, and they should have had some space unbderneath them.

So I stripped it all off, and I'll start again ... great thing about cast turrets is they can be re-surfaced and sand back in to shape.


I learnt a few techniques in placing the flawed panels and now had a method to get them in place securely, now it's just a case of getting the angles right ...
tjkelly
Visit this Community
Maryland, United States
Joined: May 04, 2007
KitMaker: 1,132 posts
Armorama: 1,123 posts
Posted: Saturday, November 06, 2010 - 11:44 PM UTC
Looking good Mick - You've got a heck of a project working there. Keep at it!

Cheers -

Tim
Heatseeker64
Visit this Community
New South Wales, Australia
Joined: October 05, 2008
KitMaker: 307 posts
Armorama: 305 posts
Posted: Sunday, November 07, 2010 - 12:56 AM UTC
As it always is with my "no brainer" builds, there's always something that absolutely positively needs some enhancement.

As I said before, I am note sure how accurate this kit is as an M60, but if you install the reactive armour as per the instructions it just looks plain wrong - it all goes on parallel to the turret sides, and the plates on the mantlet are screwy.

That said, the panels themselves look accurate enough.

After consulting some references. I opted to cut off all the mounting stems and replace them with aluminium rod, which not only bends easily, but is also easy to sand (I drilled through the plates and the replacement stems would need trimming).


I finally finished all the turret panels .... the shape of the M60's cast turret certainly would have presented a chalnnge to the designers of the mounting system!


I also didn;t like the kit's wheels with the soft rubber tyres ... I plundered a junked M48 for its wheels and cut all the locating tabs from the suspension to give the tank the distinctive "nose down" posture of a dozer.

I also replaced the basket mesh with aluminium architectural mesh and mounted some spare wheels from the M48. I'm still in the process of cleaning up the reactive armour..


Once I nut out the mantlet armour, the next challenge will be the plumbing for the dozer blade.
barron
Visit this Community
Virginia, United States
Joined: December 01, 2001
KitMaker: 666 posts
Armorama: 598 posts
Posted: Sunday, November 07, 2010 - 01:10 AM UTC
Looking good. I shot a tank table 8 gunnery on an M60A3 blade tank one time and with that blade hanging on the front made it one stable firing platform.
windysean
Visit this Community
Wisconsin, United States
Joined: September 11, 2009
KitMaker: 1,917 posts
Armorama: 735 posts
Posted: Sunday, November 07, 2010 - 03:50 PM UTC
Mick, that build looks great. You're really making something out of a really rough kit. I was only looking in this forum because I thought I wanted to build one from Desert Storm, and thinking like you did that this would be another no brainer.
Your improvements are really nice-- the aluminum armor mounts, etc. I'll keep watching this one.
thanks,
Sean.
HILBERT
Visit this Community
Zuid-Holland, Netherlands
Joined: August 07, 2004
KitMaker: 4,808 posts
Armorama: 1,069 posts
Posted: Wednesday, November 10, 2010 - 10:39 AM UTC
Funny, I'm busy with the Tamiya kit. Is the kit you have horrible too? I mean, in details?

I'll go a step further. I will use the Resin M9 Dozer from Legend Productions and the Stowage set as well. I will scratchbuild some minor things too. The suspension arms for example. Also the handles on the rear deck I will replace with better ones.

It looks real rough now. But I'm sure that will end up really nice, as I saw your other build.

Next update?

Heatseeker64
Visit this Community
New South Wales, Australia
Joined: October 05, 2008
KitMaker: 307 posts
Armorama: 305 posts
Posted: Wednesday, November 10, 2010 - 10:44 AM UTC

Quoted Text

Funny, I'm busy with the Tamiya kit. Is the kit you have horrible too? I mean, in details?

I'll go a step further. I will use the Resin M9 Dozer from Legend Productions and the Stowage set as well. I will scratchbuild some minor things too. The suspension arms for example. Also the handles on the rear deck I will replace with better ones.

It looks real rough now. But I'm sure that will end up really nice, as I saw your other build.

Next update?


Yep, the model's pretty basic and a lot of basic tidying up was needed of the rear of the hull in particular.

The dozer kit is nice, but is different in some details to the reference pics I've obtained of the examples mounted on M60s.

With the Tamiya M48 wheels, AFV Club track and a heap of stowage it should come up as a nice "representative" model which has been fun to build.
 _GOTOTOP