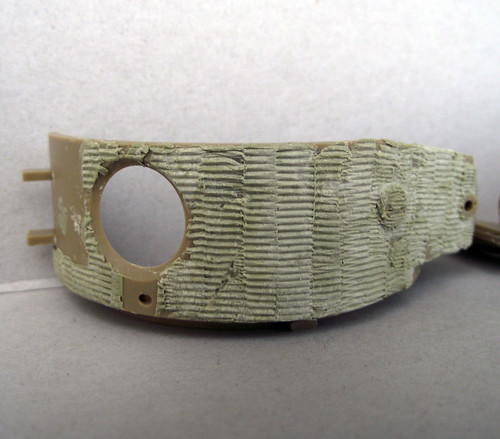
Okay I'm almost done with the Zimmerit and ready to get on with the rest of the build
I have to touch up where the glacis and front armour meets the lower hull and side armour but I'll do that when I finally glue them together.
I might also redo the turret escape hatch and the gun mantlet
I used the modelkasten zimmerit tools, milliput and plenty of water.
All constructive comments welcome
Constructive Feedback
For in-progress or completed build photos. Give and get contructive feedback!
Hosted by Darren Baker, Dave O'Meara
Tiger 1 with Zimmerit
exer
Dublin, Ireland
Joined: November 27, 2004
KitMaker: 6,048 posts
Armorama: 4,619 posts
Joined: November 27, 2004
KitMaker: 6,048 posts
Armorama: 4,619 posts
Posted: Wednesday, January 12, 2011 - 08:23 AM UTC
exer
Dublin, Ireland
Joined: November 27, 2004
KitMaker: 6,048 posts
Armorama: 4,619 posts
Joined: November 27, 2004
KitMaker: 6,048 posts
Armorama: 4,619 posts
Posted: Wednesday, January 12, 2011 - 08:27 AM UTC
Here's how I started: this is My first Tiger- Tamiya's Late (I also posted some of these photos in the Tiger Campaign thread but I'm looking for constructive comments so I'll put them here too.)
I had a go at the zimmerit after some trial and error on an old Nichimo Sherman (All it's good for).
The method I ended up using was to roll the milliput out as thin as possible on a surface sprinkled with talc then peel it off with a scalpel, wet it and transfer it to the model.
I roughed up the surface to provide a key for the milliput and pushed it into place using a damp brush.
I trimmed it in situ and then used the modelkasten tools, dipping them in water to stop them sticking, I went over it several times.
stoney
British Columbia, Canada
Joined: October 16, 2006
KitMaker: 480 posts
Armorama: 399 posts
Joined: October 16, 2006
KitMaker: 480 posts
Armorama: 399 posts
Posted: Thursday, January 13, 2011 - 05:59 AM UTC
Hey Pat, looking good. Its a great feeling to finally finish that first zimm job no? especially after the initial panic of smearing your model with putty
One thing, I don't think the upper glacis plate on the tigers recived zimm, or if so it wasn't textured the same (if that makes any sense) I'm sure some of the tiger heads could tell you in infinite detail the individual placement on every tiger ever made, but I seem to recall this area being blank.
Well done and I look forward to seeing it in paint, congratulations!
Tojo72
North Carolina, United States
Joined: June 06, 2006
KitMaker: 4,691 posts
Armorama: 3,509 posts
Joined: June 06, 2006
KitMaker: 4,691 posts
Armorama: 3,509 posts
Posted: Thursday, January 13, 2011 - 06:38 AM UTC
looks good,never tried my own zimm.
exer
Dublin, Ireland
Joined: November 27, 2004
KitMaker: 6,048 posts
Armorama: 4,619 posts
Joined: November 27, 2004
KitMaker: 6,048 posts
Armorama: 4,619 posts
Posted: Thursday, January 13, 2011 - 07:55 AM UTC
@EricThanks, Yeah it does feel good although I do have areas to touch up.
Well I thought so and asked on several forums but that info doesn't seem to be out there
I've seen it blank on some tanks but I'm going by the info in this book Modeler's Guide to the Tiger Tank A complete and comprehensive guide to modelling the Tiger I and Tiger II in 1/35th scale.
I haven't decided on a final scheme but it'll either be 505 sPzAbt or one of the Tigers used by the Hungarian Army in 1944
@Anthony thanks - you should try it once you get started it's not as daunting as it seems
Quoted Text
I'm sure some of the tiger heads could tell you in infinite detail the individual placement on every tiger ever made
Well I thought so and asked on several forums but that info doesn't seem to be out there
Quoted Text
, but I seem to recall this area being blank.
I've seen it blank on some tanks but I'm going by the info in this book Modeler's Guide to the Tiger Tank A complete and comprehensive guide to modelling the Tiger I and Tiger II in 1/35th scale.
I haven't decided on a final scheme but it'll either be 505 sPzAbt or one of the Tigers used by the Hungarian Army in 1944
@Anthony thanks - you should try it once you get started it's not as daunting as it seems
stoney
British Columbia, Canada
Joined: October 16, 2006
KitMaker: 480 posts
Armorama: 399 posts
Joined: October 16, 2006
KitMaker: 480 posts
Armorama: 399 posts
Posted: Thursday, January 13, 2011 - 09:05 AM UTC
Wow, you really cant argue with a book title like that, eh?
thebear
Quebec, Canada
Joined: November 15, 2002
KitMaker: 3,960 posts
Armorama: 3,579 posts
Joined: November 15, 2002
KitMaker: 3,960 posts
Armorama: 3,579 posts
Posted: Thursday, January 13, 2011 - 11:17 AM UTC
Hi Pat...Your zimmerit looks great and you got it right (if this is what you were talking about.....
for discussion purposes only (0f course)
Rick
for discussion purposes only (0f course)
Rick
exer
Dublin, Ireland
Joined: November 27, 2004
KitMaker: 6,048 posts
Armorama: 4,619 posts
Joined: November 27, 2004
KitMaker: 6,048 posts
Armorama: 4,619 posts
Posted: Thursday, January 13, 2011 - 12:00 PM UTC
Thanks Rick although as someone mentined over on ML the Zimmerit is less pronounced(If that's the right word) on the glacis perhaps due to being walked on by the crew
panzerbob01
Louisiana, United States
Joined: March 06, 2010
KitMaker: 3,128 posts
Armorama: 2,959 posts
Joined: March 06, 2010
KitMaker: 3,128 posts
Armorama: 2,959 posts
Posted: Thursday, January 13, 2011 - 01:32 PM UTC
Pat;
"Crew walking on it"... that's an intriguing notion (yes, I am certain they did walk on that glacic- but did that damage or compress the zim?)!
Let's presume that the zimm on that up-facing front plate ("glacis"?) is somewhat less prominent then seen say, on the turret or hull sides.
And, let's go with the "crew" model:
IF that reduced zim stature was created by crew walking on it... then it should probably be depicted on kits as being quite varied in thickness and "ridgy-ness" across that glacis, as the crew did not walk equally over all of it! Further... I should think that if crew walked on it and it did get worn or damaged, the camo painted over those walked-on portions should probably be damaged or worn-away, exposing the "raw" zim, to reflect this?
Personally, I am rather dubious about the "crew damage" scenario, and think it more likely that, if glacis zim was actually thinner, then it was applied that way... but that's just my guess.
Cheers!
PS: Does anyone know or "see" this thinner glacis zim manifest on any of the AM Tiger I zim kits, or on any of the pre-zimmed kits?
Bob
exer
Dublin, Ireland
Joined: November 27, 2004
KitMaker: 6,048 posts
Armorama: 4,619 posts
Joined: November 27, 2004
KitMaker: 6,048 posts
Armorama: 4,619 posts
Posted: Thursday, January 13, 2011 - 09:01 PM UTC
Hi Bob, you're right you know, if it was due to the crew walking on then the wear would be uneven. It makes sense that it was applied that way but I wonder why- and on some tanks it wasn't applied at all.
Grant Hall posted an interesting photo showing the area in the thread on
ML
This photo is from the review of the late tiger with Zimmerit here on Armorama but I can't make out if it is less pronounced or not.
That is the only horizontal area covered by zimmerit on Tigers and I suppose since it's purpose was to stop magnetic mines sticking it was really only of use on vertical panels.
It's interesting that the minutiae of detail on nearly every single tiger is known and written about but not much is written about zimmerit- that I can find- with regard to the patterns applied on Tigers- why the pattern was larger on the turret etc.
meaty_hellhound
Alberta, Canada
Joined: July 23, 2010
KitMaker: 786 posts
Armorama: 753 posts
Joined: July 23, 2010
KitMaker: 786 posts
Armorama: 753 posts
Posted: Friday, January 14, 2011 - 03:25 AM UTC
nice job on the zim Pat, i have tried both Milliput and Tamiya White Putty for zim and they have their pluses and minuses in my opinion. i found that for detail areas and near hatches and such i needed to use a tiny slotted screwdriver head to get the ridges right without making it look messy. the one thing i could add on your great work is to ensure the pattern breaks have a distinct vertical line between the row of ridges.
interesting discussion regarding the glacis zim, makes me wonder if they knew it was a heavy traffic area that they may have planned to lay it down thinly. i would think that if it was going to get worn down that i would want to start with a thick layer from the factory because if it's thin and then gets rubbed thinner then it looses its anti-magnetic barrier effect and becomes less useful. very curious.
i bought a Dragon King Tiger with zim already on to see how this type of kit would be to assemble and it appears that it is just as much work to remove the molded zim to make it look non-factory as it would be to make it from scratch. i like the look you've achieved and once painted it will look sweet. cheers, bd.
exer
Dublin, Ireland
Joined: November 27, 2004
KitMaker: 6,048 posts
Armorama: 4,619 posts
Joined: November 27, 2004
KitMaker: 6,048 posts
Armorama: 4,619 posts
Posted: Friday, January 14, 2011 - 04:44 AM UTC
Thanks Bruce
I thought about the distinct vertical line between the row of ridges but aftre trawling through lots of images I don't think they were always present but I will try a few on the next Tigert. There's an amazing 21 page thread with just pics of Tigers on the Axis history forum
Hohenstaufen
England - South East, United Kingdom
Joined: December 13, 2004
KitMaker: 2,192 posts
Armorama: 1,615 posts
Joined: December 13, 2004
KitMaker: 2,192 posts
Armorama: 1,615 posts
Posted: Friday, January 14, 2011 - 05:37 AM UTC
Good job on the Zim Pat. As for the upper glacis plate, there isn't a lot of point applying an anti-magnetic coating to a nearly flat surface that a mine could lie on anyway wthout falling off. So perhaps we shouldn't be asking why they spread it thinner there as much as why they bothered at all!? Perhaps, being German, they couldn't cope with the aesthetics of a large flat expanse between two well Zimmeritted (is that a word?) surfaces!
meaty_hellhound
Alberta, Canada
Joined: July 23, 2010
KitMaker: 786 posts
Armorama: 753 posts
Joined: July 23, 2010
KitMaker: 786 posts
Armorama: 753 posts
Posted: Friday, January 14, 2011 - 06:01 AM UTC
great link Pat, i check that site often for good intel. i knew you'd be on top of it and look forward to seeing how it looks once the paint hits the zim. cheers for now, bd.
exer
Dublin, Ireland
Joined: November 27, 2004
KitMaker: 6,048 posts
Armorama: 4,619 posts
Joined: November 27, 2004
KitMaker: 6,048 posts
Armorama: 4,619 posts
Posted: Sunday, January 16, 2011 - 12:19 PM UTC
Okay I thought about and decided to remove and replace the exhaust covers. I've been saving the heavy foil packets from my dogs food thinking they might be useful so I tried fabricating the replacement covers with them.
After carefully washing and cleaning the packet (To remove any latent smells to stop the dog adding more battle damage to the finished model ) I flattened the foil and measured and cut the shape using the kit part. Then I tied a piece of thin wire between two nails and used the groove in a craft knife handle to emboss the ridge at the top and the bottom of the exhaust cover
I think the replacement part is okay but a bit undersized and of course I forgot to allow for the edges of the cover that bolt to the hull
I'm happy with the method though and I'll try again. I have a hungry dog and a ready supply of thick foil
I know a lot of modelers add battle damage to the exhaust covers- are there pics to support this?
exer
Dublin, Ireland
Joined: November 27, 2004
KitMaker: 6,048 posts
Armorama: 4,619 posts
Joined: November 27, 2004
KitMaker: 6,048 posts
Armorama: 4,619 posts
Posted: Sunday, February 06, 2011 - 08:12 AM UTC
So I finally got around to makling the exhaust covers out of foil. I used the PE covers from Voyager as a template.
I think they look good. I'm kind of annoyed now that I added the front and back mudguards(?) in plastic but I'm having a go at doing the fenders in foil. Using the kit piece and the PE part as referenvce I cut the part from foil:
Then I formed the shape using straight edges and basic tools.
I still have to add the rivets /bolts holding them in place
hedorah59
California, United States
Joined: May 04, 2009
KitMaker: 123 posts
Armorama: 121 posts
Joined: May 04, 2009
KitMaker: 123 posts
Armorama: 121 posts
Posted: Wednesday, February 09, 2011 - 08:01 AM UTC
Those fenders and exhaust guards look great - When I get past the OOB stage I may have to give this method a go. Thanks for sharing!
exer
Dublin, Ireland
Joined: November 27, 2004
KitMaker: 6,048 posts
Armorama: 4,619 posts
Joined: November 27, 2004
KitMaker: 6,048 posts
Armorama: 4,619 posts
Posted: Wednesday, February 09, 2011 - 08:30 AM UTC
Thanks- the joy of this method is that if you go wrong you've only wasted some foil and as I mentioned I have a ready supply of that
pseudorealityx
Georgia, United States
Joined: January 31, 2010
KitMaker: 2,191 posts
Armorama: 1,814 posts
Joined: January 31, 2010
KitMaker: 2,191 posts
Armorama: 1,814 posts
Posted: Wednesday, February 09, 2011 - 11:30 AM UTC
How heavy is the foil? My biggest concern would just be wrecking it during the painting and weathering stages...
exer
Dublin, Ireland
Joined: November 27, 2004
KitMaker: 6,048 posts
Armorama: 4,619 posts
Joined: November 27, 2004
KitMaker: 6,048 posts
Armorama: 4,619 posts
Posted: Wednesday, February 09, 2011 - 12:41 PM UTC
Quoted Text
How heavy is the foil? My biggest concern would just be wrecking it during the painting and weathering stages...
That's my plan I've been looking at this thread for inspiration and some of the fenders look prety beat up. I.m going to drill through them into the hull and pin them in place so that they don't come away completely. I have also coated the underside with CA glue which stiffens them up.
pseudorealityx
Georgia, United States
Joined: January 31, 2010
KitMaker: 2,191 posts
Armorama: 1,814 posts
Joined: January 31, 2010
KitMaker: 2,191 posts
Armorama: 1,814 posts
Posted: Wednesday, February 09, 2011 - 03:53 PM UTC
Never thought of using the CA to stiffen it up. Very good.
Major-Hazard
United Kingdom
Joined: July 14, 2008
KitMaker: 217 posts
Armorama: 215 posts
Joined: July 14, 2008
KitMaker: 217 posts
Armorama: 215 posts
Posted: Wednesday, March 09, 2011 - 06:01 AM UTC
Nice work on the Zimmerit Pat - well done.
This was my breakthrough piece;
I think standard Milliput is great for this process.
All the best.
Bill
This was my breakthrough piece;
I think standard Milliput is great for this process.
All the best.
Bill