Hello, in this thread i am going to build CMK's volkswagen beetle, Ik will absolutely not be in mint condition.
The kit is very easy with a limited number of parts
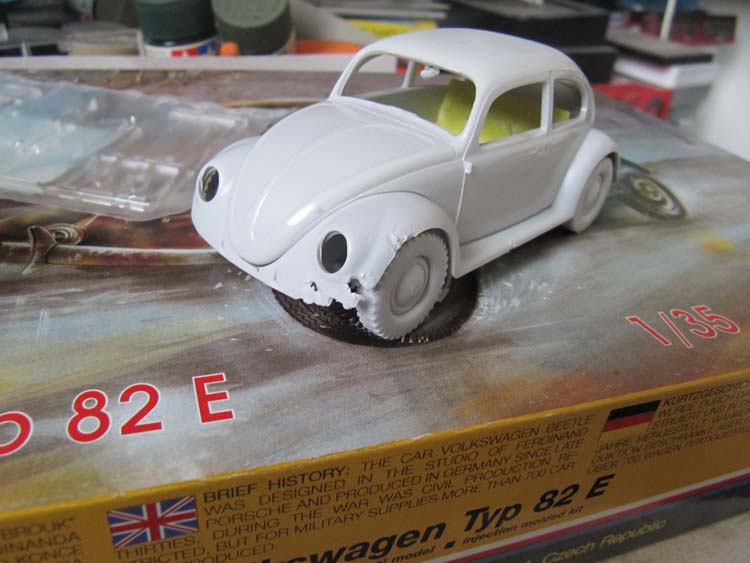
i placed the wheels a little bit deeper under the fenders
this is what the little surgery looks like
the back seat is damaged
first damage
damaged front seat
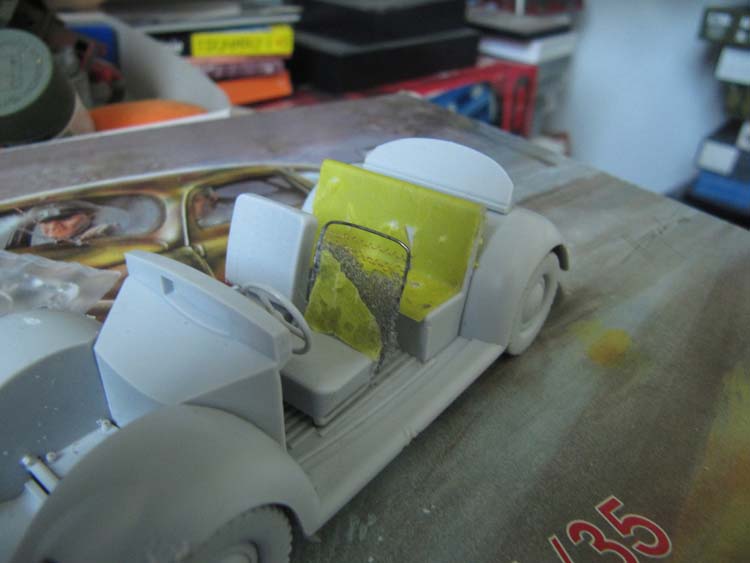
and it is almost ready for airbrushing!
update will follow
Constructive Feedback
For in-progress or completed build photos. Give and get contructive feedback!
Hosted by Darren Baker, Dave O'Meara
CMK 1/35 volkswagen beetle
robink
Netherlands
Joined: May 08, 2011
KitMaker: 14 posts
Armorama: 14 posts
Joined: May 08, 2011
KitMaker: 14 posts
Armorama: 14 posts
Posted: Sunday, May 08, 2011 - 08:01 AM UTC
pdelsoglio
Mendoza, Argentina
Joined: November 13, 2005
KitMaker: 561 posts
Armorama: 553 posts
Joined: November 13, 2005
KitMaker: 561 posts
Armorama: 553 posts
Posted: Sunday, May 08, 2011 - 09:54 AM UTC
Hi there!
Nice work with that Beetle. I really like what you have done with the fender. The damage looks so realistic.
Thanks for sharing!
Cheers
Nice work with that Beetle. I really like what you have done with the fender. The damage looks so realistic.
Thanks for sharing!
Cheers
windysean
Wisconsin, United States
Joined: September 11, 2009
KitMaker: 1,917 posts
Armorama: 735 posts
Joined: September 11, 2009
KitMaker: 1,917 posts
Armorama: 735 posts
Posted: Sunday, May 08, 2011 - 11:35 AM UTC
Robin, nice work! That interior and fender damage is VERY convincing!
I have the "Herbbie" boxing, and I'm trying to build it to the 1963 model in the Love Bug movies, but I put it aside for a while. Like you said, this won't be in mint condition. I wish the one I got had the moon hubcaps that you're using, but I'll have to make some instead.
Oh, and at 7 messages on your count-- welcome to the site!
-Sean
vonHengest
Texas, United States
Joined: June 29, 2010
KitMaker: 5,854 posts
Armorama: 4,817 posts
Joined: June 29, 2010
KitMaker: 5,854 posts
Armorama: 4,817 posts
Posted: Sunday, May 08, 2011 - 01:24 PM UTC
Great work so far Robin! One thing that stood out though. If the tire is really going to be flat enough to spread out that far, then you will need the rest of the sidewall on the lower part of the tire to spread out with it. Looks really good otherwise
zontar
Hawaii, United States
Joined: August 27, 2006
KitMaker: 1,646 posts
Armorama: 1,557 posts
Joined: August 27, 2006
KitMaker: 1,646 posts
Armorama: 1,557 posts
Posted: Thursday, May 19, 2011 - 02:03 PM UTC
Robin: Looks good. What material did you use for the torn seat covers?
Happy Modelling, -zon
collin26
Connecticut, United States
Joined: March 24, 2007
KitMaker: 317 posts
Armorama: 259 posts
Joined: March 24, 2007
KitMaker: 317 posts
Armorama: 259 posts
Posted: Thursday, May 19, 2011 - 02:40 PM UTC
Looking like a nice project. Nice work on that fron seat!