Correze, France
Joined: June 10, 2004
KitMaker: 5,329 posts
Armorama: 5,204 posts
Posted: Tuesday, June 14, 2011 - 06:49 AM UTC
Hi all,
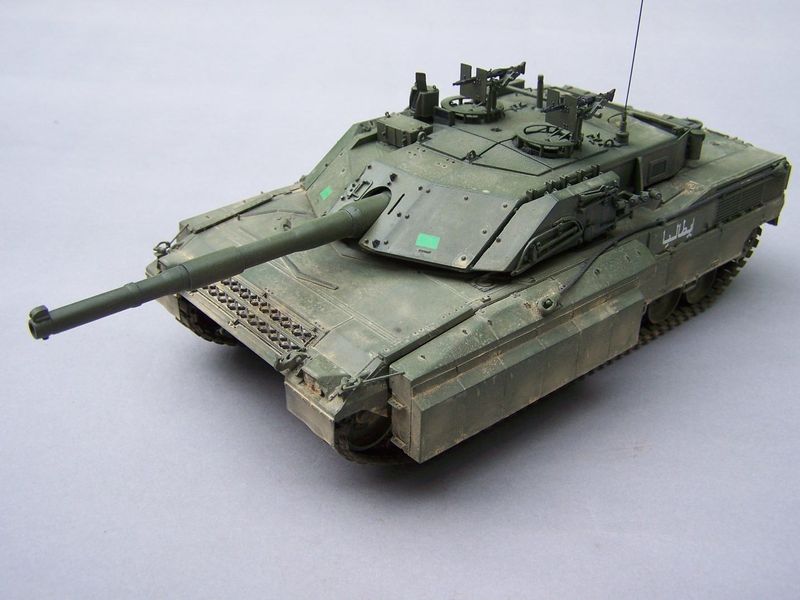
after completing my Leclerc I started this Trumpeter kit nearly OOTB for once. So the building took me only two week-ends as it is an easy one.
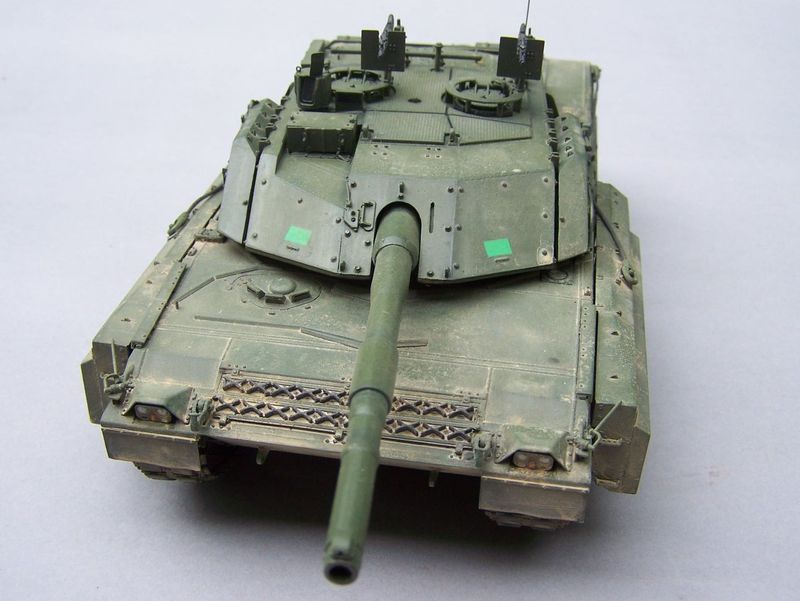
Now I'm near completion but would like some feedback on the weathering.

TIA
Olivier
Visit my site Click the banner
"La reine des batailles, j'ai nommé l'infanterie"
Napoléon
Milano, Italy
Joined: July 13, 2010
KitMaker: 3,845 posts
Armorama: 3,543 posts
Posted: Tuesday, June 14, 2011 - 07:15 AM UTC
...well in my opinion T-55 isn' t just a tank. Actually it is THE TANK...
Arkansas, United States
Joined: June 29, 2009
KitMaker: 11,610 posts
Armorama: 7,843 posts
Posted: Tuesday, June 14, 2011 - 07:38 AM UTC
nice looking kit bison. the weathering is exceptionally impressive.
Ideals are peaceful. History is violent.
Armed Forces Europe, United States
Joined: January 01, 2009
KitMaker: 1,036 posts
Armorama: 1,033 posts
Posted: Tuesday, June 14, 2011 - 08:51 AM UTC
I must agree the weathering looks very realistic ..... perfectly balanced.
Any additional gear or crew to go with it ?
Cheers
Christopher

" He who seeks to defend everything, defends nothing " Frederick the Great
Croatia Hrvatska
Joined: January 29, 2011
KitMaker: 977 posts
Armorama: 553 posts
Posted: Tuesday, June 14, 2011 - 08:54 AM UTC
Amazing work.
And done almost in two weekends.
Superb weathering,could you please describe how you did it?
Sincerely,Sven.

http://svenharjacekmodels.blogspot.com/

#284
Northern Ireland, United Kingdom
Joined: October 04, 2006
KitMaker: 3,094 posts
Armorama: 2,942 posts
Posted: Tuesday, June 14, 2011 - 08:57 AM UTC
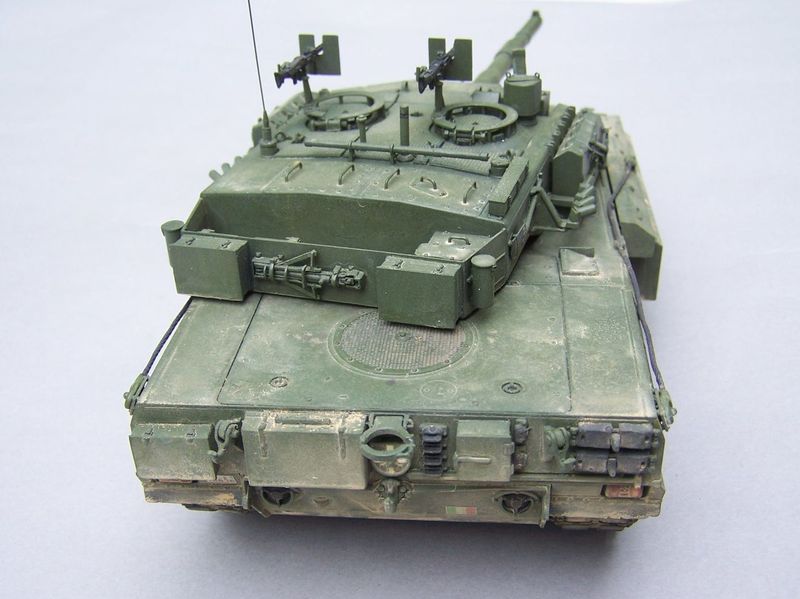
Oliver- nice build and good paint-job and weathering. My only comment was going to be that the rear of the turret looks a bit clean- that it needs a bit of dirt. But the pictures you've posted show you've got it spot-on.
On The Bench:
Ethiopian BMP-1 (Trumpeter 1/35)
AMX-13/75 (Takom 1/35)
Correze, France
Joined: June 10, 2004
KitMaker: 5,329 posts
Armorama: 5,204 posts
Posted: Tuesday, June 14, 2011 - 06:53 PM UTC
Hi all,
thanks for the kind comments.
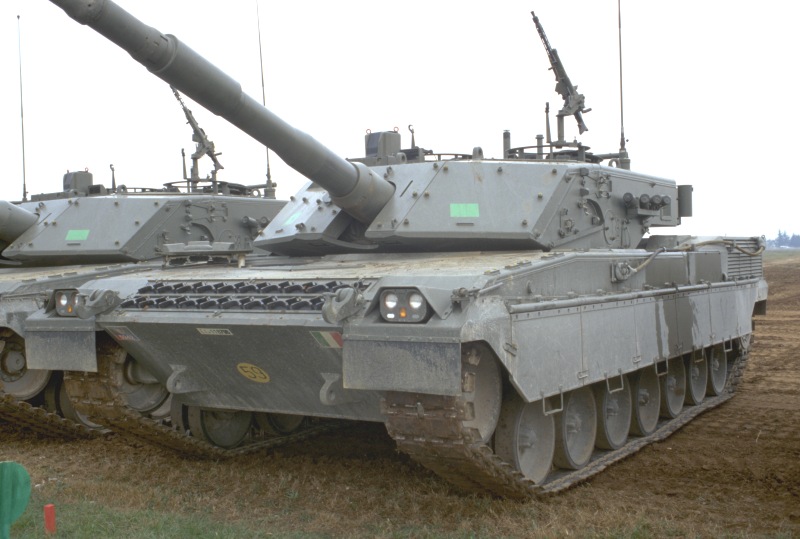
Mauro, your pictures are welcome. I browsed Ferreamole but didn't find them.
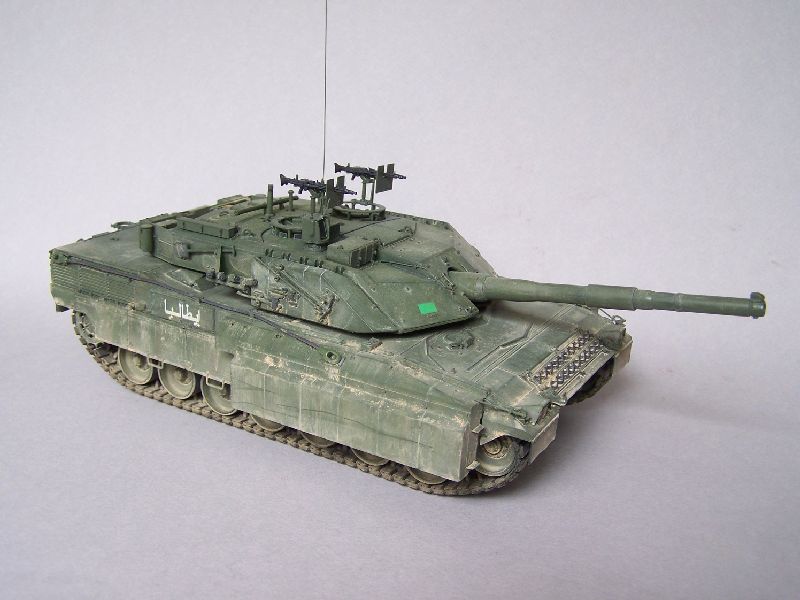
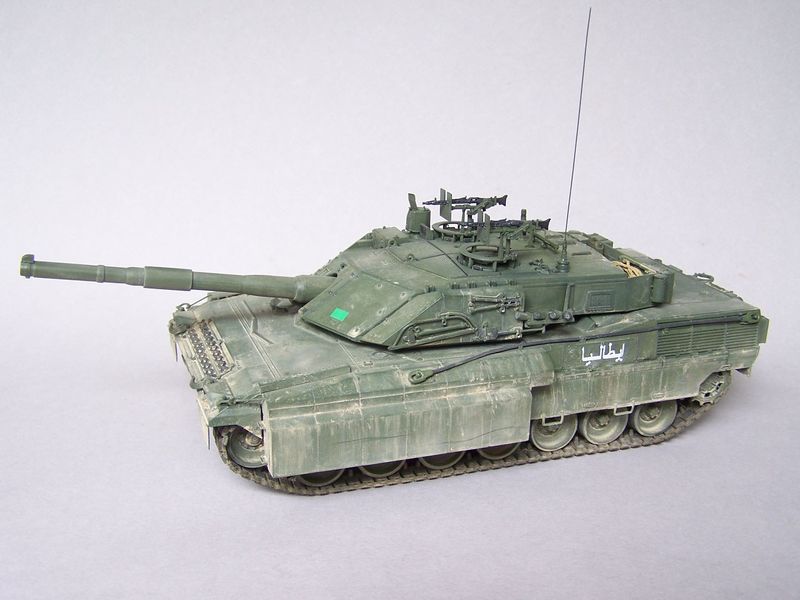
Sven, the weathering is done with my airbrush and two shades of Tamiya colors : Dark Yellow and Buff. I generally pour some drops of paint in my AB cup which is nearly filled of water. I lightly spray and let the tinted water dry before spraying a new coat and so on. Of course, I insist a bit more in the recesses and on the inwards angles where dust is supposed to gather.
Christopher, according to the pictures I have there is quite no crew gear outside the tank. But I think the bustle bin needs something to fill the large void. I'll make a large trap and add some extras like oil cans or/and a pack of bottles of water ...
Olivier
Visit my site Click the banner
"La reine des batailles, j'ai nommé l'infanterie"
Napoléon
Croatia Hrvatska
Joined: January 29, 2011
KitMaker: 977 posts
Armorama: 553 posts
Posted: Tuesday, June 14, 2011 - 07:17 PM UTC
Thank you very much for the explanation Mr.Oliver !
Sincerely,Sven
http://svenharjacekmodels.blogspot.com/
Auckland, New Zealand
Joined: June 01, 2011
KitMaker: 1,716 posts
Armorama: 1,638 posts
Posted: Thursday, June 16, 2011 - 11:11 PM UTC
Excellent Olivier ... nice soft weathering and not over done ..really looks like a vehicle which has spent alot of time in a area that hasn't rained much ,, love it mate

Phill
I know the voices ain't real but they do come up with some great ideas
Never trust a man who left alone with a tea cozy and doesn't try it on ( Billy Connolly )
Overkill is often very understated
Correze, France
Joined: June 10, 2004
KitMaker: 5,329 posts
Armorama: 5,204 posts
Posted: Friday, June 17, 2011 - 12:54 AM UTC
Thanks Phill.
I could have added some rain marks, you're quite right. I guess it's too late now if I don't want to mess it all.
Visit my site Click the banner
"La reine des batailles, j'ai nommé l'infanterie"
Napoléon
Correze, France
Joined: June 10, 2004
KitMaker: 5,329 posts
Armorama: 5,204 posts
Posted: Sunday, June 19, 2011 - 03:31 AM UTC
Hi all,
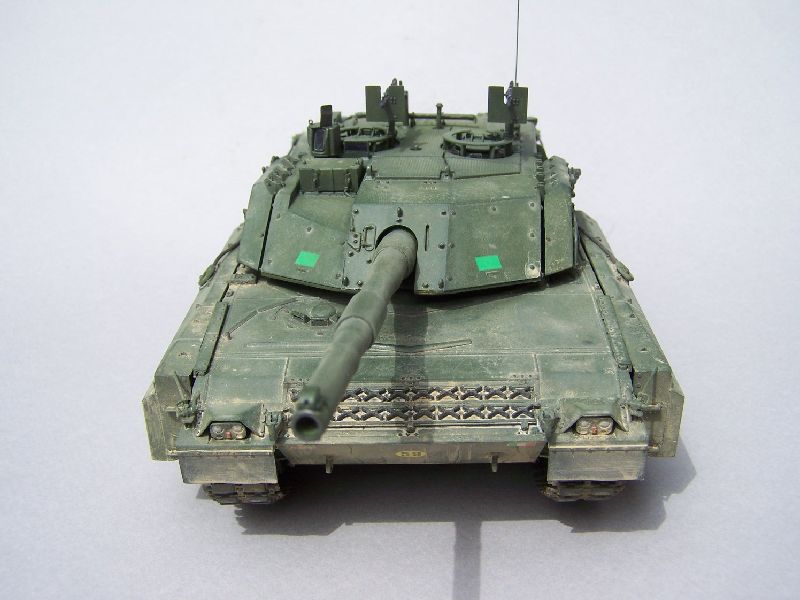
now I think I can consider it complete.
I added some stuff in the bustle bin and give the skirts a bit more dust.


A+
Olivier
Visit my site Click the banner
"La reine des batailles, j'ai nommé l'infanterie"
Napoléon
Texas, United States
Joined: June 29, 2010
KitMaker: 5,854 posts
Armorama: 4,817 posts
Posted: Sunday, June 19, 2011 - 04:00 AM UTC
All I can say in regards to the weathering is that it looks like you may want to add/emphasize the vertical streaking on the sides and lower areas based on the photos that Mauro posted. I agree with everyone's assessment that the weathering itself is perfectly balanced on your Ariete, a lot of modelers tend to overdo this type of sand weathering.
It also looks like you may want to add a bit of rust to the spare track links as well as to the ends of the tow cables. Again, this is simply going off of the photos that Mauro posted.
Does this kit come with the uparmor parts?
Correze, France
Joined: June 10, 2004
KitMaker: 5,329 posts
Armorama: 5,204 posts
Posted: Sunday, June 19, 2011 - 06:28 AM UTC
Thanks the input Jeremy.
Yes the kit comes with all you need to build an up-armored Ariete. You even have two options: the basic add-on armor package for the turret and side skirts and the additional armor package for the side skirts add-on armor.
This is the one I built.
Whatever version you want to build, the MG shields are too small. Maybe those coming with the Centauro kits are better dimensionnally wise.
Olivier
Visit my site Click the banner
"La reine des batailles, j'ai nommé l'infanterie"
Napoléon
Joined: July 27, 2006
KitMaker: 463 posts
Armorama: 450 posts
Posted: Sunday, June 19, 2011 - 07:04 AM UTC
Nice one!
the dust effects came out really good, no pigments or oils there??? IMO this is one of your best models so far

Cheers, Max

Texas, United States
Joined: June 29, 2010
KitMaker: 5,854 posts
Armorama: 4,817 posts
Posted: Sunday, June 19, 2011 - 08:27 AM UTC
Alright then, I'll keep a mental note of that. Once I shift more towards modern builds I'll probably pick one of these kits up and try my hand at it. I'll probably be building a Tamiya Leclerc first.
Also, I agree with Max's comment

Milano, Italy
Joined: July 13, 2010
KitMaker: 3,845 posts
Armorama: 3,543 posts
Posted: Sunday, June 19, 2011 - 08:43 AM UTC
Really well done Olivier, congrats!
In my opinion even an italian modeller wouldn't be able to do in a better way

...well in my opinion T-55 isn' t just a tank. Actually it is THE TANK...

#284
Northern Ireland, United Kingdom
Joined: October 04, 2006
KitMaker: 3,094 posts
Armorama: 2,942 posts
Posted: Sunday, June 19, 2011 - 09:06 AM UTC
Good stuff Olivier- weathering is really great and the items in the turret stowage basket finish things off nicely.
On The Bench:
Ethiopian BMP-1 (Trumpeter 1/35)
AMX-13/75 (Takom 1/35)
Correze, France
Joined: June 10, 2004
KitMaker: 5,329 posts
Armorama: 5,204 posts
Posted: Sunday, June 19, 2011 - 06:59 PM UTC
Thank you all for your comments and help.
Max, I only used a small amount of pigments on the side armor blocks. The rest of the tank was weathered using only sprayed tinted water, i.e. water with a few drops of Dark Yellow or Buff (Tamiya).
Olivier
Visit my site Click the banner
"La reine des batailles, j'ai nommé l'infanterie"
Napoléon
Bologna, Italy
Joined: October 05, 2006
KitMaker: 28 posts
Armorama: 22 posts
Posted: Tuesday, June 28, 2011 - 09:20 AM UTC
nice work, very realistic!!
I saw that you made the hole in the turret for mg (not present in the kit).
What his the size of hole?
What position did you do?
cheers
tambo
Correze, France
Joined: June 10, 2004
KitMaker: 5,329 posts
Armorama: 5,204 posts
Posted: Tuesday, June 28, 2011 - 06:33 PM UTC
Tambo,
thank you for the comment.
Concerning the MG slot, I used a 0.5mm drill but it looks a bit oversized. I don't have the measures for positioning the slot. I estimated it from the pictures in the Auriga book. I may be not perfectly accurate but I'm close to the real one

If you want, I can take some measures tonight on my model.
Olivier
Visit my site Click the banner
"La reine des batailles, j'ai nommé l'infanterie"
Napoléon
Bologna, Italy
Joined: October 05, 2006
KitMaker: 28 posts
Armorama: 22 posts
Posted: Tuesday, June 28, 2011 - 11:34 PM UTC
ciao Olivier, the result is very good.
please can give me the steps you used for the mg slot to imitate you.
thanks for the courtesy.
bye


tambo
Correze, France
Joined: June 10, 2004
KitMaker: 5,329 posts
Armorama: 5,204 posts
Posted: Wednesday, June 29, 2011 - 06:47 PM UTC
Hi Tambo,
measures are as follows :
from the top of the plate 6.5 mm
from the line of bolts inwards 4mm
slot length 8 mm
HTH
Olivier
Visit my site Click the banner
"La reine des batailles, j'ai nommé l'infanterie"
Napoléon
Bologna, Italy
Joined: October 05, 2006
KitMaker: 28 posts
Armorama: 22 posts
Posted: Thursday, June 30, 2011 - 01:18 AM UTC
Thanks for your explanation. Compliments again!


bye
tambo
Joel_W
 Associate Editor
New York, United States
Joined: December 04, 2010
KitMaker: 11,666 posts
Armorama: 1,143 posts
Posted: Thursday, June 30, 2011 - 11:00 AM UTC
Oliver, your weathering looks spot on and very realistic compared to the pictures posted.
On my Workbench:
Monogram 1/24 scale 427 Shelby Cobra
Just Completed:
Beemax 1/24 scale BMW M3 E30 1992 Evolution II
Correze, France
Joined: June 10, 2004
KitMaker: 5,329 posts
Armorama: 5,204 posts
Posted: Thursday, June 30, 2011 - 11:55 PM UTC
Thanks for the comment Joel

Visit my site Click the banner
"La reine des batailles, j'ai nommé l'infanterie"
Napoléon


