England - North West, United Kingdom
Joined: July 15, 2005
KitMaker: 195 posts
Armorama: 112 posts
Posted: Sunday, December 04, 2011 - 04:34 PM UTC
Hi,
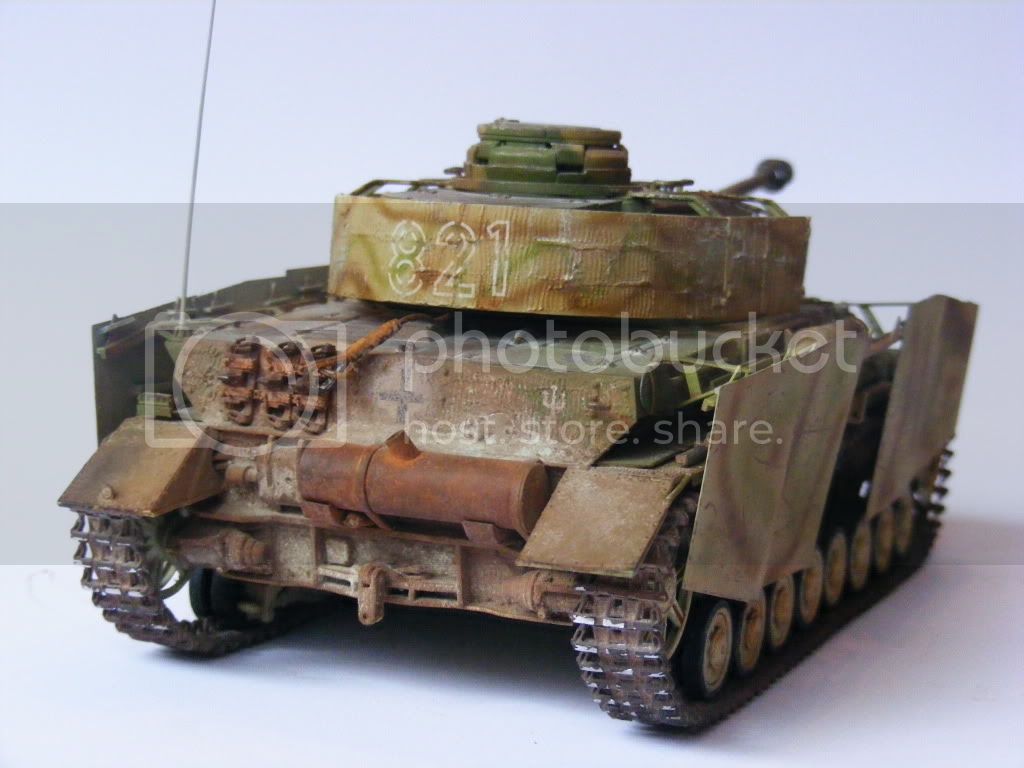
This is my first complete model I have posted on this forum. It is the DML Panzer IVH Sept-Nov kit. The model represents a November 1943 production belonging to 2nd Panzer Division in Normandy in 1944. There are several photos of the tank in Spielberger's Pzkfw IV and its Variants 1935-1945 book. I have only posted two pictures as it will be in a future issue of SMMI.


All comments welcome as they will help improve my modelling.
Thanks for looking
Toby
On the workbench:
Academy 1/32 F/A-18D
GWH 1/48 MiG-29B
Eduard 1/48 SU-27
Italeri 1/35 PT-596
Italeri 1/35 LCVP
Tiger Models 1/35 AMX-10 RCR
England - North West, United Kingdom
Joined: July 18, 2010
KitMaker: 611 posts
Armorama: 584 posts
Posted: Monday, December 05, 2011 - 12:20 AM UTC
looks very good toby! how did you achieve that rust on the muffler? everytime i try to rust something it looks awful

thanks stan

England - North West, United Kingdom
Joined: July 15, 2005
KitMaker: 195 posts
Armorama: 112 posts
Posted: Monday, December 05, 2011 - 01:35 AM UTC
Stan,
Thanks fr the comments. With regards to the rust on the muffler I painted it in dunkelgelb then used different MIG pigments (mud, dust, earth then different rust colours and black). I basically applied the rust colours in small measures to a small spot, changed the pigment colour and applied it to another spot. In the end I was quite happy with the mottled look. However, it was created more by luck than anything else. What I would do next time is paint and weather the muffler then add it to the model, as there was some spillage of the rust which was difficult to remove without changing the colours of the surrounding pigments. Next time I'm going to give the hairspary technique a try and see how that fares.
Cheers
Toby
On the workbench:
Academy 1/32 F/A-18D
GWH 1/48 MiG-29B
Eduard 1/48 SU-27
Italeri 1/35 PT-596
Italeri 1/35 LCVP
Tiger Models 1/35 AMX-10 RCR
England - North West, United Kingdom
Joined: July 18, 2010
KitMaker: 611 posts
Armorama: 584 posts
Posted: Monday, December 05, 2011 - 01:40 AM UTC
did you apply the pigments dry or did you use a fixer of some sorts?

England - North West, United Kingdom
Joined: July 15, 2005
KitMaker: 195 posts
Armorama: 112 posts
Posted: Monday, December 05, 2011 - 02:38 AM UTC
I applied the pixments dry as I didn't have any fixer at the time, but then gave it a very light spray of Vallejo Matt varnish to seal it in.
Toby
On the workbench:
Academy 1/32 F/A-18D
GWH 1/48 MiG-29B
Eduard 1/48 SU-27
Italeri 1/35 PT-596
Italeri 1/35 LCVP
Tiger Models 1/35 AMX-10 RCR
England - North West, United Kingdom
Joined: July 18, 2010
KitMaker: 611 posts
Armorama: 584 posts
Posted: Tuesday, December 06, 2011 - 08:31 PM UTC
thanks for letting me know toby


