_GOTOBOTTOM
Constructive Feedback
For in-progress or completed build photos. Give and get contructive feedback!
A tale of two King Tigers
centurionmkv
Visit this Community
California, United States
Joined: March 13, 2010
KitMaker: 67 posts
Armorama: 56 posts
Posted: Thursday, March 29, 2012 - 09:32 AM UTC
Hello Armorama,

This is the first time I am publicly posting my works in progress so please be gentle with me.

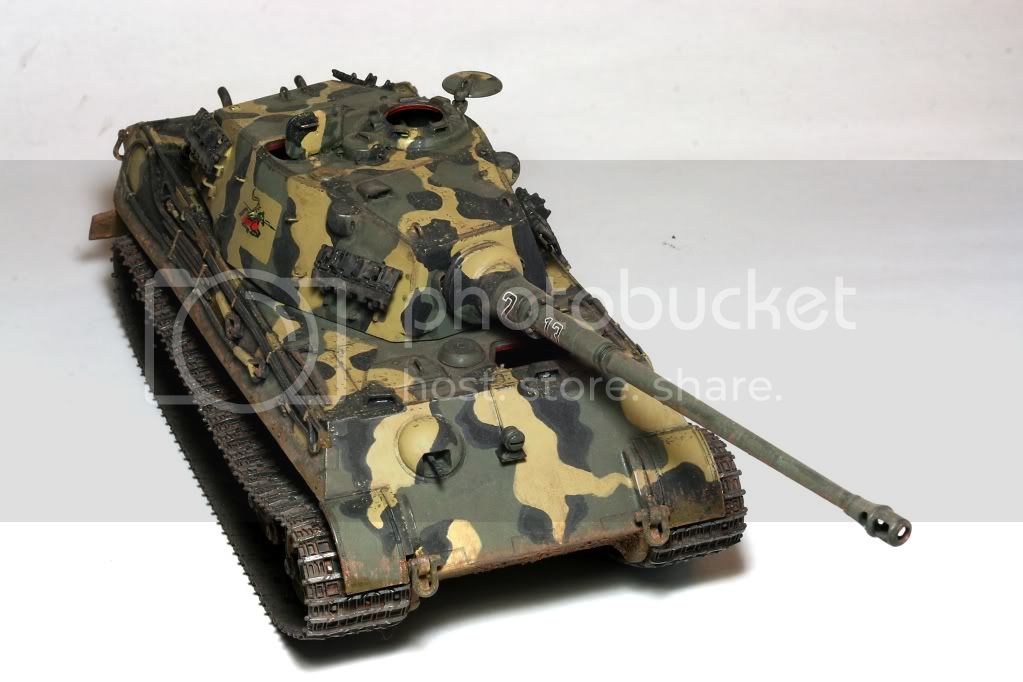
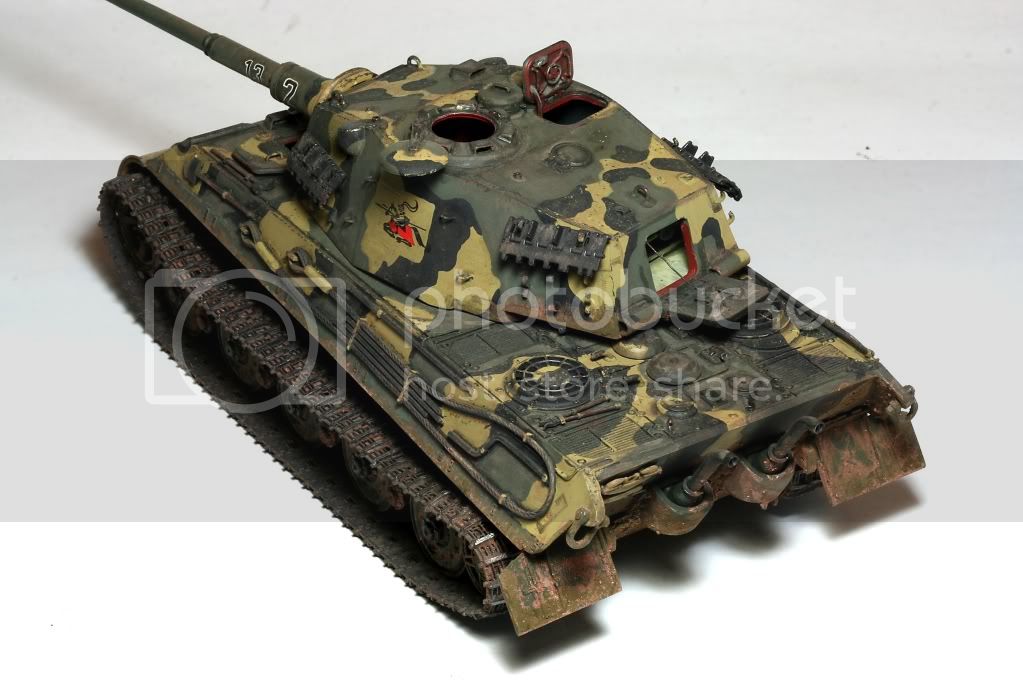
These are two very different King Tigers I built, one in mid-2011 and the other recently "completed" in March 2012. Both are not intended to be 100% accurate detail wise; rather they are intended as fun builds for me to learn painting and weathering techniques.

These are only the second and third 1:35 scale models I have built so far. I used to build 1:72 scale stuff.

Both models have been hand painted with a paint brush, no airbrush was used.

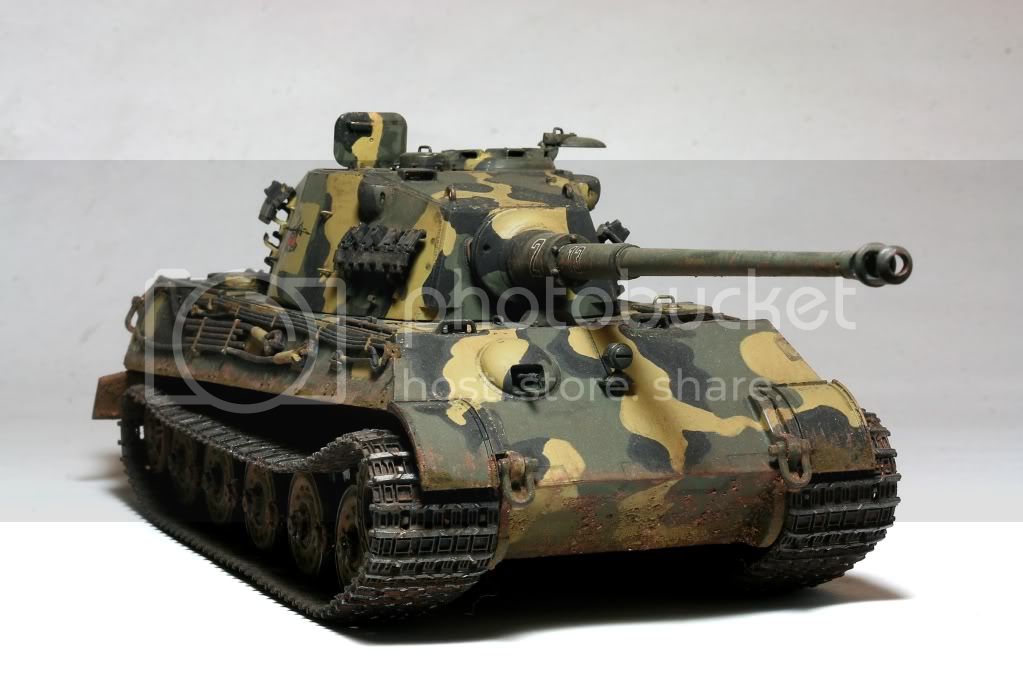
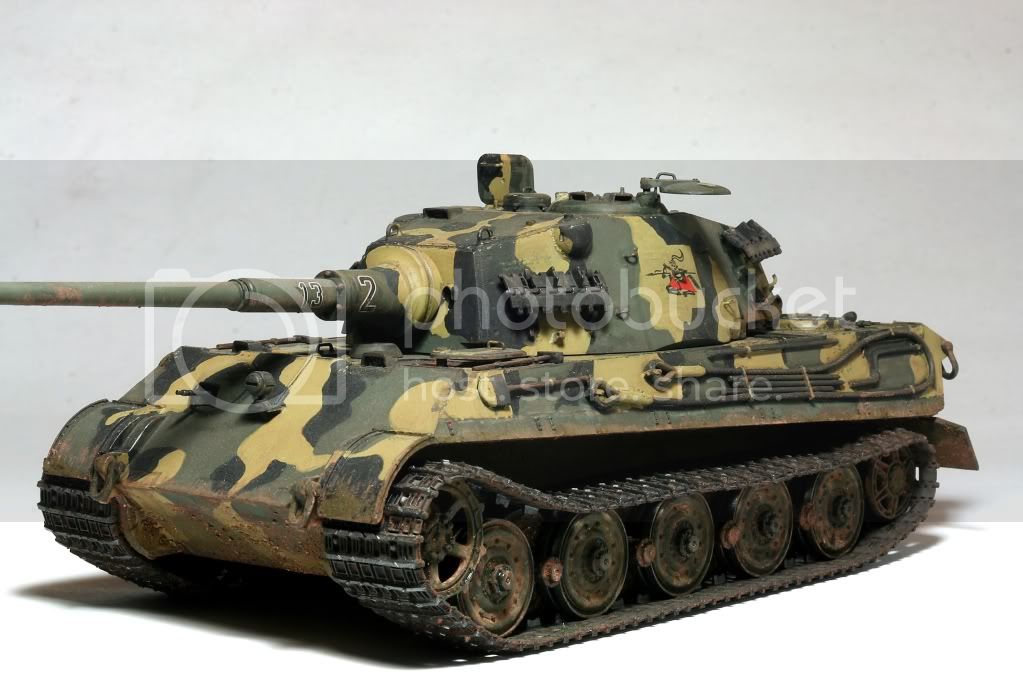
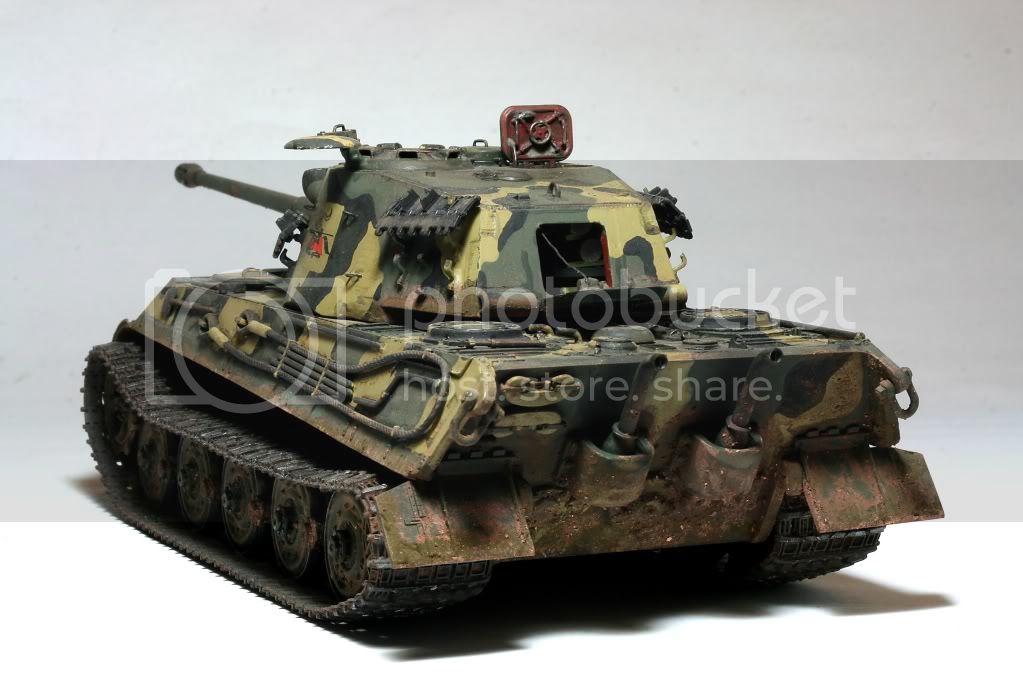
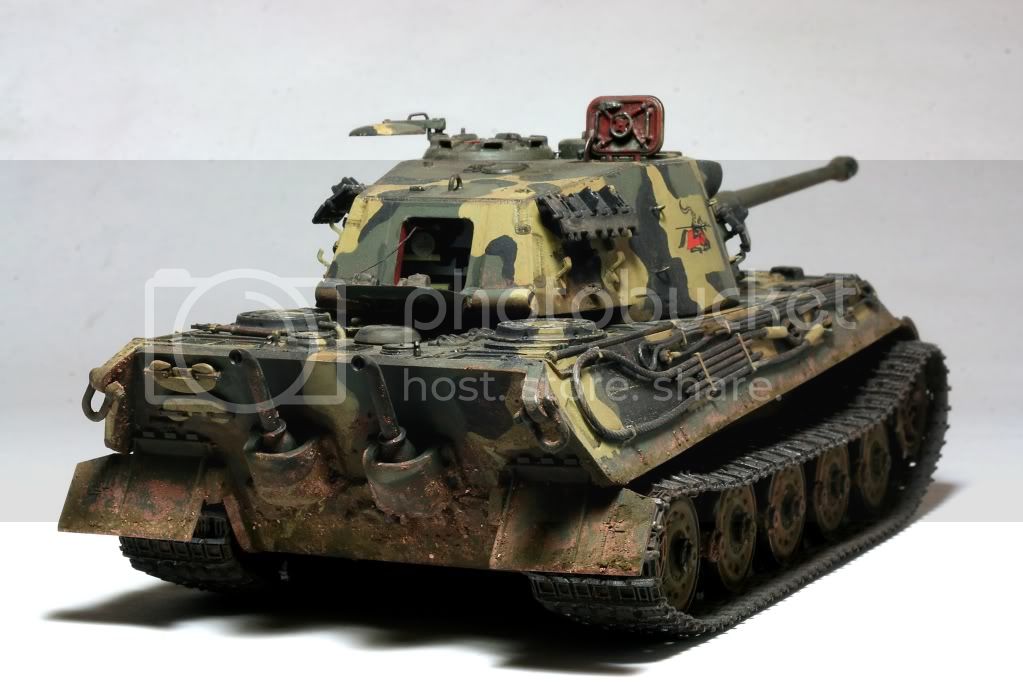
The first one is my take on the famous King Tiger Anneliese after the winter between 1944 and 1945. Since no photos exist of the vehicle without a coat of white wash, I took some artistic liberty on guessing what the paint scheme is underneath the winter camouflage.

My intention is to depict this vehicle after the German capitulation in Hungary, in either the fall of 1945 or spring of 1946. The tank was captured by the Soviets and used as a scrap yard trophy in a Hungarian Army base until it was scrapped late 1946.

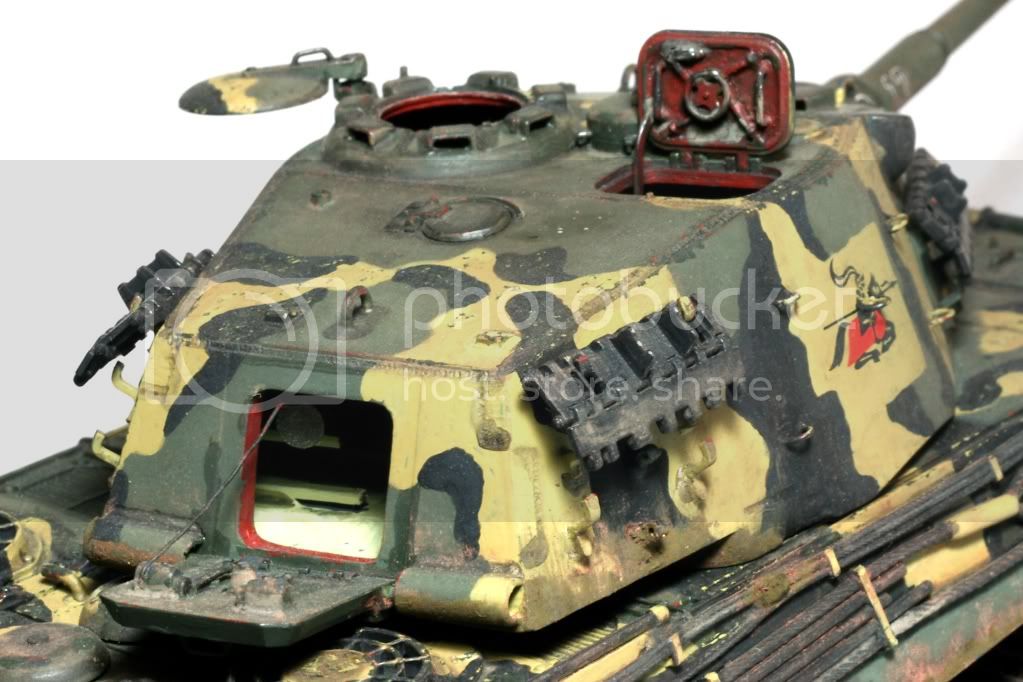
The hastily painted on winter white wash has worn off and the underlying paint and zimmerit was subject to abuse of curious onlookers scampering on and off the tank. So this is a hypothetical 1946 panzer.


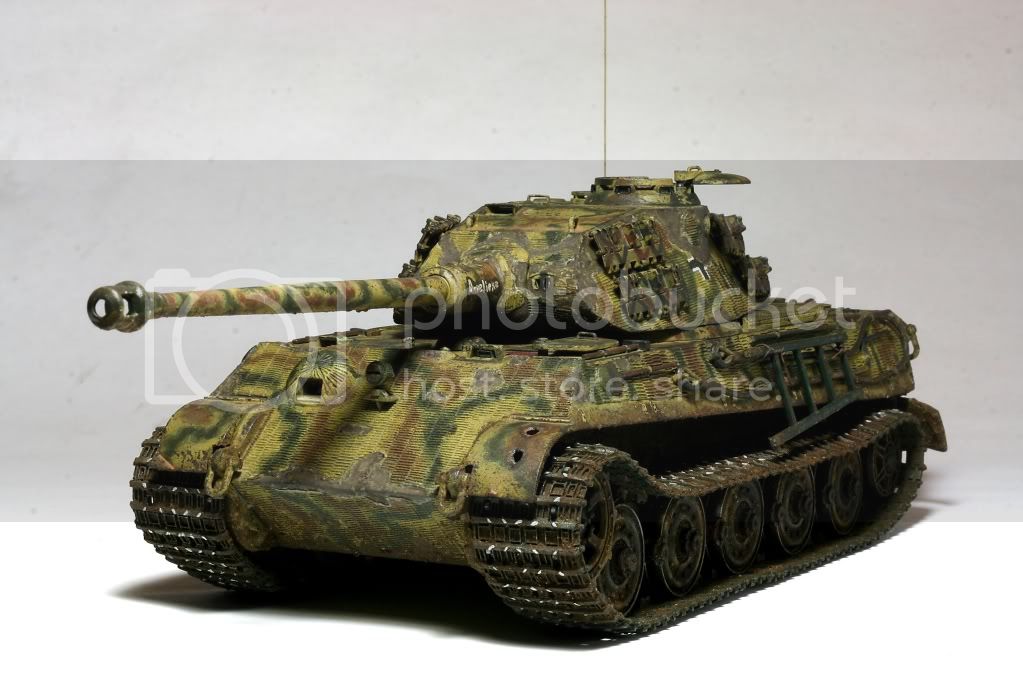
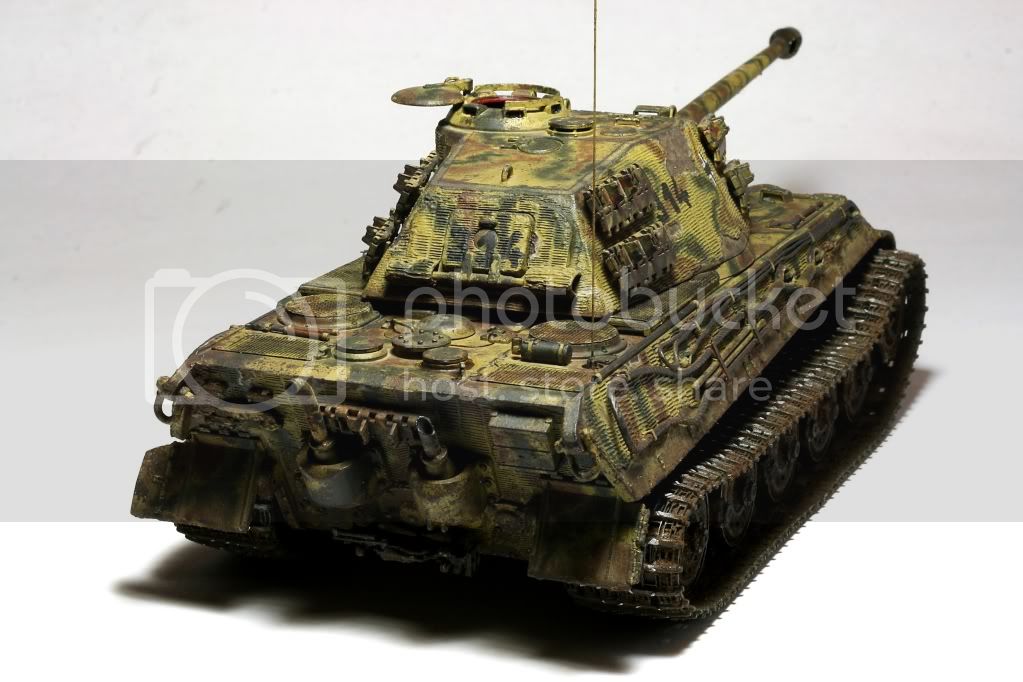

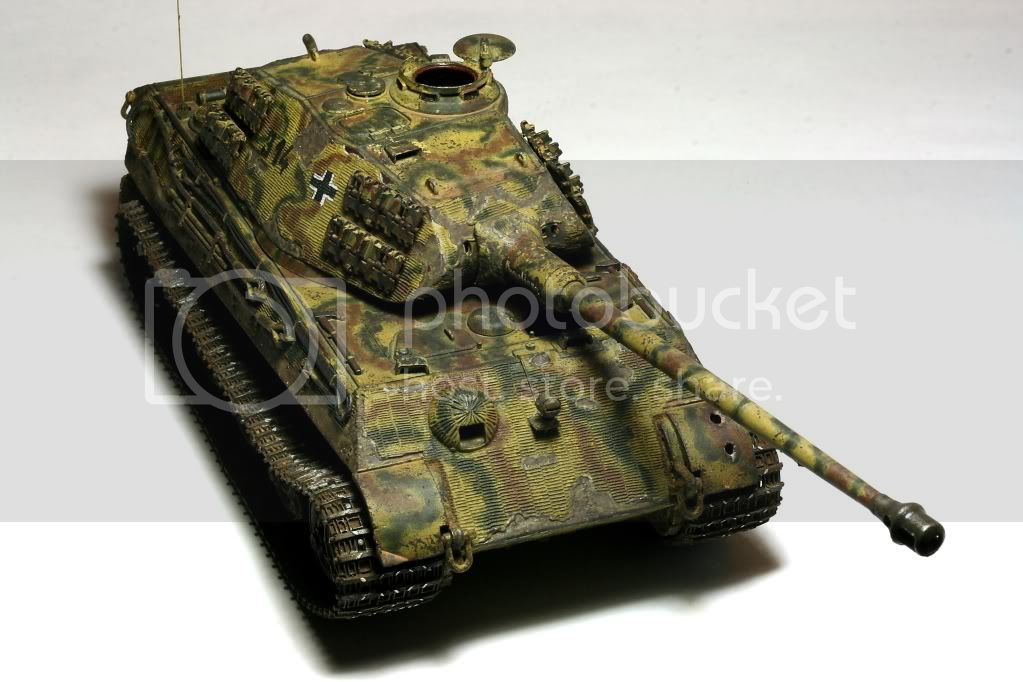
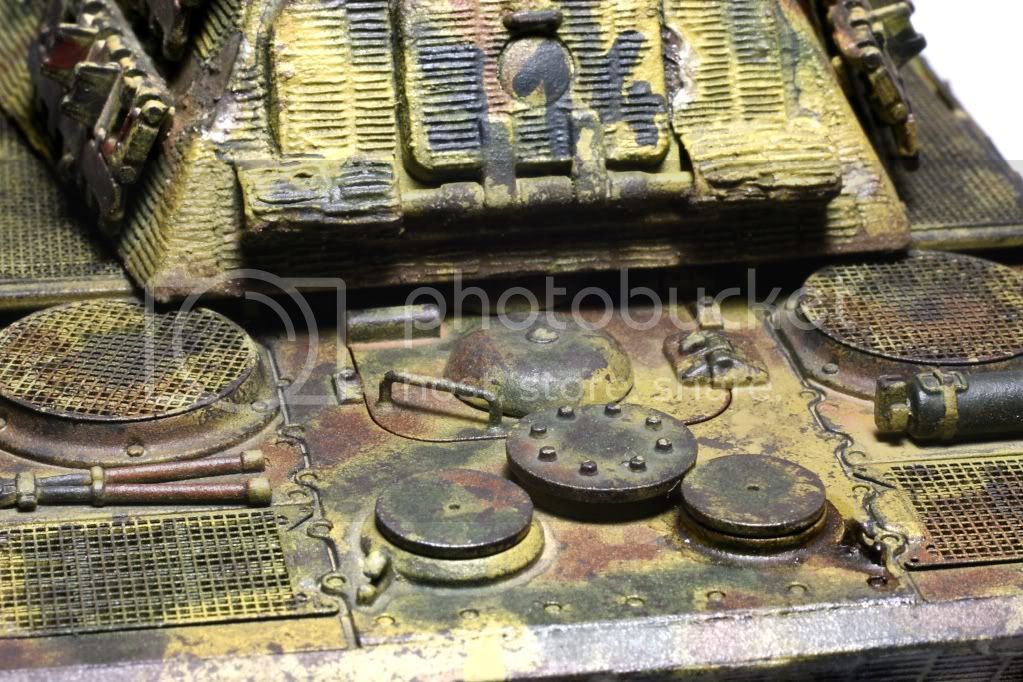
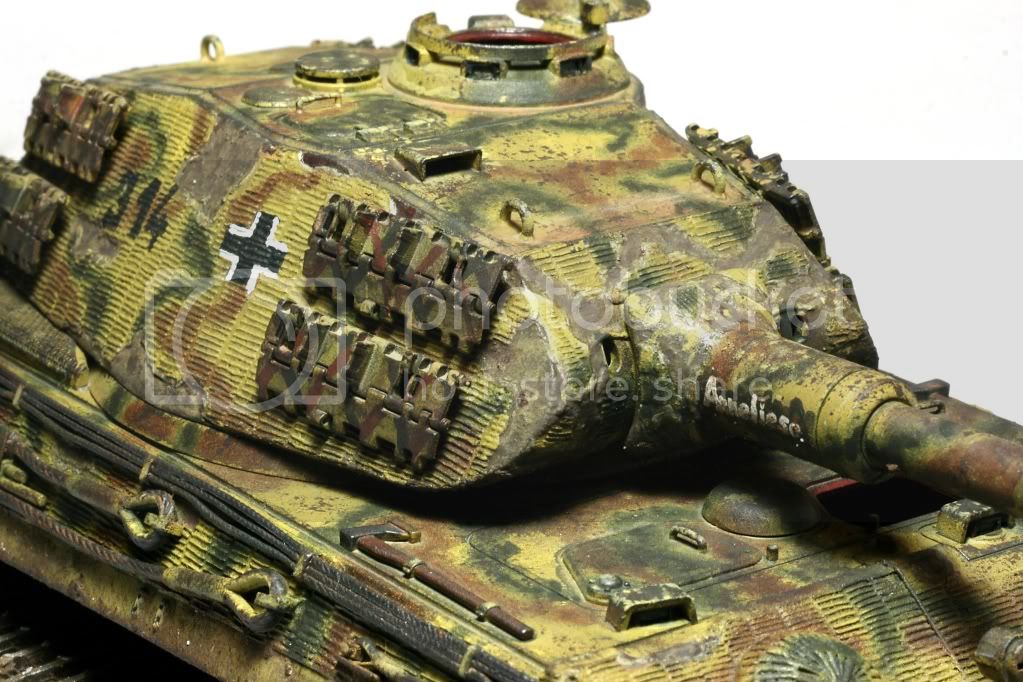
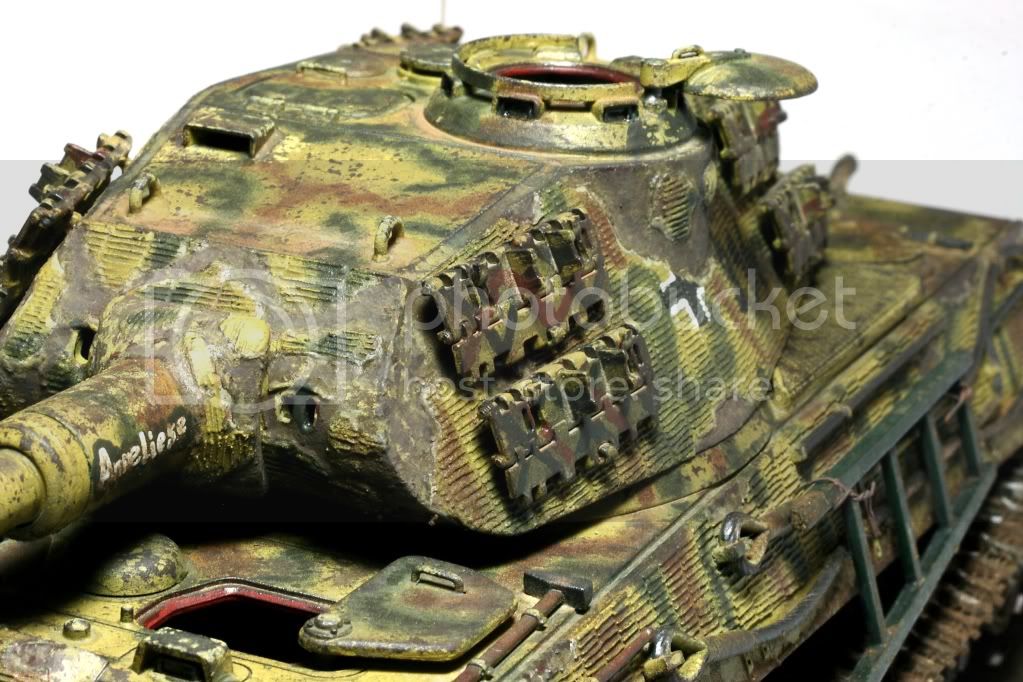


Again, this tank was fully hand painted using my experimental method of applying soft edged camouflage without an airbrush. This method was inspired by Brent Watterson's amazing Braille Scale hand painted wargaming pieces. I just tried doing it on a larger scale.

I will post more pictures of my other King Tiger later.


Thanks!
+Y.C.

centurionmkv
Visit this Community
California, United States
Joined: March 13, 2010
KitMaker: 67 posts
Armorama: 56 posts
Posted: Thursday, March 29, 2012 - 09:38 AM UTC
I forgot to mention, the zimmerit is from Verlinden's much hated PE chipped zimmerit set. It went on without problems, minor fit issues that were easily fixed with a cutter and sanding stick.

The base kit is Tamiya's Porsche King Tiger in 1:35 scale. The PE grills came from Tamiya's King Tiger etched grill set and from DML's Porsche King Tiger (to replace a set damaged during construction).

All markings except for "Anneliese" (on the gun barrel sleeve) are hand painted from masks cut out of Tamiya's decal sheet.

Everything else is out of the box. The towing cables were first cut into pieces, bent with needle nose pliers and then glued back in place to add slack to them.

Thanks!
+Y.C.
centurionmkv
Visit this Community
California, United States
Joined: March 13, 2010
KitMaker: 67 posts
Armorama: 56 posts
Posted: Thursday, March 29, 2012 - 10:28 AM UTC
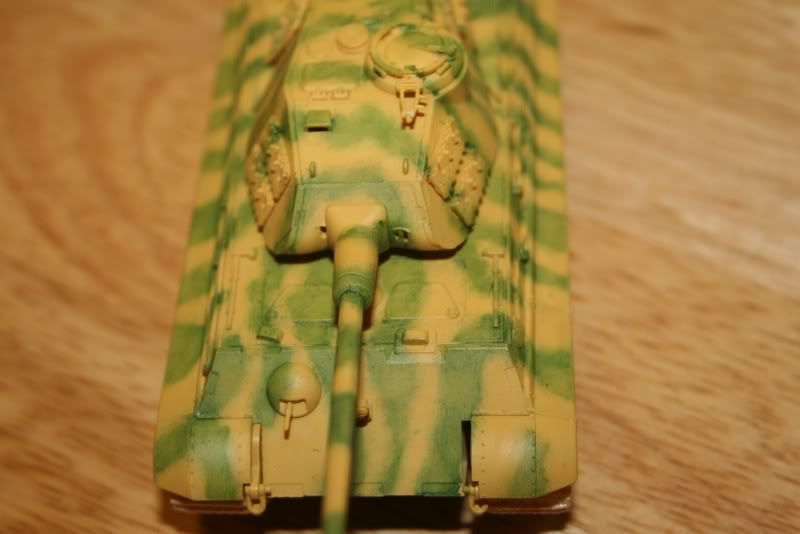
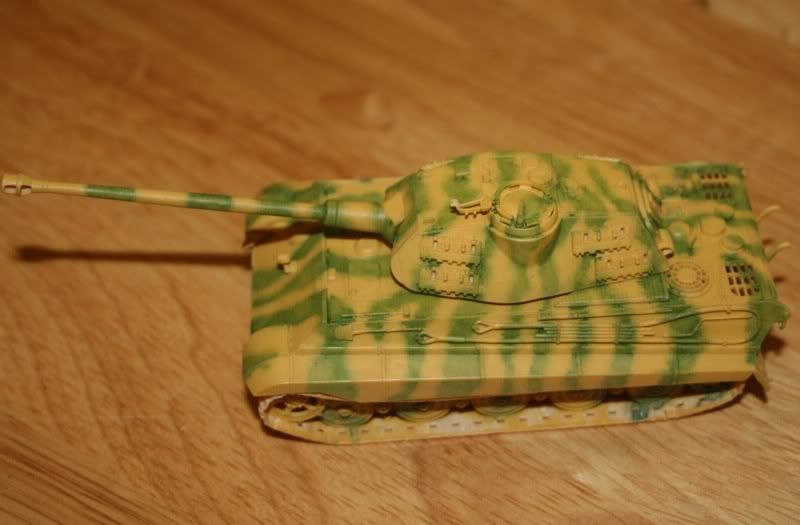
Here is my second King Tiger. I actually built this one first back in 2011. It was a CMD conversion of the Tamiya King Tiger (Henschel turret) kit. The CMD conversion is for a hypothetical July 1945 production version with the two range finder extensions on each side of the turret.

The paint scheme is again hand applied with a paint brush. This one was more difficult. The camouflage is not entirely hypothetical on a heavy tank, being based off Bovington's TOG 2's current museum scheme. I chose this one to make it look different and I thought it simply looked cool on a large vehicle.

Again, everything else is out of the box (with the exception of CMD's resin conversion). The tracks are not the single link type seen on late King Tigers simply because they came from the Tamiya donor kit. Because of this, the tracks on the turret are also the traditional King Tiger double link type and I hinged them to purposely show that they don't fit on the newer track hangers. These have been influenced by photos of welded on track links seen on Churchill Mk.IV tanks in NW Europe.


Thanks!
+Y.C.
centurionmkv
Visit this Community
California, United States
Joined: March 13, 2010
KitMaker: 67 posts
Armorama: 56 posts
Posted: Thursday, March 29, 2012 - 10:33 AM UTC
This is Bovington tank museum's TOG 2 that I based the paint scheme on:


Photo credit, Wikipedia.

Thanks!
+Y.C.
zontar
Visit this Community
Hawaii, United States
Joined: August 27, 2006
KitMaker: 1,646 posts
Armorama: 1,557 posts
Posted: Thursday, March 29, 2012 - 11:27 AM UTC
Y.C.: I think you've made the jump in scale quite readily. Very impressive work!! Thanks for sharing.

Happy Modeling, -zon
centurionmkv
Visit this Community
California, United States
Joined: March 13, 2010
KitMaker: 67 posts
Armorama: 56 posts
Posted: Thursday, March 29, 2012 - 12:57 PM UTC
Hi,

Thanks for the encouraging words. I am using these two models to experiment with camo and weathering in larger scales. So far so good. On the other hand, these are works in progress as I haven't added everything to them.

Cheers!
+Y.C.
GregCloseCombat
Visit this Community
California, United States
Joined: June 30, 2008
KitMaker: 2,408 posts
Armorama: 2,394 posts
Posted: Thursday, March 29, 2012 - 02:51 PM UTC
Welcome to Armorama, and your hand painted camo looks very well done overall. So what is Brett's tricks you used?
centurionmkv
Visit this Community
California, United States
Joined: March 13, 2010
KitMaker: 67 posts
Armorama: 56 posts
Posted: Thursday, March 29, 2012 - 03:44 PM UTC
Hi,

So, I have been following Brent's builds for a while now. He had a tutorial (which unfortunately seems to be lost to the World Wide Web) outlining the steps used to create soft edged camouflage using a paint brush.

Here is his Photobucket page showing a sample build with a 1:48 Skybow Tiger 1:

http://s207.photobucket.com/albums/bb113/House-of-Queeg/1-48th%20Models/

The basic trick is to stipple the camouflage colors using a stiff bristled "cut down" paint brush over the base coat. The paint on the brush needs to be thinned and dry brushed over a napkin before being applied to the model. You then stipple the edge of the camouflage colors with the base coat color using a paint brush to create the feathered effect. Repeat the process over and over until the desired result is achieved.

All I had were bottled paint, paint brushes and a rattle can containing the base coat. The spray can I used is for wargamers and the color may not be initially correct straight out of the can. I will fix this later with washes.

So my modification to his method is to stipple the camouflage color over the base coat as per his instructions. I then very lightly spray over the camouflage pattern with the rattle can (basically spraying more than a foot away from the model). This way, I have a wide spread of paint particles not concentrated on a certain area but will settle all over the vehicle.

I allow the random particles of base coat colored paint to settle on the camouflage colors. The random particles create a fine feathered effect on the camouflage paint patterns.

I next apply another layer of camouflage paint using a narrower paint brush within the boundaries of the feathered camouflage pattern and spray lightly over it again using the rattle can. This process is repeated until I have a gradient effect of the camouflage paint being feathered around the edges but being solid colored in the center.

To top it off, I apply unthinned camouflage paint in the center of the camouflage patterns using a very fine brush in random locations. This is to simulate where the center of the jet of paint from the spray gun contacting the vehicle when being painted in a 1:1 scale.

I am still refining this method and I really enjoy doing it. I think of it as a poor man's airbrush.

Of course, the camouflage for my July 1945 King Tiger is just simple hand applied solid coats of color. Nothing fancy there.

Again thanks for the comments!

Cheers,
+Y.C.
Trisaw
Visit this Community
California, United States
Joined: December 24, 2002
KitMaker: 4,105 posts
Armorama: 2,492 posts
Posted: Saturday, March 31, 2012 - 11:57 AM UTC
Y.C.,

Very nice handiwork indeed! Construction looks flawless and the paint scheme looks wonderful. Nice job!
Il_Colonnello
Visit this Community
Modena, Italy
Joined: March 08, 2012
KitMaker: 140 posts
Armorama: 140 posts
Posted: Sunday, April 01, 2012 - 12:57 AM UTC
Hello Yang, I have closely very much followed the examples of painting at brush that you suggested, who they are very interesting, ma ritengo che per avere una buona sfumatura di colore, è essenziale l'uso della aerografo, anche se molto semplice e poco costoso.
With this tool, in fact you can handle better the nuances, especially at the edges between different colors.
This is my opinion and it also the same of friends of our modelling group, with which I meet with they in the laboratory of our usual hobby store, whose owner is hosting us and also putting us his site available to us to show our models at the enthusiasts.
Also, remember what we call the '"Scale Effect", which is an aspect of painting that many modelers underestimate. In practice, more the model is smaller, much lighter the shades should be: in fact, you should always keep in mind how big is the smallest of our brushes if they relate to the scale of the model. The airbrush much diminished this problem, helping to overcome the effect.
Fortunately for us, the owner of the shop that entertains us, besides being a great modeller, he attended the "High School of Arts" and he is certificate as "Master of Art," so we can all learn from him and improve our techniques of painting.
Here is his interpretation of one of the s.SS.Pz.Abt. 505 King Tiger .
http://www.masterminiatures.it/gal/tiger-ii.php
The same thing, we can see in the interpretation of the King Tiger "Annelise", built by a friend of our group and painted after the advice of Gian Luca (though this time in winter plumage).
http://www.masterminiatures.it/gal/tiger2-porsche.php
As you can see, in both the nuances are reproduced very naturally.
Your works are really very good and throughout the web we found many artists who use this technique with outstanding results, but my friends and I prefer to follow the classical school.
However, two beautiful works.
With much esteem
Gianfranco
naimbrain
Visit this Community
United Kingdom
Joined: March 15, 2010
KitMaker: 123 posts
Armorama: 118 posts
Posted: Friday, May 04, 2012 - 03:03 AM UTC
Hi Y.C.

Very impressive work!

I'm particularly impressed and interested in your brushed soft edges, I'm working to try to master a similar technique. I've been applying oil paint with a small brush and then feathering it with a second completely dry stiff bristle brush, however I suspect that applying the paint using a stippling motion could improve this technique.
Here's a couple of photos of my latest attempts on a 1/72 Tiger II:


I've switched to oil paints because I find the much slower drying time allows for working and blending the paint with the second brush. I've also noticed on the Tiger II that thinly applied oil paint gives a slightly transparent finish, it almost looks faded as soon as it's applied. This is very different to the solid colour when using a similar technique with acrylic. It's probably easier to show this than describe it so below is the result of the same technique using acrylic:


I also find that the technique is harder to achieve a good finish when there's a strong contrast between colours. The effect below is solid acrylic camo with the white dividing line in oil. Any short-falls in technique really scream at this level of contrast:

A final word of warning if you want to try oil paints, they dry very slowly, you should allow at least a week before handling and a month before applying other oil based weathering effects (I found out the hard way with the jagdpanther, If you're interested you can follow the trials and tribulations of this project in the Matchbox Nostalgia campaign).

Hey, isn't it fun to discover someone else trying out similar techniques.

Regards,
John
centurionmkv
Visit this Community
California, United States
Joined: March 13, 2010
KitMaker: 67 posts
Armorama: 56 posts
Posted: Monday, May 07, 2012 - 05:17 AM UTC
John,

My apologies for the late reply, I only noticed your post now since this thread has been going cold for a while now.

I actually quite like your oil based method because it leaves behind a semi transparent layer. If creatively stippled onto a model, it can be used to simulate a sprayed-on feel to the paint job.

Originally, I built small scale (1/72) models and have tried the stipple method. On the other hand, on a 1/35 scale model, the effort needed to stipple consistently to get feathered edges is much too great for my skill level. Hence I figured out that you can use a spray can to leave particles of paint on the existing camo to get the feathered edge effect and then just fill in the center of the camo patterns with color.

I have also tried using oil based paints on a 1/48 King Tiger before as an experimental piece and it came out good but not entirely what I was expecting.

I may go back to a smaller scale to try your method out.

It is always good to experiment to achieve different effects using nothing but the humble paint brush!

Cheers!
+Y.C.
 _GOTOTOP