New Jersey, United States
Joined: October 10, 2012
KitMaker: 124 posts
Armorama: 102 posts
Posted: Sunday, January 13, 2013 - 01:12 AM UTC
Bill's First Law of Modelling: Dropped tiny parts will disappear into an alternate universe, and will re-appear many weeks later when you are searching for a different dropped tiny part. Corollary: You no longer need the part.
Arkansas, United States
Joined: June 29, 2009
KitMaker: 11,610 posts
Armorama: 7,843 posts
Posted: Sunday, January 13, 2013 - 01:15 AM UTC
Can't help you, without photos.
Ideals are peaceful. History is violent.
New Jersey, United States
Joined: October 10, 2012
KitMaker: 124 posts
Armorama: 102 posts
Posted: Sunday, January 13, 2013 - 01:25 AM UTC
yeah, i struggled a lot with the photos. Finally just pointed to flikr images. Any hints here would be appreciated also.
Bill's First Law of Modelling: Dropped tiny parts will disappear into an alternate universe, and will re-appear many weeks later when you are searching for a different dropped tiny part. Corollary: You no longer need the part.
California, United States
Joined: August 10, 2012
KitMaker: 1,510 posts
Armorama: 1,443 posts
Posted: Sunday, January 13, 2013 - 01:37 AM UTC
Bill, amazing work. Welcome back to the hobby.

As for photos, I use Photobucket. After you've got it uploaded (Photobucket has a fairly large 'UPLOAD' icon so it shouldn't be an issue finding it) you want to copy the IMG/image code. Then simply paste that in the reply box.
Also have no idea what you mean about it looking 'toyish'. Hope to see more of your work on here.
What cheek! Let them have it!
Arkansas, United States
Joined: June 29, 2009
KitMaker: 11,610 posts
Armorama: 7,843 posts
Posted: Sunday, January 13, 2013 - 01:53 AM UTC
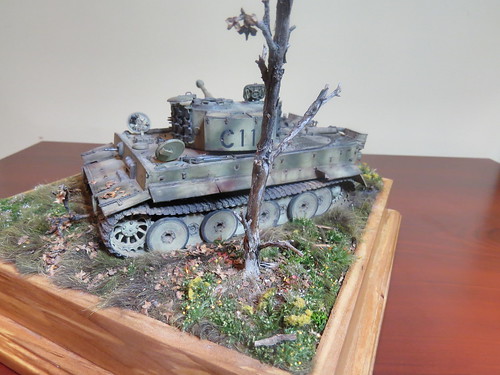
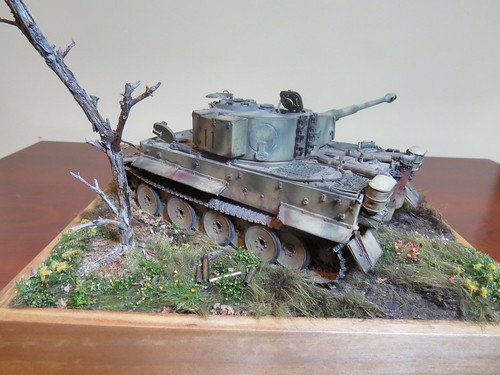
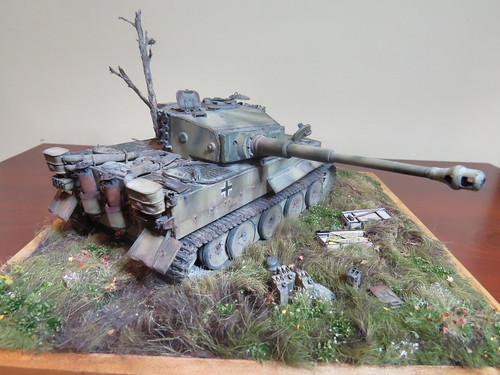
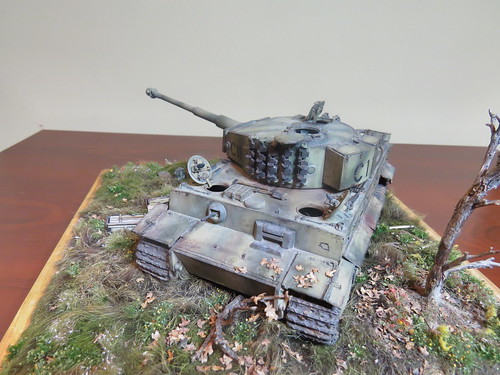
Well done. I have two observations. If you are going to leave the tank unbuttoned, you will need either an interior or figures to position in the hatches. The second, and this may just be personal preference, is to spray the end of the barrel with a little exhaust. I use MM enamel exhaust. I have also had to mix my own using MM burnt metal and burnt iron. This is assuming that the tank has seen combat. The tree is a nice addition, but it looks more like a stick. There just aren't enough branches to look realistic. The rest of the ground work is quite good. What's the story with the crates and tools? They look out of place, without a back story.
Ideals are peaceful. History is violent.
Kentucky, United States
Joined: May 27, 2007
KitMaker: 327 posts
Armorama: 259 posts
Posted: Sunday, January 13, 2013 - 02:25 AM UTC
Bill OUTSTANDING DIO. Dont change a thing and welcome back

Møre og Romsdal, Norway
Joined: December 03, 2012
KitMaker: 300 posts
Armorama: 285 posts
Posted: Sunday, January 13, 2013 - 03:26 AM UTC
Quoted Text
Well done. I have two observations. If you are going to leave the tank unbuttoned, you will need either an interior or figures to position in the hatches. The second, and this may just be personal preference, is to spray the end of the barrel with a little exhaust. I use MM enamel exhaust. I have also had to mix my own using MM burnt metal and burnt iron. This is assuming that the tank has seen combat. The tree is a nice addition, but it looks more like a stick. There just aren't enough branches to look realistic. The rest of the ground work is quite good. What's the story with the crates and tools? They look out of place, without a back story.
I have to disagree with you on the tree. It looks pretty good for a long dead tree.
Very nice dio, Bill!
Colorado, United States
Joined: February 10, 2008
KitMaker: 730 posts
Armorama: 616 posts
Posted: Sunday, January 13, 2013 - 04:15 AM UTC
Hi Bill, welcome back and your beast is looking good!
Mid production Tiger I-s are my favorites!
Good luck


New Jersey, United States
Joined: October 10, 2012
KitMaker: 124 posts
Armorama: 102 posts
Posted: Sunday, January 13, 2013 - 07:13 AM UTC
Yes, the story on the "stuff" on the groud: crates are ammo boxes, and not sure if you can see the open one has 3 shells with a tarp thrown over. The other stuff is, well, just stuff for me to play with. If there's a story, it's a tank at rest during it's last days. The tree is meant to be a destroyed tree, the leaves are all "dead" i.e. not autmun colors. The autumn colors you do see, that's ground cover stuff. Good point about the blackening of the end of the barrel, I'd love to have a dialog here about that. Out of "sense" i originally did that, then changed it to a chipped apprearance when I couldnt find one single picture showing a german tank barrel showing what I would expect, some burnt paint from use. Any comments/thoughts on this?
Bill's First Law of Modelling: Dropped tiny parts will disappear into an alternate universe, and will re-appear many weeks later when you are searching for a different dropped tiny part. Corollary: You no longer need the part.
New Jersey, United States
Joined: October 10, 2012
KitMaker: 124 posts
Armorama: 102 posts
Posted: Sunday, January 13, 2013 - 07:19 AM UTC
Thanks all for the kind words! I must say it was pure fun getting back into the hobby, even working with PE is relaxing compared to work.

I will try out the photobucket method, I really didnt enjoy using flikr. I am surprised at the feedback being so positive, what I meant by "toyish" is that the pics just dont seem to reproduce the model very well and when I see some of the other pics on this sight I felt mine were not up to par. Probably just being overly self critical but that's part of the hobby as well. So long as you enjoy the effort!
I am no working on a US M2 Halftrack and will post that in the AFV section since its in progress. Again, thanks to all for the encouragement and kind words. I love this site, if something like this existed 30 years ago I likely would have stayed with it.
Bill
Bill's First Law of Modelling: Dropped tiny parts will disappear into an alternate universe, and will re-appear many weeks later when you are searching for a different dropped tiny part. Corollary: You no longer need the part.
New Zealand
Joined: March 25, 2009
KitMaker: 152 posts
Armorama: 119 posts
Posted: Sunday, January 13, 2013 - 07:54 AM UTC
Wow! For someone that hasn't built a model in over thirty years that's really really awesome work there Bill! Hope to see more of your builds in the coming months dude and congrats!

Varese, Italy
Joined: January 06, 2013
KitMaker: 2 posts
Armorama: 2 posts
Posted: Sunday, January 13, 2013 - 08:36 AM UTC
Very beautifull diorama, in particular the terrain!
Nevada, United States
Joined: December 21, 2008
KitMaker: 1,109 posts
Armorama: 1,095 posts
Posted: Sunday, January 13, 2013 - 12:16 PM UTC
Looks pretty good the way it is. I like the tree. Figures give a sense of scale and lend context to the scene.
As far as blackening the barrel is concerned, don't. It didn't happen in real life, at least not like some portray. It is easy to overdo and then looks stupid.
G
Lasci la pistola. Porti le cannoli.
California, United States
Joined: August 10, 2012
KitMaker: 1,510 posts
Armorama: 1,443 posts
Posted: Sunday, January 13, 2013 - 12:27 PM UTC
Quoted Text
Quoted Text
Well done. I have two observations. If you are going to leave the tank unbuttoned, you will need either an interior or figures to position in the hatches. The second, and this may just be personal preference, is to spray the end of the barrel with a little exhaust. I use MM enamel exhaust. I have also had to mix my own using MM burnt metal and burnt iron. This is assuming that the tank has seen combat. The tree is a nice addition, but it looks more like a stick. There just aren't enough branches to look realistic. The rest of the ground work is quite good. What's the story with the crates and tools? They look out of place, without a back story.
I have to disagree with you on the tree. It looks pretty good for a long dead tree.
Very nice dio, Bill!
Agreed.

Your twig-tree looks very old and dead.
Bill I understand what you mean about the photos. Don't sweat it, I've seen many, many modeling blogs where the owner doesn't even bother to have a clean background for their photos. Usually they just set things on the carpet or a counter. And since this is your first build since the seventies, I doubt anyone will blame your for not having a photo booth of any kind.
What cheek! Let them have it!
South Carolina, United States
Joined: July 12, 2012
KitMaker: 72 posts
Armorama: 70 posts
Posted: Wednesday, January 16, 2013 - 02:33 PM UTC
For the photography try to get some close ups from various angles. Also,try to improve the lighting I use a desk lamp but I position it to change the intensity and the angle on which the light hits the subject. That could eliminate the "Toy-ish" look you are having problems with. Nice build by the way. Hope this helps.
AMPS Central SC
AMPS #2904
New York, United States
Joined: January 13, 2013
KitMaker: 10 posts
Armorama: 7 posts
Posted: Wednesday, January 16, 2013 - 03:00 PM UTC
Nice tiger,and great job after a lay off.

#003
Donegal, Ireland
Joined: May 14, 2002
KitMaker: 9,763 posts
Armorama: 7,444 posts
Posted: Friday, January 18, 2013 - 05:09 AM UTC
Welcome back Bill. Very nice model and ground work. I also think its great you took time to make a professional looking base and plate. All it needs now is figures!!

IPMS Stockholm
"The problem with common sense, is that it is not that common"
Metro Manila, Philippines
Joined: December 25, 2012
KitMaker: 34 posts
Armorama: 29 posts
Posted: Saturday, January 26, 2013 - 06:34 PM UTC
Hello. Amazing work! I'd like to ask where do people get the wooden bases like this? my LHS don't sell any.
California, United States
Joined: August 10, 2012
KitMaker: 1,510 posts
Armorama: 1,443 posts
Posted: Saturday, January 26, 2013 - 06:57 PM UTC
Quoted Text
Hello. Amazing work! I'd like to ask where do people get the wooden bases like this? my LHS don't sell any.
You'll have to change a few things to suit your needs/diorama of course but there's a pretty basic outline.
What cheek! Let them have it!
Ohio, United States
Joined: February 28, 2007
KitMaker: 392 posts
Armorama: 198 posts
Posted: Monday, January 28, 2013 - 04:42 PM UTC
This is awesome work. The absurdity of war is epitomized by the living character of the various facets of ground vegetation all which seems to waver and coalesce quite mysteriously...I mean, with this flush and the iron hulk with wooden accessories amidst it, the whole scene becomes dubious and evocative. This is good. The pinnacle is the sparse tree. It is a symbolic stand-in for the human character. Ordinarily, I yearn to see the human character with a model. In this case it would detract from the vacuous character which everything else works to achieve here. Heavy armor like this, again, exist to bring vacuity and absurdity into being.
Texas, United States
Joined: June 12, 2007
KitMaker: 1,866 posts
Armorama: 1,696 posts
Posted: Tuesday, January 29, 2013 - 06:37 AM UTC
Ditto.
Actually, I'd have to say that's a pretty spectacular comeback.
British Columbia, Canada
Joined: November 09, 2012
KitMaker: 48 posts
Armorama: 42 posts
Posted: Tuesday, January 29, 2013 - 07:21 AM UTC
You havent done a build since the 70s, and you do one now of this quality!? You my friend, simply put, have talent! Excellent model.

New Jersey, United States
Joined: October 10, 2012
KitMaker: 124 posts
Armorama: 102 posts
Posted: Sunday, February 10, 2013 - 02:20 PM UTC
Thanks everyone for the kind words and encouragement. I've been recouping from surgery but am a good way into a new project of an M2A1 Halftrack posted in the AFV forum.
The base was made by:
Reiff Craft Works
http://www.reiffcraftworks.com/Professional quality and they are great to work with!
Bill's First Law of Modelling: Dropped tiny parts will disappear into an alternate universe, and will re-appear many weeks later when you are searching for a different dropped tiny part. Corollary: You no longer need the part.


 Your twig-tree looks very old and dead.


