Just started getting back into modeling after a long time off.
Still feel that I have a lot to learn but am happy over all on how this one turned out.
Only problems I had with the model was the back fenders did fit well and the tank tracks were tough to get on.
The tools I used were the start paints that came with the kit and some krylon matte finish.
Any feedback on what I might do better next time will be appreciated.
Constructive Feedback
For in-progress or completed build photos. Give and get contructive feedback!
Hosted by Darren Baker, Dave O'Meara
Airfix 1/76 Cromwell feedback
Cbacon84
California, United States
Joined: October 10, 2012
KitMaker: 204 posts
Armorama: 45 posts
Joined: October 10, 2012
KitMaker: 204 posts
Armorama: 45 posts
Posted: Thursday, February 14, 2013 - 02:56 PM UTC
retiredyank
Arkansas, United States
Joined: June 29, 2009
KitMaker: 11,610 posts
Armorama: 7,843 posts
Joined: June 29, 2009
KitMaker: 11,610 posts
Armorama: 7,843 posts
Posted: Thursday, February 14, 2013 - 04:31 PM UTC
The finish should be flat. Have to say, the tracks are pitiful. Not due to you; it's just Airfix. I see some black on some of the road wheels. This is a big no no. You should back off on the pin wash, for this scale. The markings look good. No silvering, to be found.
Cbacon84
California, United States
Joined: October 10, 2012
KitMaker: 204 posts
Armorama: 45 posts
Joined: October 10, 2012
KitMaker: 204 posts
Armorama: 45 posts
Posted: Thursday, February 14, 2013 - 07:39 PM UTC
well like I said still got a lot to learn.
any tips on what on what might be done to blend the touch up spots to give it a more flat appearance?
also whats the reason for doing less pin wash on this scale?
as for the wheels ya that was the one area that i wasn't entirely happy about even painting with a 0000 brush still had trouble.
At least i got the markings on right
lespauljames
England - South West, United Kingdom
Joined: January 06, 2007
KitMaker: 3,661 posts
Armorama: 2,764 posts
Joined: January 06, 2007
KitMaker: 3,661 posts
Armorama: 2,764 posts
Posted: Friday, February 15, 2013 - 12:37 AM UTC
Hello Casey,
first off, welcome back to the hobby, I pop in and out of it from time to time when finances allow!
your construction looks great for what you had to work with, the airfix 1.76 are old kits,
decals are great, no silvering perfect.
the tracks are fine, but in the future, consider using a dark grey, or light grey/brown, or even the bog standard black lightly dry brushed with a metallic. you would rarely see such a birght silver on tracks unless it is on a point of contact that has been worn against a tarmac road for example.
good effort on the wash, its always a tricky one to do, and you have the basics down well, so all you can do is practice and work on your techniques, black however is sometimes too harsh a colour for a wash, perhaps next time try a dark brown, like burnt umber, mixed with a small amount of black.
dont stop using black washes entirely, in the right context they can look fantastic.
A tip for your wheels is to use thin paint, and build up the layers. its all in the practice though.
hope that helps.
James
retiredyank
Arkansas, United States
Joined: June 29, 2009
KitMaker: 11,610 posts
Armorama: 7,843 posts
Joined: June 29, 2009
KitMaker: 11,610 posts
Armorama: 7,843 posts
Posted: Friday, February 15, 2013 - 01:14 AM UTC
James nailed it. Practice, practice, practice. The reason I like 1:35 models, is that they are easier to weather. At 1:72 or, in your case 1:76, the weathering will not be readily apparent. You have to think in perspective. The vehicle would be very far away. And, any weathering would be more of a very, very faint color distortion.
Joel_W
Associate Editor
New York, United States
Joined: December 04, 2010
KitMaker: 11,666 posts
Armorama: 1,143 posts
Joined: December 04, 2010
KitMaker: 11,666 posts
Armorama: 1,143 posts
Posted: Friday, February 15, 2013 - 02:19 AM UTC
Welcome back to our hobby.
As others have said, in 1/72-76 scale, I would certainly not apply a black pin wash, as it just looks too out of scale, and jumps right out at the viewer. If anything, I would have used the same basic color and just darken it up some with a little black. A earth tone filter would have helped, and a lighter earth tone wash on the top surfaces just for a hint of fading. I always like to finish my weathering with a very diluted dust filter to help blend all the colors together. Finally, seal with a good quality clear flat finish.
James already gave you some solid advice on the tracks, which would have helped to tone down the appearance.
Joel
Cbacon84
California, United States
Joined: October 10, 2012
KitMaker: 204 posts
Armorama: 45 posts
Joined: October 10, 2012
KitMaker: 204 posts
Armorama: 45 posts
Posted: Friday, February 15, 2013 - 09:25 AM UTC
Thank you Matt, James, and Joel for the tips I will apply them to the next model I do.
I agree with you Matt on on the 1:35 as my favorite scale
Mainly doing the 1:76 right now as it lets me practice and experiment without me feeling that I messed up a more expensive kit or breaking the bank when I buy a new one
I agree with you Matt on on the 1:35 as my favorite scale
Mainly doing the 1:76 right now as it lets me practice and experiment without me feeling that I messed up a more expensive kit or breaking the bank when I buy a new one
imatanker
Maine, United States
Joined: February 11, 2011
KitMaker: 1,654 posts
Armorama: 1,565 posts
Joined: February 11, 2011
KitMaker: 1,654 posts
Armorama: 1,565 posts
Posted: Friday, February 15, 2013 - 11:49 AM UTC
Quoted Text
Thank you Matt, James, and Joel for the tips I will apply them to the next model I do.
I agree with you Matt on on the 1:35 as my favorite scale
Mainly doing the 1:76 right now as it lets me practice and experiment without me feeling that I messed up a more expensive kit or breaking the bank when I buy a new one
Casey...Don't be scared of small scale stuff.It is different to work with,but it can be very rewarding.Plus you can build 2-3 kits for about the same price of a 1/35 kit.
I think they can be weathered well,it just takes some getting used to.
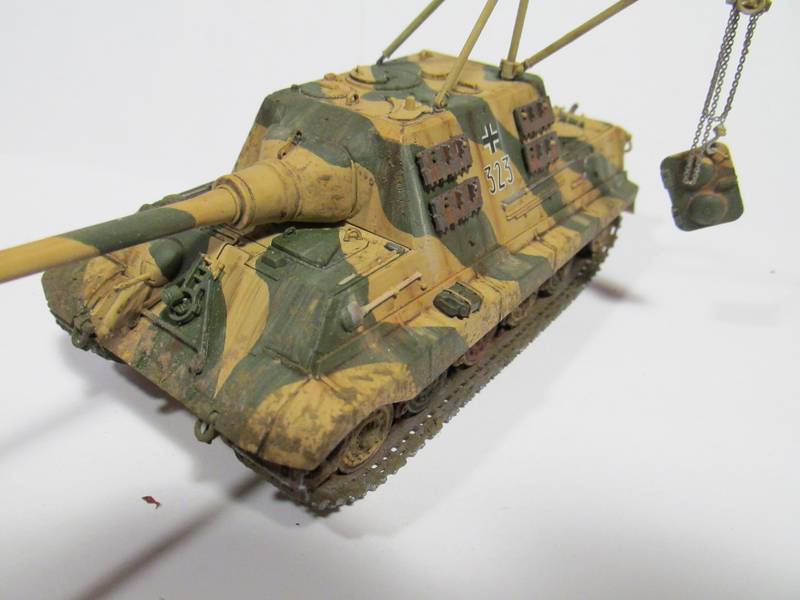
Here's a pic of a 1/72 Jagdtiger I just finished.I think it looks pretty good
And here's one of a 1/76 Jagdpanther I finished a while ago.
I will say that if you are not careful with your weathering it's very easy to end up with a little, brownish,yellowish blob Jeff T.
firstcircle
England - South East, United Kingdom
Joined: November 19, 2008
KitMaker: 2,249 posts
Armorama: 2,007 posts
Joined: November 19, 2008
KitMaker: 2,249 posts
Armorama: 2,007 posts
Posted: Friday, February 15, 2013 - 01:27 PM UTC
Casey, a couple of things on what others said... This isn't an old Airfix kit, but a new tool 2011 product. The issue you have with the tracks is partly due to the fact that you haven't cleaned up the mould line that runs all the way arround them, right down the centre of the track. (This is due, some may not be aware, to the tracks being once injection moulded piece, not floppies at all.) That is quite tough to clean up as you don't want to damage the tread, though of course you don't need to do it where it contacts the ground, so it's not as long a task as it may at first seem.
The tyres - there's been discussion recently here about this (look for a thread called something like "the Ken Abrams method") and as James says, paint the wheel in the base colour first, then with your black well thinned, let it run around the rim. If it doesn't quite cover properly, do another coat - but thinner paint will track around the wheel / tyre rim more easily.
I have to say I think you've done well considering you were using the paints in the kit. Did you prime it first, or was that painted straight on to the plastic?
You may find this thread of interest, the same kit: Airfix Cromwell IV - a very nice build by Michael Johnson.
Cbacon84
California, United States
Joined: October 10, 2012
KitMaker: 204 posts
Armorama: 45 posts
Joined: October 10, 2012
KitMaker: 204 posts
Armorama: 45 posts
Posted: Friday, February 15, 2013 - 02:56 PM UTC
Quoted Text
I have to say I think you've done well considering you were using the paints in the kit. Did you prime it first, or was that painted straight on to the plastic?
I didn't prime this one as I was out when I started so I painted straight on to the plastic giving it about 3 coats of paint
lespauljames
England - South West, United Kingdom
Joined: January 06, 2007
KitMaker: 3,661 posts
Armorama: 2,764 posts
Joined: January 06, 2007
KitMaker: 3,661 posts
Armorama: 2,764 posts
Posted: Monday, February 18, 2013 - 11:50 AM UTC
Matt, thanks for pointing that out, I was oblivious to the fact it was a new release! no misinformation was intended!
J
J
Joel_W
Associate Editor
New York, United States
Joined: December 04, 2010
KitMaker: 11,666 posts
Armorama: 1,143 posts
Joined: December 04, 2010
KitMaker: 11,666 posts
Armorama: 1,143 posts
Posted: Tuesday, February 19, 2013 - 02:00 AM UTC
Just a follow up to Matt's suggestion on how to paint tires. Thin is better, as it helps the paint to flow, especially if there is a lip for it to follow. Tamiya paints @ 2:1 will be smooth as silk, but count on two applications.
As for the color, I wouldn't use black, especially in such a small scale as it looks unrealistic. Dark Gray with a few drops of Black is what you want to shoot for. I use Tamiya XF-63 German Dark Gray with a few drops of black to a full bottle. I keep on adding X20-A to thin it as I go.
Joel
As for the color, I wouldn't use black, especially in such a small scale as it looks unrealistic. Dark Gray with a few drops of Black is what you want to shoot for. I use Tamiya XF-63 German Dark Gray with a few drops of black to a full bottle. I keep on adding X20-A to thin it as I go.
Joel
Cbacon84
California, United States
Joined: October 10, 2012
KitMaker: 204 posts
Armorama: 45 posts
Joined: October 10, 2012
KitMaker: 204 posts
Armorama: 45 posts
Posted: Tuesday, February 19, 2013 - 09:14 PM UTC
Quoted Text
Tamiya paints @ 2:1 will be smooth as silk, but count on two applications.
on the ratio I take it you mean 2 parts paint to 1 part water right?
that brings me to another question, what a good too to use for measuring paint, other then eyeballing it?