Ohio, United States
Joined: August 12, 2010
KitMaker: 731 posts
Armorama: 711 posts
Posted: Sunday, May 26, 2013 - 10:06 AM UTC
I have been wanting to build this partiular Stug for some time now. With Dragons new release of kit # 6593 It's now possible to build it straight out of the box, almost.
I just can't resist getting this one out and starting on it. It’s not gonna be a fast build as I really want to take my time on the paint steps and plan things out.
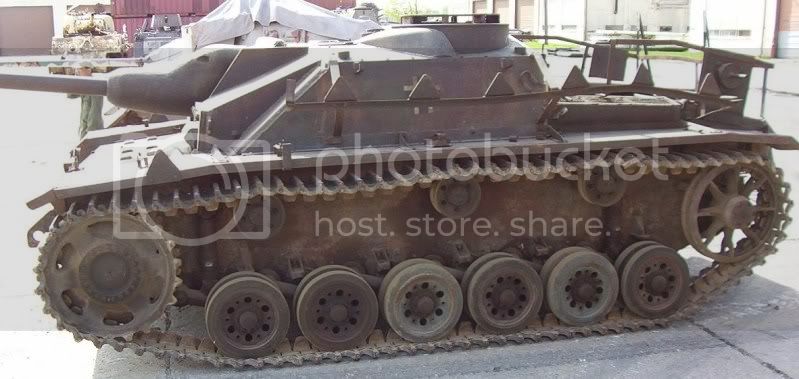
The inspiration of this build is a late war Stug III Ausf G that was captured and shipped to the US. It’s been in storage at Fort Knox and has recently been transferred to Fort Benning. It still has its original paint.


After studding a good part of the night. I have come up with a conclusion of how I perceive this stug was painted.
Being this Stug was built on or after December of 1944, it would have been painted as follows. Primed in Red Oxide RAL 8012, on top of that patches of dunklegelb RAL 7028, olivefruen RAL 6003, and rotbraun RAL 8017 were sprayed in a soft edge pattern. Rotbraun being the most predominant color used. Especially from the fenders down. The only Red oxide I see exposed is where paint has been worn or chipped off.
Massachusetts, United States
Joined: January 03, 2010
KitMaker: 2,159 posts
Armorama: 707 posts
Posted: Sunday, May 26, 2013 - 10:16 AM UTC
Ahhhhhhh...there she is!!! Love it!! Great subject and great references pics BJ!! Keep tempting me I might just break that kit out!!! LOL!!!! Count me in on this one buddy!!!

Ohio, United States
Joined: August 12, 2010
KitMaker: 731 posts
Armorama: 711 posts
Posted: Sunday, May 26, 2013 - 10:22 AM UTC
Quoted Text
Ahhhhhhh...there she is!!! Love it!! Great subject and great references pics BJ!! Keep tempting me I might just break that kit out!!! LOL!!!! Count me in on this one buddy!!! 
I think I hear that kit talking to you.............build me......build me.............build me (((LOL)))
Texas, United States
Joined: March 08, 2010
KitMaker: 2,465 posts
Armorama: 2,383 posts
Posted: Sunday, May 26, 2013 - 11:33 AM UTC
OH YEAH....Bring it on my brotha!!! This is gonna be SHAWEEEET!!!


Gary

North Carolina, United States
Joined: February 06, 2006
KitMaker: 1,544 posts
Armorama: 1,464 posts
Posted: Sunday, May 26, 2013 - 01:08 PM UTC
Looovee it! This Stug is in the Squadron Walk around too! Its a wonderful example of a late stug and it even has the original paintwork.... Looking forward to seeing this build.
chris

Ohio, United States
Joined: August 12, 2010
KitMaker: 731 posts
Armorama: 711 posts
Posted: Monday, May 27, 2013 - 11:06 AM UTC
And so it begins. Not much accomplished, but at least its an update. I started working on steps 1 and 2, step 1 is road wheels and I can only take so much of them at one time, LOL. So I started with parts from step 2 which deals with the torsion bars and suspension.
I also spent some time test fitting the upper hull components to make sure every thing will line up nice. I am experiencing some warping of parts on this one, so a little filler will be needed here and there, but nothing to complicated.


Texas, United States
Joined: March 08, 2010
KitMaker: 2,465 posts
Armorama: 2,383 posts
Posted: Monday, May 27, 2013 - 02:37 PM UTC
Well John, i expected tracks at least by now Mr.!

Gonna be a good-un brother!

Ohio, United States
Joined: August 12, 2010
KitMaker: 731 posts
Armorama: 711 posts
Posted: Monday, May 27, 2013 - 02:49 PM UTC
Thank you brother Gary!! Been staring at it all day trying to decide on a few things.

Indiana, United States
Joined: June 10, 2005
KitMaker: 6,188 posts
Armorama: 5,960 posts
Posted: Tuesday, May 28, 2013 - 01:46 AM UTC
Hmmmm, beautiful choice in the Ausf.G version.
Makes me think we need another StuG Campaign later this year.
~ Jeff
North Carolina, United States
Joined: June 06, 2006
KitMaker: 4,691 posts
Armorama: 3,509 posts
Posted: Tuesday, May 28, 2013 - 01:53 AM UTC
Should be a good one John,great reference pics you got there.
Ohio, United States
Joined: August 12, 2010
KitMaker: 731 posts
Armorama: 711 posts
Posted: Saturday, June 08, 2013 - 01:05 AM UTC
Not a lot of bench time lately, But I did manage to get most of the parts in step 1 cleaned up and assembled. A small section of the MK tracks were assembled to insure they would fit the drive sprockets. Now I’m going to skip forward and turn my attention to the interior so I can get it painted and the major hull components assembled.

Indiana, United States
Joined: June 10, 2005
KitMaker: 6,188 posts
Armorama: 5,960 posts
Posted: Saturday, June 08, 2013 - 06:02 AM UTC
It's got me in the StuG mood!
Let's see some more!

~ Jeff
England - East Anglia, United Kingdom
Joined: March 21, 2012
KitMaker: 1,673 posts
Armorama: 1,640 posts
Posted: Saturday, June 08, 2013 - 06:21 AM UTC
Hi John,
beautiful choice there dude, the StuG III G has to be the
best looker of them all and your´s will belong to them too.
Those Dragon kits are just so pristine in detail and you should have no Problems with the build.
@ Jeff: what´s with the # 2 on the StuG campaign?
I´ll be there straight away, I have found a new subject
for some more scratch building on a III G.

Paul
"Lord Raglan wishes the cavalry to advance rapidly to the front, follow the enemy & try to prevent the enemy carrying away the guns. Troop horse artillery may accompany. French cavalry is on your left. Immediate. R Airey."
Ohio, United States
Joined: August 12, 2010
KitMaker: 731 posts
Armorama: 711 posts
Posted: Sunday, June 09, 2013 - 11:05 AM UTC
Thank guys!!
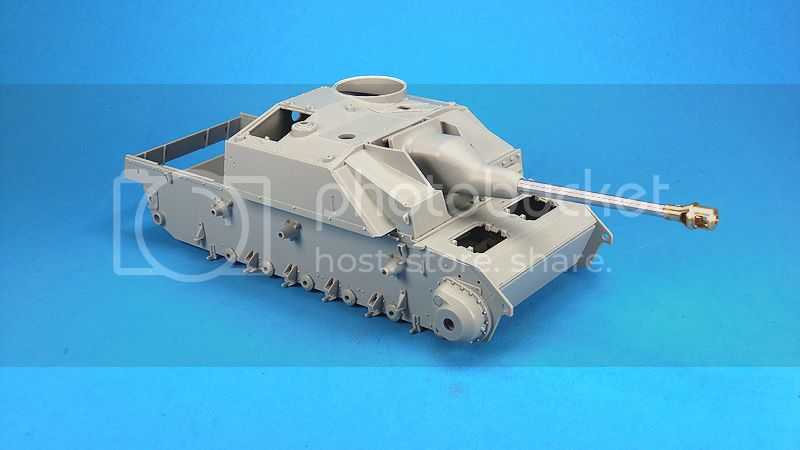
Here are a couple of shots of the major hull pieces and fenders dry fitted together. The kit has some minimal warping and wanted to test fit all the major player to see if I was going to have any problems. Every thing fits well and will only need some putty work on a few seams, mainly on the front plates.
Now I can take it back apart and start on the interior.


Ohio, United States
Joined: August 12, 2010
KitMaker: 731 posts
Armorama: 711 posts
Posted: Thursday, June 13, 2013 - 02:37 PM UTC
Tonight I continued working on the gun mount and assemble the RB Barrel. The Mantel had to be drilled out to accept the brass sleeve that comes with the RB Barrel.
This is going to be a real puzzle to get all the sub assemblies together once they are ready for final assembly.


England - North East, United Kingdom
Joined: June 22, 2010
KitMaker: 1,224 posts
Armorama: 1,207 posts
Posted: Thursday, June 13, 2013 - 06:33 PM UTC
very very nice - looks a lot more menacing than my StuG E
Ohio, United States
Joined: August 12, 2010
KitMaker: 731 posts
Armorama: 711 posts
Posted: Sunday, June 16, 2013 - 01:21 PM UTC
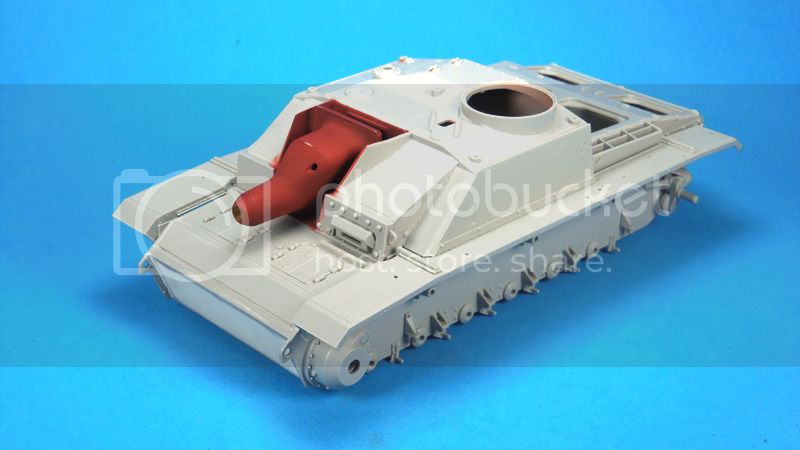
In order to get the mantlet installed, it has to be slid into place with the interior floor loose and angled up in the front while the front hull is slipped into place at the same time.
Part of the gun mount is visible behind the mantlet and it would be difficult to get good paint coverage in all those tight spots, so I mixed up some Tamiya Rot Oxide and gave the are a coat incase I miss some spots while spraying the cammo colors.

Ohio, United States
Joined: August 12, 2010
KitMaker: 731 posts
Armorama: 711 posts
Posted: Sunday, June 23, 2013 - 12:19 PM UTC
I know with all the back and forth test fit pictures that this thing doesn’t look like it’s going anywhere. But I assure you, I am making progress. In the pics below, all major hull components are glued together and I’m starting to get some detail parts on.
The front plate had sink marks all the way around the edges, so I filled them in with putty. When I started sanding the putty, I realized the entire center was sunk in also. It took about 3 coats of putty to get it flat.


Quebec, Canada
Joined: November 15, 2002
KitMaker: 3,960 posts
Armorama: 3,579 posts
Posted: Saturday, June 29, 2013 - 05:00 AM UTC
wow...now that's what I call a sink mark!!
Texas, United States
Joined: March 08, 2010
KitMaker: 2,465 posts
Armorama: 2,383 posts
Posted: Sunday, June 30, 2013 - 02:08 PM UTC
Holy Crap Brother, never saw one that bad before. Looks like ya got it all sorted though....nice job my friend!

Auckland, New Zealand
Joined: October 25, 2005
KitMaker: 949 posts
Armorama: 139 posts
Posted: Monday, July 01, 2013 - 04:44 PM UTC
Hi John.
I'm following this with much interest.
I'm more of a figure/bust painter and do the odd plane so I hope this may inspire me to perhaps buy my first Armour kit.
Chris
"A Geek is someone who has found something more interesting than sex."
Neil Degrasse Tyson
Austria
Joined: August 31, 2010
KitMaker: 28 posts
Armorama: 26 posts
Posted: Monday, September 23, 2013 - 10:39 PM UTC
Hi John: Nice and interesting projects.I will follow with interest.
There are guesses that the Ft. Knox Stug is febr./march 1945 production.
The last known change between Dec1944 and later production was the addition of a "nose" on botton of front towing eye.
The muzzle brake you are using is not late version. The last one had a big round flange at the muzzle side
Regards from Vienna/Austria
Robert
Ohio, United States
Joined: August 12, 2010
KitMaker: 731 posts
Armorama: 711 posts
Posted: Monday, September 23, 2013 - 11:06 PM UTC
Hi Robert, thanks for the information! I'll check into the towing eyes, I know I have the wrong barrel, I still have to order the correct barrel for it.
Uusimaa, Finland
Joined: October 22, 2012
KitMaker: 1,194 posts
Armorama: 1,077 posts
Posted: Tuesday, September 24, 2013 - 01:15 AM UTC
Howdy, nice build going on. I just reviewed this kit here and it's interesting to compare builds to see if it was just me or whether others are having the same issues.
Kimmo
There is a time to laugh and a time not to laugh, and this is not one of them.
North Carolina, United States
Joined: March 27, 2005
KitMaker: 56 posts
Armorama: 49 posts
Posted: Thursday, October 10, 2013 - 04:30 AM UTC


