Hi again everybody,
Encouraged by my previous post, I am continuing the spam
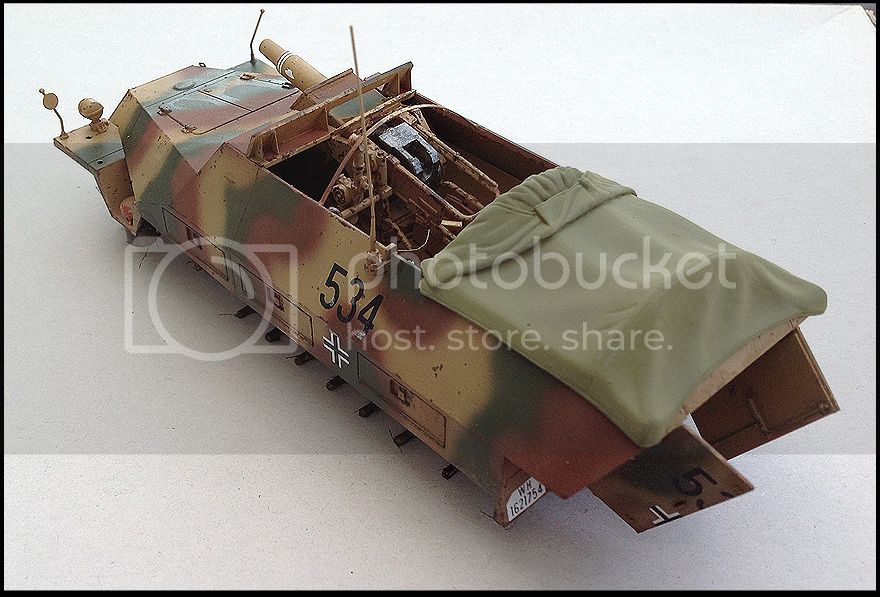
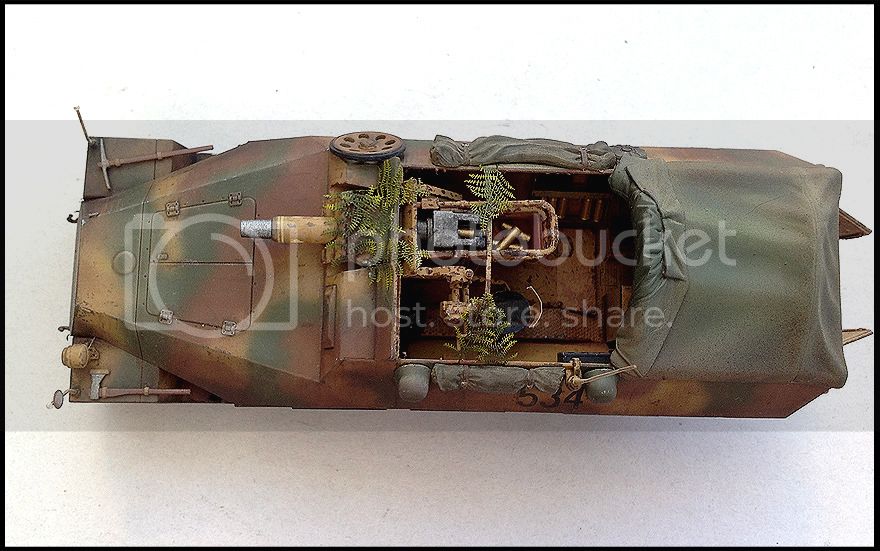
This is Tamiya's 251/9, with some extra stuff added; Eduard's photo etch for the model itself, radio set from Eduard's pre-painted package, ammo and spent casing from RB, width indicators from RB, antenna from RB, as well as DS Styrene canvas cover for the rear compartment from a Dragon 251. Again, the model is approaching completion, but I'll post a few older ones to show the progress.
This is the assembly completed stage, the model is still in several major components/parts in order to facilitate the painting of the interior:
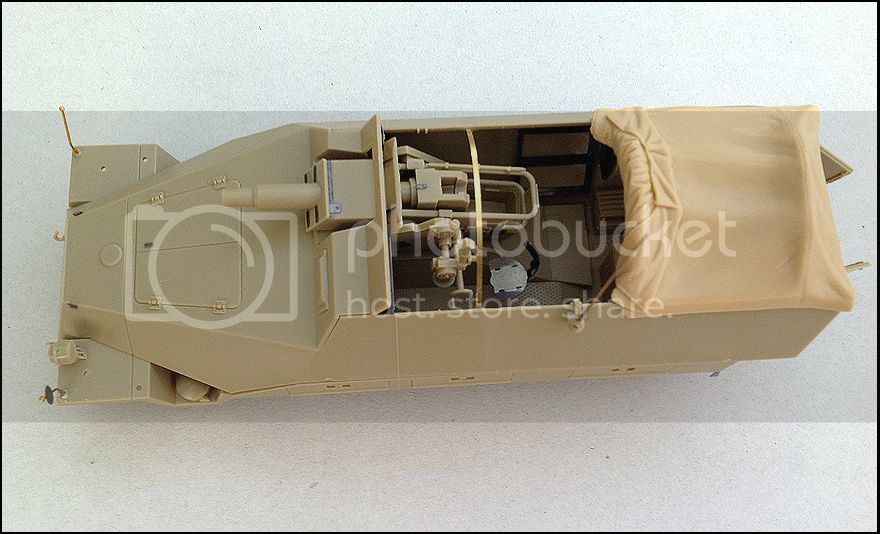
Initial paint job done. I painted the whole model in a primer-like color, and for the interior I used some hairspray, my first contact with this technique. The chipping down to primer is done via the hairspray removal, the others are hand-painted:
Then, the exterior first pass plus some already applied weathering:
Mud applied:
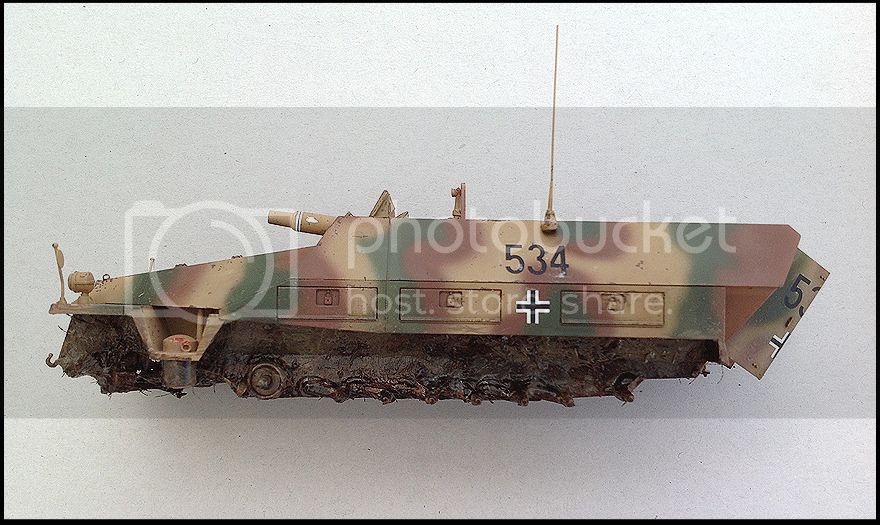
Weathering completed:
Accessories on. the fern is from Eduard, painted by myself:
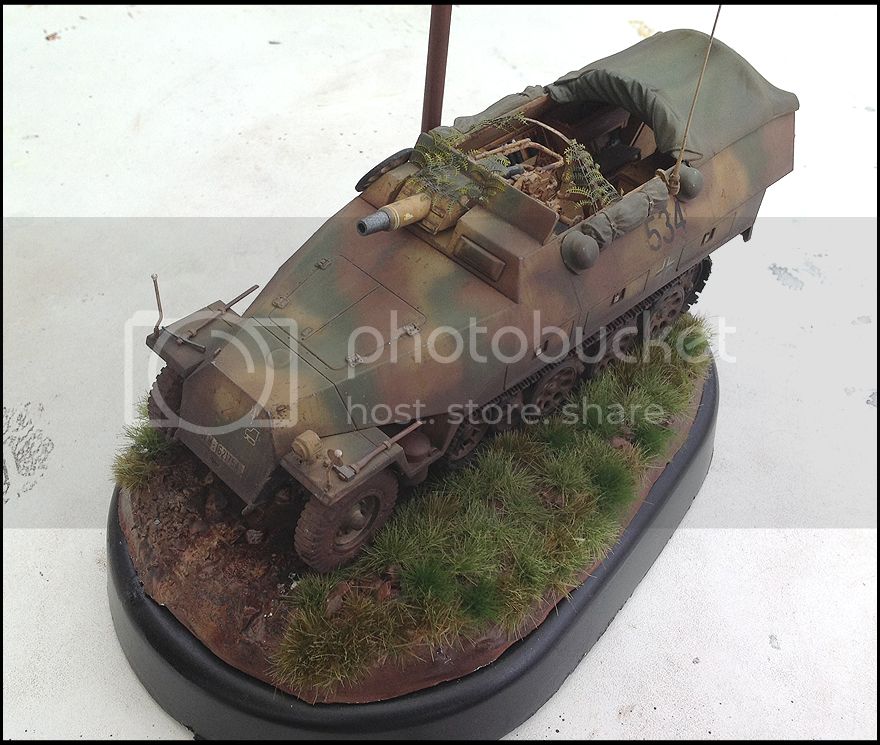
And finally, the current state of the project -- on a small base. The protruding stick is actually a telegraph pole from Italeri, to be finalized with some wires hanging:
What's left is to wire up the radio properly, finish the telegraph pole, and then to address my figurephobia again and prepare two figures, one radio operator kneeling next to the set, the other one an officer with binoculars outside of the vehicle's front left end to keep the composition right.
Thanks for watching -- and any comments and recommendations!
Have a nice day,
Ivan/D4
Constructive Feedback
For in-progress or completed build photos. Give and get contructive feedback!
Hosted by Darren Baker, Dave O'Meara
Sd.Kfz. 251/9 1/35
Drone04
Sofiya, Bulgaria
Joined: July 03, 2010
KitMaker: 51 posts
Armorama: 48 posts
Joined: July 03, 2010
KitMaker: 51 posts
Armorama: 48 posts
Posted: Thursday, May 30, 2013 - 10:09 PM UTC
jrutman
Pennsylvania, United States
Joined: April 10, 2011
KitMaker: 7,941 posts
Armorama: 7,934 posts
Joined: April 10, 2011
KitMaker: 7,941 posts
Armorama: 7,934 posts
Posted: Friday, May 31, 2013 - 01:52 AM UTC
Nicely done so far. Great paint job and weathering. I like the chipping technique and I think you used it well . If I had to say something constructive I would not use as much chipping?
Maybe a little overdone?
Small point though as it looks very nice overall.
J
Maybe a little overdone?
Small point though as it looks very nice overall.
J
yeahwiggie
Dalarnas, Sweden
Joined: March 24, 2006
KitMaker: 2,093 posts
Armorama: 1,359 posts
Joined: March 24, 2006
KitMaker: 2,093 posts
Armorama: 1,359 posts
Posted: Friday, May 31, 2013 - 03:28 AM UTC
That is one good looking 251/9!
I like what you did with the construction. The additions really paid off. The colours are good too, as is the weathering.
I'm not much of a chipping guy, so I too think it's a bit overdone.
No matter what. This is an eyecatcher!
I like what you did with the construction. The additions really paid off. The colours are good too, as is the weathering.
I'm not much of a chipping guy, so I too think it's a bit overdone.
No matter what. This is an eyecatcher!
retiredyank
Arkansas, United States
Joined: June 29, 2009
KitMaker: 11,610 posts
Armorama: 7,843 posts
Joined: June 29, 2009
KitMaker: 11,610 posts
Armorama: 7,843 posts
Posted: Friday, May 31, 2013 - 08:59 AM UTC
Spectacular, on all fronts! For some reason, the foliage reminds me of Christmas. I particularly like the camo modulation and weathering. How did you achieve this effect?
HEINE-07
Ohio, United States
Joined: February 28, 2007
KitMaker: 392 posts
Armorama: 198 posts
Joined: February 28, 2007
KitMaker: 392 posts
Armorama: 198 posts
Posted: Sunday, June 02, 2013 - 04:27 AM UTC
Beautiful work. The base really brings this to life. The paint chipping is not overdone, as most of it being inside, the service and sacrifice of the crew is implied...implied as a service up against steel. The chipping shows a hard and on-going effort by the crew, as a way of life. The weathering is brilliant, especially the dark road dust on the lower half.
Drone04
Sofiya, Bulgaria
Joined: July 03, 2010
KitMaker: 51 posts
Armorama: 48 posts
Joined: July 03, 2010
KitMaker: 51 posts
Armorama: 48 posts
Posted: Tuesday, June 04, 2013 - 02:27 AM UTC
Thank you very much for the kind words guys! For the modulation in the lower part of the hull I used primarily AK Interactive's Dark Mud and Kursk Earth filters, Mig's Earth wash, as well as Mig's Russian Earth pigments -- and a bit of patience.
And indeed, I wanted to portray a vehicle in which the crew has had quite an active tour of duty. Luckily, the 251 APC's have ample room to portray the "inner life" of the vehicle and its crew -- not so straightforward with fully enclosed machines
Panzer-Ole
Kobenhavn, Denmark
Joined: August 27, 2006
KitMaker: 155 posts
Armorama: 145 posts
Joined: August 27, 2006
KitMaker: 155 posts
Armorama: 145 posts
Posted: Wednesday, June 05, 2013 - 05:37 AM UTC
Hi Ivan
That one is looking just fine, I like the tarp as it gives some color variation and is seldom shown and the small and compact base is really nice.
Congratulations with the model and thank you for sharing.
Ole
That one is looking just fine, I like the tarp as it gives some color variation and is seldom shown and the small and compact base is really nice.
Congratulations with the model and thank you for sharing.
Ole
Posted: Thursday, June 06, 2013 - 08:39 PM UTC
Very nice Ivan. The tarps look great on this and "soften" or breaks up the camo effect. Some figures would add a lot to this and give life to the scene. I think the base is a bit too short ... looks like a planning issue the way it hangs over the back of the base. Might be better to move to move it forward some?
Hohenstaufen
England - South East, United Kingdom
Joined: December 13, 2004
KitMaker: 2,192 posts
Armorama: 1,615 posts
Joined: December 13, 2004
KitMaker: 2,192 posts
Armorama: 1,615 posts
Posted: Sunday, June 09, 2013 - 06:38 AM UTC
Ivan,
This I like. Thanks for posting. I actually like the way the rear overhangs the base, gives it a more "active" look. However I do agree with Frank, this model cries out for some human figures in it - a "busy" gun crew would really fit with the chipping around the gun and lift the scene to really outstanding.
Drone04
Sofiya, Bulgaria
Joined: July 03, 2010
KitMaker: 51 posts
Armorama: 48 posts
Joined: July 03, 2010
KitMaker: 51 posts
Armorama: 48 posts
Posted: Tuesday, June 18, 2013 - 09:15 PM UTC
Thank you very much indeed guys!
@Frank: Unfortunately, the way the base ended up like is making it next to impossible to move it forward without some reworking, and I am getting a bit tired of this model already Plus, in reality, it ain't that bad hanging its behind out like this
@Steve: As I haven't started working on the figures just yet, upon your proposal I am really considering going for some more action-oriented figures rather than the more static ones I had in mind. Thanks a lot for the suggestion!
thebear
Quebec, Canada
Joined: November 15, 2002
KitMaker: 3,960 posts
Armorama: 3,579 posts
Joined: November 15, 2002
KitMaker: 3,960 posts
Armorama: 3,579 posts
Posted: Saturday, June 29, 2013 - 05:11 AM UTC
Great work Ivan...You have just made up my mind to start this kit as soon as I finish what I'm working on... Thanks !
Rick
Rick
Drone04
Sofiya, Bulgaria
Joined: July 03, 2010
KitMaker: 51 posts
Armorama: 48 posts
Joined: July 03, 2010
KitMaker: 51 posts
Armorama: 48 posts
Posted: Sunday, June 30, 2013 - 10:12 PM UTC
Thanks a lot Rick, it is really appreciated! I'm very glad you find this model inspirational! BTW, it is overall a pleasure to build, and in my opinion photo etch is a must to bring the best out of it!
Ivan
Ivan
chris1
Auckland, New Zealand
Joined: October 25, 2005
KitMaker: 949 posts
Armorama: 139 posts
Joined: October 25, 2005
KitMaker: 949 posts
Armorama: 139 posts
Posted: Monday, July 01, 2013 - 04:49 PM UTC
Hi again Ivan
As per my comments for your DAK Pz III
Choice.
My I suggest How about 1 or 2 figs.
That would really set her off.
Chris
As per my comments for your DAK Pz III
Choice.
My I suggest How about 1 or 2 figs.
That would really set her off.
Chris
GregCloseCombat
California, United States
Joined: June 30, 2008
KitMaker: 2,408 posts
Armorama: 2,394 posts
Joined: June 30, 2008
KitMaker: 2,408 posts
Armorama: 2,394 posts
Posted: Tuesday, July 02, 2013 - 05:19 AM UTC
Great camo and mud!!! The tarp is a nice color contrast. A bigger base I'd prefer also but the open doors does make it work ok. Maybe a figure looking at saboteur evidence is possible but I like action scenes too. This is my favorite 251 version. What color did you paint the barrel end in? Congrats
Drone04
Sofiya, Bulgaria
Joined: July 03, 2010
KitMaker: 51 posts
Armorama: 48 posts
Joined: July 03, 2010
KitMaker: 51 posts
Armorama: 48 posts
Posted: Wednesday, July 03, 2013 - 09:43 PM UTC
Thanks Chris, Greg!
This was my first attempt to make mud, I used Diluted (or maybe it was Liquid?) Putty by Gunze, in which I poured in some Tamiya acrylic paint for color, and then took an old brush and cut off its hair in the mixture to simulate grass strands. I put in also some fine sand for texture, and with a brush applied it generously on the lower hull before I put the roadwheels on -- and repeated the procedure on the roadwheels as well. The concoction dries up quite fast, in 30 min in the sun I could resume work. Then I went over it with AK Dark Earth, Dark Green, and Kursk Earth filters -- and that's it.
And on the figures' side, my initial plan was to use this set from Zvezda:
More specifically, the radio operator inside the vehicle, and the officer out of the vehicle, standing next to the front left wheel of the 251 to maintain the diagonal composition with the telegraph pole on the rear right. I intended this to be an early morning recon mission on July 4, 1943 (no pun intended with today's date ) at Kursk -- a day before the start of the great offensive. As it rained in the early morning of this day, we get the mud and the tarp
However, after the recommendations of several of you guys, I am really beginning to wonder if I shouldn't use some more action-oriented figures showing the crew in action (aimer in position, loader with the next round, commander spotting targets).
But bottomline is, I am most certainly going to add figures, it is in the plans from day one
Thanks again guys, and have a great day,
Ivan
Drone04
Sofiya, Bulgaria
Joined: July 03, 2010
KitMaker: 51 posts
Armorama: 48 posts
Joined: July 03, 2010
KitMaker: 51 posts
Armorama: 48 posts
Posted: Wednesday, July 03, 2013 - 09:54 PM UTC
Forgot to respond, sorry Greg:
The barrel I painted (by brush) with Tamiya's Gun Metal. When airbrushed, this specific paint goes a bit darker, when brush painted -- at least in my experience -- it gives a bit more irregular appearance with a mixture of darker and brighter metal spots. Then I "drybrushed" it with Mig's Gun Metal pigment -- I am a big fan of using direct pigment rubbing in with a brush onto the matt paint. The matt paint surface absorbs a part of the pigment, and after you blow off the extra, or even after you clean it up more thoroughly, a good amount of the pigment sticks in. This is exactly what I did with the barrel to give it the worn metal appearance. But I use this approach on bigger surfaces as well, it does very good job for simulating dust of any color (coz it is, essentially, dust after all ).
GregCloseCombat
California, United States
Joined: June 30, 2008
KitMaker: 2,408 posts
Armorama: 2,394 posts
Joined: June 30, 2008
KitMaker: 2,408 posts
Armorama: 2,394 posts
Posted: Friday, July 05, 2013 - 06:33 PM UTC
Thanks for that info.
Drone04
Sofiya, Bulgaria
Joined: July 03, 2010
KitMaker: 51 posts
Armorama: 48 posts
Joined: July 03, 2010
KitMaker: 51 posts
Armorama: 48 posts
Posted: Sunday, September 15, 2013 - 07:18 AM UTC
Hi everybody,
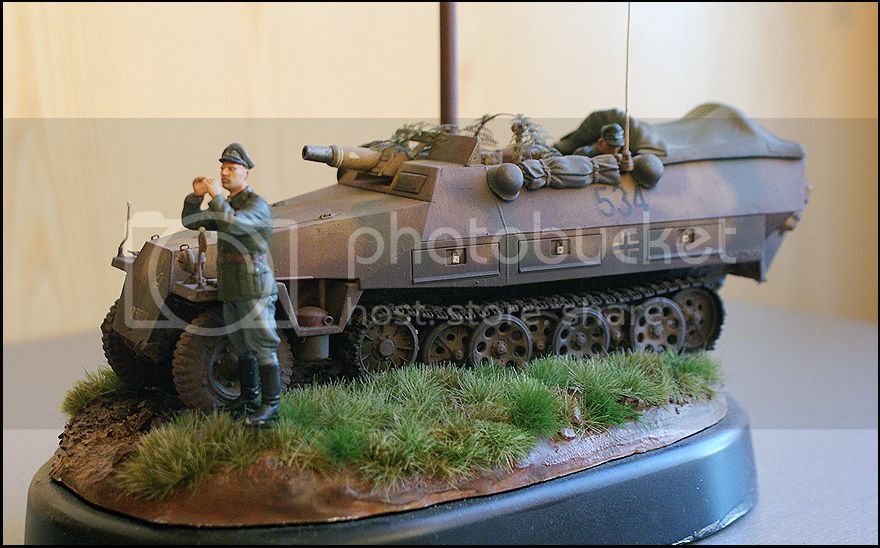
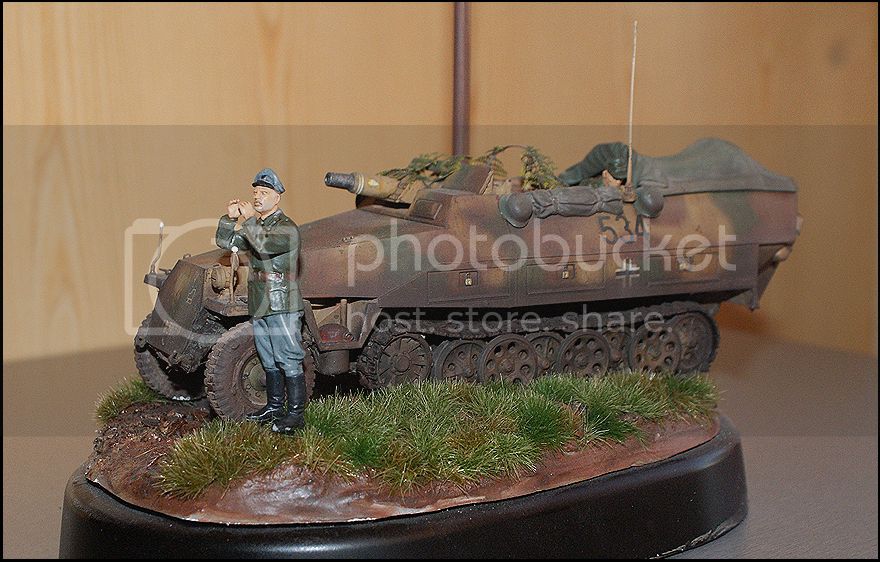
A small update here as well -- two figures. In the end, I decided to continue with the original plan to have a recon mission setup. The figures aren't close to finishing yet, but any opinions would be most welcome!
Thanks for watching,
Ivan
A small update here as well -- two figures. In the end, I decided to continue with the original plan to have a recon mission setup. The figures aren't close to finishing yet, but any opinions would be most welcome!
Thanks for watching,
Ivan
All_You_Can_Kit
Jakarta Raya, Indonesia
Joined: August 22, 2012
KitMaker: 599 posts
Armorama: 527 posts
Joined: August 22, 2012
KitMaker: 599 posts
Armorama: 527 posts
Posted: Sunday, September 15, 2013 - 08:06 AM UTC
You do your outstanding work mate! Every aspects were very artistically touched, especially the application of the mud and exactly the 'fall' of the track onto its' interleaved wheels. Also the additional hanged accessories, such as tellermine, helmets, tarps, spare wheels, etc. were excellently combined. My first SdKfz 251 does not appear as good as yours
Once again, congratulations, and thanks for sharing Ivan. Can't wait for the finishing of the figures!
Warm regards from Indonesia
Garry
Once again, congratulations, and thanks for sharing Ivan. Can't wait for the finishing of the figures!
Warm regards from Indonesia
Garry
AFVFan
North Carolina, United States
Joined: May 17, 2012
KitMaker: 1,980 posts
Armorama: 1,571 posts
Joined: May 17, 2012
KitMaker: 1,980 posts
Armorama: 1,571 posts
Posted: Sunday, September 15, 2013 - 08:20 AM UTC
Looks good, Ivan. I'll have to go along with a few of the others in saying that the chipping on the gun is a bit over done. My general rule of thumb is that in order to have chipped paint, it has to have had something damage it. There are chipped places on the gun and cradle that someone would have had to go out of their way to get at (this same comment can be applied to your 251/22, too).
easyco69
Ontario, Canada
Joined: November 03, 2012
KitMaker: 2,275 posts
Armorama: 2,233 posts
Joined: November 03, 2012
KitMaker: 2,275 posts
Armorama: 2,233 posts
Posted: Monday, September 23, 2013 - 01:03 AM UTC
Nice!! Me like!