Victoria, Australia
Joined: October 11, 2013
KitMaker: 160 posts
Armorama: 152 posts
Posted: Friday, December 13, 2013 - 09:56 PM UTC
@Alex, looks like it's going to be quite an interesting looking build. Never seen one of those before.
Today I broke out the airbrush, oil paints and the cat litter

And finished my one and a half big cats. So that crappy Airfix kit I started with was still able to be used and gave me the idea for this diorama.
I am calling this one done


Currently building:
Italeri M60A1 Patton - what if 4 challenge
Revell 1/25 32 Ford rat rod
Italeri 1/48 Junkers JU-87B Stuka
Bronco 1/35 Hungarian Zrinyi assault gun
Lisboa, Portugal
Joined: March 04, 2008
KitMaker: 5,386 posts
Armorama: 4,727 posts
Posted: Saturday, December 14, 2013 - 06:45 AM UTC
Very nice scene Jason.
Congrats on that one !!!
Here's my progress:
Dashboard and gearbox ready for paint too.

Active Builds: 0
Active Campaigns: 0
Lisboa, Portugal
Joined: March 04, 2008
KitMaker: 5,386 posts
Armorama: 4,727 posts
Posted: Sunday, December 15, 2013 - 05:30 AM UTC
Getting some black paint.
Dashboard, gearbox, suspension & transmission parts.

Active Builds: 0
Active Campaigns: 0
ColinEdm
 Associate Editor
Alberta, Canada
Joined: October 15, 2013
KitMaker: 1,355 posts
Armorama: 1,229 posts
Posted: Sunday, December 15, 2013 - 04:49 PM UTC
Now that my Firefly is done, I can now start my Tiger 2 for this campaign! Started off with suspension, front glacis and rear plates.

The kit also came with a PE fret, I started with the brackets for the jack. It will take a few days for my eyes to un-cross and my spine to straighten....

Jason, love your mini dio!
The voices are back.....excellent....
Lisboa, Portugal
Joined: March 04, 2008
KitMaker: 5,386 posts
Armorama: 4,727 posts
Posted: Monday, December 16, 2013 - 06:15 AM UTC
Ouch Colin... glad the carpet monster didn't see those ...
Great work

My update:
Dashboard w/decals, still need to touch up the gearbox and paint the steering wheel.

Black paint all over it

Stay tuned for more soon..
Active Builds: 0
Active Campaigns: 0
ColinEdm
 Associate Editor
Alberta, Canada
Joined: October 15, 2013
KitMaker: 1,355 posts
Armorama: 1,229 posts
Posted: Monday, December 16, 2013 - 07:37 AM UTC
Thanks John, actually did drop the butterfly nut/rod part twice - good thing my workroom has a concrete floor so a bit easier to find things!
The voices are back.....excellent....
Lisboa, Portugal
Joined: March 04, 2008
KitMaker: 5,386 posts
Armorama: 4,727 posts
Posted: Tuesday, December 17, 2013 - 12:10 PM UTC
Quoted Text
Thanks John, actually did drop the butterfly nut/rod part twice - good thing my workroom has a concrete floor so a bit easier to find things!
Lucky you Colin !!
I've made some small progress, finished the gearbox and was just painting some seats & ammo boxes.
No photos today.

Active Builds: 0
Active Campaigns: 0
Lisboa, Portugal
Joined: March 04, 2008
KitMaker: 5,386 posts
Armorama: 4,727 posts
Posted: Wednesday, December 18, 2013 - 06:12 AM UTC
Here it is,

I'm currently working on the other seats, oh well I'm typing and uploading photos to be accurate

Active Builds: 0
Active Campaigns: 0
Texas, United States
Joined: March 17, 2006
KitMaker: 1,117 posts
Armorama: 1,115 posts
Posted: Thursday, December 19, 2013 - 01:57 AM UTC
Here is the project I intend to build for this campaign. I plan to build it straight from the box for most case, just plan to replace the smoke grenade launchers with some from voyager. I've had this sitting around for some time now since I was not happy with the doors being cast shut.


On the workbench:
T-62M
ZTZ 99 MBT
Lav-25A2 with MILES Gear
M7 Priest X2
Lisboa, Portugal
Joined: March 04, 2008
KitMaker: 5,386 posts
Armorama: 4,727 posts
Posted: Thursday, December 19, 2013 - 04:03 AM UTC
Nice Resin kit Christopher.
Hope it turns out ok and not just a smelly resin headache ..

Here's my progress:

So this is next:

Just a dryfit with the equipment so far,

And now the masking,


Active Builds: 0
Active Campaigns: 0
Lisboa, Portugal
Joined: March 04, 2008
KitMaker: 5,386 posts
Armorama: 4,727 posts
Posted: Thursday, December 19, 2013 - 06:50 AM UTC
Finished the masking,

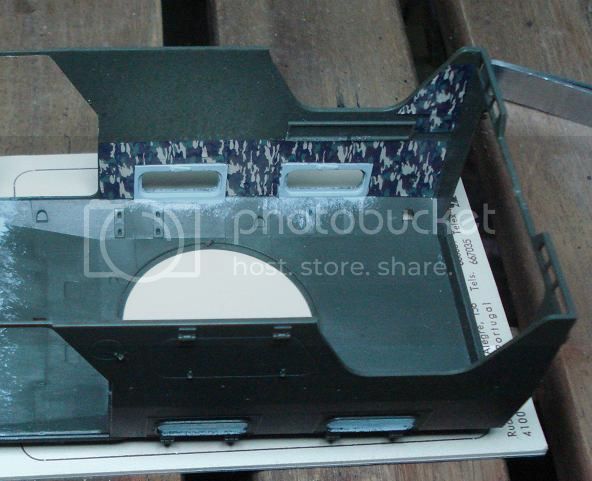
Started with the interior decals


Added the dashboard, one seat, gearbox too.
Still missing the other seats and the ammo rack.

Sorry about the dark photos
Active Builds: 0
Active Campaigns: 0
Lisboa, Portugal
Joined: March 04, 2008
KitMaker: 5,386 posts
Armorama: 4,727 posts
Posted: Friday, December 20, 2013 - 05:56 AM UTC
The other missing seats

and started painting the grey blue parts before adding the decals:

Active Builds: 0
Active Campaigns: 0
Victoria, Australia
Joined: October 11, 2013
KitMaker: 160 posts
Armorama: 152 posts
Posted: Friday, December 20, 2013 - 08:43 AM UTC
@John, looking great and coming together nicely by the looks of it. Just curious what's the camo on the rear wheel arches, decals or paint?
Currently building:
Italeri M60A1 Patton - what if 4 challenge
Revell 1/25 32 Ford rat rod
Italeri 1/48 Junkers JU-87B Stuka
Bronco 1/35 Hungarian Zrinyi assault gun
Lisboa, Portugal
Joined: March 04, 2008
KitMaker: 5,386 posts
Armorama: 4,727 posts
Posted: Friday, December 20, 2013 - 01:51 PM UTC
Quoted Text
@John, looking great and coming together nicely by the looks of it. Just curious what's the camo on the rear wheel arches, decals or paint?
decals
Active Builds: 0
Active Campaigns: 0
Tasmania, Australia
Joined: November 06, 2009
KitMaker: 368 posts
Armorama: 321 posts
Posted: Saturday, December 21, 2013 - 01:20 AM UTC
Some nice builds happening (and loved the cute little Bergepanther.
Well I just signed up, will Building Hobby Boss's F-14B in '48 scale (I have to finish it by late January for a comp so will be a quickish build).
Hope to get it started tomorrow will post pics soon after.
Lisboa, Portugal
Joined: March 04, 2008
KitMaker: 5,386 posts
Armorama: 4,727 posts
Posted: Saturday, December 21, 2013 - 06:17 AM UTC
Almost finished the seats

I also gave a coat of green before starting working on the interior, and adding the side windows, front glass & wipers
(I hate masking windows and leaving fingerprints and paint smudges all over )


Active Builds: 0
Active Campaigns: 0
Lisboa, Portugal
Joined: March 04, 2008
KitMaker: 5,386 posts
Armorama: 4,727 posts
Posted: Sunday, December 22, 2013 - 11:21 AM UTC


Just need to add the clear parts for the head lights.
This step of the interior is done.
Stay tuned for more !!

Active Builds: 0
Active Campaigns: 0
ColinEdm
 Associate Editor
Alberta, Canada
Joined: October 15, 2013
KitMaker: 1,355 posts
Armorama: 1,229 posts
Posted: Sunday, December 22, 2013 - 04:42 PM UTC
Coming along nicely John!
Some progress on my Tiger II. Have completed the rear plate and most of the upper hull and test fit on lower hull, Using a primer colour and will leave the backs of the wheels primer.

Don't have the butterfly nuts on yet, they are tiny!


Also tried doing some more photetch but the tool clamps are proving to be a little beyond my skill set right now, will probably just add the clamp handles to the stock tools and use some of the bigger and simpler holddowns.

As you can see I tried soldering the axe bracket, a little sloppy, still need more practice!
The voices are back.....excellent....
Lisboa, Portugal
Joined: March 04, 2008
KitMaker: 5,386 posts
Armorama: 4,727 posts
Posted: Monday, December 23, 2013 - 07:09 AM UTC
Thanks Colin ! Your Tiger II is very nice too !
Patience with that PE !
Here's my progress today:
Touched up some interior parts,

And the silver for the headlights

Started the interior decals


And around the back door


Also added the clear parts for the headlights


Active Builds: 0
Active Campaigns: 0
ColinEdm
 Associate Editor
Alberta, Canada
Joined: October 15, 2013
KitMaker: 1,355 posts
Armorama: 1,229 posts
Posted: Monday, December 23, 2013 - 05:24 PM UTC
Went back and had another crack at the PE brackets for the tools...


It will take a while, my eyes (and patience) will only let me do 1 or 2 a night!
The voices are back.....excellent....
Lisboa, Portugal
Joined: March 04, 2008
KitMaker: 5,386 posts
Armorama: 4,727 posts
Posted: Tuesday, December 24, 2013 - 06:08 AM UTC
Very nice job on that PE !!
Today's work
Wheels

Ready for paint & tires

Also finished the interior decals


Active Builds: 0
Active Campaigns: 0
North Carolina, United States
Joined: June 06, 2006
KitMaker: 4,691 posts
Armorama: 3,509 posts
Posted: Tuesday, December 24, 2013 - 07:36 AM UTC
Looking good John,1st of these that I have seen
Victoria, Australia
Joined: October 11, 2013
KitMaker: 160 posts
Armorama: 152 posts
Posted: Tuesday, December 24, 2013 - 09:31 AM UTC
Colin, the zimmerit and those tiny PE tool clamps look great. Some PE is a nightmare to work with!
John, great work with the internal decals!
Currently building:
Italeri M60A1 Patton - what if 4 challenge
Revell 1/25 32 Ford rat rod
Italeri 1/48 Junkers JU-87B Stuka
Bronco 1/35 Hungarian Zrinyi assault gun
Lisboa, Portugal
Joined: March 04, 2008
KitMaker: 5,386 posts
Armorama: 4,727 posts
Posted: Tuesday, December 24, 2013 - 09:49 AM UTC
Thanks Jason & Anthony !
It's a very good kit from Meng ( my first Meng and surely one of many ..).
It's a pleasure to build, good detailing, good fitting, decals.
No issues, no problems.

Active Builds: 0
Active Campaigns: 0
ColinEdm
 Associate Editor
Alberta, Canada
Joined: October 15, 2013
KitMaker: 1,355 posts
Armorama: 1,229 posts
Posted: Tuesday, December 24, 2013 - 11:30 AM UTC
Thanks Jason!
The PE clamps really are a PITA. I am slowly getting a technique down for them, but will be glad when I am done with them.
The voices are back.....excellent....


