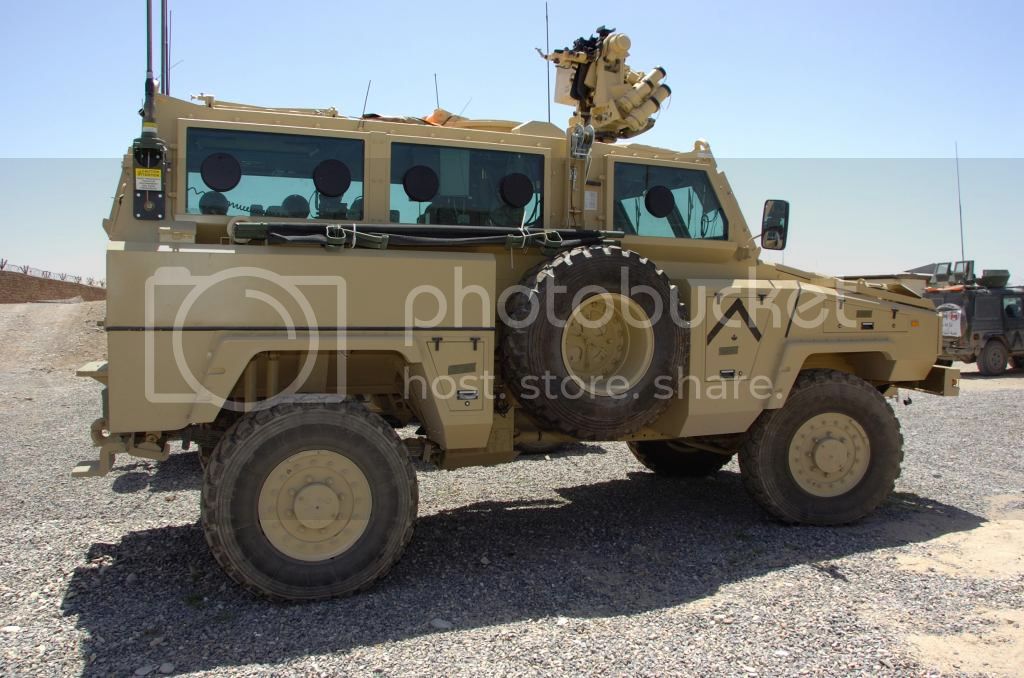
I was originally going to buy Kinteics RG-31 and AFV clubs M151 protector and scratch build the missing details for a Canadian RG. But I was pleasantly surprised when Kinteic released the Canadian version, with the correct RWS, T-style antennas and blast shields. But after building their M-ATV I was a little leery of buying this kit. Much to my surprise the kit was a real step up from their M-ATV
Box-art
Instructions, seem to be nicely done with a brief description of the vehicle. Laid out nicely, starts with the suspension and undercarriage and progresses to interior then exterior.
Box Content.

The parts spures come wrapped in very strange feeling plastic bags. But everything in was well preserved. There are 8 sprues, 6 in a nice tan plastic, 1 clear plastic, 1 in a hard black vinyl. Also is a sheet of nice decals designed by Cartograf and printed by Bison Decals, and a small sheet of photo-etch.
Sprue A- Sprue A has the upper hull, outer stowage bins/fender parts, and the grill. Everything is really nicely done. The details on the stowage bins is nice and crisp, and the grill looks excellent.

Sprue B- sprue B contains the lower hull and I believe the majority of the suspension components. I remember Kinetic's M-ATV suspension and how awfully detailed and thick the parts were. The suspension in this kit is truly wonderful. Nicely detailed with thin-to scale parts. The tread plate for the rear

Sprue E. Sprue E contains parts for the interior. From the troop seats, A/C unit, dashboard and the gunners stand. Everything again, quite crisply done and seems to be accurate. Some downsides are flash on the seats and some thick sprue attachment points. Parts will require a lot of cleanup.

Sprue F. Sprue F is one of the two sprues specifically added to build a Canadian RG-31. It includes the new front and rear windows, the radio rack, rear sentry blast shield, monitor for the RWS, and the base for the RWS. Nicely done again, everything seems to be correctly moulded. But again thick sprue attachment points and some soft details on the radio rack .
Spure K. Spure K is the second of two sprues included for the Canadian Version. It contains the parts for the RWS and T-Style antenna mounts. The parts here look nice, the correct version of the M151 Protector RWS with the correct 8 76mm Wegman grenade launchers as opposed to the 4x4 bank seen on vehicles such as the stryker. The one flaw of this sprue, is the .50cal. Quite honestly it looks worse the some Tamiya ones from the 70's considering how much went into other aspects of the kit its quite a let down. The other issue with the RWS is its only designed for the .50cal. The majority of RG-31's I've seen in canadian service used the C6 GPMG(FN MAG, L7A2 etc...) I will be swaping out the .50cal for Live-Resin's excellent GPMG.

Spure C-B, the final sprue which is C and another B has final exterior items for the RG. C mostly contains part for the American version of the vehicle and is not used. B has the front windshield, tire cranks, rims, bumper, back door and the back of the hull. No real problems here except some thickish spure attachment points.

Clear parts. Unlike the American version Canadians did not have any gun ports in the windows of their RG's and the glass for the sides is different shape. This is refleected in Kinteics new clear parts spure. Everything seems nice, and translucent with no warping in the parts.

Decals
Decals, are provided for three CAF RG-31's. An early one from 2006, without the T-style antenna's, and blast shield. And two others from 2009. One having the Autobot logo and the other carrying the Punisher logo and Canadian Airborne Regiment Logo. Both examples can be found in Richard Saucier's Canadian EROC in Afghanistan book. Oddly enough none of the marking options are equipped with the prominent blast shields. But as time progressed the vehicles would have eventually gotten them. The decals are nice, the colour register looks good. They are designed by cartograf and printed by Bison Decals so I hope that they go down easy.

Vinyl and Tires.
While the Canadian version did not have the gunports on the side windows, they did retain one in the rear window and I believe one placed to the side of the driver and front passengers windows. The plastic feels quite stiff and may prove difficult to work with. The tires are a strange plasticy-vinyl mix. I do have some concerns and may replace them with DEF models sagged RG-31 tire set.

Overall, the kit is a very welcome addition to the recent explosive of Canadian military vehicles. It is a vast leap in terms of kit quality over the M-ATV, and I look forward to begining work on it.
Hosted by Darren Baker
1/35 Kinetic RG-31 Canadian Build+Review
Youngun
Ontario, Canada
Joined: November 10, 2010
KitMaker: 587 posts
Armorama: 550 posts
Joined: November 10, 2010
KitMaker: 587 posts
Armorama: 550 posts
Posted: Sunday, October 20, 2013 - 09:29 AM UTC
hliu24
California, United States
Joined: November 19, 2010
KitMaker: 798 posts
Armorama: 797 posts
Joined: November 19, 2010
KitMaker: 798 posts
Armorama: 797 posts
Posted: Sunday, October 20, 2013 - 10:03 AM UTC
Thank you Alex, will follow.
Jay
Jay
junglejim
Alberta, Canada
Joined: February 18, 2003
KitMaker: 1,728 posts
Armorama: 1,629 posts
Joined: February 18, 2003
KitMaker: 1,728 posts
Armorama: 1,629 posts
Posted: Sunday, October 20, 2013 - 10:44 AM UTC
Good review Alex - just a quick note - the 'earlier' versions first in Afghanistan did have the firing ports in the windows, so if you do have the US version of the kit you can swap out the windows (that's what I plan to do). I believe the 'later' ones with the blast shields didn't have the firing ports .
Cheers,
Jim
Cheers,
Jim
bison126
Correze, France
Joined: June 10, 2004
KitMaker: 5,329 posts
Armorama: 5,204 posts
Joined: June 10, 2004
KitMaker: 5,329 posts
Armorama: 5,204 posts
Posted: Sunday, October 20, 2013 - 05:54 PM UTC
Another on my wish list. Interesting in box review Alex. Thanks for it.
I second you about the poor looking M2 MG. When you swap it for a C6, what other mods do you need ? I guess the MG cradle is not the same. Where can you find a suitable one?
Olivier
I second you about the poor looking M2 MG. When you swap it for a C6, what other mods do you need ? I guess the MG cradle is not the same. Where can you find a suitable one?
Olivier
LeoCmdr
Alberta, Canada
Joined: January 19, 2005
KitMaker: 4,085 posts
Armorama: 3,917 posts
Joined: January 19, 2005
KitMaker: 4,085 posts
Armorama: 3,917 posts
Posted: Sunday, October 20, 2013 - 06:10 PM UTC
Quoted Text
Another on my wish list. Interesting in box review Alex. Thanks for it.
I second you about the poor looking M2 MG. When you swap it for a C6, what other mods do you need ? I guess the MG cradle is not the same. Where can you find a suitable one?
Olivier
The mount on the M151 RWS is universal for mounting the .50 Cal, C6, etc...There shouldn't be any major modifications in 1/35 to mount a C6.
Youngun
Ontario, Canada
Joined: November 10, 2010
KitMaker: 587 posts
Armorama: 550 posts
Joined: November 10, 2010
KitMaker: 587 posts
Armorama: 550 posts
Posted: Monday, October 21, 2013 - 12:27 AM UTC
Quoted Text
Quoted TextAnother on my wish list. Interesting in box review Alex. Thanks for it.
I second you about the poor looking M2 MG. When you swap it for a C6, what other mods do you need ? I guess the MG cradle is not the same. Where can you find a suitable one?
Olivier
The mount on the M151 RWS is universal for mounting the .50 Cal, C6, etc...There shouldn't be any major modifications in 1/35 to mount a C6.
Jason I believe that a feed chute tray is added. In the EROC book most of the empty RWS' have some small metal trays. This maybe a custom thing or a field expedited soultuion but I do believe there is some difference.
bison126
Correze, France
Joined: June 10, 2004
KitMaker: 5,329 posts
Armorama: 5,204 posts
Joined: June 10, 2004
KitMaker: 5,329 posts
Armorama: 5,204 posts
Posted: Monday, October 21, 2013 - 02:55 AM UTC
Thanks for the input Jason and Alex.
LeoCmdr
Alberta, Canada
Joined: January 19, 2005
KitMaker: 4,085 posts
Armorama: 3,917 posts
Joined: January 19, 2005
KitMaker: 4,085 posts
Armorama: 3,917 posts
Posted: Monday, October 21, 2013 - 02:59 AM UTC
Quoted Text
Quoted TextQuoted TextAnother on my wish list. Interesting in box review Alex. Thanks for it.
I second you about the poor looking M2 MG. When you swap it for a C6, what other mods do you need ? I guess the MG cradle is not the same. Where can you find a suitable one?
Olivier
The mount on the M151 RWS is universal for mounting the .50 Cal, C6, etc...There shouldn't be any major modifications in 1/35 to mount a C6.
Jason I believe that a feed chute tray is added. In the EROC book most of the empty RWS' have some small metal trays. This maybe a custom thing or a field expedited soultuion but I do believe there is some difference.
As I stated...There shouldn't be any "major modifications" in 1/35 to mount a C6. I guess that is subjective as to what you consider a major modification. A feed tray on the left side and the opposite side link chute won't be hard to create. You will likely also have to create a smaller cradle for the C6 as opposed to the .50 Cal...again, not a major modification.
Youngun
Ontario, Canada
Joined: November 10, 2010
KitMaker: 587 posts
Armorama: 550 posts
Joined: November 10, 2010
KitMaker: 587 posts
Armorama: 550 posts
Posted: Wednesday, October 23, 2013 - 10:37 AM UTC
So I've been pretty sick since monday, but it did give me a bit of time to work on the RG. Unfortunately because I was sick I decided not to start where the kit starts with the suspension. But jumped ahead to the exterior bins and meatier interior chucks. So
Step 9- Exterior bin assembly. Fairly straight forward, had some slight alignment issues but everything went together fairly straight forward.
Step 10- in step 10 there is a mix of interior and exterior parts constructed. The interior A/C unit is build along with the loaders stand for access to the RWS. Exterior wise you get the t-style mounts, early style mounts and the spare tire winch parts.
So far there I haven't encountered any major problems. Some of the fit of parts isn't the greatest as seen, the sprue attachment points are often thick and leave noticable white marks on the parts. With regards to the T-style antenna if I had the money to invest in a resin casting kit I would love to cast the parts for my other Canadian forces vehicles..
aristeidis
Attica, Greece / Ελλάδα
Joined: September 15, 2012
KitMaker: 621 posts
Armorama: 592 posts
Joined: September 15, 2012
KitMaker: 621 posts
Armorama: 592 posts
Posted: Wednesday, December 18, 2013 - 09:36 PM UTC
Any more progress on this unique built? Are there any more differences compared to the us version except the antennas and the rws? Is the back part of the roof a little different? Are there any hatches as in the US version?
Youngun
Ontario, Canada
Joined: November 10, 2010
KitMaker: 587 posts
Armorama: 550 posts
Joined: November 10, 2010
KitMaker: 587 posts
Armorama: 550 posts
Posted: Thursday, December 19, 2013 - 02:43 AM UTC
Aristeidis, yes there has been more progress to the kit but I had to take it home where my airbrush is and didn't take any pictures before leaving it.
With reagrd to differences, the main vehicle is the same as the US version. On the interior there are changes because of the RWS. There is a monitor, and one of the crew seats does face forward with a joy stick.
On the exterior the first major differences are the RWS and Canadian T-style antenna's. But also the front and rear windows have a different shape from the American version, the front window being diamond like on the Canadian. Also around the rear hatches Canadian RG's as the deployment went on in Afghanistan began to get shields around the hatch to protect the rear sentry postitions. Also later Canadian ones did not have the pistol ports in the Windows, they were solid.
I'm leaving for home after my final exam tomorrow, and will update this post with pictures.
aristeidis
Attica, Greece / Ελλάδα
Joined: September 15, 2012
KitMaker: 621 posts
Armorama: 592 posts
Joined: September 15, 2012
KitMaker: 621 posts
Armorama: 592 posts
Posted: Thursday, December 19, 2013 - 06:37 AM UTC
Alex thank you very much for the reply! Looking forward to see the incoming progress and photos! I intend to order it but i already have the US version, so i want to see if it worths the money for something different looking!
Youngun
Ontario, Canada
Joined: November 10, 2010
KitMaker: 587 posts
Armorama: 550 posts
Joined: November 10, 2010
KitMaker: 587 posts
Armorama: 550 posts
Posted: Thursday, December 19, 2013 - 06:51 AM UTC
You can compare the spures above, there are two additional sprues in this kit. One consists of the RWS, and the antenna's and a few other Canadian Specific bits. The other has the roof armour/RWS mount, the air defense shields, the Canadian windows and some interior components that are different. In my view its worth the money if you want the Canadian Version, as if you try to scratch it some changes are quite extensive. The only thing I recommend is swapping out the .50cal for a live resin GPMG or .50cal
recceboy
Alberta, Canada
Joined: July 20, 2006
KitMaker: 706 posts
Armorama: 665 posts
Joined: July 20, 2006
KitMaker: 706 posts
Armorama: 665 posts
Posted: Thursday, December 19, 2013 - 03:01 PM UTC
We use Mk 3 & MK 3a's and the armoured pistol ports can be seen on all variants, as well mounting the .50cal.
Anthony
Anthony
parrot
Ontario, Canada
Joined: March 01, 2002
KitMaker: 1,607 posts
Armorama: 1,581 posts
Joined: March 01, 2002
KitMaker: 1,607 posts
Armorama: 1,581 posts
Posted: Wednesday, January 01, 2014 - 01:59 AM UTC
Hi Alex,
I don't know how I missed this build til now.Found it by chance looking for my own.
Be careful down the line with the instructions,there are mistakes and things left out.The sprue attachments are a bit of a pain with most extending onto the part.A lot of small trimming.Your also right,the 50 is pretty bad.I changed it on the US version,but that was much easier.
Looking forward to your progress.
Tom
Youngun
Ontario, Canada
Joined: November 10, 2010
KitMaker: 587 posts
Armorama: 550 posts
Joined: November 10, 2010
KitMaker: 587 posts
Armorama: 550 posts
Posted: Tuesday, January 07, 2014 - 03:58 PM UTC
Youngun
Ontario, Canada
Joined: November 10, 2010
KitMaker: 587 posts
Armorama: 550 posts
Joined: November 10, 2010
KitMaker: 587 posts
Armorama: 550 posts
Posted: Thursday, January 09, 2014 - 03:54 PM UTC
Now that the interior is the proper colour, I have some progress to report on. The interior is missing some detail, and the radio to be honest is quite pitiful. Everything is still glossy as it was just painted. The major stuff is done, now its just some small details and i'll closer her up, finish building and onto paint.
Kinda bummed that Legend just announced an interior update, but since its not Canadian specific it might be a bit overpriced for a few additional pieces.
parrot
Ontario, Canada
Joined: March 01, 2002
KitMaker: 1,607 posts
Armorama: 1,581 posts
Joined: March 01, 2002
KitMaker: 1,607 posts
Armorama: 1,581 posts
Posted: Friday, January 10, 2014 - 10:12 AM UTC
It's looking really good Alex.
I would save my money on the Legend AM.After your done it gets pretty hard to see detail on the interior,that's why I left all my hatches open.
Looking forward to the finished product.
Tom
I would save my money on the Legend AM.After your done it gets pretty hard to see detail on the interior,that's why I left all my hatches open.
Looking forward to the finished product.
Tom
Youngun
Ontario, Canada
Joined: November 10, 2010
KitMaker: 587 posts
Armorama: 550 posts
Joined: November 10, 2010
KitMaker: 587 posts
Armorama: 550 posts
Posted: Friday, January 10, 2014 - 11:39 AM UTC
gcdavidson
Ontario, Canada
Joined: August 05, 2003
KitMaker: 1,698 posts
Armorama: 1,563 posts
Joined: August 05, 2003
KitMaker: 1,698 posts
Armorama: 1,563 posts
Posted: Friday, January 10, 2014 - 03:46 PM UTC
try running a black sharpie around the perimeter of the glass. helps make it look less plastic-y.
Youngun
Ontario, Canada
Joined: November 10, 2010
KitMaker: 587 posts
Armorama: 550 posts
Joined: November 10, 2010
KitMaker: 587 posts
Armorama: 550 posts
Posted: Tuesday, January 14, 2014 - 05:41 AM UTC
35th-scale
Kildare, Ireland
Joined: November 21, 2007
KitMaker: 3,212 posts
Armorama: 2,807 posts
Joined: November 21, 2007
KitMaker: 3,212 posts
Armorama: 2,807 posts
Posted: Tuesday, January 14, 2014 - 08:53 PM UTC
That's coming along nicely! The RWS really looks the business
parrot
Ontario, Canada
Joined: March 01, 2002
KitMaker: 1,607 posts
Armorama: 1,581 posts
Joined: March 01, 2002
KitMaker: 1,607 posts
Armorama: 1,581 posts
Posted: Wednesday, January 15, 2014 - 10:17 AM UTC
Your going to leave us in suspence for a month?What are you,one of these Canadian snowbirds? .
Anyway,it's looking great.Looks like you had better luck than me fitting the shields on.
Hurry back.
Tom
Anyway,it's looking great.Looks like you had better luck than me fitting the shields on.
Hurry back.
Tom
Youngun
Ontario, Canada
Joined: November 10, 2010
KitMaker: 587 posts
Armorama: 550 posts
Joined: November 10, 2010
KitMaker: 587 posts
Armorama: 550 posts
Posted: Sunday, February 02, 2014 - 10:03 AM UTC
Sorry for misleading you gentlemen, came home this weekend to watch the superbowl with friends and get some days on the ski hill.
Did some minor paint work, I.E the handles for the stowage bins, the latches for the bins and the rubber seals around the vehicle(black lines) which are instead of being raised are sunken into the plastic. Then came the decals, I originally wanted to do the Punisher with the Canadian Airborne wings on the back. Unfortunately both are way to big, so I settled for the transformer markings.
Overall pain in the ass, the decals didn't set the way I wanted to, took a lot of coercing to get them in place and dried with a sheen regardless of how much micro sol and set I used. The other thing, beside the tire jacks and rear you will notice empty white squares. These are supposed to be data plates with information, no idea why they are blank seeing some of the other small stuff printed.
Anyways thanks for watching.
parrot
Ontario, Canada
Joined: March 01, 2002
KitMaker: 1,607 posts
Armorama: 1,581 posts
Joined: March 01, 2002
KitMaker: 1,607 posts
Armorama: 1,581 posts
Posted: Monday, February 03, 2014 - 10:48 AM UTC
Hi Alex,
Good to have you back.
I was actually going to ask you what the point of the squares were?Not impressed with the decals either.
In fact,when I accidently dropped it I was amazed that one fell off.Never seen that happen before.
Tom
Good to have you back.
I was actually going to ask you what the point of the squares were?Not impressed with the decals either.
In fact,when I accidently dropped it I was amazed that one fell off.Never seen that happen before.
Tom