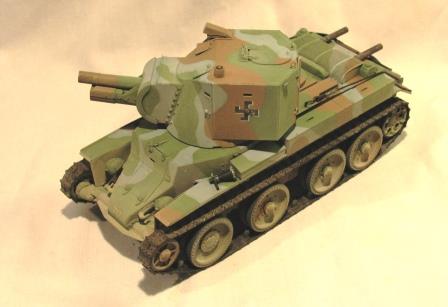
Tamiya's 1/35 BT-42. Another out of the box build (including the silly string tow cable). Tri-color Finnish camouflage. As with all my builds, comments, especially constructive ones, are welcome.
This is the base camo layout before weathering was started.
These are the finished build....
A couple detail shots....
And with that I'll close the book on 2014.
Constructive Feedback
For in-progress or completed build photos. Give and get contructive feedback!
Hosted by Darren Baker, Dave O'Meara
Finnish BT-42 Completed
AFVFan
North Carolina, United States
Joined: May 17, 2012
KitMaker: 1,980 posts
Armorama: 1,571 posts
Joined: May 17, 2012
KitMaker: 1,980 posts
Armorama: 1,571 posts
Posted: Monday, December 08, 2014 - 02:28 AM UTC
Thudius
Uusimaa, Finland
Joined: October 22, 2012
KitMaker: 1,194 posts
Armorama: 1,077 posts
Joined: October 22, 2012
KitMaker: 1,194 posts
Armorama: 1,077 posts
Posted: Monday, December 08, 2014 - 03:13 AM UTC
Not too shabby Bob. What paints did you use?
Kimmo
Kimmo
alewar
Canelones, Uruguay
Joined: December 27, 2006
KitMaker: 773 posts
Armorama: 765 posts
Joined: December 27, 2006
KitMaker: 773 posts
Armorama: 765 posts
Posted: Monday, December 08, 2014 - 03:16 AM UTC
I like the cammo and the finish.
Btw which colors did you use?
Regards
Alvaro
Btw which colors did you use?
Regards
Alvaro
Cookiescool2
Georgia, United States
Joined: May 09, 2014
KitMaker: 273 posts
Armorama: 270 posts
Joined: May 09, 2014
KitMaker: 273 posts
Armorama: 270 posts
Posted: Monday, December 08, 2014 - 04:02 AM UTC
Outstanding build! I very much like the "used" look, I look forward to your future projects!
AFVFan
North Carolina, United States
Joined: May 17, 2012
KitMaker: 1,980 posts
Armorama: 1,571 posts
Joined: May 17, 2012
KitMaker: 1,980 posts
Armorama: 1,571 posts
Posted: Monday, December 08, 2014 - 06:16 AM UTC
Thanks for the comments, guys. Appreciate the interest.
In regards to the paint for the camo, it was all Model Master enamel. The light color is Russian Topside Gray (2120) straight out of the bottle. The brown is French Chestnut (2107) with some white added. The green is RAF Dark Green (2060) also lightened with white. After laying down the pattern with my airbrush I went back in and hardened up the lines by hand, avoiding the whole pesky masking thing.
While looking over the pics again I noticed I still have to paint the rear light. It never fails, I always find stuff in pictures that I never see in real life.
justsendit
Colorado, United States
Joined: February 24, 2014
KitMaker: 3,033 posts
Armorama: 2,492 posts
Joined: February 24, 2014
KitMaker: 3,033 posts
Armorama: 2,492 posts
Posted: Monday, December 08, 2014 - 06:49 AM UTC
Your paint and weathering scheme has a very realistic look to it.
Nicely done!
--mike
Nicely done!
--mike
panzerbob01
Louisiana, United States
Joined: March 06, 2010
KitMaker: 3,128 posts
Armorama: 2,959 posts
Joined: March 06, 2010
KitMaker: 3,128 posts
Armorama: 2,959 posts
Posted: Monday, December 08, 2014 - 07:43 AM UTC
VERY COOL job and a really neat interpretation of that tricolor scheme! It's a great presentation all the way 'round And your photos show your great job to real advantage!
I did this one not long ago for one of the Armorama campaigns - also modeled the "famous" #717 used in the Battle of Vyborg in 1944! How could anyone resist painting this rather ugly tank in that neat scheme?!
MOSTLY OOTB, as did you, although I did add in a couple of glaring missing details, such as those vent-baffle operating devices on the rear ends of each side vent box, and the small reinforcement plate welded along the front axle housing.
All-up, I found it to be a great kit and build in most particulars, although I was totally underwhelmed by the kit's styrene barrel... and that silly string (which I also used...) - well... "Silly" wasn't exactly the word I used!
Your colors look pretty good - somewhat different (other than that gray...) from my choices, but very good-looking, and your dirt-load is frankly much better than mine turned out! (Maybe I'll go revisit that on mine... along with a little dark pinwash to pick out a few bits as you have )
And when I looked at your pics.. right. Yeap. I found at least one detail (those handles on that rear deck screen) that you have hit which somehow I left off! I'll imagine that they were somehow just shot off my incarnation of 717!
PS: your camo edging came out OK on that scheme (I went for the masking - a little tedious at first but turned out pretty easy to do once I tried things out a bit), but your end pattern seems to MAY have lost or left off some of the forms and "units" of the real thing (I, too, left a lobe or 2 off... I have "tested a few folks to see if they could find the blobs I actually missed! GREAT fun if one wants to tweak at the officionados! ) Still, it really looks cool and "the part", and I'm certainly not the paint-splat counter type!
And yeah, that little lamp looks like it missed the red paint!
NICE '42, Bob!
Bob
ColinEdm
Associate Editor
Alberta, Canada
Joined: October 15, 2013
KitMaker: 1,355 posts
Armorama: 1,229 posts
Joined: October 15, 2013
KitMaker: 1,355 posts
Armorama: 1,229 posts
Posted: Monday, December 08, 2014 - 09:35 AM UTC
Nicely done!
AFVFan
North Carolina, United States
Joined: May 17, 2012
KitMaker: 1,980 posts
Armorama: 1,571 posts
Joined: May 17, 2012
KitMaker: 1,980 posts
Armorama: 1,571 posts
Posted: Monday, December 08, 2014 - 10:24 AM UTC
Mike and Colin - Appreciate the kind words.
Bob - Same goes for you, Bob. Your assessment of the kit is dead on. It really needs a metal barrel and wire cables to help take it to the next level. I loved the little PE mold they gave you to shape the engine screen. That really saved a lot of headaches!
I actually did a pretty thorough pin wash on it, but a lot of it disappeared when I added the "dust" filter. And yes, I did get a bit lazy when I hit the back panels. I think it's a hold over from doing so many German vehicles. They've always got so much stuff hanging off the back that you can't really see the paint!
As for the colors, yours is probably more accurate. This is a commission piece. The guy sent me a picture he had dug up somewhere and requested that I match the colors on it. I did that quite well at the possible cost in some accuracy.
Bob - Same goes for you, Bob. Your assessment of the kit is dead on. It really needs a metal barrel and wire cables to help take it to the next level. I loved the little PE mold they gave you to shape the engine screen. That really saved a lot of headaches!
I actually did a pretty thorough pin wash on it, but a lot of it disappeared when I added the "dust" filter. And yes, I did get a bit lazy when I hit the back panels. I think it's a hold over from doing so many German vehicles. They've always got so much stuff hanging off the back that you can't really see the paint!
As for the colors, yours is probably more accurate. This is a commission piece. The guy sent me a picture he had dug up somewhere and requested that I match the colors on it. I did that quite well at the possible cost in some accuracy.
retiredyank
Arkansas, United States
Joined: June 29, 2009
KitMaker: 11,610 posts
Armorama: 7,843 posts
Joined: June 29, 2009
KitMaker: 11,610 posts
Armorama: 7,843 posts
Posted: Tuesday, December 09, 2014 - 06:09 PM UTC
Now, that's one ugly beast. Well done. Just looking at it, I thought Tamiya paint. I'm all about rust, but it is one of those "less is more" things. That being said, superb weathering on the pipes!
AFVFan
North Carolina, United States
Joined: May 17, 2012
KitMaker: 1,980 posts
Armorama: 1,571 posts
Joined: May 17, 2012
KitMaker: 1,980 posts
Armorama: 1,571 posts
Posted: Wednesday, December 10, 2014 - 07:14 AM UTC
Appreciate the comments, Matt.
Tedwards252
South Carolina, United States
Joined: July 12, 2012
KitMaker: 72 posts
Armorama: 70 posts
Joined: July 12, 2012
KitMaker: 72 posts
Armorama: 70 posts
Posted: Saturday, January 17, 2015 - 03:17 AM UTC
Nice work, Bob. I really like this.
AFVFan
North Carolina, United States
Joined: May 17, 2012
KitMaker: 1,980 posts
Armorama: 1,571 posts
Joined: May 17, 2012
KitMaker: 1,980 posts
Armorama: 1,571 posts
Posted: Saturday, January 17, 2015 - 02:53 PM UTC
Appreciate the kind words, Trevor.