Canada
Joined: February 08, 2008
KitMaker: 51 posts
Armorama: 49 posts
Posted: Sunday, January 04, 2015 - 02:27 AM UTC
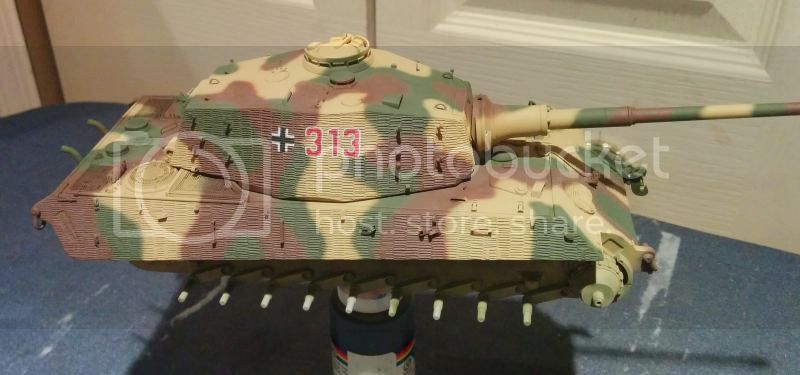
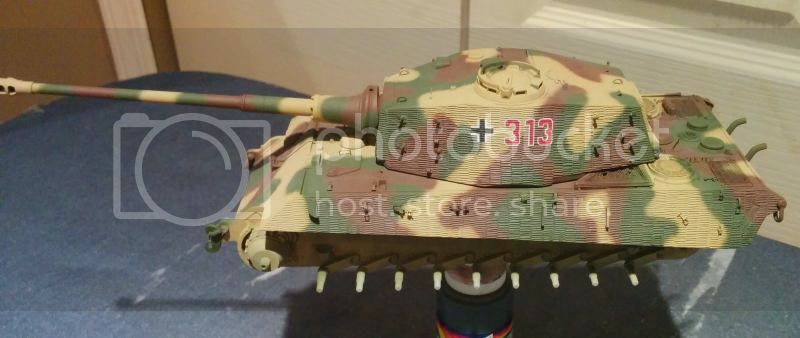
Hey folks, I haven't been on here for a while but thought I'd drop a couple pics of the tiger II I'm currently working on.
It was primed with vallejo grey then painted entirely with a mix of tamiya olive green, yellow and sky. The brown is tamiya red brown and the dark yellow is a mix of tamiya dark yellow, desert yellow and white.
The markings are archer dry transfers and then lightly over sprayed with lifecolour N europe dust. The road wheels are painted solid in yellow, green and brown.
Tracks are friul. This was all done freehand and I'm not building any specific tank so markings etc prob arn't correct etc but that's not the point of this build. Time to gloss coat and start the weathering process :-)
Oregon, United States
Joined: September 22, 2004
KitMaker: 375 posts
Armorama: 282 posts
Posted: Sunday, January 04, 2015 - 03:23 AM UTC
That's a really nice paint job, excellent freehand camo spraying...however, there is no reason to gloss coat a model to start weathering it. Working in smaller controlled sections at a time will yield superior overall results on the paint as is.
A gloss coat reduces the surface tension and tooth so much it alters how effective the weathering processes can be applied, controlled and ultimately the end results.
Best,
Michael Rinaldi, RSP
www.rinaldistudiopress.com
www.facebook.com/RinaldiStudio
Canada
Joined: February 08, 2008
KitMaker: 51 posts
Armorama: 49 posts
Posted: Sunday, January 04, 2015 - 05:14 AM UTC
Thank you sir, coming from a man of your talent it's greatly appreciated.
I've used your techniques from your books and have had good success with that including a T90 that's sitting on the shelf close to being finished. I just had a earg to do something old-school I suppose.
Thanks again though!
North Carolina, United States
Joined: May 17, 2012
KitMaker: 1,980 posts
Armorama: 1,571 posts
Posted: Sunday, January 04, 2015 - 09:08 AM UTC
I do like a gloss coat to work on if I'm planning panel line pin washes and fine line streaking. I've found it keeps the paint "bleed" down to a minimum, and allows the washes to flow smoother. After those two stages are done though, I'll shoot a coat of dull over it to complete the rest of the weathering.
Can't say I'm right or wrong....it's just how I'm used to doing it.

Canada
Joined: February 08, 2008
KitMaker: 51 posts
Armorama: 49 posts
Posted: Wednesday, January 07, 2015 - 08:11 AM UTC
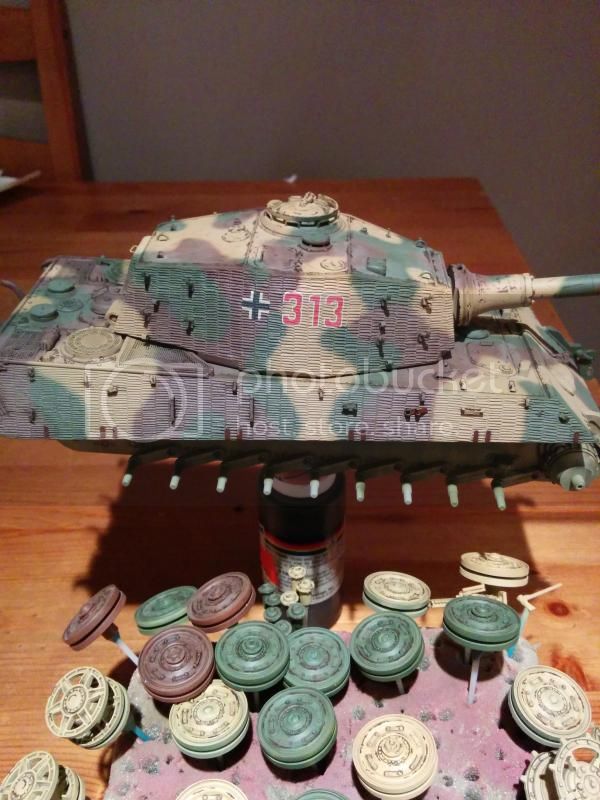
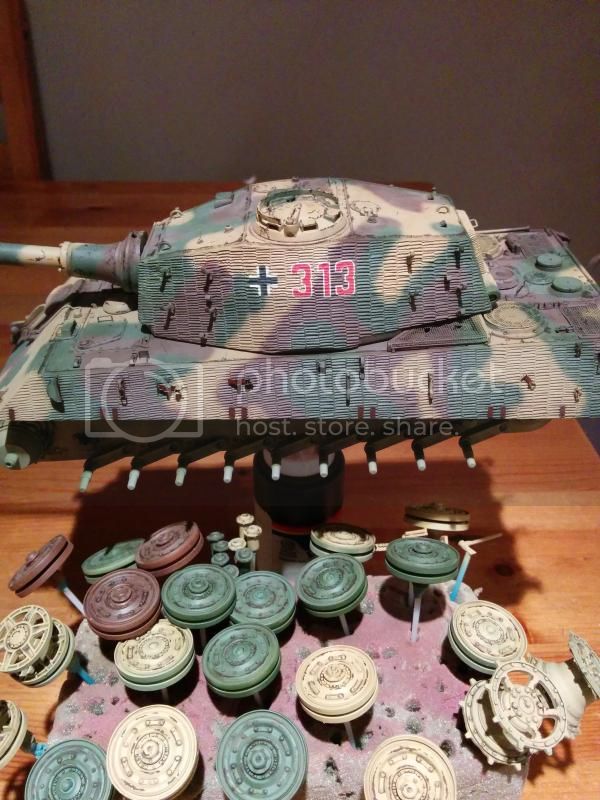
Well, little update here.
I gloss coated it then back tracked and applied matt coat over that. So in the end there is a super thick (relativly speaking) barrier between the base coat and the weathering.
So far I've done a filter with humbrol enamel some pin wishing with various dark oils then proceed to chip with vallejo. I also decided to add a touch of color by painting inside tool brackets and the fender mounting plates in hull red. Though not realistic I think it adds a touch to the paint job.
Now I am at that I'm scared what to do next moment. I am thinking I want to add just a bit of dried mud to the lower chassis and road wheels and then mostly dust the upper surface though I'm not exactly sure how to deal with the zim.
The panzer IV I did turned our much darker than I wanted because of overall washes that I haven't done on this model and I didn't lighten my base colours on this Tiger II as much as I should have. Oh the things we learn as we go, it's what makes it fun right?
Any suggestions would be greatly appreciated.
Here are pics of where I am now
Namabiiru
 Associate Editor
#399
Rhode Island, United States
Joined: March 05, 2014
KitMaker: 2,888 posts
Armorama: 1,920 posts
Posted: Wednesday, January 07, 2015 - 08:56 AM UTC
Jon,
I think it's shaping up nicely. If you feel your colors are too dark I would suggest going over the whole thing with a very light overspray of your base color dunkelgelb, lightened slightly and thinned to almost nothing. This will lighten up your colors and tie everything together with a sun-faded look. Have to be careful not to over-do it, though--you've done a great job with your camo and you don't want to hide that.
Also the paint on the rims of those steel road wheels would have worn off pretty quickly, so don't forget to go around those with an appropriate steel grey color.
My $0.02 anyway...

North Carolina, United States
Joined: May 17, 2012
KitMaker: 1,980 posts
Armorama: 1,571 posts
Posted: Wednesday, January 07, 2015 - 09:04 AM UTC
Quoted Text
Also the paint on the rims of those steel road wheels would have worn off pretty quickly, so don't forget to go around those with an appropriate steel grey color.
and don't forget the corresponding wear pattern on the tracks from the wheels.

Canada
Joined: February 08, 2008
KitMaker: 51 posts
Armorama: 49 posts
Posted: Wednesday, January 07, 2015 - 09:08 AM UTC
Thanks Mark,
I still have not metallized the contact surfaces of the road wheels and will carry that over into the rim as well as the sprocket teeth.
As for lightening with the dark yellow would it not do the same using a very light dust colour? Or should I use the dark yellow first then dust over that.
Thanks
Jon
Namabiiru
 Associate Editor
#399
Rhode Island, United States
Joined: March 05, 2014
KitMaker: 2,888 posts
Armorama: 1,920 posts
Posted: Wednesday, January 07, 2015 - 09:14 AM UTC
I think either would work. I generally start with my base color, but dust or light earth color should do just fine. Personal preference, I suppose.

Canada
Joined: February 08, 2008
KitMaker: 51 posts
Armorama: 49 posts
Posted: Wednesday, January 07, 2015 - 09:32 AM UTC
and don't forget the corresponding wear pattern on the tracks from the wheels.

I'm working with friul tracks so that will be easy enough
Arkansas, United States
Joined: June 29, 2009
KitMaker: 11,610 posts
Armorama: 7,843 posts
Posted: Wednesday, January 07, 2015 - 08:15 PM UTC
A wash will also alter the color, as it fills the zimmerit. I ended up with a much darker color than I intended. Just something to keep in mind. The paint, up to this point looks great. I also had a problem, with the decals snuggling down. It seems your's are perfect.
Ideals are peaceful. History is violent.
Canada
Joined: February 08, 2008
KitMaker: 51 posts
Armorama: 49 posts
Posted: Thursday, January 08, 2015 - 12:03 AM UTC
Thanks Matt, I won't be doing any general washes just more pin washes and dust effects where needed.
As for the markings I used a set of archer dry transfers. They are about 12 years old but still followed the profile of the zim fairly well. They are not perfect but as long as your nose isn't against the model you can't tell :-)
Oregon, United States
Joined: September 22, 2004
KitMaker: 375 posts
Armorama: 282 posts
Posted: Thursday, January 08, 2015 - 03:48 AM UTC
Quoted Text
Now I am at that I'm scared what to do next moment. I am thinking I want to add just a bit of dried mud to the lower chassis and road wheels and then mostly dust the upper surface though I'm not exactly sure how to deal with the zim...
It's coming along well Jon, and if you're apprehensive on applying the next step, switch to a scrap or practice model and try that step out there first.
Practice and experience are the single greatest factors in moving forward, you're scared because you're not familiar enough with the process, old or newer techniques, it doesn't really matter. Just keep pushing and practice everything beforehand to get a better feel for what the results will be. Mileage is the true determining factor between skill levels.

Regarding zimm, pretend it's not there and weather as normal. The more hung up you get about it, the more stressed and reserved you'll become. Focus on the details attached to the model like the the tool clamps, bolts, etc. And don't fear mistakes, they will happen regardless. Believe me, they do...

Best,
Michael Rinaldi, RSP
www.rinaldistudiopress.com
www.facebook.com/RinaldiStudio
Canada
Joined: February 08, 2008
KitMaker: 51 posts
Armorama: 49 posts
Posted: Thursday, January 08, 2015 - 07:07 AM UTC
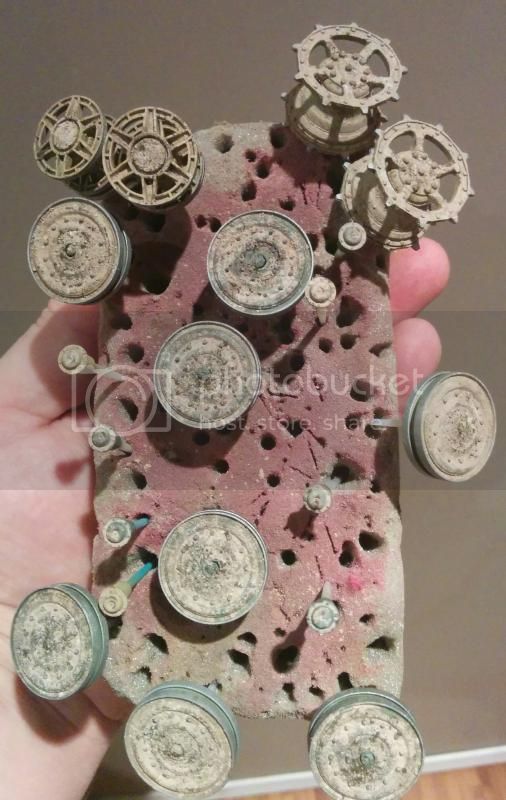
Well, after playing around mixing pigments last night and today I started the initial application of dried caked on dirt to the lower hull and the inner road wheels.
I think it looks better than my previous attempts and splattering oil paint stains makes for a big improvement over my previous works.
Tonight I'll add some dark pin washes and some streaking down the sides as well as attach the inner set of road wheels in preparation for the outer ones.
I'm really enjoying this project and like the challenge of trying new things. Thanks for all the great comments so far.


Oregon, United States
Joined: September 22, 2004
KitMaker: 375 posts
Armorama: 282 posts
Posted: Thursday, January 08, 2015 - 08:20 AM UTC
Outstanding! Looks awesome, love the various tones and scale effects...no apprehension there.

Best,
Michael Rinaldi, RSP
www.rinaldistudiopress.com
www.facebook.com/RinaldiStudio
Canada
Joined: February 08, 2008
KitMaker: 51 posts
Armorama: 49 posts
Posted: Friday, January 09, 2015 - 09:55 AM UTC
Well here is the running gear basically finished. I feel it's turned out quite well in my opinion. Sorry these cell pics really aren't doing a great job of capturing the true colors


Utrecht, Netherlands
Joined: July 31, 2003
KitMaker: 995 posts
Armorama: 64 posts
Posted: Saturday, January 10, 2015 - 02:06 AM UTC
Really awesome build en paint job! The colours look nice!
If a sherman can't do it, no other tank can do it!!
workbench:
The postcard campaign : Austin tilly
M8 greyhound
Canada
Joined: February 08, 2008
KitMaker: 51 posts
Armorama: 49 posts
Posted: Monday, January 26, 2015 - 05:25 AM UTC
Hi guys, so bit of a hold on this project as my wife and I were in hawaii for our honeymoon.
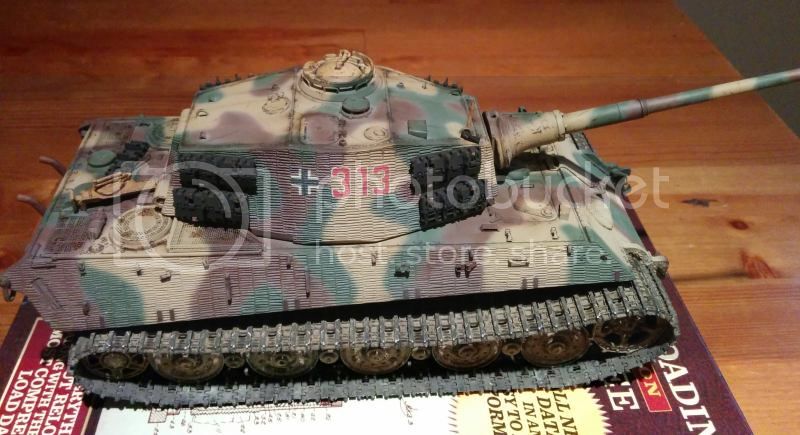
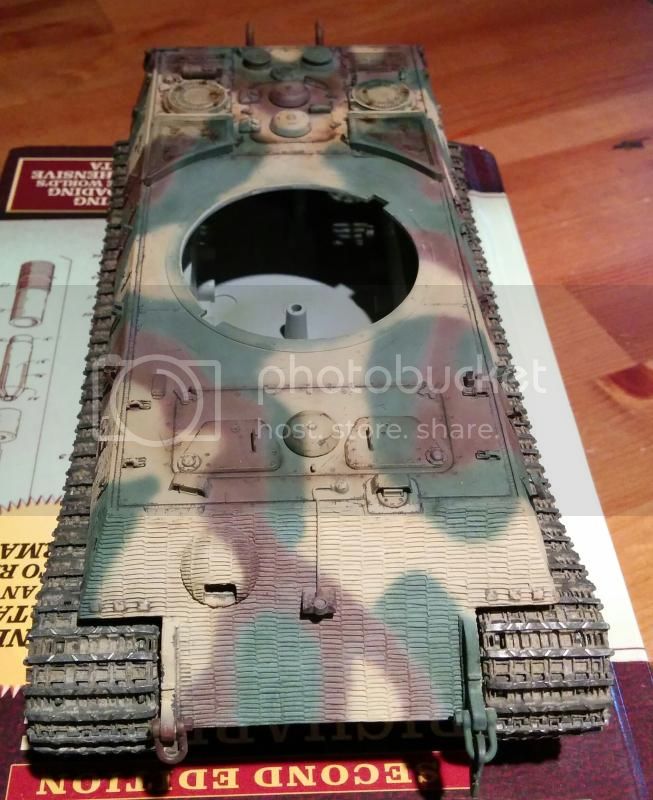
Spent the last 2 days doing some more weathering with oils and got the tracks finished and mounted.
I had half a bottle of black it but even after pre washing the tracks the effect was hardly pleasing, do I mixed up some flat black, red brown and dark earth and sprayed the track runs and spare links.
Following that I layed them out and applied the pigments I used on the running gear fixing them in place with isopropyl. A bit of blending and marking with a 8h pencil where the steel road wheels would have made contact and a light sanding with a emery board to polish the cleats and guide horns and they were ready for install.
Now it's time to start weathering the hull and turret sides. I will tackle that this evening. I also have to weather the spare track links they are very garish right now.
Hope you enjoy and thanks for the comments



Namabiiru
 Associate Editor
#399
Rhode Island, United States
Joined: March 05, 2014
KitMaker: 2,888 posts
Armorama: 1,920 posts
Posted: Monday, January 26, 2015 - 05:44 AM UTC
Shaping up nicely. Looks great!

Louisiana, United States
Joined: March 06, 2010
KitMaker: 3,128 posts
Armorama: 2,959 posts
Posted: Monday, January 26, 2015 - 06:06 AM UTC
Lookin' Good, Jon!

As this is a later-war Tiger... maybe you should consider either some rusting on those turret track-links, or even spraying them "in continuation" with one or both post-dunkelgelb camo colors. Pics show that such spares often did get partially or even completely camo-painted. NEW links would likely appear wearing a black satin enamel "fresh from the factory".
Looks great - just a suggestion to capture some more history here!
Bob

Canada
Joined: February 08, 2008
KitMaker: 51 posts
Armorama: 49 posts
Posted: Monday, January 26, 2015 - 06:16 AM UTC
Thanks Bob, I've liked the look of the turret even without the spare links. I realize they are austere right now and mentioned they would be weathered.
You just gave me a fun idea to do do some hs chipping with the cammo colors over them and since I've modeled it with most of the fittings missing I'll prob not include a full set on the tank
Alberta, Canada
Joined: August 20, 2008
KitMaker: 1,295 posts
Armorama: 1,191 posts
Posted: Monday, January 26, 2015 - 06:46 AM UTC
Congratulations Jon on your honeymoon. Still trying to figure out how to get back to Hawaii again! We had a great time there.
That said your build is very nice. I like your overall look, did you know se the silly putty method for your camo scheme?
Will this big cat sit static, or do you have plans for a dio?
Either way you have a great looking cat!
Dave

Do what you love, and love what you do... then everything else is simply an extension of that which drives your heart.
Canada
Joined: February 08, 2008
KitMaker: 51 posts
Armorama: 49 posts
Posted: Monday, January 26, 2015 - 06:56 AM UTC
Thanks Dave, Hawaii was indeed amazing, and a treat to be able to go diving NOT in a dry suit lol
As for the KT due to not having space in my hobby room it will just be static unfortunately.
The cammo was done all free hand. Did base coat of green, then the brown followed by dark yellow. Then went back and retouched the edges of the brown and green. I was spraying tamiya through my Iwata HP B+
Arkansas, United States
Joined: June 29, 2009
KitMaker: 11,610 posts
Armorama: 7,843 posts
Posted: Monday, January 26, 2015 - 07:28 PM UTC
Excellent weathering. Don't forget to paint your spare track hangers.
Ideals are peaceful. History is violent.
New York, United States
Joined: May 27, 2013
KitMaker: 2,210 posts
Armorama: 1,712 posts
Posted: Friday, January 30, 2015 - 02:44 AM UTC
Great build so far. I like the look. Two questions: 1, with the oil splatters, how did you get that effect? It looks really good. Also, how did you get the dry mud? I've tried to do this myself but I can't quite get it right.
I do some 3D design work. Message me for more info on what I'm doing or have done. Inquire about a product catalog.


