_GOTOBOTTOM
Constructive Feedback
For in-progress or completed build photos. Give and get contructive feedback!
Sd.kfz 7/1 Flakvierling WIP
Tank178
Visit this Community
Illinois, United States
Joined: December 30, 2009
KitMaker: 92 posts
Armorama: 63 posts
Posted: Wednesday, January 28, 2015 - 01:24 AM UTC
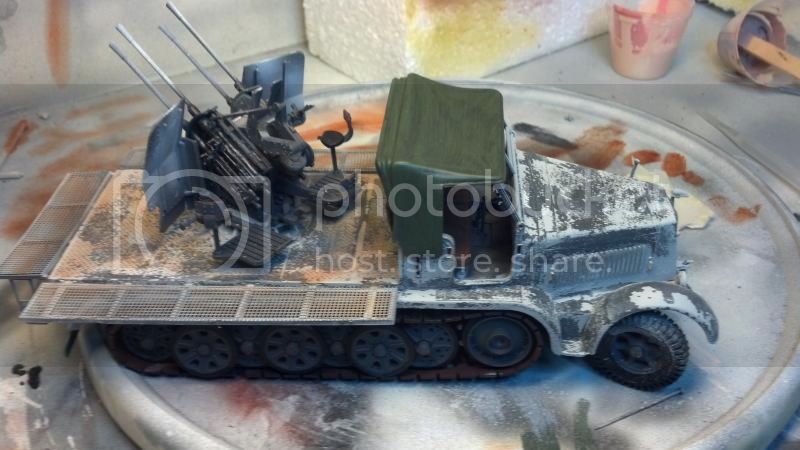
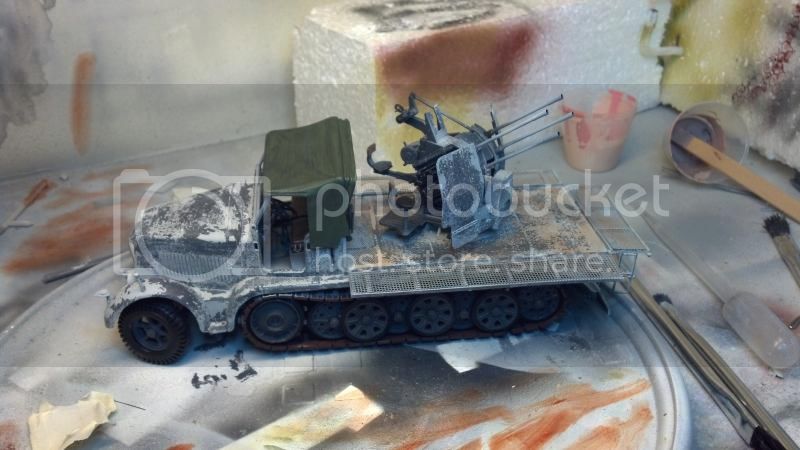
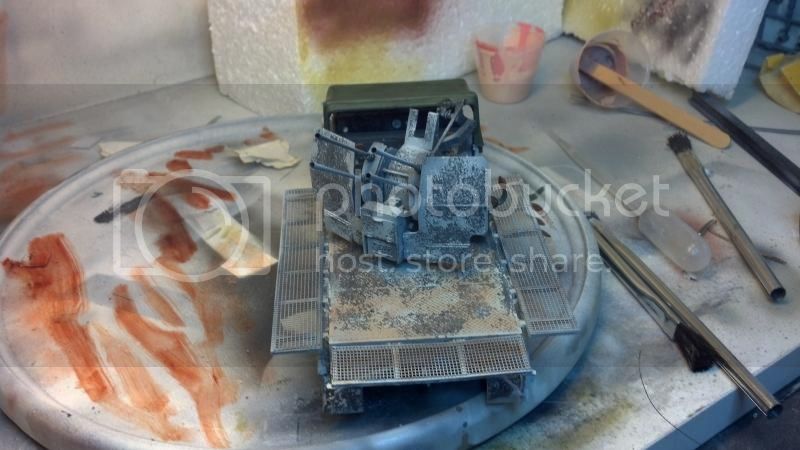
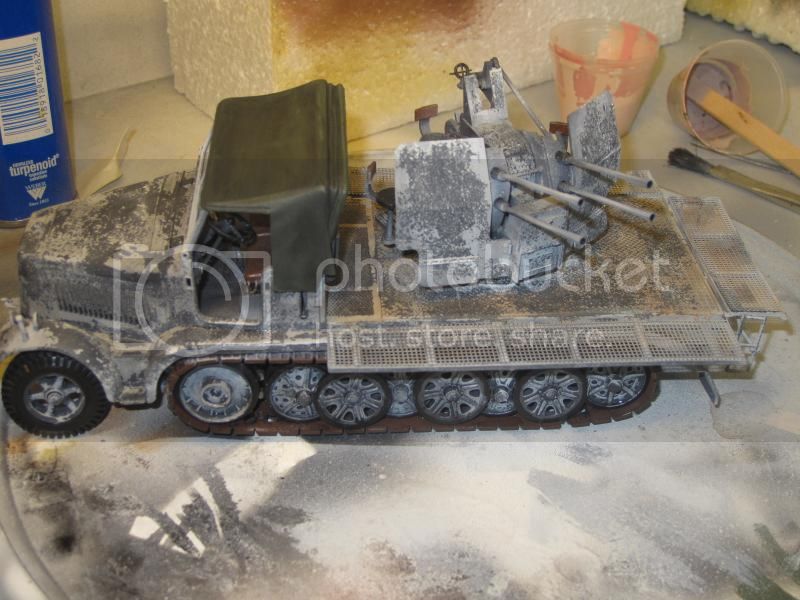
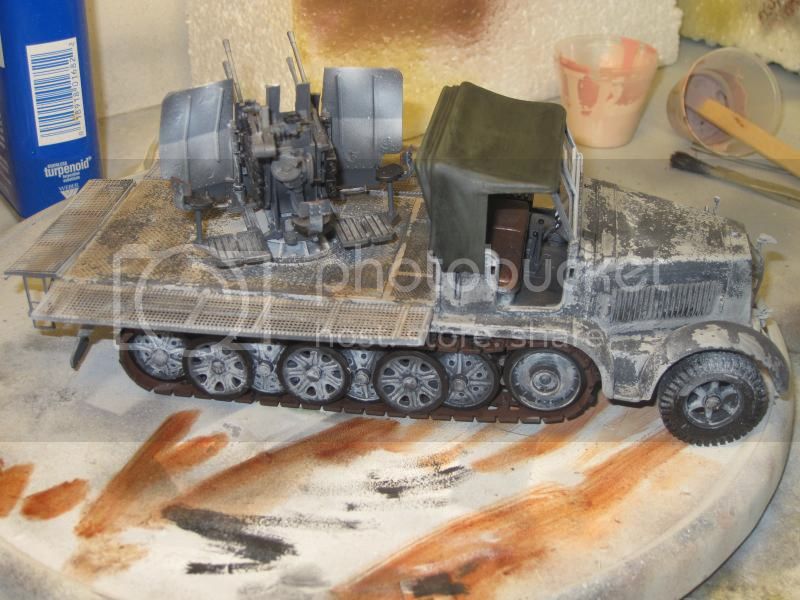
I have been working on the Tamiya Flakvierling for a few months. I got the kit in a scratch and dent sale. The chasis frame was slightly warped, but a soak in some warm water and some gentle bending straightened it out all right. My intent was to build it OOB with no after market bits, but as 2 of the 4 barrels were broken, I had to buy an aftermarket barrel set (man they look good). Since I paid next to nothing for the kit, I wanted this to be the test bed for the hairspray winter camo technique which I have never tried. It will also serve to be the test bed for some weathering and scenery with mud etc. Anyway, apparently I didn't mask the tracks as well as I thought I did and some white overspray got on the driver's side, but no worries, they are gonna get muddied up here shortly. I used some oil paints for the rust colored on the bed of the vehicle and the side grates. So far I am pretty pleased with the worn white wash camo.
Here are some pics.


165thspc
#521
Visit this Community
Kentucky, United States
Joined: April 13, 2011
KitMaker: 9,465 posts
Armorama: 8,695 posts
Posted: Wednesday, January 28, 2015 - 04:53 AM UTC
Why would the winter camo not extend to the road wheels? Just wondering.
Tank178
Visit this Community
Illinois, United States
Joined: December 30, 2009
KitMaker: 92 posts
Armorama: 63 posts
Posted: Wednesday, January 28, 2015 - 05:17 AM UTC
the reason the road wheels do not have any winter camo is because i had the tracks and wheels masked off. I will be adding whitewash to the wheels next and continueweathering the entire vehicle. i plan on putting the vehicle in a small dio and it will have some mud etc on the running gear etc
165thspc
#521
Visit this Community
Kentucky, United States
Joined: April 13, 2011
KitMaker: 9,465 posts
Armorama: 8,695 posts
Posted: Wednesday, January 28, 2015 - 05:34 AM UTC
You can usually peel those rubber band tracks off and on by starting from the real idler and working forward, unless of course you have already glued the tracks to the road wheels to simulate track sag.

Hint: You can easily simulate track sag on this model by super gluing the track just to the front of the drive sprocket. Once dried, simply rotate the top of the drive sprocket up and to the rear this will pull the rest of the top track run down onto the road wheels to simulate sag.

Namabiiru
Staff MemberAssociate Editor
MODEL SHIPWRIGHTS
#399
Visit this Community
Rhode Island, United States
Joined: March 05, 2014
KitMaker: 2,888 posts
Armorama: 1,920 posts
Posted: Wednesday, January 28, 2015 - 06:09 AM UTC
Art,
Looking good so far. To complete your severely weathered winter camo, I recommend dotting it liberally with white artist oils and then using a soft brush and copious amounts of turpentine to take it back off again using downward brush strokes. This will create the appearance of the white wash being gradually washed off over time.

165thspc
#521
Visit this Community
Kentucky, United States
Joined: April 13, 2011
KitMaker: 9,465 posts
Armorama: 8,695 posts
Posted: Wednesday, January 28, 2015 - 10:28 AM UTC
Excellent work Art. - As an alternate suggestion to the oil based white wash might I suggest just using simple grade school white tempra paint. It simulates white wash perfectly. You can go as thick or thin as you want by just rinsing it off after the initial application and I see no reason why the hair spray technique would not work with the tempra paint.

The German units did not have white paste to mix into an actual white paint. They only had white wash to use for winter camo which then slowly weathered away as spring approached.
Armored76
Visit this Community
Bayern, Germany
Joined: September 30, 2013
KitMaker: 1,615 posts
Armorama: 1,500 posts
Posted: Wednesday, January 28, 2015 - 03:03 PM UTC
This looks great, Art! I REALLY like the slightly muddier look on the platform as well as the overall look of the washed camo.

Somethings that comes to mind is whether the camo would extend to the barrels, as well. Anybody has any reliable information on this?

The gunner platforms look a bit too clean so these could probably use some muddy pigments.

The track on the left side looks a bit too close to the chassis but this might be because of the angle the photo was taken from.

Last but not least, the cabin cover has too much contrast so you might consider toning it down a bit by either a white/light filter or some lightened based color.

As I said, it looks REALLY good, as it is so I'm sure the upcoming weathering steps will make it even better.

Cheers,
Cristian
obg153
Visit this Community
Texas, United States
Joined: April 07, 2009
KitMaker: 1,063 posts
Armorama: 1,049 posts
Posted: Thursday, January 29, 2015 - 06:48 AM UTC
For a kit that's around 40 years old, you've got a winner in the making Art!! The new barrels do make a distinct difference. I've had this kit in my stash since I bought it new in a Japanese hobby store shortly after it was first released by Tamiya. Box is open but the bags are still sealed.
Tank178
Visit this Community
Illinois, United States
Joined: December 30, 2009
KitMaker: 92 posts
Armorama: 63 posts
Posted: Monday, February 02, 2015 - 07:45 AM UTC
I have been able to spend a little time here and there and have started to add some weathering. I put some whitewash on the road wheels and put a black pinwash over the whole truck. I repainted the canvas top a darker color and then dirtied it up. Started making the base for the dio I am going to place it in.


165thspc
#521
Visit this Community
Kentucky, United States
Joined: April 13, 2011
KitMaker: 9,465 posts
Armorama: 8,695 posts
Posted: Monday, February 02, 2015 - 11:16 AM UTC
There is a strong likelihood that the crew would throw the same white wash onto the cloth top as they did on the vehicle. Right now there is just still too much contrast between the cloth top and everything else.

Perhaps some white chalk dust applied (scrubbed) into the rough surface of the top as weathering would bring the two colors closer together?

Just a suggestion.
Namabiiru
Staff MemberAssociate Editor
MODEL SHIPWRIGHTS
#399
Visit this Community
Rhode Island, United States
Joined: March 05, 2014
KitMaker: 2,888 posts
Armorama: 1,920 posts
Posted: Monday, February 02, 2015 - 11:32 AM UTC
Art,
A couple of things jump out at me in your last photo that I'll point out, which are admittedly nit-picky at this stage, but I'll mention them anyway.

The backsides of the armor plate on the gun have some ejector pin holes that might benefit from some filling, and the way the white is sprayed in there doesn't seem to be consistent with the rest of the weathering. My guess is the crew probably would not have bothered to whitewash back there, but if they had it should be showing essentially the same level of wear as the front. Lastly, the gunners and loaders seats were stamped steel rather than upholstered so they should be the same color as the rest of the gun mount (with a lot of wear from harness buckles, etc.)

Still a great looking project overall!

Tank178
Visit this Community
Illinois, United States
Joined: December 30, 2009
KitMaker: 92 posts
Armorama: 63 posts
Posted: Monday, February 02, 2015 - 12:31 PM UTC

Quoted Text

Lastly, the gunners and loaders seats were stamped steel rather than upholstered so they should be the same color as the rest of the gun mount (with a lot of wear from harness buckles, etc.)


I wasn't sure about those parts of the seats. Where both the seat bottom and backrest stamped steel? As for the ejector pin markings, I realized that after I had glued them on . Maybe I will try and remove them and fill and repaint to the Panzer grey on the backside of the sheilds

Part of me agrees that the canvas top has too much contrast, but I can't find any good images of German soft tops with painted or white washed camo. Maybe I will do a light misting of a light gray to tone it down.

Thanks for all the feedback!
165thspc
#521
Visit this Community
Kentucky, United States
Joined: April 13, 2011
KitMaker: 9,465 posts
Armorama: 8,695 posts
Posted: Thursday, February 05, 2015 - 12:23 AM UTC
Yes, I missed the metal seats question myself.

The only time I had ever seen a seat shaped like that was the heavily rubberized ones on a BMW motorcycle so I assumed these gunnery seats were the same and painted mine semi-gloss black.

Recent research shows you are exactly right, the whole assembly is stamped metal.
 _GOTOTOP