Hi,
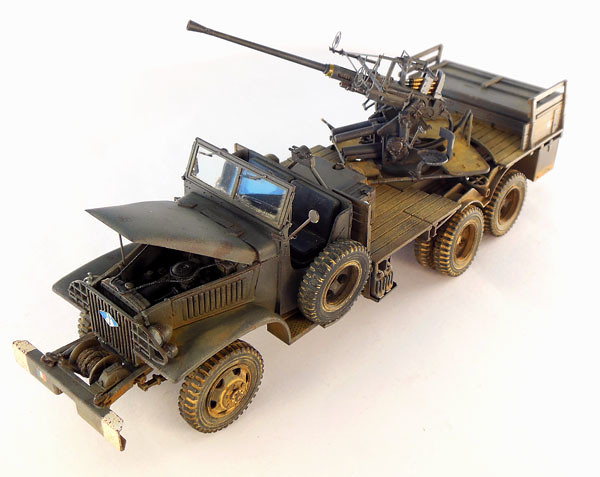
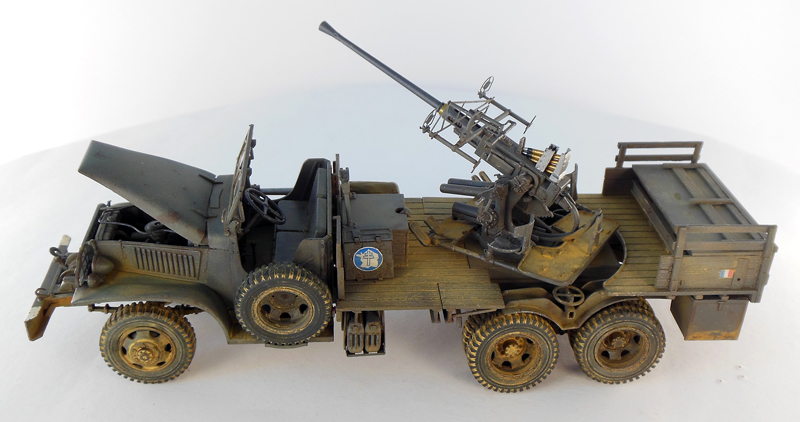
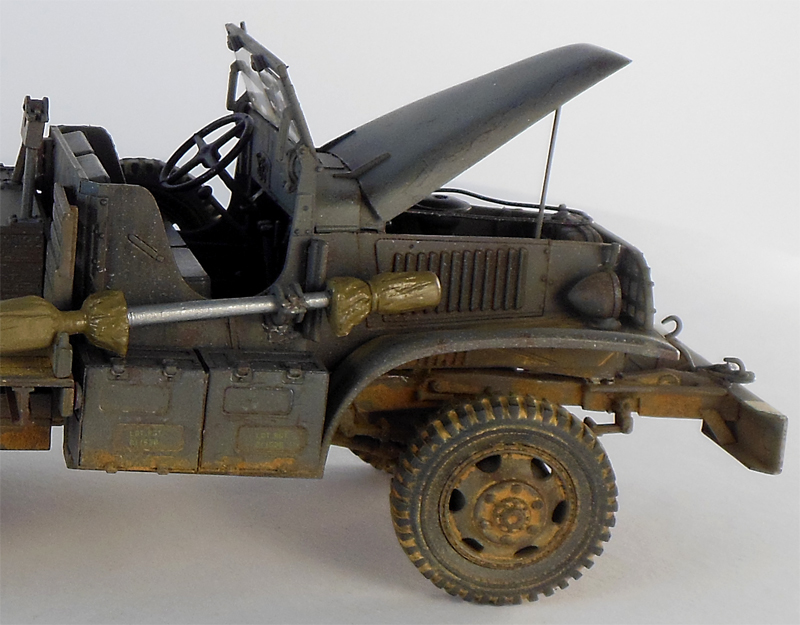
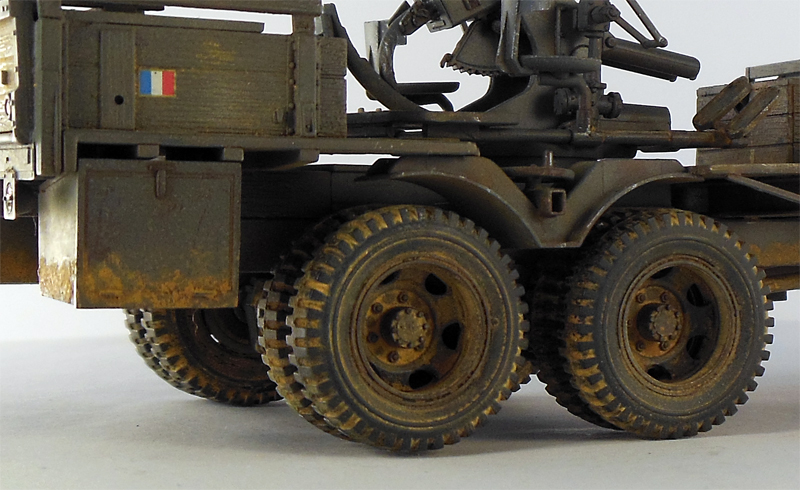
I have just finished this kit for the "What the Flak?" campaign and thought I'll throw this out for you experts to chew it up and tell me what I did wrong
Seriously, suggestions for possible improvements are highly welcome!
Many thanks in advance!
Cheers,
Cristian
Constructive Feedback
For in-progress or completed build photos. Give and get contructive feedback!
Hosted by Darren Baker, Dave O'Meara
GMC Bofors 40mm Gun
Armored76
Bayern, Germany
Joined: September 30, 2013
KitMaker: 1,615 posts
Armorama: 1,500 posts
Joined: September 30, 2013
KitMaker: 1,615 posts
Armorama: 1,500 posts
Posted: Friday, January 30, 2015 - 12:03 PM UTC
airborne1
Queensland, Australia
Joined: April 15, 2006
KitMaker: 915 posts
Armorama: 797 posts
Joined: April 15, 2006
KitMaker: 915 posts
Armorama: 797 posts
Posted: Friday, January 30, 2015 - 12:41 PM UTC
Hi Cristian,
Nice job on the Gmc Bofors , looks great .
Hard to find anything to include .
Built this kit as well and the instructions from Hobby Boss are difficult in areas so you have excelled on overcoming the difficulty in the first place .
The spare barrel looks like there is gloss on the covers, it could be the photo but I'd spray a coat of matt varnish to subdue that area.
The storage boxes under the deck at the rear behind the last wheel would be pretty dirty from the last tyre because it would throw the dirt/dust and mud all the way up on the side facing the wheel .
Even to say at the side and rear of the storage box.
But at the end of the day if your happy with the way the GMC looks that is all you need.
It would be good to see if one of the kit manufacturers like Minimart or Bronco bring figures out mounted on this beast because they give the gun some scale .
Thanks for showing a great looking model .
Michael
Armored76
Bayern, Germany
Joined: September 30, 2013
KitMaker: 1,615 posts
Armorama: 1,500 posts
Joined: September 30, 2013
KitMaker: 1,615 posts
Armorama: 1,500 posts
Posted: Friday, January 30, 2015 - 04:10 PM UTC
Thank you, Michael!
The spare barrel has been hand-painted and for some reason this ends to a semi-gloss finish so this is something that I'll need to fix.
The mud being thrown on the back storage boxes and the front mud guard is so obvious now that you mention it I'll address that, as well.
Thanks again!
Cristian
The spare barrel has been hand-painted and for some reason this ends to a semi-gloss finish so this is something that I'll need to fix.
The mud being thrown on the back storage boxes and the front mud guard is so obvious now that you mention it I'll address that, as well.
Thanks again!
Cristian
markchis
Kuwait / لعربية
Joined: February 09, 2009
KitMaker: 467 posts
Armorama: 392 posts
Joined: February 09, 2009
KitMaker: 467 posts
Armorama: 392 posts
Posted: Monday, February 09, 2015 - 12:01 PM UTC
Hi Christian,
looks great - cant see anything that i dont like. really sharp detailing with the PE, paint work and weathering. ALSO photos look perfect to me - sharp and good lighting - well done !!
best
Mark
looks great - cant see anything that i dont like. really sharp detailing with the PE, paint work and weathering. ALSO photos look perfect to me - sharp and good lighting - well done !!
best
Mark
Armored76
Bayern, Germany
Joined: September 30, 2013
KitMaker: 1,615 posts
Armorama: 1,500 posts
Joined: September 30, 2013
KitMaker: 1,615 posts
Armorama: 1,500 posts
Posted: Monday, February 09, 2015 - 03:05 PM UTC
Thank you, Mark!
vettejack
Florida, United States
Joined: November 23, 2012
KitMaker: 1,277 posts
Armorama: 1,254 posts
Joined: November 23, 2012
KitMaker: 1,277 posts
Armorama: 1,254 posts
Posted: Monday, February 09, 2015 - 05:24 PM UTC
Your flag on the box shows 'silvering' around the colors ...and it looks like it could still be recovered if you apply some decal solution that would make the silvering 'go away'. The rest of the decals need to be weathered a bit as well...subduing their appearance to German gunners.
Your wheel/tire weathering looks pretty good...even better is throwing some mud on the inner fenders above the wheels where dirt/mud would be slung from rotation.
I would throw a bracket over your two 'jerry' cans. As they look now presents a feel of slipping out during a sharp turn. Tons of reference photos show retainer brackets to jerry can racks.
If the rear storage area had wood slats, then try and paint/weather them to look a bit like wood. The contrast between the vehicles' paint and natural wood grain would make your piece 'pop'! Same thing with the box in the front of the bed.
Think about a slight application of graphite to the barrel of the gun...these barrels were changed often and never featured the original color of the gun after a few rounds were fired off...burning off any paint treatment from the factory. Again, reference photos are plenty.
Your winch cable looks out of scale. Try replacing with .032 to .035 picture hanger wire...weathered of course.
See if you can leather up the seats. A more natural leathery/brownish look will break up the cabin area and give your seat the pop it deserves as well.
See if you can find decals for your instrument panel. I'm sure there are some out there designed for this truck. You'll have to use a decal solution again to help them settle into the shape of the instrument panel from the molding process of the plastic.
Other than a few fine tweeks, you've got one good looking truck!
Armored76
Bayern, Germany
Joined: September 30, 2013
KitMaker: 1,615 posts
Armorama: 1,500 posts
Joined: September 30, 2013
KitMaker: 1,615 posts
Armorama: 1,500 posts
Posted: Monday, February 09, 2015 - 11:43 PM UTC
Thanks, John! Some great idea there!