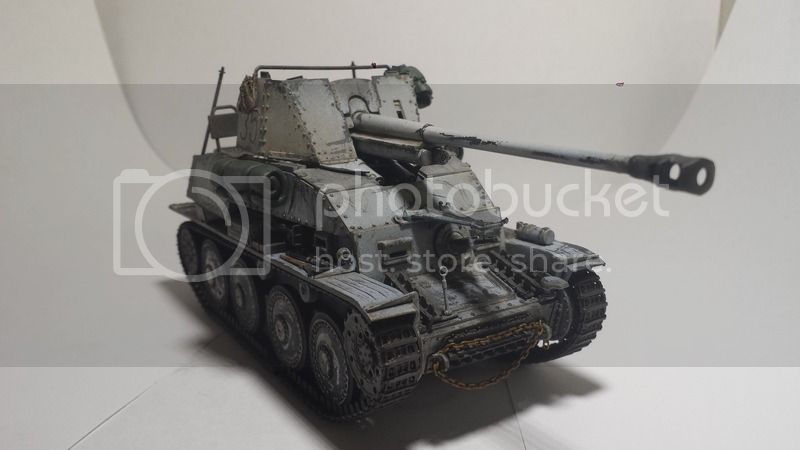
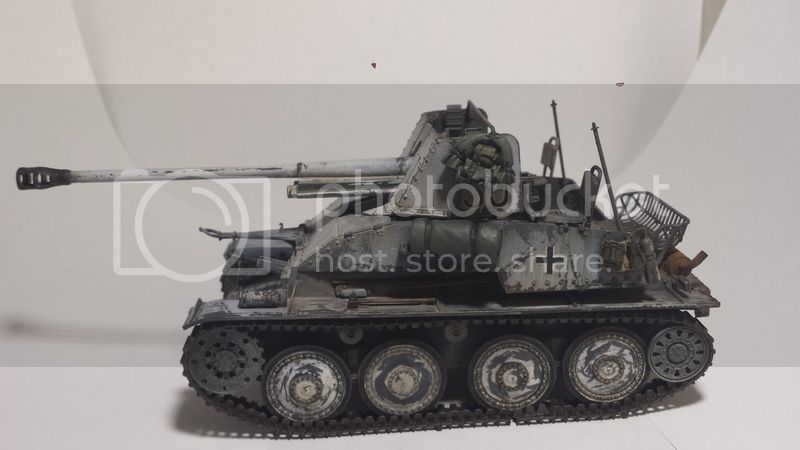
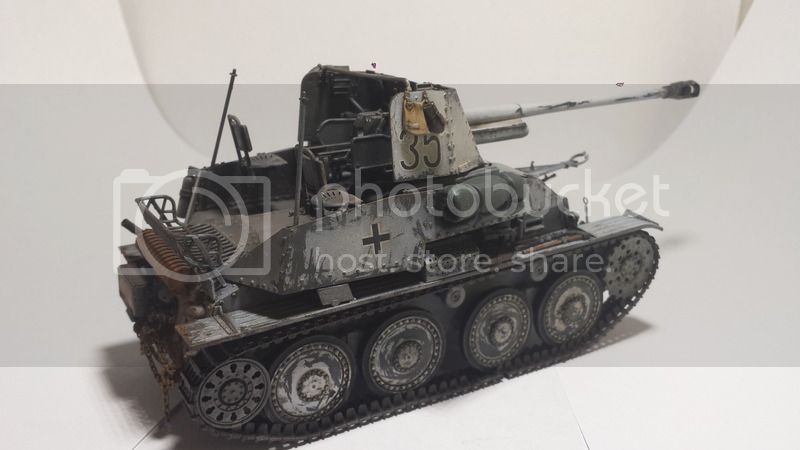
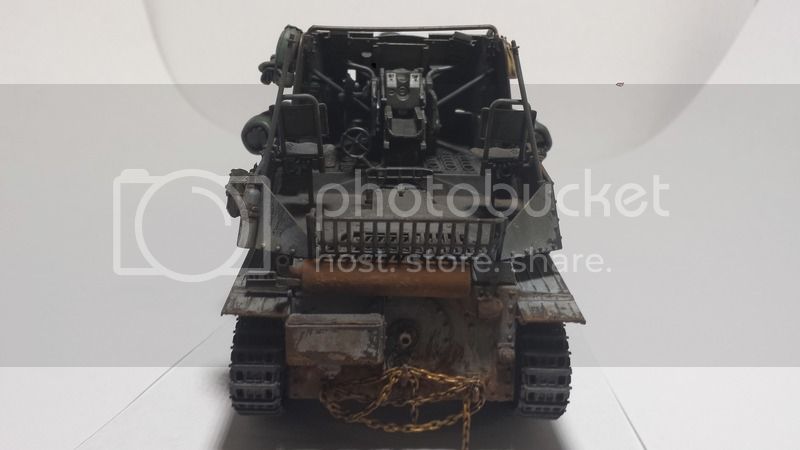
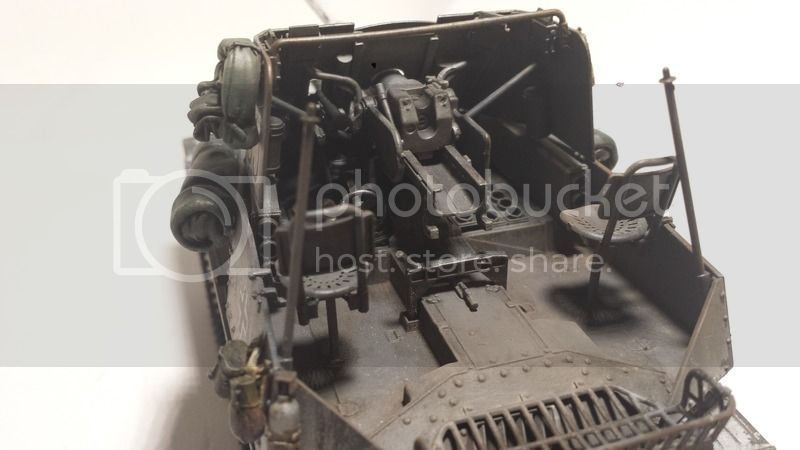
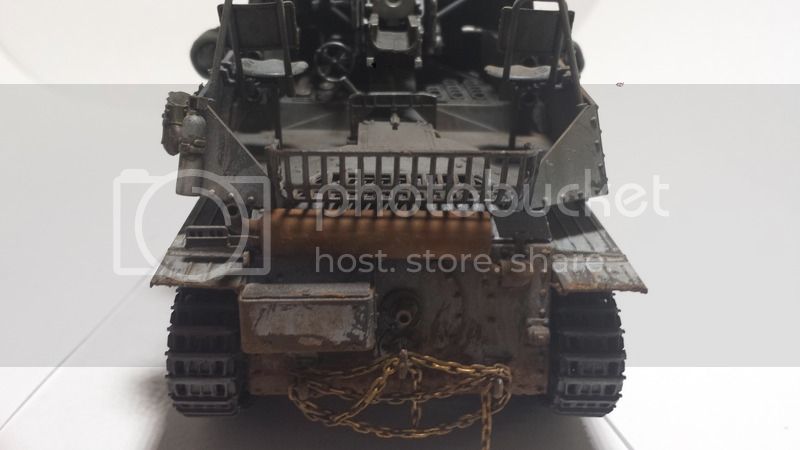
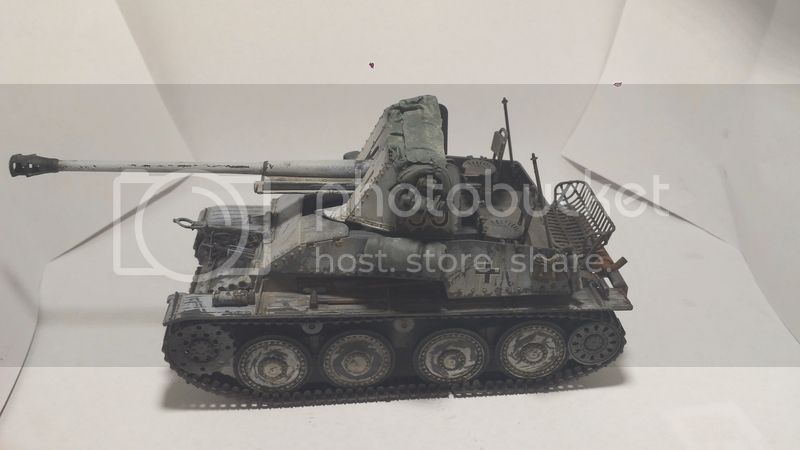
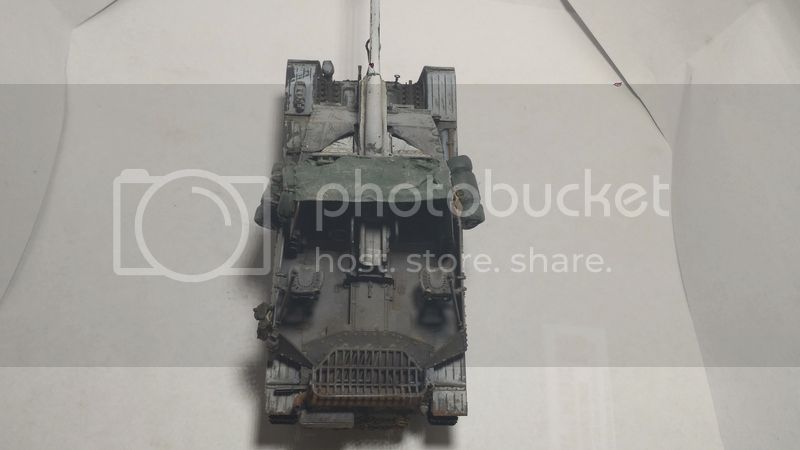
Marder III Winter whitewash.
United States
Joined: April 29, 2008
KitMaker: 54 posts
Armorama: 51 posts
Posted: Thursday, March 19, 2015 - 09:56 PM UTC
United States
Joined: November 28, 2012
KitMaker: 319 posts
Armorama: 285 posts
Posted: Thursday, March 19, 2015 - 10:13 PM UTC
One of the best I have ever seen. Can you tell us your procedure?
United States
Joined: April 29, 2008
KitMaker: 54 posts
Armorama: 51 posts
Posted: Thursday, March 19, 2015 - 10:16 PM UTC
Base coated in Dunkel grau, let dry for a day, then used AK worn effects sprayed a light coat over entire model. I let that dry for a day then sprayed a light coat of Vallejo white over the model. i also let that dry for a day. i then came back with a Q-tip and a cup of warm water and gently rubbed away the white.
Texas, United States
Joined: April 07, 2009
KitMaker: 1,063 posts
Armorama: 1,049 posts
Posted: Friday, March 20, 2015 - 02:02 AM UTC
Very nice results and definitely has that Russian front look! Couple questions,,, what kit did you use,, and was that chain part of the kit or AM??
Even my pick-up is panzer grey.
Georgia, United States
Joined: July 26, 2013
KitMaker: 2,272 posts
Armorama: 1,860 posts
Posted: Friday, March 20, 2015 - 02:22 AM UTC
Vinyl-looking tracks suggest to me this is the Tamiya kit, and no chain was included in that.
On the Campaign Trail:
Tank Destroyer 2020
United States
Joined: April 29, 2008
KitMaker: 54 posts
Armorama: 51 posts
Posted: Friday, March 20, 2015 - 04:35 AM UTC
yah its a tamiya.
and the vinyl track sucks , im making a dio out of it with figures so the bottom crap track alignment will get covered with snow/mud.
its all basically OOB with some Verlinden stowage and the chain.
Washington, United States
Joined: February 04, 2006
KitMaker: 302 posts
Armorama: 300 posts
Posted: Friday, March 20, 2015 - 05:14 AM UTC
looks good, but the already mentioned chain... Rust or black or something but raw brass.
United States
Joined: April 29, 2008
KitMaker: 54 posts
Armorama: 51 posts
Posted: Friday, March 20, 2015 - 06:14 AM UTC
The chain is rusted. Not sure what you mean by raw brass?
Colorado, United States
Joined: February 24, 2014
KitMaker: 3,033 posts
Armorama: 2,492 posts
Posted: Friday, March 20, 2015 - 06:44 AM UTC
Hi Kevin, Very nice build!
My own experience with ‘Vallejo White’ has been interesting to say the least, as it is never really what I expect. You’ve used that color to your advantage here — works great for your whitewash effect.
IMHO … both the chains and some of the stowage seems a bit shiny and could benefit from a little dusting or matt finish. Great work none-the-less.
—mike
North Carolina, United States
Joined: May 17, 2012
KitMaker: 1,980 posts
Armorama: 1,571 posts
Posted: Friday, March 20, 2015 - 07:16 AM UTC
Quoted Text
The chain is rusted. Not sure what you mean by raw brass?
I believe he's referring to the last picture. The rear chain looks like it has some brass showing. It may just be the angle or lighting.
Three things stand out to me. One is the stowage. It's hard to tell about the smaller stuff on the upper superstructure, but on those two big rolls on the sides, it's obvious that there's nothing actually attaching them to the vehicle. The second thing shows most in the 5th (next to last) picture. It's that nasty seam in the gun cradle behind the breech. And lastly, are the missing guide teeth on the right track (3rd pic), but you alluded to the diorama setting covering that up.
Beyond that, you did a great job on her. The paint and weathering look spot on.
United States
Joined: April 29, 2008
KitMaker: 54 posts
Armorama: 51 posts
Posted: Friday, March 20, 2015 - 07:23 AM UTC
Quoted Text
Quoted Text
The chain is rusted. Not sure what you mean by raw brass?
I believe he's referring to the last picture. The rear chain looks like it has some brass showing. It may just be the angle or lighting.
Three things stand out to me. One is the stowage. It's hard to tell about the smaller stuff on the upper superstructure, but on those two big rolls on the sides, it's obvious that there's nothing actually attaching them to the vehicle. The second thing shows most in the 5th (next to last) picture. It's that nasty seam in the gun cradle behind the breech. And lastly, are the missing guide teeth on the right track (3rd pic), but you alluded to the diorama setting covering that up.
Beyond that, you did a great job on her. The paint and weathering look spot on.
Thx for comments.
as far as the rolls. It's common in my experience having storage on vehicles look like they are not attached hed. My vehicles in iraq we have small latches and hung rocks up on them. Could not tell how they were attached. Here I just used my imagination.
Gun seam, yeah it's bad but can't really change it now.
And the chains. They are from AK pre rusted. It's the lighting . No brass is visible at all in real life.
California, United States
Joined: October 22, 2013
KitMaker: 56 posts
Armorama: 38 posts
Posted: Friday, March 20, 2015 - 07:39 PM UTC
Hi Kevin,
Very nice job. Not overly beat up but shows the effect of having gone through at least one winter in the East.
The split line could possibly be fixed by scraping and carefully filling with Mr. Surfacer, putty or? Painting and dry brushing with metallic gray, shadow gray or plain metallic mixed with black. THen adding some grease effects on the rails and in the valley of the cradle should mask the split line. Or just leave it with a dull shine and bright rails.
Orrrr...... Scratch a piece canvas and wrap it around the breech and tie it off. Problem solved. It's what I did when I buggered up a PaK 40 breech and cradle. Followed up with a canvas muzzle cover for consistancy.
Maybe some light grease effects on the return rollers and road wheels too.
I agree with you on the packs etc. Our guys in Nam, Ontos, cannon cockers, AmTrackers and tankers would hang gear,lawn chairs, other field expedient comforts, C Rats, cases of PBR or whatever on any flat surface, bracket, hook or rail they could find on the vehicle. The further forward from the BnHQ the outfit, the more some looked like rolling garage sales especially when they moved out to new positions further forward.
THe chain color is fine IMO. Looks like it may have been dragged and some heavier rust has beeen worn off and a thin brighter layer remains. Color shift in the photo contributes also.
Too bad about the guide horns though. Going to be hard to disguise that.
Very nice job. I'm convinced it will look spectacular in a late winter, early spring (or?) diorama.
Hope I haven't been excessively critical.
Tony
United States
Joined: April 29, 2008
KitMaker: 54 posts
Armorama: 51 posts
Posted: Friday, March 20, 2015 - 07:59 PM UTC
Quoted Text
Hi Kevin,
Very nice job. Not overly beat up but shows the effect of having gone through at least one winter in the East.
The split line could possibly be fixed by scraping and carefully filling with Mr. Surfacer, putty or? Painting and dry brushing with metallic gray, shadow gray or plain metallic mixed with black. THen adding some grease effects on the rails and in the valley of the cradle should mask the split line. Or just leave it with a dull shine and bright rails.
Orrrr...... Scratch a piece canvas and wrap it around the breech and tie it off. Problem solved. It's what I did when I buggered up a PaK 40 breech and cradle. Followed up with a canvas muzzle cover for consistancy.
Maybe some light grease effects on the return rollers and road wheels too.
I agree with you on the packs etc. Our guys in Nam, Ontos, cannon cockers, AmTrackers and tankers would hang gear,lawn chairs, other field expedient comforts, C Rats, cases of PBR or whatever on any flat surface, bracket, hook or rail they could find on the vehicle. The further forward from the BnHQ the outfit, the more some looked like rolling garage sales especially when they moved out to new positions further forward.
THe chain color is fine IMO. Looks like it may have been dragged and some heavier rust has beeen worn off and a thin brighter layer remains. Color shift in the photo contributes also.
Too bad about the guide horns though. Going to be hard to disguise that.
Very nice job. I'm convinced it will look spectacular in a late winter, early spring (or?) diorama.
Hope I haven't been excessively critical.
Tony
Thx tony,
Not at all that's why I posted here . To learn how to get better. All criticism is welcome.
I'm not the best modeler but trying to perfect it as best I can given the materials I have.
North Carolina, United States
Joined: May 17, 2012
KitMaker: 1,980 posts
Armorama: 1,571 posts
Posted: Saturday, March 21, 2015 - 12:05 AM UTC
Nothing against the stowage, and I'm surely not saying it doesn't belong on the vehicle. All I'm saying is that it would give a better impression, and seem more realistic, if there was some point of attachment shown.
In the end, it's your model, do it how you like it. I only expressed my thoughts that you asked for.

United States
Joined: April 29, 2008
KitMaker: 54 posts
Armorama: 51 posts
Posted: Saturday, March 21, 2015 - 12:07 AM UTC
United States
Joined: April 29, 2008
KitMaker: 54 posts
Armorama: 51 posts
Posted: Saturday, March 21, 2015 - 12:11 AM UTC
Quoted Text
Nothing against the stowage, and I'm surely not saying it doesn't belong on the vehicle. All I'm saying is that it would give a better impression, and seem more realistic, if there was some point of attachment shown.
In the end, it's your model, do it how you like it. I only expressed my thoughts that you asked for. 
I do appreciate the thoughts I really do. For one I just don't have anything to make it look as if it's hanging on hooks. And like I said sometimes crew will fabricate stowage hooks that you can't see.
Don't take my comments as being anti critical , right now I just don't have means to make it so.
United States
Joined: June 04, 2014
KitMaker: 137 posts
Armorama: 128 posts
Posted: Saturday, March 21, 2015 - 12:46 AM UTC
Good job - I really like it. The tarp covering the top of the gun looks really realistic but the ones below it, on either side, look a little less so by comparison. I would give them the same colors and weathering that you did for the cover tarp.
North Carolina, United States
Joined: May 17, 2012
KitMaker: 1,980 posts
Armorama: 1,571 posts
Posted: Saturday, March 21, 2015 - 05:03 AM UTC
Quoted Text
I do appreciate the thoughts I really do. For one I just don't have anything to make it look as if it's hanging on hooks. And like I said sometimes crew will fabricate stowage hooks that you can't see.
Don't take my comments as being anti critical , right now I just don't have means to make it so.
Just something to plan for on the next one

That upper tarp looks great!
North Carolina, United States
Joined: January 21, 2004
KitMaker: 803 posts
Armorama: 740 posts
Posted: Saturday, March 21, 2015 - 06:55 AM UTC
I can't fiigure out how to add an image to this, but I found something about equipment hanging:
http://fotodiguerra.altervista.org/php/cpg143/displayimage.php?pid=7383I would think that it is perfectly acceptable to think that a crew would make field mods to accommodate their needs.
I agree with the tarp roll comment, maybe recreate them using the same tissue technique??
The track fix is easy-just bury it in some mud in the dio!
And maybe take an ultra thin piece of sheet styrene to cover the seam in the breach.
Just my thoughts, but you did an awesome job on that bad boy!
California, United States
Joined: October 22, 2013
KitMaker: 56 posts
Armorama: 38 posts
Posted: Saturday, March 21, 2015 - 07:28 AM UTC
Hi Kevin,
I know one thing. Your technique for making tarps doesn't need improving. Perfect folds, color, fading, and subtle damage. Same for the fabric texture. Very realistic.
Not putting edge seams and grommets on it makes it look even more realistic. Crew would probably have scrounged up a piece of tarp and tossed it on the machine. Field expedient addition.
I think you are stuck with the side mounted tarps. Can't overlay them with tissue and repaint them easily. Dislodging them to cover with tissue, paint and weather will create more problems than it solves. Same for using CA glue to add texture.
+1 on the plastic card or brass overlay in the cradle to disguise the seam.
Tony
United States
Joined: April 29, 2008
KitMaker: 54 posts
Armorama: 51 posts
Posted: Saturday, March 21, 2015 - 08:09 AM UTC
Quoted Text
Hi Kevin,
I know one thing. Your technique for making tarps doesn't need improving. Perfect folds, color, fading, and subtle damage. Same for the fabric texture. Very realistic.
Not putting edge seams and grommets on it makes it look even more realistic. Crew would probably have scrounged up a piece of tarp and tossed it on the machine. Field expedient addition.
I think you are stuck with the side mounted tarps. Can't overlay them with tissue and repaint them easily. Dislodging them to cover with tissue, paint and weather will create more problems than it solves. Same for using CA glue to add texture.
+1 on the plastic card or brass overlay in the cradle to disguise the seam.
Tony
Thx tony
The side folds I can't do anything with they are ca glued on. But I will probably dust them up a bit more.
And try the gun breech thing.
