Greeting from Finland.
I decided to give this hobby a try, last models built are from childhood as a toys painten with what ever colors was at hand..
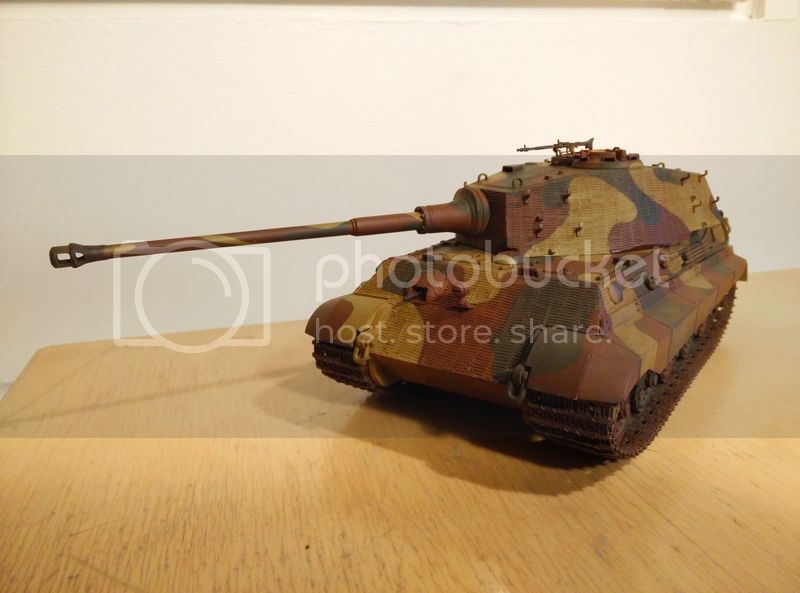
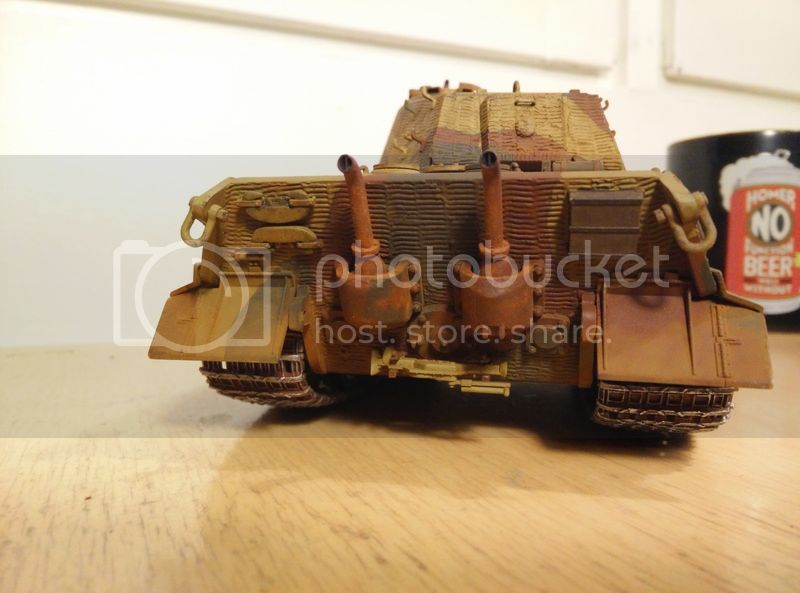
Really enjoyed the process and this Tamiya kit was painless to build. I could leave it like this but some more weathering could be done, just dont know what... If you can at this point anymore.I tried to add some chipping with black paint and bare metal with silver. I forgot to paint the markings and some errors like that, the mg is held up by a ghost etc. Didnt try to achieve autenthicity or suchs.. just to build as good looking thing as I can at this point and to try out this hobby.
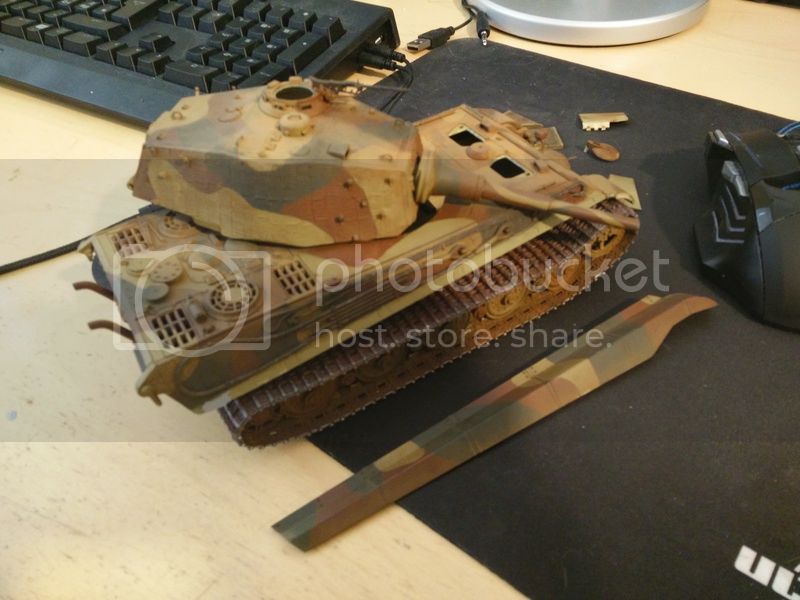
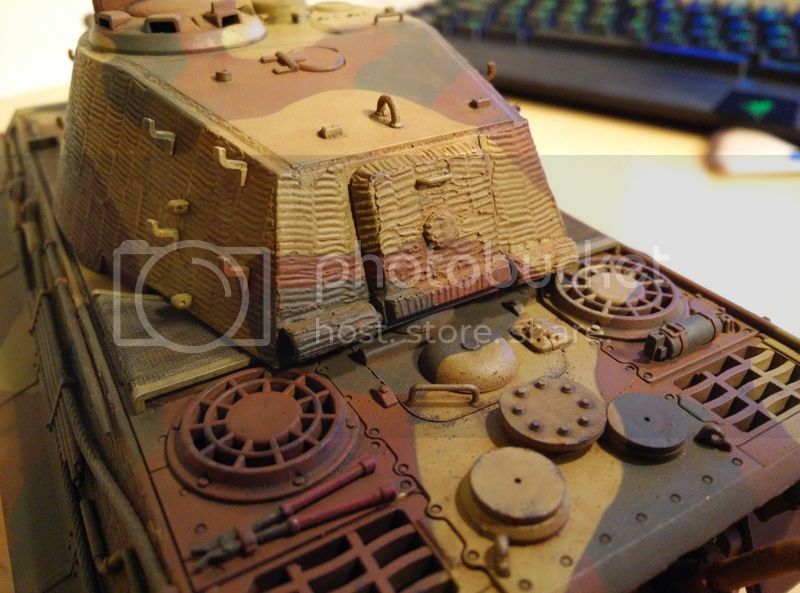
Zimmerit is wood putty aplied with diy tool made with dremel knockoff and piece cut from hardware store putty spatula/palette knife thingie.
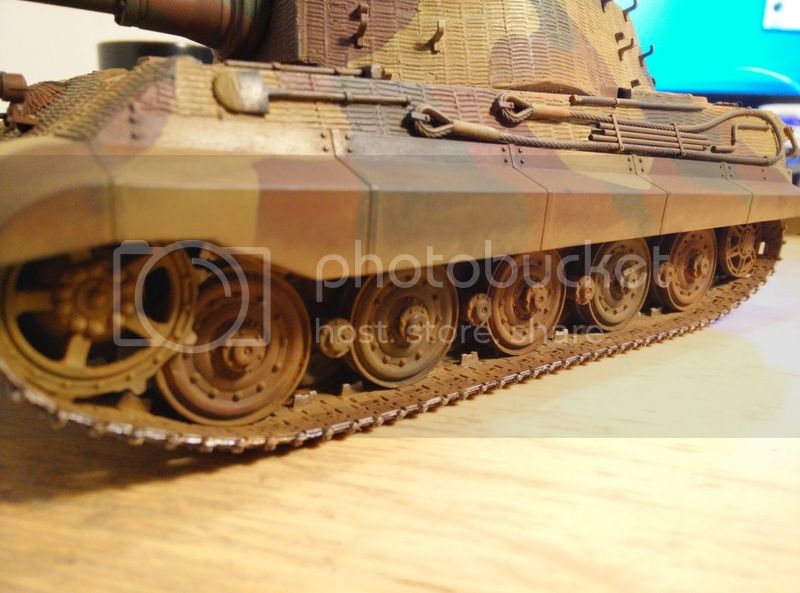
Primed with decanted automotive gray. Rest of the base/camo colors are also airbrushed vallejo model color. I didnt have the red brown so I had to mix it from red and browns so that may not be accurate. Also there is issues with came patterns edge, I used blu tack and at some places you can see strips of all the colors as the airbrush angle and too thick/round mask was used. Tools brush painted after assemply and priming. Better brushes are must for next one, awfull to try detail small things with brush that looks like furball...
Some oil wash with black and filter with dark brown. Lastly I have dusted it with brown chalk pastel which I think I over did and it became somewhat dull looking. Can I revert this some good way? Tried with damp brush but the pastel tends to smudge if even little too much water is used. Tracks I primed with same gray, then mixed rusty tone, gun metal on the roadwheel areas and some dry brushing else where. Also gave them brown oil filter and dusting with pastel. Its hard to think all the small things while weathering and where to do what.. Learnt alot and much more to discover.. Also I had funky build order that will do differently next time.
Feel free to comment and give improvements
Next build will be more tought out and accurately done for sure..
Here is link to all the pics in photobucket.
http://s1295.photobucket.com/user/1m4s0/library/Mobile%20Uploads/Tiger%202%20Tamiya%2035164
Ps. Is there a way to paint the symbols anymore and get it to match the rest?
And excuse my grammar
Constructive Feedback
For in-progress or completed build photos. Give and get contructive feedback!
Hosted by Darren Baker, Dave O'Meara
First build, Tamiya Tiger 2
TDZepp
Keski-Suomi, Finland
Joined: April 15, 2015
KitMaker: 48 posts
Armorama: 47 posts
Joined: April 15, 2015
KitMaker: 48 posts
Armorama: 47 posts
Posted: Wednesday, April 15, 2015 - 05:22 PM UTC
PanzerKarl
England - North West, United Kingdom
Joined: April 20, 2004
KitMaker: 2,439 posts
Armorama: 1,980 posts
Joined: April 20, 2004
KitMaker: 2,439 posts
Armorama: 1,980 posts
Posted: Wednesday, April 15, 2015 - 05:46 PM UTC
That looks very nice good job,are you going to apply any decals?
I have a Jagdtiger that I want to paint in a few weeks and I will be using Blu tack for the camo,think your camo came out great.
Thanks
Karl
I have a Jagdtiger that I want to paint in a few weeks and I will be using Blu tack for the camo,think your camo came out great.
Thanks
Karl
Posted: Wednesday, April 15, 2015 - 05:56 PM UTC
Well my opinion is that you could go even heavier on the pastels but that it just my way of looking at things as I like my vehicles dusty and dirty!
If you want to reduce the effect/intensity of the pastels hit the vehicle with a flat clear dulling spray. (test first on underside) Hold the can or air brush some distance back from the model so the spray is almost dry when it hits the model.
Any clear fixative spray usually will have the negative impact of reducing the apparent intensity of pastels by as much as a half to two-thirds!
By the way - excellent work!
obg153
Texas, United States
Joined: April 07, 2009
KitMaker: 1,063 posts
Armorama: 1,049 posts
Joined: April 07, 2009
KitMaker: 1,063 posts
Armorama: 1,049 posts
Posted: Wednesday, April 15, 2015 - 06:25 PM UTC
This looks very good overall. For a hand-applied zimmerit, I think it's pretty convincing. Only two suggestions; it looks like the jack isn't painted, but that could be the angle of the photo; and next time you might invest in some pe mesh screens for the engine deck.
ColinEdm
Associate Editor
Alberta, Canada
Joined: October 15, 2013
KitMaker: 1,355 posts
Armorama: 1,229 posts
Joined: October 15, 2013
KitMaker: 1,355 posts
Armorama: 1,229 posts
Posted: Wednesday, April 15, 2015 - 06:30 PM UTC
Well done sir! Welcome back to the hobby!
TDZepp
Keski-Suomi, Finland
Joined: April 15, 2015
KitMaker: 48 posts
Armorama: 47 posts
Joined: April 15, 2015
KitMaker: 48 posts
Armorama: 47 posts
Posted: Wednesday, April 15, 2015 - 06:43 PM UTC
I didnt intent to apply decals as I did the zimmer the way I did. Also I didnt really like the way it was presented in the Tamiya box that you had square box on the turret side without zimmerit and the decal there.
I was going to spray at least the cross symbol with somekind a stencil but then I forgot it
The blu tack is great for masking, I found it much easier to press it flat against the table and make the pattern like that. First I tried to make these long strings of it and then apply, but I found that its more job then to fill the inside with tape or more blu tack. And when you make thin flats that you apply to the model you get more crisp hard edge. You get softer edge if you make thick rounded mask so the paint can feather under the edge and in any case you have to note the angle you air brush from.
Thanks for the tip Michael, I will try that if I find that I want to do something more to this!
In RL the model looks much more dusty than in the pictures for some reason, I would be happy if it would look like that in RL.
The jack is painted in tank base color, that being the dark yellow, I may have forgotten to apply the filter for it!
Yes the mesh screens, I tough if I add them at all.. Tamiya provided some 2 sided tape for the purpose but I found it lacking alot... So I used super glue and that made it messy looking around the edges where the glue is applied. Also the screen frame is weird as you have to apply the mesh on the top and not under it for more nicer look, ofc I dunno how its in the real thing so...
Thanks for the tips, next ones I will get some better looking stuff like the PE that you say.
I also would like to get hints for the next "project". I tought it could be something larger in scale, like some sort of diorama/scene.
Have been trying to make research, some kursk scene would be ok tho it doesnt need to be too authentic for me, I would like to get at least correct tank types and possible scenery. ie: tiger 1 against kv-1 in kursk, but some city scene would be more for my liking, just dont know how to find out more about these places that tank battles took place... I think that kursk is done quite much.
Cantstopbuyingkits
European Union
Joined: January 28, 2015
KitMaker: 2,099 posts
Armorama: 1,920 posts
Joined: January 28, 2015
KitMaker: 2,099 posts
Armorama: 1,920 posts
Posted: Wednesday, April 15, 2015 - 06:49 PM UTC
Your zimmerit looks really nice for a first try, not flawlessly applied like some manufacturers think it should be.
TDZepp
Keski-Suomi, Finland
Joined: April 15, 2015
KitMaker: 48 posts
Armorama: 47 posts
Joined: April 15, 2015
KitMaker: 48 posts
Armorama: 47 posts
Posted: Wednesday, April 15, 2015 - 06:54 PM UTC
I tought the zimmerit alot before I started to make it... With the tools that I had it was hard to get so fine comp that you could apply it with, also I had very vague understanding of the measurements it needed to be and the reference in models around the internet varies much so it was hard to get a picture how it "should" look like.
I also looked the aftermarket zimmerit sets from PE and to me they all looked too generic/repetative or how do you say it... flawless.
Also it was fun to make it!
I tend to do as much by myself as I can, before I have to resort to readymade stuff.
Some PE accessory kits would be fine, like fenders and such for better look... that I woudnt start making my self
Tojo72
North Carolina, United States
Joined: June 06, 2006
KitMaker: 4,691 posts
Armorama: 3,509 posts
Joined: June 06, 2006
KitMaker: 4,691 posts
Armorama: 3,509 posts
Posted: Wednesday, April 15, 2015 - 07:05 PM UTC
Really nice job on the hard edge camo pattern for sure.
retiredyank
Arkansas, United States
Joined: June 29, 2009
KitMaker: 11,610 posts
Armorama: 7,843 posts
Joined: June 29, 2009
KitMaker: 11,610 posts
Armorama: 7,843 posts
Posted: Wednesday, April 15, 2015 - 08:50 PM UTC
And, what a build! Welcome back. The engine screens are well done. I gave up on a Dragon KT, for that very reason. I can't differentiate between your zimmerit and am parts. Usually, the fire extinguisher is mounted, prior to painting. I agree that you could use more pigment on the tracks and running gear. You don't necessarily need to bury the tank in dirt. IMHO, I have begun to diverge from pigment. I find it just as convincing to weather with my airbrush and apply pigment sparingly. You can achieve great effect, with filters and dry brushing. This is especially true for vehicles, with zimmerit.
AFVFan
North Carolina, United States
Joined: May 17, 2012
KitMaker: 1,980 posts
Armorama: 1,571 posts
Joined: May 17, 2012
KitMaker: 1,980 posts
Armorama: 1,571 posts
Posted: Wednesday, April 15, 2015 - 08:52 PM UTC
Overall, a very nice effort! The paint looks great and you've got some nice detailing going on.
There are a few points to think about, though. First, the glass lenses in the periscopes need to be painted. Next, The cleats on the tracks and the track guides should show a more bare metal look. These two items can still be done, if you care to do them. The final item is more of a future build thing. The spare track hangers needed to be thinned a bit to get them in scale.
HTH
TDZepp
Keski-Suomi, Finland
Joined: April 15, 2015
KitMaker: 48 posts
Armorama: 47 posts
Joined: April 15, 2015
KitMaker: 48 posts
Armorama: 47 posts
Posted: Wednesday, April 15, 2015 - 10:05 PM UTC
Indeed!
Those view ports never even cross my mind, thanks for the tip!
What paint would you use (or method) for those?
I could give the tracks a little silver paint, There is only gun metal now and its somewhat too gray, I was afraid to use the silver it its too shiny then
Those view ports never even cross my mind, thanks for the tip!
What paint would you use (or method) for those?
I could give the tracks a little silver paint, There is only gun metal now and its somewhat too gray, I was afraid to use the silver it its too shiny then
AFVFan
North Carolina, United States
Joined: May 17, 2012
KitMaker: 1,980 posts
Armorama: 1,571 posts
Joined: May 17, 2012
KitMaker: 1,980 posts
Armorama: 1,571 posts
Posted: Thursday, April 16, 2015 - 01:13 AM UTC
Quoted Text
Indeed!
Those view ports never even cross my mind, thanks for the tip!
What paint would you use (or method) for those?
I could give the tracks a little silver paint, There is only gun metal now and its somewhat too gray, I was afraid to use the silver it its too shiny then
I normally do mine in a gloss black with a very light dusting of pigment to knock the gloss down a bit. The only way I know of to accomplish it is a small brush, steady hand, and a magnifier (don't know how your eyes are, but mine need all the help they can get).
For the tracks I use a mix of silver and medium grey to get the color and apply it using the dry brush technique. The final coat of flat dulls the shine. On the guide teeth, only the top half would be done. These were polished by the contact with the raised lips of the road wheels.
Posted: Thursday, April 16, 2015 - 01:36 AM UTC
Quoted Text
Your zimmerit looks really nice for a first try, not flawlessly applied like some manufacturers think it should be.
Sam, super work! I concur about the zimmerit. I think the understated weathering is entirely plausible, too.
TDZepp
Keski-Suomi, Finland
Joined: April 15, 2015
KitMaker: 48 posts
Armorama: 47 posts
Joined: April 15, 2015
KitMaker: 48 posts
Armorama: 47 posts
Posted: Thursday, April 16, 2015 - 08:27 AM UTC
Hmm, only top half? Which perspective should I look this from
I tried to reason myself that most top part(wheel side) wouldnt have the shine. As the track moves all directions when in motion and the wheel lip will be almost flat agains the inner part of the quide as it travels on flat even terrain? Then wear toward up comes when the track bounces up and down in motion. I dont know how far the suspension and track tension will let the guide/track rise?
I have somewhat limited color selection of vallejo paints, I think I could use flat black and gloss varnish for the shine. (For the periscope)
AFVFan
North Carolina, United States
Joined: May 17, 2012
KitMaker: 1,980 posts
Armorama: 1,571 posts
Joined: May 17, 2012
KitMaker: 1,980 posts
Armorama: 1,571 posts
Posted: Thursday, April 16, 2015 - 03:42 PM UTC
TDZepp
Keski-Suomi, Finland
Joined: April 15, 2015
KitMaker: 48 posts
Armorama: 47 posts
Joined: April 15, 2015
KitMaker: 48 posts
Armorama: 47 posts
Posted: Thursday, April 16, 2015 - 07:07 PM UTC
I tried to do some mork work on the tiger but I think I will leave it here so I dont make it any worse
Painted the periscopes and added shine to the tracks.
Added silver to the guides and tracks but again dusted those away when adding some to the fender etc
Also added some dust paths on the tank where the crew could have moved but those didnt show on the pictures very well..
http://i1295.photobucket.com/albums/b636/1m4s0/Mobile%20Uploads/Tiger%202%20Tamiya%2035164/IMG_20150417_163732_zpsu0a6qo1d.jpg
That jack really stands out like sore thumb, need some filter and dusting to blend it in..
note: The coffee mug.
AFVFan
North Carolina, United States
Joined: May 17, 2012
KitMaker: 1,980 posts
Armorama: 1,571 posts
Joined: May 17, 2012
KitMaker: 1,980 posts
Armorama: 1,571 posts
Posted: Friday, April 17, 2015 - 12:04 AM UTC
Don't know about anyone else, but I sure like the improvements. You might try a dark wash on that jack, followed by a light coat of dust. It would bring out the details and help blend it in a bit better.
Armorsmith
Pennsylvania, United States
Joined: April 09, 2015
KitMaker: 1,063 posts
Armorama: 1,000 posts
Joined: April 09, 2015
KitMaker: 1,063 posts
Armorama: 1,000 posts
Posted: Friday, April 17, 2015 - 02:26 AM UTC
This is a very solid initial effort. Clean build, more than adequate airbrush work, nice cammo scheme and restrained weathering. Take what you have learned from this build as well as the comments offered for improvement and incorporate them into your next build. Remember that weathering is very personal and subjective. Some like very heavy weathering and very worn appearance while others opt for a lighter treatment and a less battle weary finish,not to mention the vast possibilities between the two extremes. Do what feels right and is pleasing to you. After all, it is your "artwork." Trying to build to what others perceive is correct will only frustrate you and take all the enjoyment out of the hobby for you. Look forward to seeing more of your builds as you develop your skills and techniques.
billflorig
Hawaii, United States
Joined: January 20, 2015
KitMaker: 152 posts
Armorama: 146 posts
Joined: January 20, 2015
KitMaker: 152 posts
Armorama: 146 posts
Posted: Friday, April 17, 2015 - 02:28 AM UTC
TDZepp,
Great Tiger II and welcome back to the hobby! I'm currently building Italeri's 1/72 scale Tiger II. If it looks OK I may have the courage to post it and ask the field for suggested improvements! I need the training!
Here is to you!
Great Tiger II and welcome back to the hobby! I'm currently building Italeri's 1/72 scale Tiger II. If it looks OK I may have the courage to post it and ask the field for suggested improvements! I need the training!
Here is to you!
AFVFan
North Carolina, United States
Joined: May 17, 2012
KitMaker: 1,980 posts
Armorama: 1,571 posts
Joined: May 17, 2012
KitMaker: 1,980 posts
Armorama: 1,571 posts
Posted: Friday, April 17, 2015 - 06:35 AM UTC
Quoted Text
TDZepp,
Great Tiger II and welcome back to the hobby! I'm currently building Italeri's 1/72 scale Tiger II. If it looks OK I may have the courage to post it and ask the field for suggested improvements! I need the training!
Here is to you!
Bill, if you can coax constructive comments out of the crowd, there's no better way to learn. It'd be a pleasure to see your build, and to be honest, the sooner the better. Sometimes problem areas are spotted before the build is complete making any needed changes a lot easier.
TDZepp
Keski-Suomi, Finland
Joined: April 15, 2015
KitMaker: 48 posts
Armorama: 47 posts
Joined: April 15, 2015
KitMaker: 48 posts
Armorama: 47 posts
Posted: Saturday, May 09, 2015 - 03:10 PM UTC
AFVFan
North Carolina, United States
Joined: May 17, 2012
KitMaker: 1,980 posts
Armorama: 1,571 posts
Joined: May 17, 2012
KitMaker: 1,980 posts
Armorama: 1,571 posts
Posted: Saturday, May 09, 2015 - 03:24 PM UTC
That barrel would be easily fixed by a metal replacement.
TDZepp
Keski-Suomi, Finland
Joined: April 15, 2015
KitMaker: 48 posts
Armorama: 47 posts
Joined: April 15, 2015
KitMaker: 48 posts
Armorama: 47 posts
Posted: Saturday, May 09, 2015 - 04:36 PM UTC
Indeed have to see how hard is it to get the old removed without breaking it more..
Im also hesitant about matching the new paint to the old one
I have diorama project starting in few days if I get the stuff. I will try to fix this too while at it.
Im also hesitant about matching the new paint to the old one
I have diorama project starting in few days if I get the stuff. I will try to fix this too while at it.
iowabrit
Iowa, United States
Joined: November 06, 2007
KitMaker: 585 posts
Armorama: 557 posts
Joined: November 06, 2007
KitMaker: 585 posts
Armorama: 557 posts
Posted: Saturday, May 09, 2015 - 07:02 PM UTC
First thing to do after you get the barrel fixed is to shoot the cat.