I know this topic has been posted a few times over the years on Armorama, but I was curious as to how most of you make your bedrolls, tarps or blankets.
In the past I have tried the Kleenex (facial tissue) and white glue technique with great success. I am contemplating trying Milliput in the near future, but it seems more labor intensive.
How do you make them? What technique has worked best for you? What looks most realistic in 1/35 scale?
If you have photos of your work, please post them. Thanks!
v/r
Tim
Armor/AFV
For discussions on tanks, artillery, jeeps, etc.
For discussions on tanks, artillery, jeeps, etc.
Hosted by Darren Baker, Mario Matijasic
Bedrolls, Tarps & Blankets

timcc2008

Joined: May 12, 2010
KitMaker: 139 posts
Armorama: 135 posts

Posted: Monday, August 14, 2017 - 07:30 PM UTC

TotemWolf

Joined: February 11, 2013
KitMaker: 294 posts
Armorama: 196 posts

Posted: Monday, August 14, 2017 - 08:01 PM UTC
I've used Milliput rolled "very" thin before and it works. However my daughter makes little figures with polymer clay. It can be sculpted and then baked hard. Afterwards it can take acrylics for painting and weathering as well as a sealer. I have been thinking of trying that.

AgentG

Joined: December 21, 2008
KitMaker: 1,109 posts
Armorama: 1,095 posts

Posted: Monday, August 14, 2017 - 08:11 PM UTC
After discovering the "Value Gear" line of resin accessories, I almost never make my own anymore.
http://valuegeardetails.com/
G
http://valuegeardetails.com/
G
pod3105

Joined: August 08, 2010
KitMaker: 466 posts
Armorama: 444 posts

Posted: Monday, August 14, 2017 - 08:12 PM UTC
Mix some pva glue with acrylic paint (any colour you want) and paint on to a non-absorbent surface. I use aluminium foil and sand paper. It usually takes a couple of layers to build up sufficient thickness. Once happy with t look simply peel off the base and off you go. REALLY good for tarps in particular. It sits and tears just like the real thing.
Posted: Monday, August 14, 2017 - 08:13 PM UTC
How I make them depends on what, exactly, I'm making and where it will go on the model/diorama.
A tarp that is extended and in place (like a cargo bed tilt, I tend to make from not Kleenex, but gift wrapping tissue, the sort you stuff around and over a gift to hide it in a gift bag or wrap a shirt in in the box. It's stronger, holds its shape better when wet and can be painted with thinned white glue in sections to make it easier to work with. It also doesn't fuzz as some facial tissues do when wetted with the glue mix.
For rolled tarps and backpacks I use epoxy putty, be it Milliput, Aves or Green Stuff.
A benefit to the green stuff is that it's less tacky, so easier to roll out into sheets. It is, however, a much stiffer (higher viscosity) putty and can be a PITA to work into that nice sheet one wants for a tarp. It also cures over a longer time allowing you more working time.
Aves is softer and more tacky, but smoothes well and is easier to form. It tends to sag a bit, though, because it is relatively soft.
A lot of the figure guys use the Green Stuff because it is less tacky and has a long working time and simply put up with the fact it's quite stiff.
To get a thin sheet of putty I roll it between two sheets of plastic wrap, dusting occasionally with baking powder as a release agent from the sheet. Get it as thin as you can and keep it cool to slow the cure process and give you more working time.
Cut the thin sheet into a rectangle the size you want and then roll it and/or fold it into the tarp, bedroll, haversack, etc, you are looking for. Let it cure and then paint.
If you want to have any rope or strap bulges in it, form them before curing. I usually place the item where it will fit on the vehicle, drape it accordingly and locate where I want the straps. I then use the back of an exacto to emboss the strap/rope lines into the item. If there would be wrinkles or ripples in the fabric because of the straps or how the item is placed, I create them at this point as well. Once cured you can remove the item for painting an them replace it on the model.
The putty won't stick to plastic or paint, but it will grab any undercuts or features that it presses around, so be careful what's underneath. You might want to add a dusting of baking powder to the surface to reduce adhesion, but if the item mechanically locks over and around something, it's not coming off.
When the putty is still soft, you can put in tears, indications of grommets, patches, pockets, etc.
HTH
Paul

timcc2008

Joined: May 12, 2010
KitMaker: 139 posts
Armorama: 135 posts

Posted: Monday, August 14, 2017 - 09:54 PM UTC
Robert- If you try the polymer clay (what brand?), please post on how it worked out. I know milliput is essentially a polymer clay.
G- Value Gear looks like a detailed line of quick and easy tarps, etc. But what if you want to depict that certain gear that conforms to an irregular surface?
Paul H.- so what you are saying is that you use thick layers of dried acrylic paint (once it's cured). Am I correct?
Paul R.- Thanks for the detail you put into your post about how you make your tarps, etc. I have not tried the tissue paper approach and may consider that before I try Milliput, just to see how it reacts, conforms and stands up to washes, etc.
babaoriley

Joined: June 23, 2017
KitMaker: 195 posts
Armorama: 179 posts

Posted: Monday, August 14, 2017 - 10:39 PM UTC
The thin metal foil around the necks of wine bottles can be useful for making tarps as it can be made to sag realistically, e.g. a rolled tarp will sag unless there is something like a bundle of tent pole inside it. A side benefit is you are left with an open bottle of wine and, well....
paulie100

Joined: November 25, 2013
KitMaker: 35 posts
Armorama: 34 posts

Posted: Monday, August 14, 2017 - 11:04 PM UTC
from my experience, magicscult is the best medium, miliput is too grainy/ green stuff too sticky....
Red Zebra in the UK also has a range of rolls, and now even camo nets in resin.
www.redzebramodels.co.uk
Red Zebra in the UK also has a range of rolls, and now even camo nets in resin.
www.redzebramodels.co.uk

rdt1953

Joined: February 06, 2015
KitMaker: 1,098 posts
Armorama: 68 posts

Posted: Tuesday, August 15, 2017 - 12:01 AM UTC
Hi - I'm primarily an aircraft guy but I wander into the armor side on occasion - I made the rolled side curtains on this AFV Club Matador with polymer clay-the straps /buckles are photo etch . Worked well enough I suppose- there is some shrinkage /shape change ( minimal) from baking.
There also seems to be some leaching into the paint after a while causing a little glossy sheen.
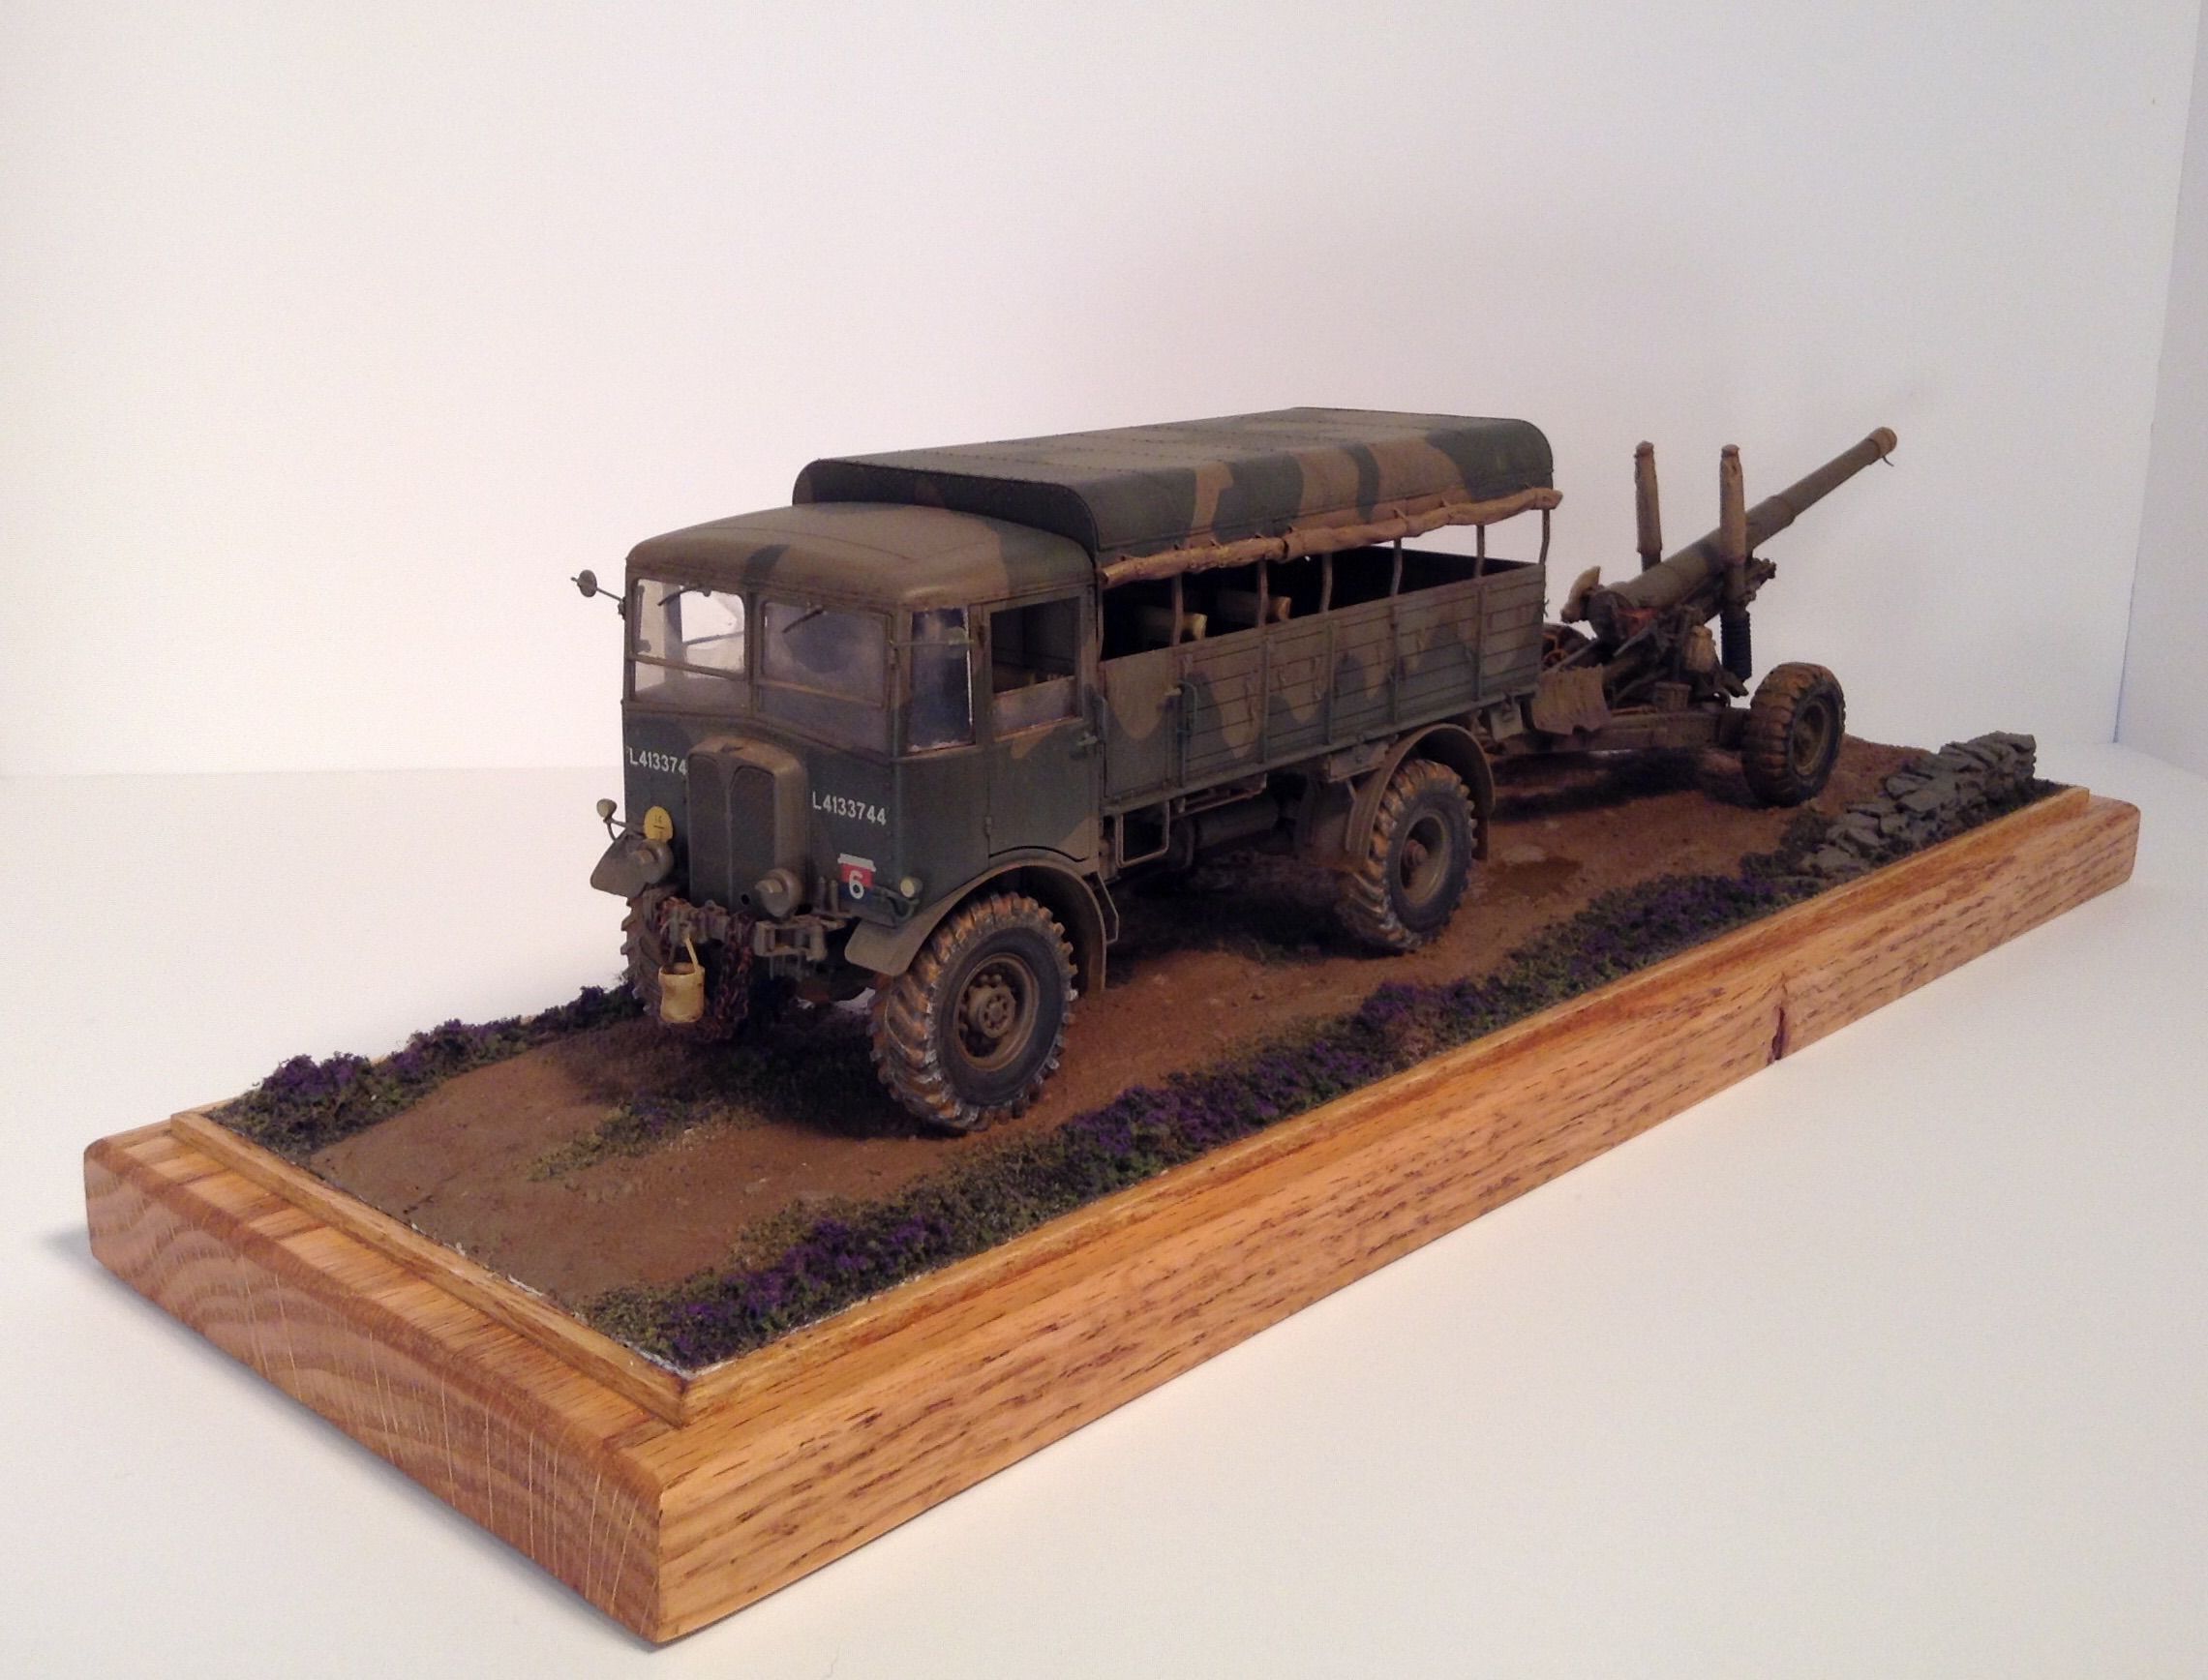
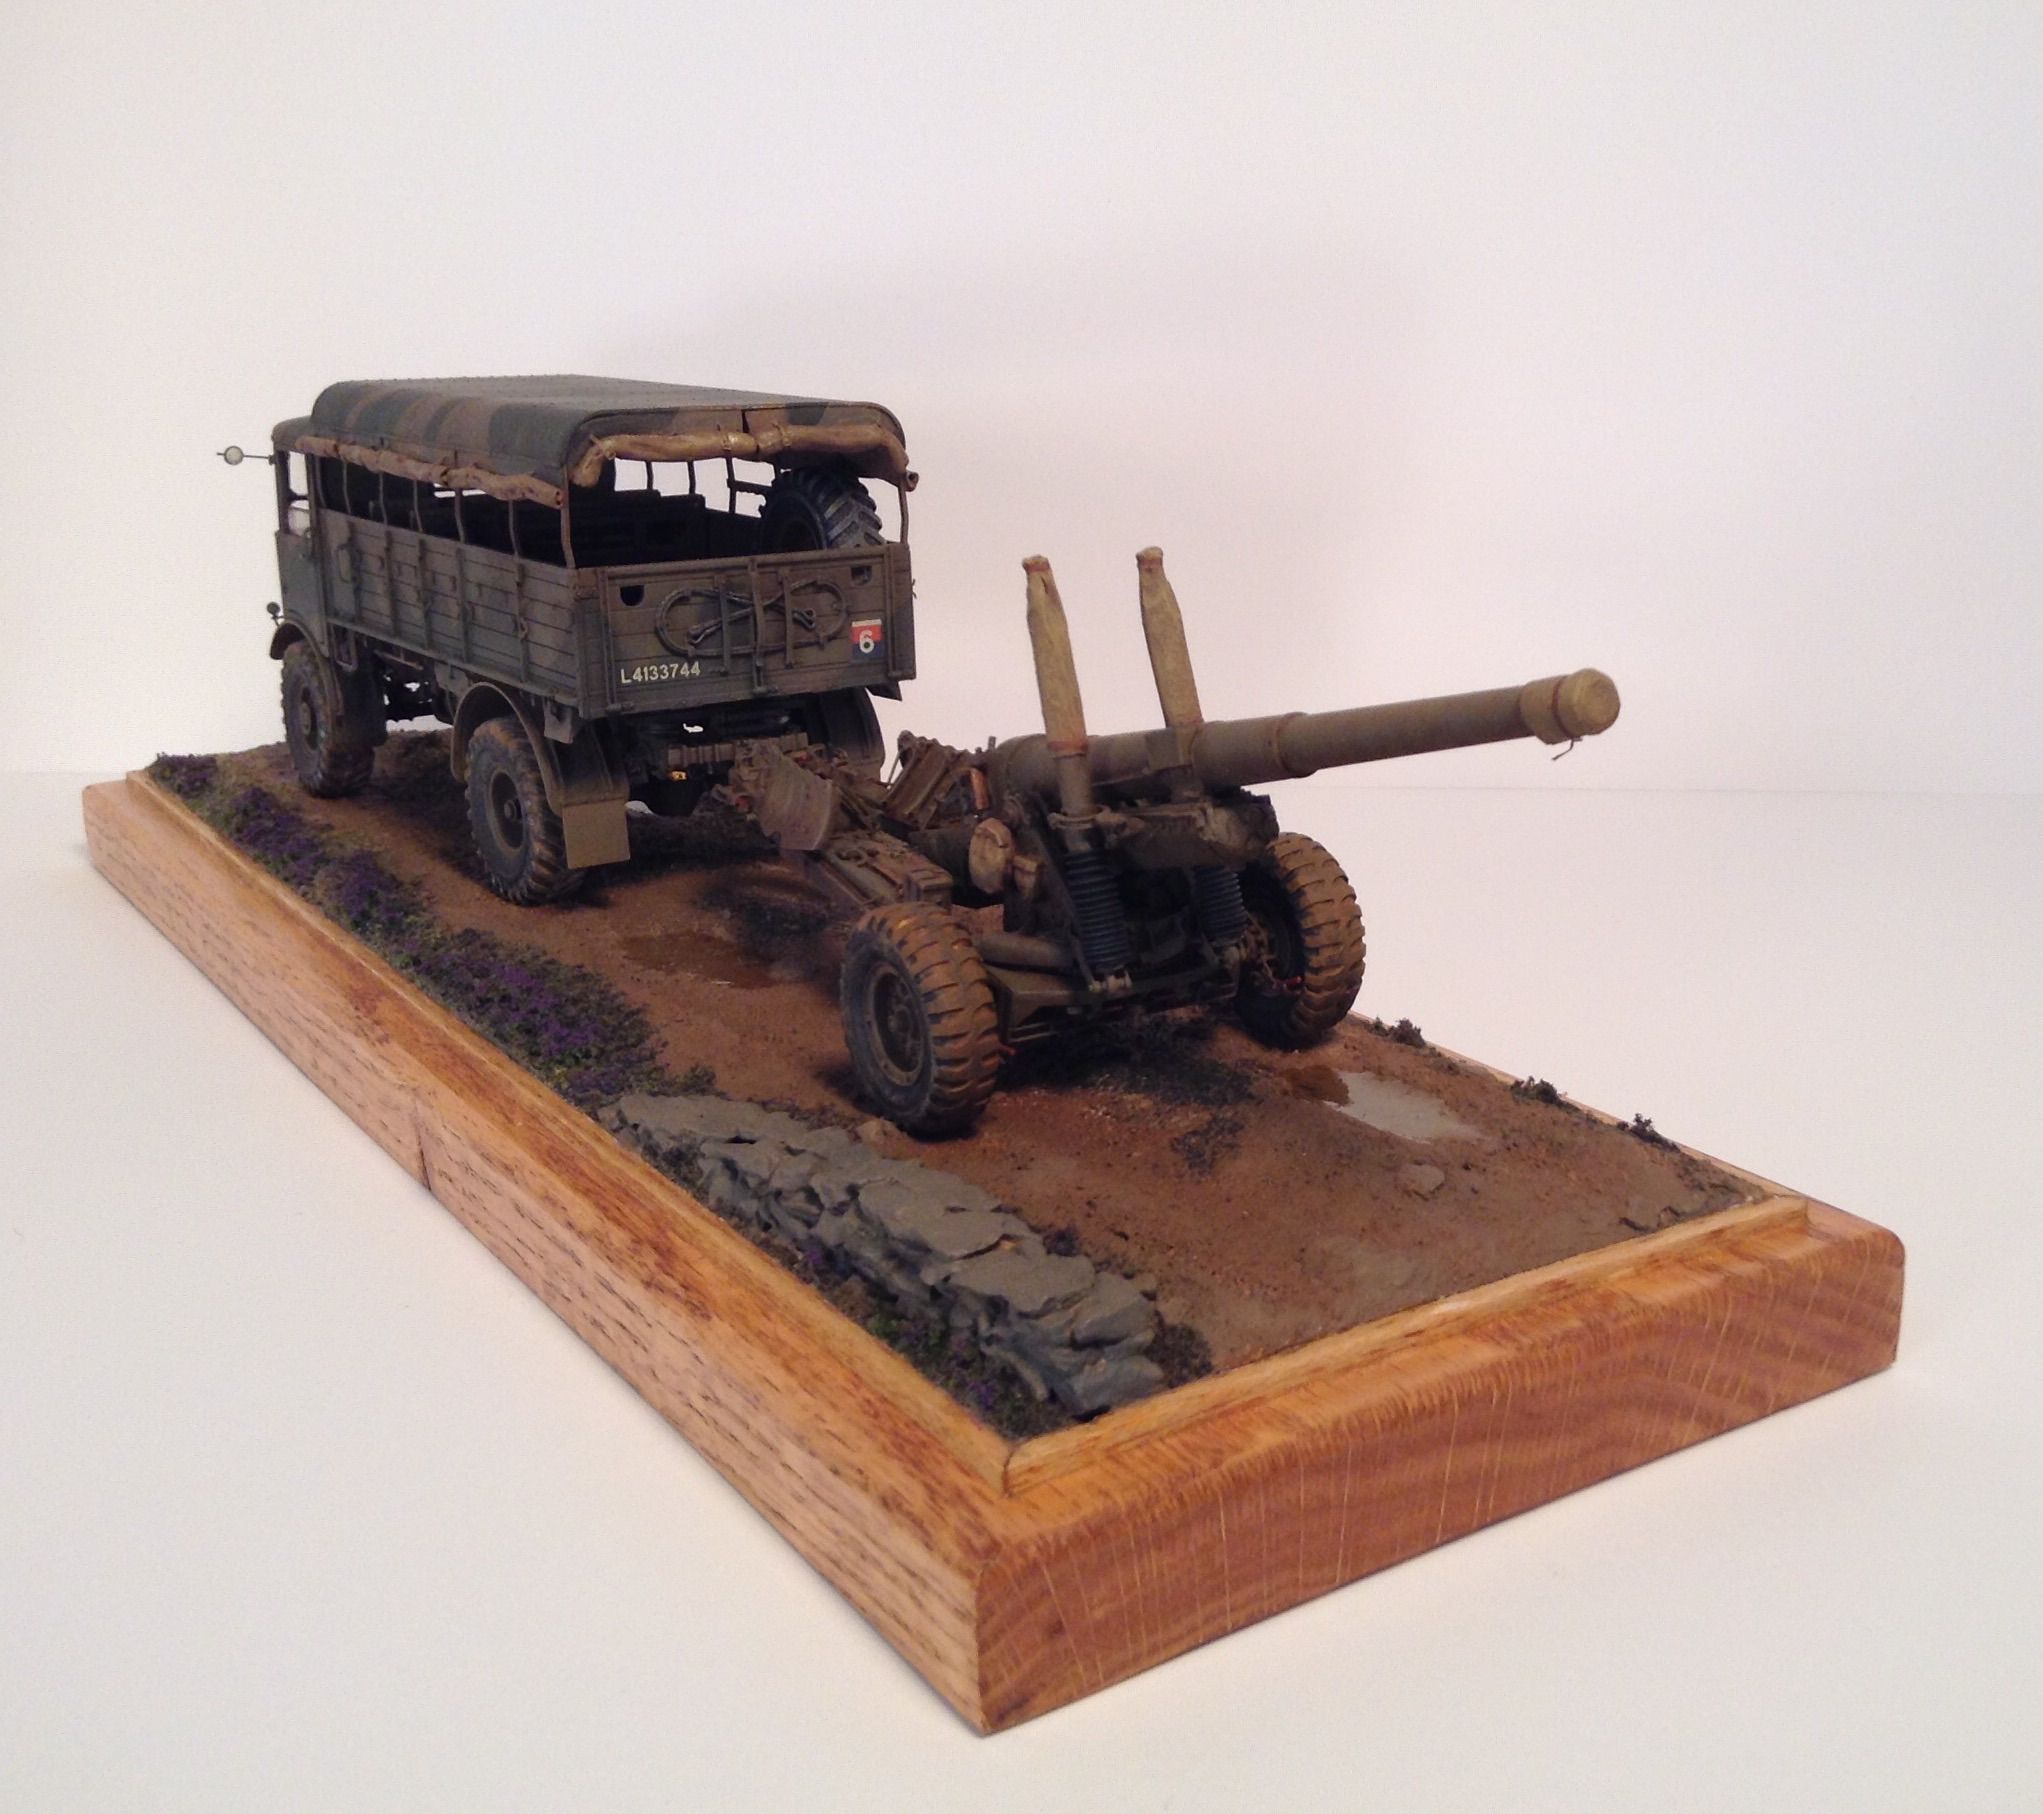
The covers for the equilibrators,muzzle and sight on the gun are gift wrap tissue/pva glue.
Hope this is of some help - Richard
There also seems to be some leaching into the paint after a while causing a little glossy sheen.


The covers for the equilibrators,muzzle and sight on the gun are gift wrap tissue/pva glue.
Hope this is of some help - Richard
parrot

Joined: March 01, 2002
KitMaker: 1,607 posts
Armorama: 1,581 posts

Posted: Tuesday, August 15, 2017 - 12:59 AM UTC
Quoted Text
After discovering the "Value Gear" line of resin accessories, I almost never make my own anymore.
http://valuegeardetails.com/
G
Have to admit to the same.Well priced,well detailed and plenty of variety.
When needed I still use the tissue and glue technique.
Tom
Posted: Tuesday, August 15, 2017 - 01:03 AM UTC
Quoted Text
I know milliput is essentially a polymer clay.
Not really. The polymer clays need heat to activate the crosslinking that makes them rigid and there is some shrinkage on some of them due to that.
Miliput and other epoxy putties are 2-part epoxies that set once mixed without additional heat (in fact the fastest setting types generate their own heat form the reaction). There is no shrinkage from the reaction.
This is important for many applications as if you want the item to harden to paint it then you need to remove it and the clay stuff has to be moved around while soft, increasing the risk that the shape changes, even a little, meaning the item won't fit back in place after curing. Epoxy putty items can be left in place on the model to be painted or can be removed after cure to paint depending on the item and how it interacts with the model surface (mechanically locks or not). The clay stuff must be removed to go into the oven and you're pretty likely to have the shape shift. Very small or delicate items probably can't even be moved without distorting too much to be useful. Epoxy putty items can be left in place until hardened and then painted as required.
Paul

11Bravo_C2

Joined: May 12, 2015
KitMaker: 475 posts
Armorama: 394 posts

Posted: Tuesday, August 15, 2017 - 01:19 AM UTC
Quoted Text
After discovering the "Value Gear" line of resin accessories, I almost never make my own anymore.
http://valuegeardetails.com/
G
Thanks for the link!!

TotemWolf

Joined: February 11, 2013
KitMaker: 294 posts
Armorama: 196 posts

Posted: Tuesday, August 15, 2017 - 01:27 AM UTC
Quoted Text
Robert- If you try the polymer clay (what brand?), please post on how it worked out. I know milliput is essentially a polymer clay.
As was just said Milliput is not polymer clay.
You did inspire me to give it a try and I had a bit of time on hands so here's what I threw together in an hour or so. They took acrylic paint real well.
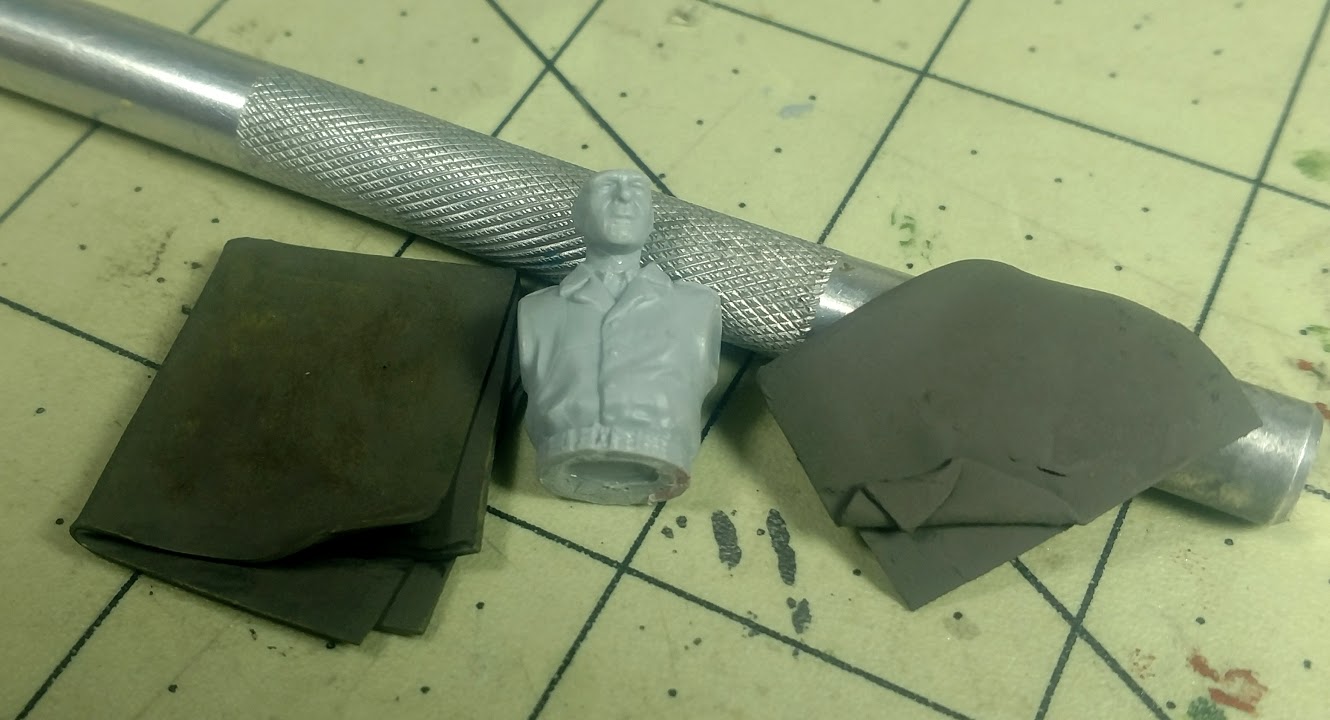
On the left would be roughly a 1.2m x 1.8m (4'x6') tarp in 1:35 scale. On the right a wool blanket.
While they were baking my daughter explained how I could make them textured, so I played around with that.
This one used a cloth handkerchief for the texture.
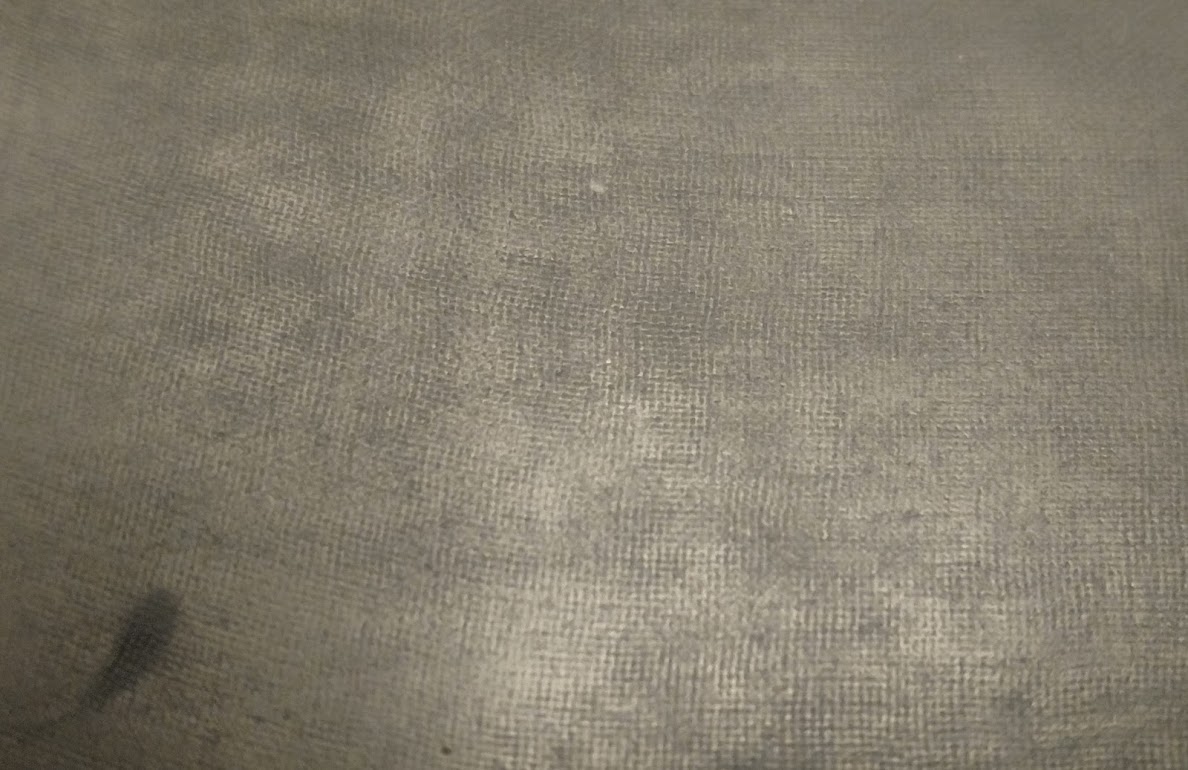
This one used gauze mesh and I folded it over and laid the ruler by it for scale.
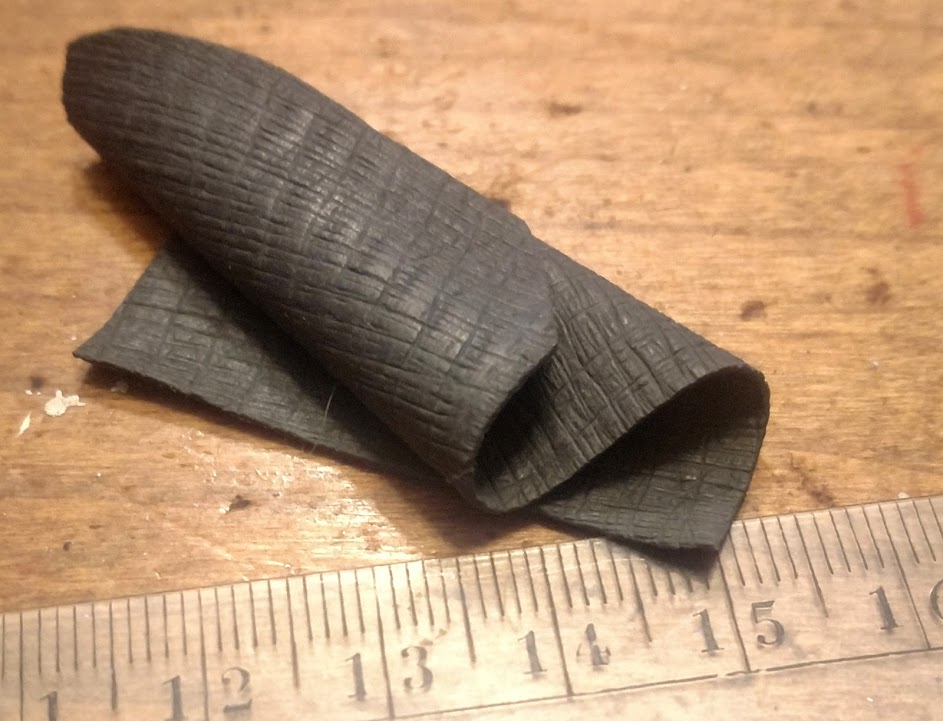
I will have to play around with it a lot more and see what can be done with it. I will also test how it reacts to various thinners, paints, glues etc. Maybe another thread on it later.
Thanks for the inspiration.

justsendit

Joined: February 24, 2014
KitMaker: 3,033 posts
Armorama: 2,492 posts

Posted: Tuesday, August 15, 2017 - 04:38 AM UTC
Hi Tim,
I’ve done some of all the above, though recently, I did a little bit of a cheat. I used Value Gear ‘Long Rolls (LR)’ as a base for an M21's fender stowage. Since the resin doesn’t bend, I strategically broke some of the rolls into pieces and kind of re-sculpted the undersides to form over the fenders.
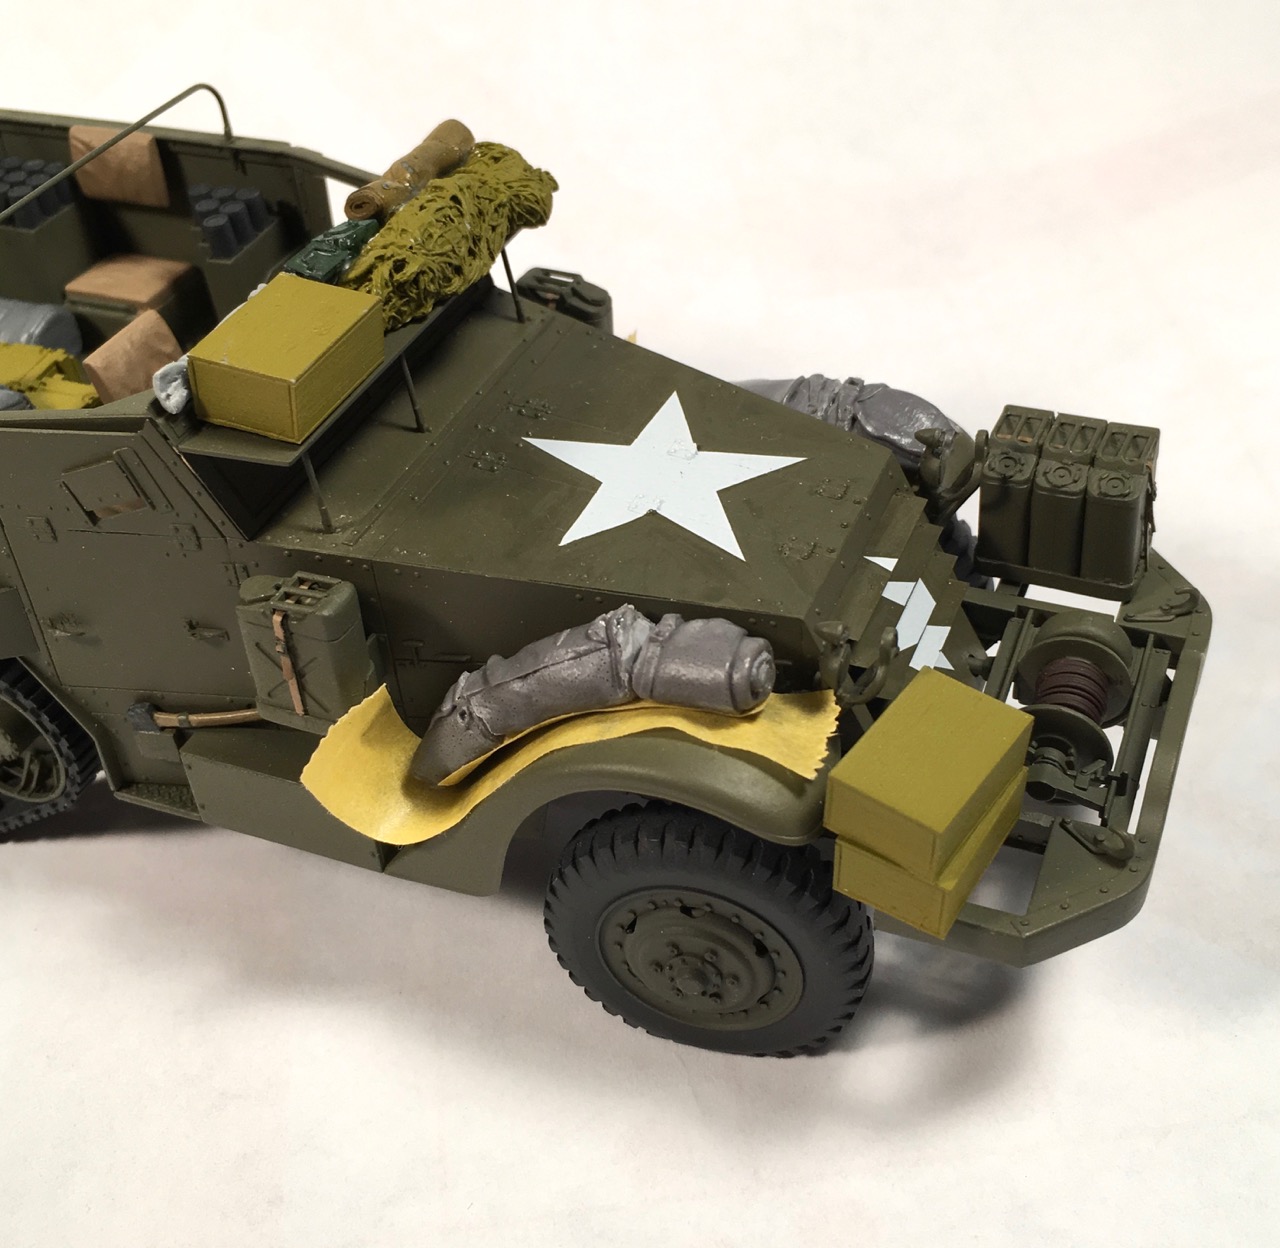

In the top of the right-rear rack is another Value Gear piece cut in half with its front re-sculpted to fit.

This method still required a bit of effort, but it's sometimes fun to try different things.
Cheers!🍺
—mike
PS: The groundwork on your 'Poland 1939 Diorama' is outstanding.
I’ve done some of all the above, though recently, I did a little bit of a cheat. I used Value Gear ‘Long Rolls (LR)’ as a base for an M21's fender stowage. Since the resin doesn’t bend, I strategically broke some of the rolls into pieces and kind of re-sculpted the undersides to form over the fenders.


In the top of the right-rear rack is another Value Gear piece cut in half with its front re-sculpted to fit.

This method still required a bit of effort, but it's sometimes fun to try different things.
Cheers!🍺
—mike
PS: The groundwork on your 'Poland 1939 Diorama' is outstanding.
Pave-Hawk

Joined: May 05, 2006
KitMaker: 900 posts
Armorama: 510 posts

Posted: Tuesday, August 15, 2017 - 07:07 AM UTC
For those trying polymer clay, be careful if you are trying to get the items to conform to fenders or turrets or other areas on the model.
The polymer clay plasticisers will eat through paint and styrene if left too long. Luckily I was doing it on a resin model so only had to touch up the paint, not repair a big hole in the model.
The reason (as I understand it) is that polymer clays are basically pvc in a solvent, and anything the dissolves pvc (eg MEK) will happily munch through styrene.
This applies to oven bake clays, air dry clays may be different.

TotemWolf

Joined: February 11, 2013
KitMaker: 294 posts
Armorama: 196 posts

Posted: Tuesday, August 15, 2017 - 08:12 AM UTC
Quoted Text
For those trying polymer clay, be careful if you are trying to get the items to conform to fenders or turrets or other areas on the model.
The polymer clay plasticisers will eat through paint and styrene if left too long. Luckily I was doing it on a resin model so only had to touch up the paint, not repair a big hole in the model.
The reason (as I understand it) is that polymer clays are basically pvc in a solvent, and anything the dissolves pvc (eg MEK) will happily munch through styrene.
This applies to oven bake clays, air dry clays may be different.

Oh wow.
Here's a link to some facts about polymer clay and plastic.
But it could still be useful if used right.
Thanks for the info.

avenue

Joined: May 25, 2013
KitMaker: 544 posts
Armorama: 542 posts
Posted: Tuesday, August 15, 2017 - 10:00 AM UTC
Quoted Text
For those trying polymer clay, be careful if you are trying to get the items to conform to fenders or turrets or other areas on the model.
The polymer clay plasticisers will eat through paint and styrene if left too long. Luckily I was doing it on a resin model so only had to touch up the paint, not repair a big hole in the model.
The reason (as I understand it) is that polymer clays are basically pvc in a solvent, and anything the dissolves pvc (eg MEK) will happily munch through styrene.
This applies to oven bake clays, air dry clays may be different.
Thank's for reminding me,I planning to use polymer clay to make bedroll,but after reading your article I decided to switch to air clay.
Posted: Tuesday, August 15, 2017 - 08:42 PM UTC
Quoted Text
I decided to switch to air clay.
Be aware that the air clays shrink a fair amount so anything that fit nice and snug when formed will have gaps or not fit properly once dried.
That's possibly the main reason I like the epoxy putties for this sort of thing, no shrinkage. They don't dry, which means that a volatile substance (usually water) evaporates from the putty, causing shrinkage. They cure or set, which is a chemical reaction between the two parts of the putty releasing no volatiles and therefore no shrinkage occurs.

timcc2008

Joined: May 12, 2010
KitMaker: 139 posts
Armorama: 135 posts

Posted: Wednesday, August 16, 2017 - 03:32 AM UTC
I am really appreciative of all the discussion thus far on this topic as well as some great looking examples.
Paul- I have no idea what I was thinking when I said that Milliput was essentially a polymer. Must have had a brain fart at the time.
Richard- your Matador looks great. Would not even notice any shrinkage from the baking of the polymer clay.
Robert- love the texture with the handkerchief and the gauze. Glad I inspired you!
Mike- I like the idea of re-sculpting the Value Gear stowage to "fit" the vehicle. The M21 stowage looks great.
Thanks for the compliment on the Poland diorama. I have not worked on it in awhile. Started working on figure conversions for it, but then I had to take that step away. I just have not gone back to it as yet. Here's a link to it if anyone is interested in what I have done thus far.
http://armorama.com/forums/258762#2194519
Iain- that's very useful information on polymer clay.
Robert- thanks for the link. That's a good article on polymer clay melting plastic.

cabasner

Joined: February 12, 2012
KitMaker: 1,083 posts
Armorama: 1,014 posts

Posted: Wednesday, August 16, 2017 - 07:48 AM UTC
I don't know if the reference to 'Green Stuff' is a reference to Kneadatite, which is a 2 part epoxy that comes in ribbons of blue and yellow, which you cut off as much as you need, then knead the two colored strips to create a green epoxy lump or ball. I have this as well as Apoxie Sculpt, which also works well, but I an ABSOLUTELY SOLD on Kneadatite. Yes, it gets incredibly sticky as you work the two pieces (the yellow and blue) together, but the beauty is that you can use water and/or baking powder to preclude the stickiness. You can roll this stuff out to paper thinness; I use the baking powder to prevent it from sticking to the surface I am rolling on (granite countertop) and the roller (a plastic tube). And you can create anything you want with it. I need to create a canvas bag to put on my Merkava IV 50cal MG (to catch ejected shells), and this stuff is the way to go. I rolled it a lump of it to an ultra thin sheet, and left it to harden overnight. The sheet is now 'cured', and in this very thin sheet form, it is flexible, and capable of molding into the shape I need for the bag, which I will probably glue whatever edges remain, with super glue or any other type of glue.
If you leave it slightly thicker, you can make blankets/tarps, and mold/fold them to whatever shape you want, while it is still pliable (stays this way for many hours, allowing you to create whatever you want), then leave to cure. It becomes hard as rock, and you can then paint, glue, sand, file, whatever you want to do with it. I just can't see any product of its type that could be any better. That's my experience, at least.
If you leave it slightly thicker, you can make blankets/tarps, and mold/fold them to whatever shape you want, while it is still pliable (stays this way for many hours, allowing you to create whatever you want), then leave to cure. It becomes hard as rock, and you can then paint, glue, sand, file, whatever you want to do with it. I just can't see any product of its type that could be any better. That's my experience, at least.
avenue

Joined: May 25, 2013
KitMaker: 544 posts
Armorama: 542 posts
Posted: Wednesday, August 16, 2017 - 10:15 AM UTC
what about tamiya epoxy resin? need opinion.
avenue

Joined: May 25, 2013
KitMaker: 544 posts
Armorama: 542 posts
Posted: Wednesday, August 16, 2017 - 12:07 PM UTC
I watch youtube video,how to make bed roll and canvas using epoxy resin,it look so easy, until i try it my self,wow! epoxy resin is very sticky.I use baby powder or pretoleum jelly.sometime it work.I thinking returning to tissue paper as an alternative.

ChrisJohnson
Joined: June 02, 2005
KitMaker: 65 posts
Armorama: 53 posts
KitMaker: 65 posts
Armorama: 53 posts

Posted: Wednesday, August 16, 2017 - 03:29 PM UTC
Quoted Text
from my experience, magicscult is the best medium, miliput is too grainy/ green stuff too sticky....
Red Zebra in the UK also has a range of rolls, and now even camo nets in resin.
www.redzebramodels.co.uk
Before I try this stuff, is Magic Sculpt a polymer resin?
Cheers,
Chris
Posted: Wednesday, August 16, 2017 - 07:59 PM UTC
Quoted Text
I don't know if the reference to 'Green Stuff' is a reference to Kneadatite
Yep, it was. I also believe it is sold under the name Green Stuff, but Kneadatite is the better known name, to be sure. (Had cranial flatulence on that one. That's my defence and I'm sticking to it!)
I love the working time on kneadatite. It starts to set up reasonably quickly, so getting the bulk shape fairly fast is important, but it then seems to plateau for quite a while giving you a chance to get fine details in place, like folds, wrinkles, grommet holes, etc.
When rolled out thin, quickly, it stays pretty pliable for a long time giving you plenty of time to fold up that tarp, set it in place with a few other pieces and, again, put in those fine details.
The one negative I find with it is that it's quite a bit less pliable, when freshly mixed, than many other putties. This is good for forming delicate shapes as it doesn't sag, but a pain for rolling out thin as it really resists the rolling pin and is harder to get into an even sheet. Still, the best putty for that task.
My only problem is that it's hard to find where I am so I hoard the small amount I have for special projects, like tarps, where it really shines.

Paul

cabasner

Joined: February 12, 2012
KitMaker: 1,083 posts
Armorama: 1,014 posts

Posted: Wednesday, August 16, 2017 - 08:33 PM UTC
Quoted Text
My only problem is that it's hard to find where I am so I hoard the small amount I have for special projects, like tarps, where it really shines.
Paul
I'd be happy to send you some, if that's possible 😊
 |


