Trust Life magazine, and Frenchy, to show the 'E8 with the T-66 tracks in Korea. I knew there was a limited number fitted with the T-66 tracks.
I believe it was a short life that doomed the T-66. The T-80's were more robust and easier to work on, but the T-66 is a cooler looking track.
Hosted by Darren Baker
RCD M4A3E8, Korea
m4sherman

Joined: January 18, 2006
KitMaker: 1,866 posts
Armorama: 1,808 posts

Posted: Wednesday, December 19, 2018 - 12:49 PM UTC

LeoCmdr

Joined: January 19, 2005
KitMaker: 4,085 posts
Armorama: 3,917 posts

Posted: Wednesday, December 19, 2018 - 01:52 PM UTC
Quoted Text
Quoted TextQuoted TextI can't see the T66 track in Korea.
I can(in U.S. Army service at least...)
a last one here (without exhaust deflector BTW...)
H.P.
The photos H.P. posted are dated October 1950. That is about as late that I've seen T66 tracks on US tanks. Doesn't exclude the possibility of them beeing used later.
In the book mentioned above about Canadian army vehicles in Korea (great book!) there is one picture of a Canadian Sherman with T66 tracks (and sand shields!). This photo is probably taken right after the Canadians got their vehicles in mid May 1951. That is the only photo I've seen of a Canadian Sherman in Korea with T66 tracks.
Cheers,
/E
There's actually two pics in the book that show the T66 tracks on Shermans and it explains that when the tanks were first received at the depot in Pusan by the Canadians they had the T66 tracks and the majority had full fenders/sand shields. They were quickly replaced with the T80 tracks. Late in the war some tanks received the T84 track...those would have been D Squadron, RCD crewed tanks.
So for a D Squadron, RCD tanks the T80 or T84 tracks would be correct...but not the T66 tracks.
HDSC2D

Joined: March 12, 2013
KitMaker: 170 posts
Armorama: 141 posts

Posted: Thursday, December 20, 2018 - 03:00 AM UTC
Asuka/Tasca has the engine deck torsion bars and other late M4A3E8 features as well: http://tasca-shop.ocnk.net/product/66
griffontech

Joined: November 21, 2007
KitMaker: 237 posts
Armorama: 231 posts

Posted: Sunday, December 23, 2018 - 06:00 AM UTC
Frenchie to the rescue...AGAIN. How do you do it?
Well, now I am on the fence. I did deliberate and decided to keep the build as an American Tank and go and purchase a Tamiya Korean war E8.
With Frenchie's info I could build a bastard tank given to the Canadians. Once again, not building a specific vehicle, just one used by Canadians in Korea. I will have to source decals for the Canadian tanks though.
As I was deciding what to do, I entered this models info into my Excel database (yes, I have one to track my models). And low and behold as I typed out "M4A3E8" I suddenly discovered I already had a Dragon E8, kit 6183, hidden away somewhere in my stash. Well GRRRRRRRRR!
Now I don't want to go purchase a 3rd E8 just for the project. So, quick vote from you guys: Keep the Tamiya E8 as a Canadian, and build the Dragon as a WWII Us vehicle, or other way around?
I'll try and post pics once I figure out how to do it. Haven't uploaded pics here for a while.

LeoCmdr

Joined: January 19, 2005
KitMaker: 4,085 posts
Armorama: 3,917 posts

Posted: Sunday, December 23, 2018 - 12:14 PM UTC
Use the Tamiya kit for your Korean War Canadian M4A3E8 build.
For markings there are Canadian Korean War Sherman sets with the tactical markings and vehicle names...for each Squadron of the Strathcona tanks but none for the Dragoons. There is also a great set of Strathcona Korean War Sherman decals from Star Decals. It includes names from A and C Squadron Strathcona Shermans.
For markings there are Canadian Korean War Sherman sets with the tactical markings and vehicle names...for each Squadron of the Strathcona tanks but none for the Dragoons. There is also a great set of Strathcona Korean War Sherman decals from Star Decals. It includes names from A and C Squadron Strathcona Shermans.
griffontech

Joined: November 21, 2007
KitMaker: 237 posts
Armorama: 231 posts

Posted: Saturday, January 05, 2019 - 01:37 PM UTC
Ok,
So I finally caved (yet again...) to the modeling gods. I found a Tamiya M4A3E8 Korean War version and picked it up.
Now I have no need to worry about scratch building certain parts. I've attached pics of what I accomplished to date on the European theatre version.
Only additions:
-moved .50 MG mount forward. Drilled out original base plate mounting bolt holes
-drilled out the barrel for bow gun and turret coax MG port
-replaced hatch and a couple engine deck handles with wire
-drilled out the numerous holes on lower edge of track guards
I may be able to swap the lower hull and turret over to the Korean War version to finish that build. I haven't looked at the parts close enough yet to see if everything is good between the two versions. If not, it will be easy enough to build up the 2nd model. This Tamiya kit basically falls together.
Bonus with the Korean War kit! It comes with a Russian GAZ-67B field car that I didn't know about.
Does anyone know if US OD Green changed between WWII and Korea? To make the two stand apart on the model shelf (along with the Dragon E8 still in the stash...) I will maybe alter the OD colour slightly between these two kits to show a change over the years.

 " BORDER="0">

 [img]
[img]
[img] " BORDER="0">

 " BORDER="0">
So I finally caved (yet again...) to the modeling gods. I found a Tamiya M4A3E8 Korean War version and picked it up.
Now I have no need to worry about scratch building certain parts. I've attached pics of what I accomplished to date on the European theatre version.
Only additions:
-moved .50 MG mount forward. Drilled out original base plate mounting bolt holes
-drilled out the barrel for bow gun and turret coax MG port
-replaced hatch and a couple engine deck handles with wire
-drilled out the numerous holes on lower edge of track guards
I may be able to swap the lower hull and turret over to the Korean War version to finish that build. I haven't looked at the parts close enough yet to see if everything is good between the two versions. If not, it will be easy enough to build up the 2nd model. This Tamiya kit basically falls together.
Bonus with the Korean War kit! It comes with a Russian GAZ-67B field car that I didn't know about.
Does anyone know if US OD Green changed between WWII and Korea? To make the two stand apart on the model shelf (along with the Dragon E8 still in the stash...) I will maybe alter the OD colour slightly between these two kits to show a change over the years.
 " BORDER="0">
  [img]
[img][img]
 " BORDER="0">
  " BORDER="0">
LeoCmdr

Joined: January 19, 2005
KitMaker: 4,085 posts
Armorama: 3,917 posts

Posted: Saturday, January 05, 2019 - 02:16 PM UTC
Lookin’ good Dave! Nice clean build.
griffontech

Joined: November 21, 2007
KitMaker: 237 posts
Armorama: 231 posts

Posted: Saturday, January 05, 2019 - 02:40 PM UTC
Thanks. This is just the beginning stages. The Canadian E8 will have allot of suitable stowage on back deck, plus a jerry can rack on the side. If you check earlier posts there is a pick of a Canadian E8 with a guy sleeping on the engine deck. I think I may add him in too. I'm not much of a figure builder, but since this guy is covered by a blanket I think I'll manage 
I'll do a small vignette of the E8 during some down time.

I'll do a small vignette of the E8 during some down time.
griffontech

Joined: November 21, 2007
KitMaker: 237 posts
Armorama: 231 posts

Posted: Sunday, January 06, 2019 - 01:21 PM UTC
Basic build on both tanks is now done.
The Korean era one only took a few hours to put together.
Upper hull on both is removeable and an excellent fit. I may not even glue them down.
This is the first time building a tank completely with running gear before painting, so it will be an interesting challenge for me. I normally leave the tracks and road wheels off for painting.
Still some clean up and finishing details to do before they head to the paint booth.
After doing both builds so close together I can honestly say that other than tracks, Tamiya could have issued this as a two-in-one kit. There are only about 20 pieces that are different between the two tanks, and this is taken up mostly by the exhaust and mantlett cover pieces.

griffontech

Joined: November 21, 2007
KitMaker: 237 posts
Armorama: 231 posts

Posted: Sunday, February 24, 2019 - 04:15 AM UTC
Small update:
Both Sherman's are now painted.
-WWII US Sherman is was painted with Model Master Green Drab acrylic. Buff colour was then added for fading. I may have lightened it too much, but it will darken with additional weathering
-Canadian Korean War Sherman was painted with Tamiya XF-62 Olive drab then highlighted with a lightly thinned base coat.
Both models are now clear coated in select spots. I'll be using a combo of the kit decals and the excellent set of Canadian Korean War Decals by Bison on both models.
Tracks are also base coated in Tamiya matt black and will be installed today.
Korean war on the right (with mantlet cover):


The US Sherman looks VERY faded in this shot. Just the lighting.


A Bonus shot of my pups Casey and Chester watching me work:

Both Sherman's are now painted.
-WWII US Sherman is was painted with Model Master Green Drab acrylic. Buff colour was then added for fading. I may have lightened it too much, but it will darken with additional weathering
-Canadian Korean War Sherman was painted with Tamiya XF-62 Olive drab then highlighted with a lightly thinned base coat.
Both models are now clear coated in select spots. I'll be using a combo of the kit decals and the excellent set of Canadian Korean War Decals by Bison on both models.
Tracks are also base coated in Tamiya matt black and will be installed today.
Korean war on the right (with mantlet cover):


The US Sherman looks VERY faded in this shot. Just the lighting.


A Bonus shot of my pups Casey and Chester watching me work:

griffontech

Joined: November 21, 2007
KitMaker: 237 posts
Armorama: 231 posts

Posted: Saturday, March 02, 2019 - 10:28 AM UTC
Hey all.
I just got back from my LHS (which is sadly closing down) and managed to find a set of AFV Club T80 tracks on discount!
I was going to add spare track to the turret and body of the RCD E8, but until today I didn't have any options.
So, how were the tracks attached to the turret and hull? Welded? Bolts, brackets?
No photo's I can find show enough detail.
Thanks.

LeoCmdr

Joined: January 19, 2005
KitMaker: 4,085 posts
Armorama: 3,917 posts

Posted: Saturday, March 02, 2019 - 03:24 PM UTC
The tracks used on the turret and hull sides is Centurion track not Sherman track. The Centurion track sections were welded on. The track on the glacis plate was spare T80 track attached via brackets.

LeoCmdr

Joined: January 19, 2005
KitMaker: 4,085 posts
Armorama: 3,917 posts

Posted: Sunday, March 03, 2019 - 09:33 AM UTC
Quoted Text
So, how were the tracks attached to the turret and hull? Welded? Bolts, brackets?
Dave,
The book I recommended that you pick up in December 2018 has images of how the Centurion tracks are mounted on the Sherman turret. They were welded but also used a post welded on the turret side to assist in supporting the weight of the track sections. I would suggest that this is likely the same post that was used previously to mount spare road wheels to the turret sides.
Not sure if you picked up the book or plan to but it is the BEST resource available for modelling a Korean War Canadian M4A3E8.
griffontech

Joined: November 21, 2007
KitMaker: 237 posts
Armorama: 231 posts

Posted: Sunday, March 03, 2019 - 10:18 AM UTC
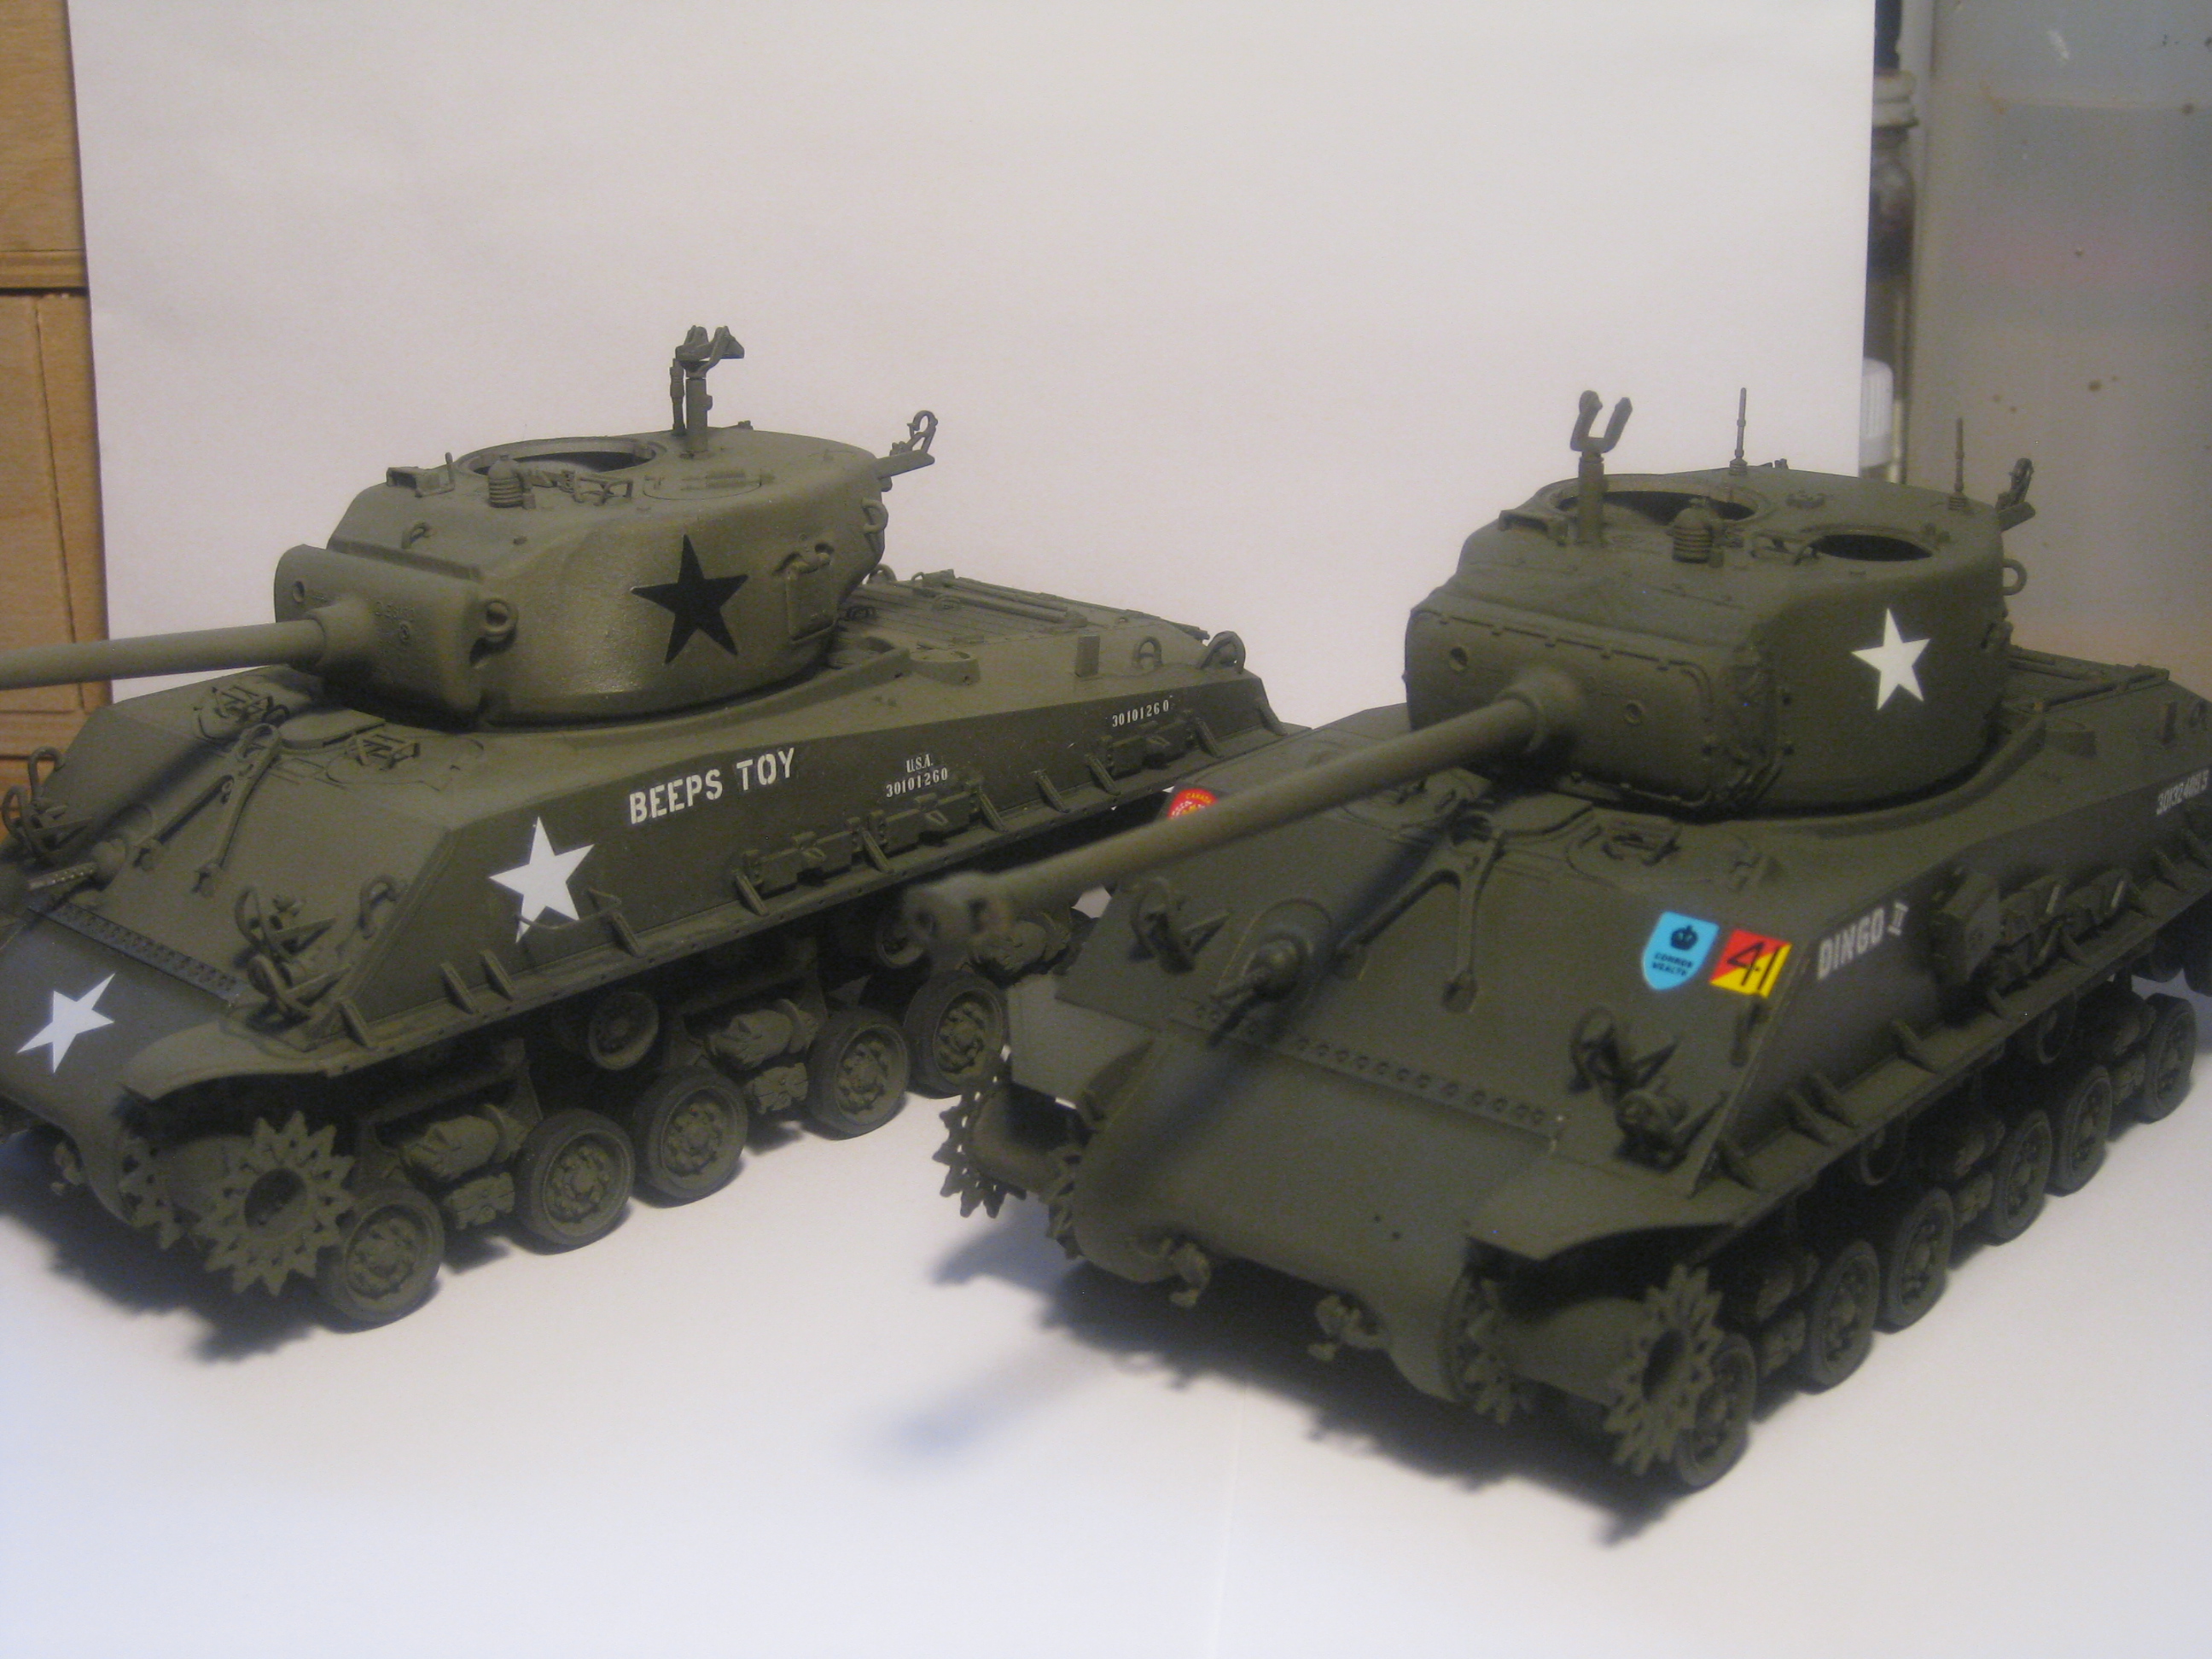
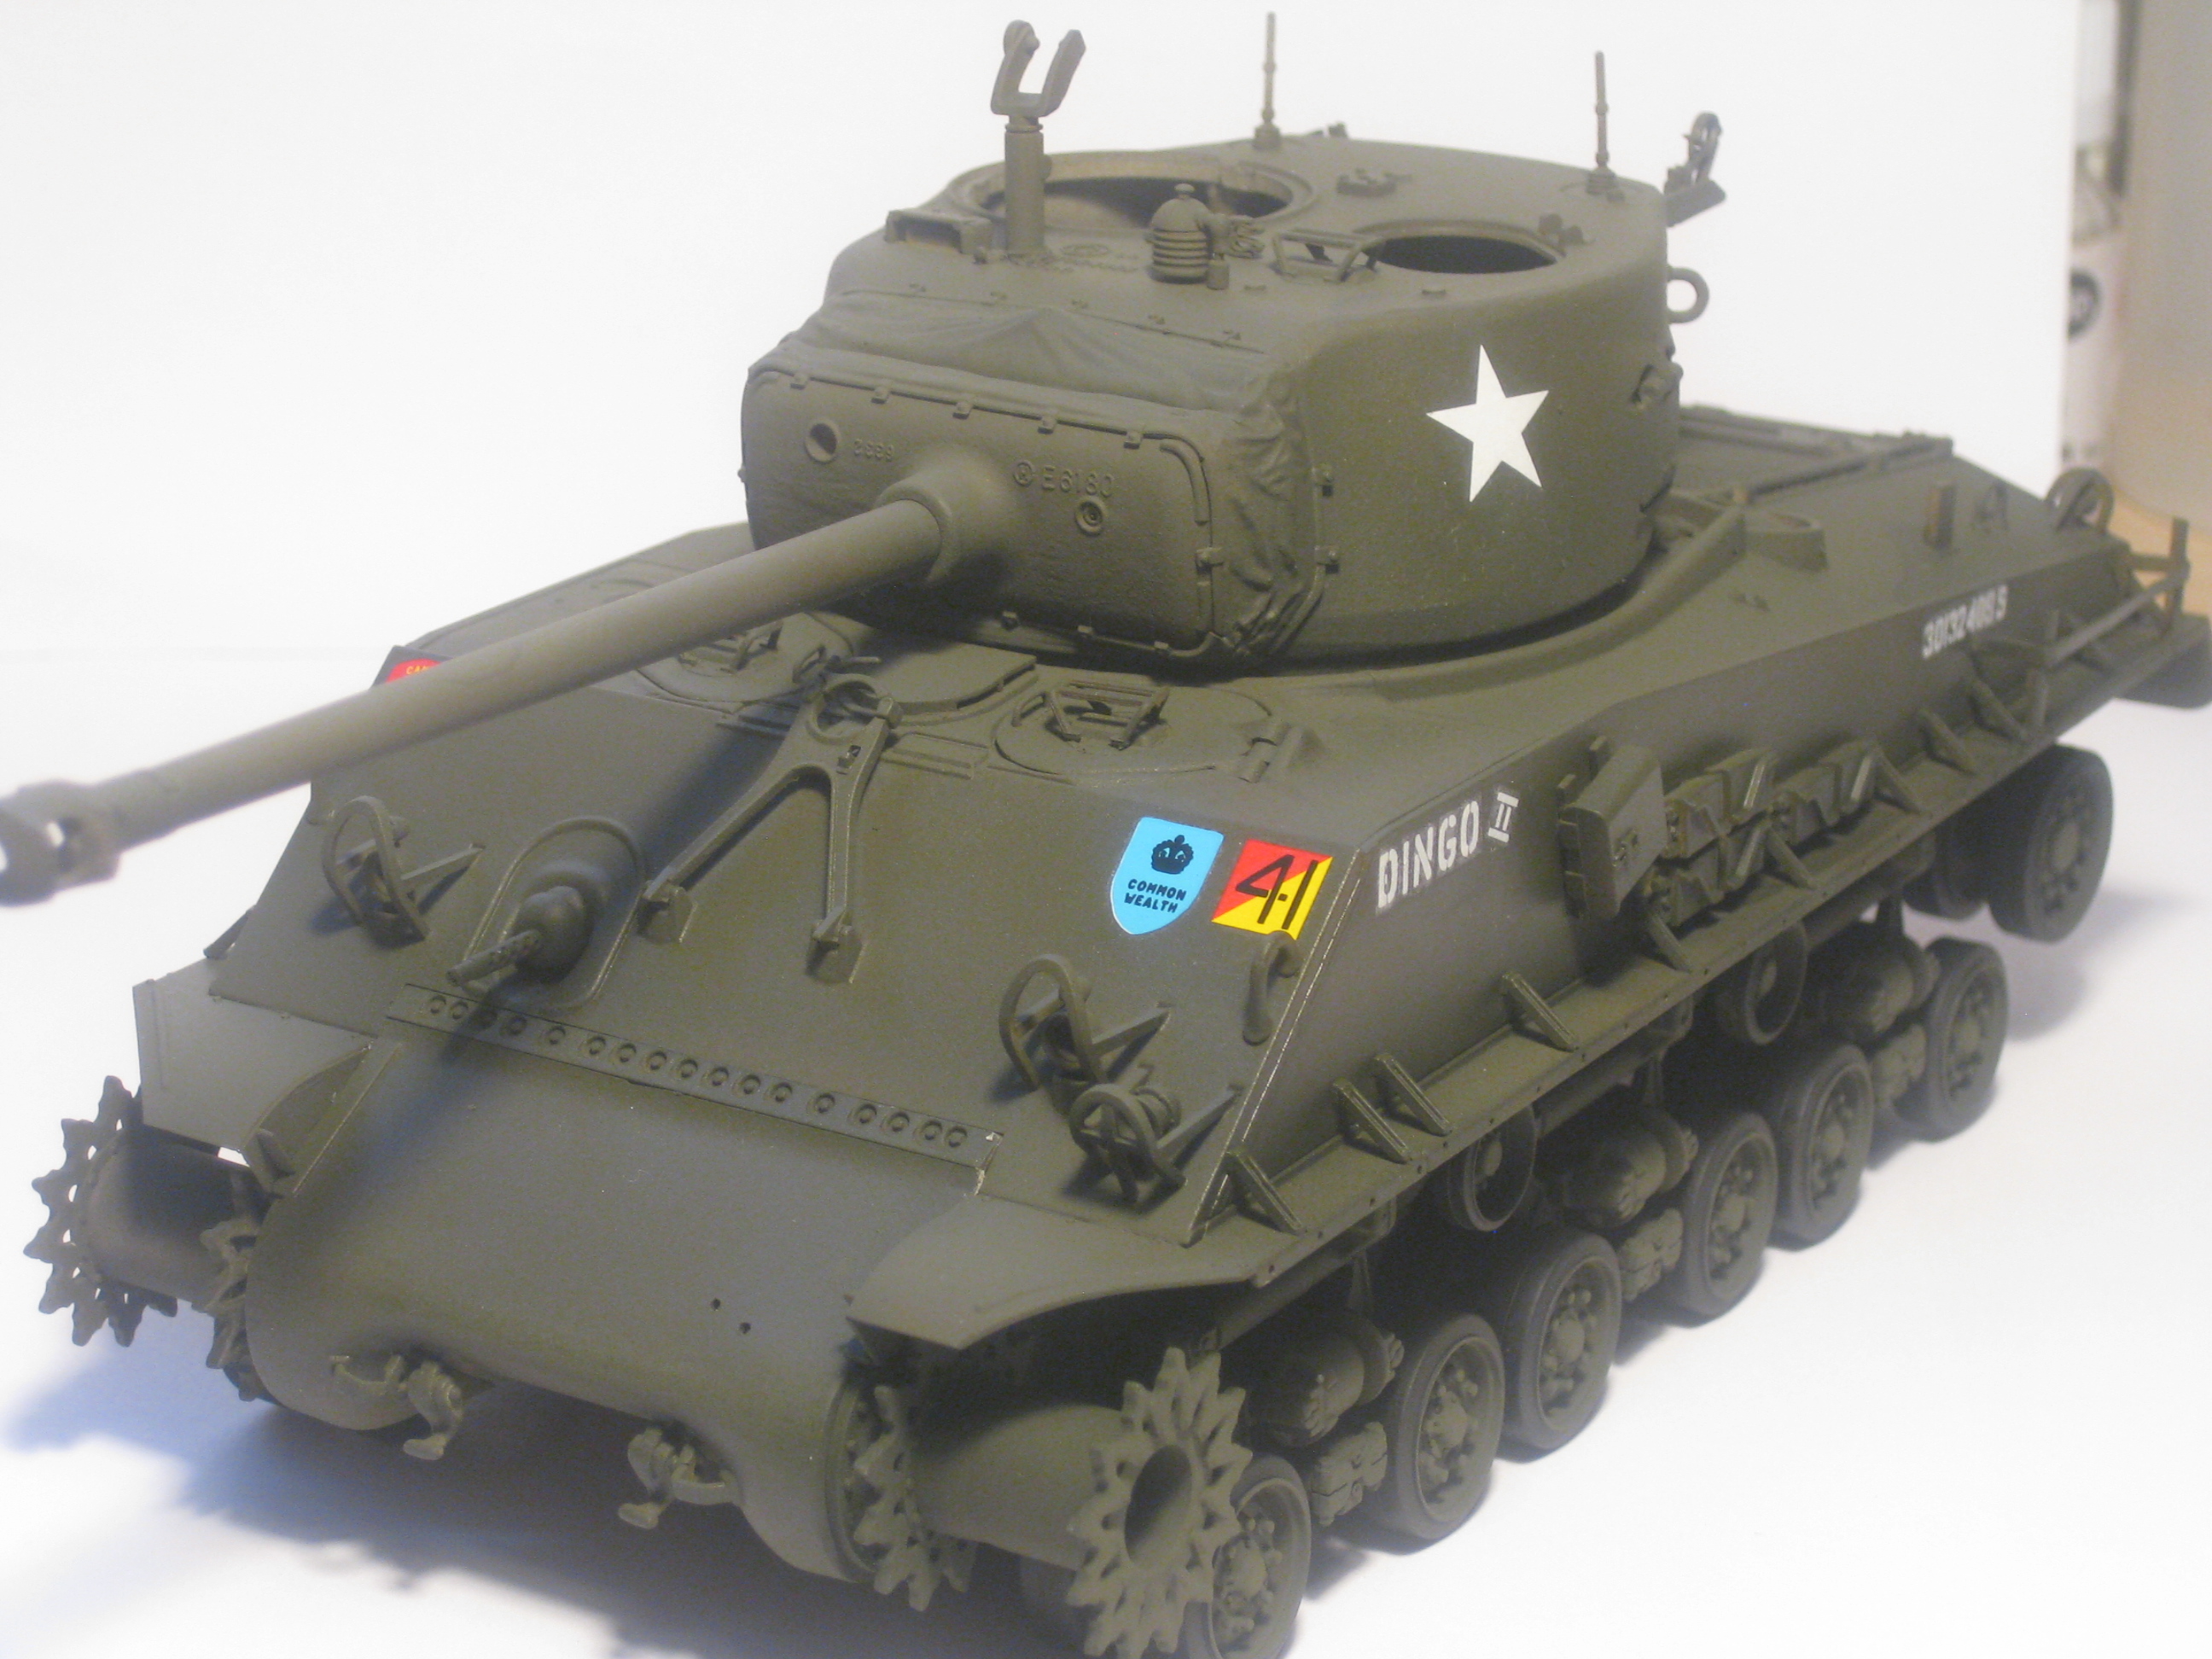
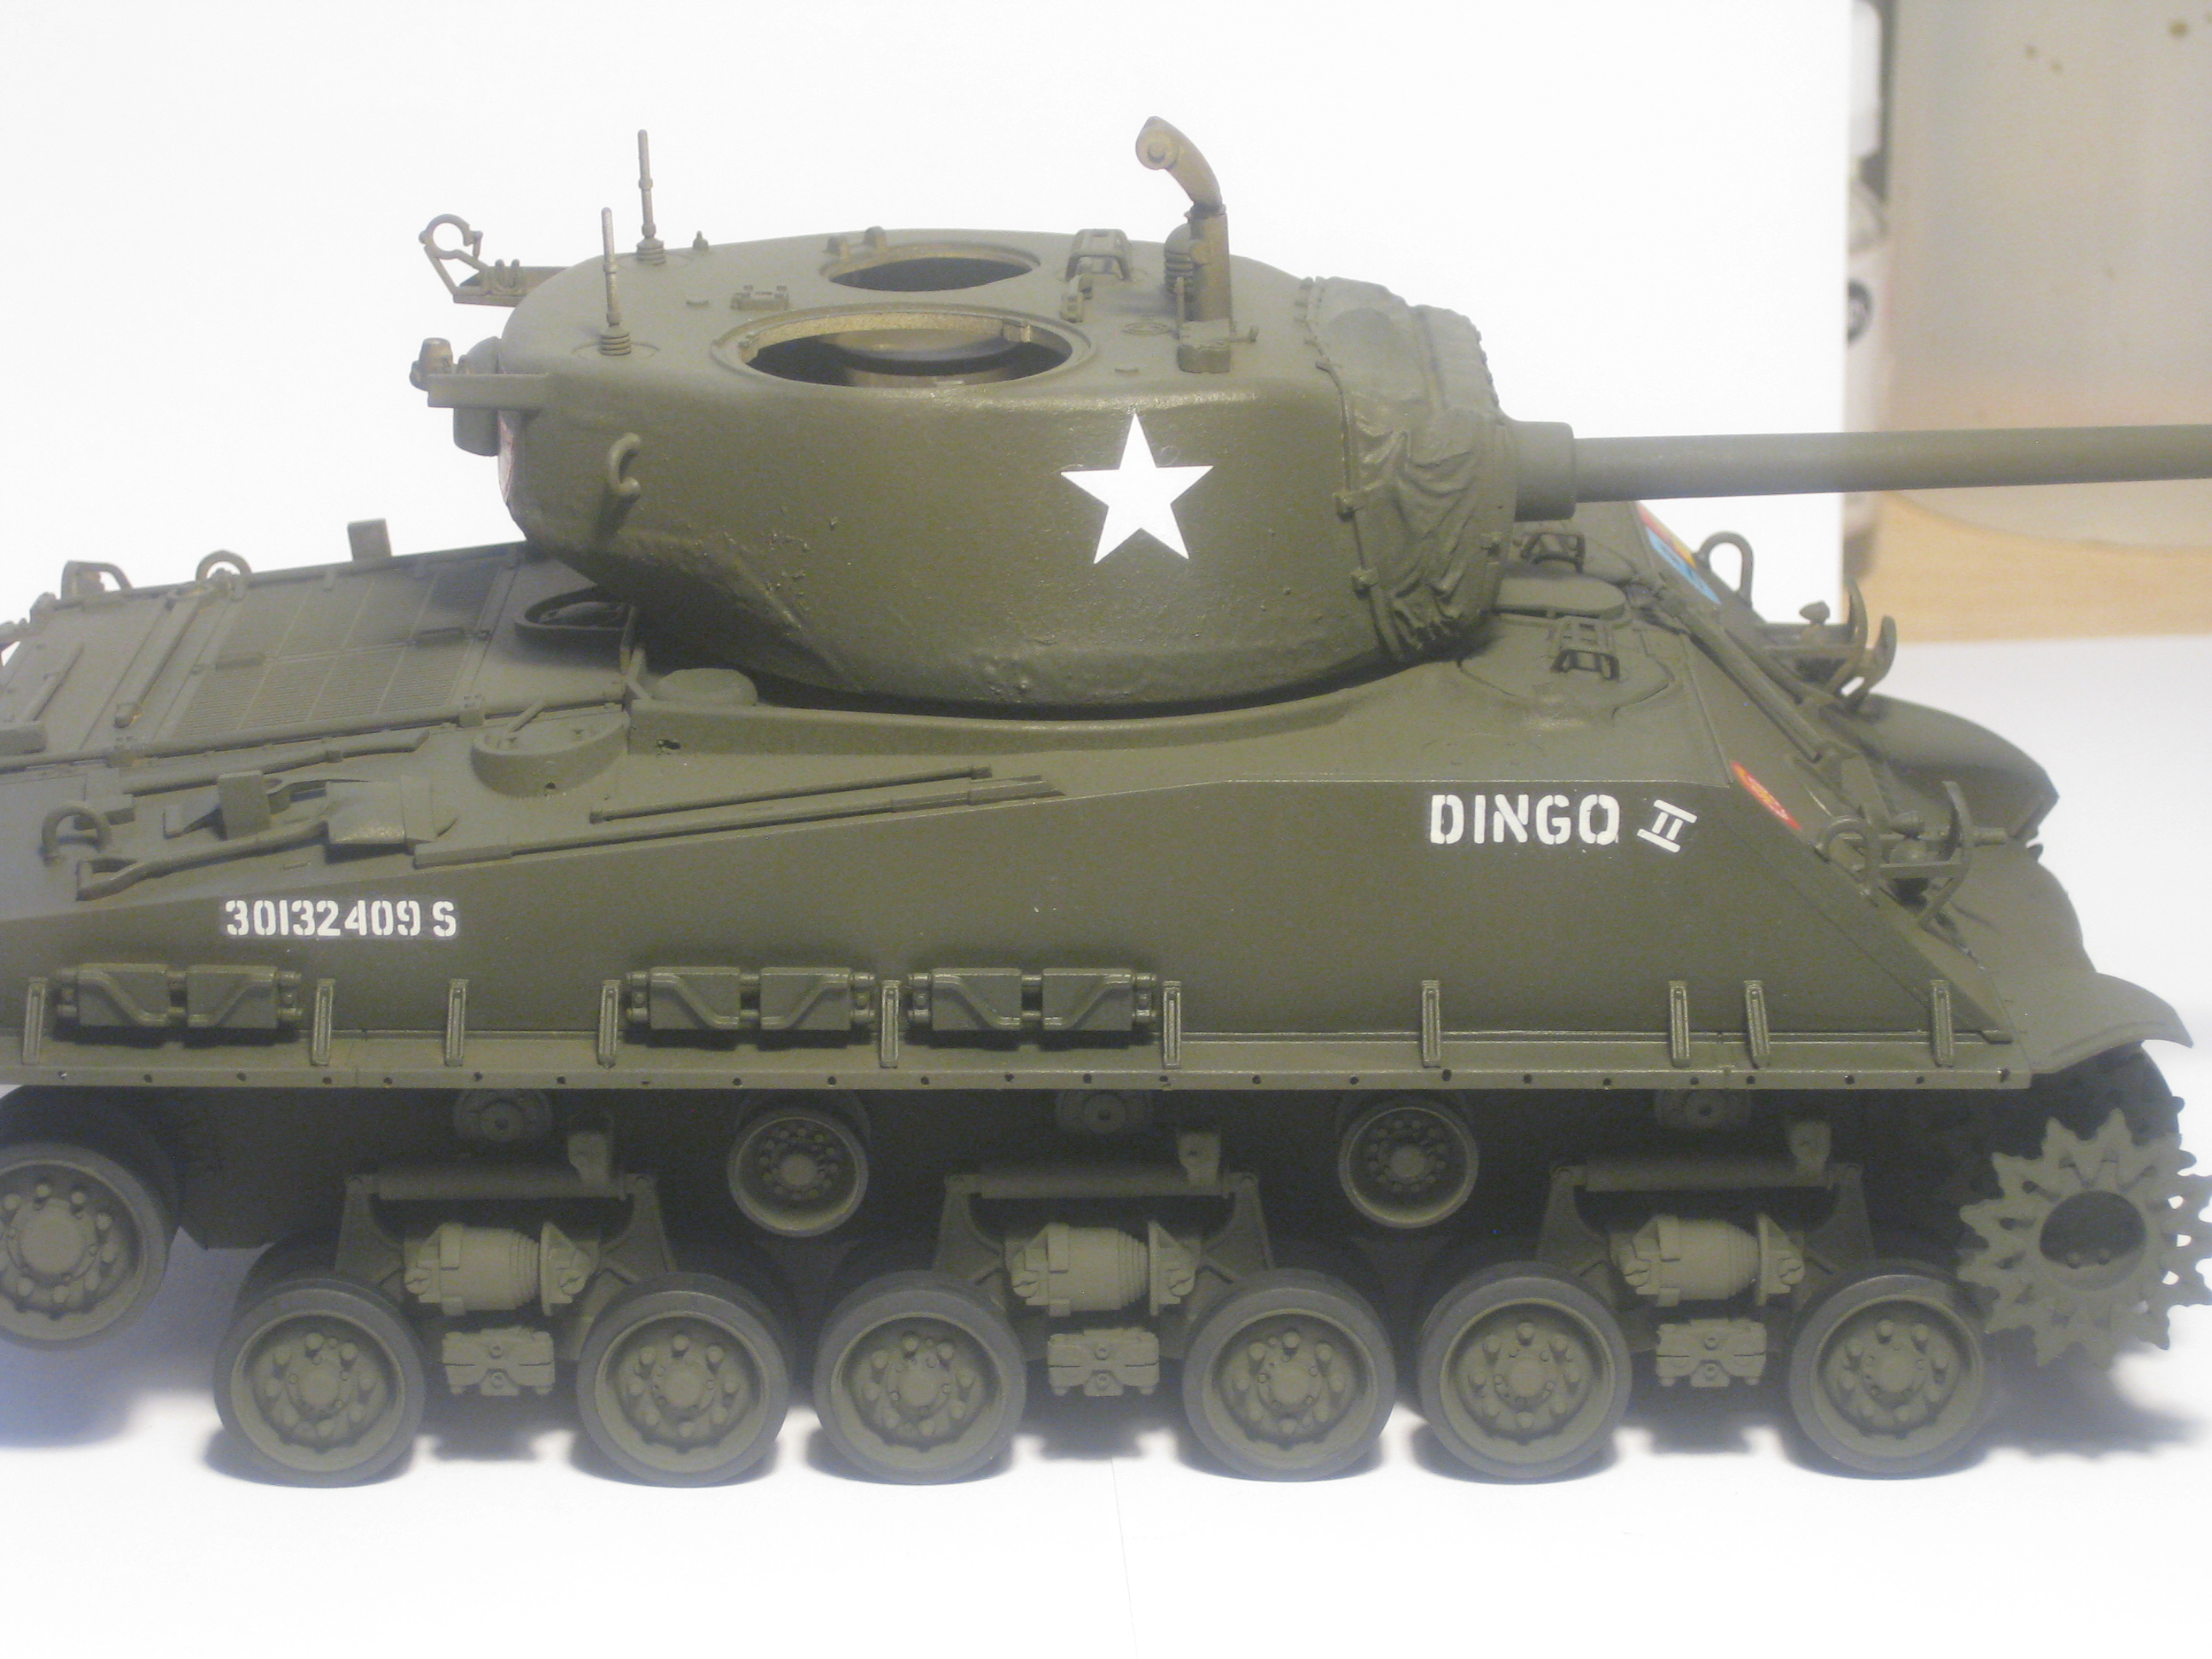
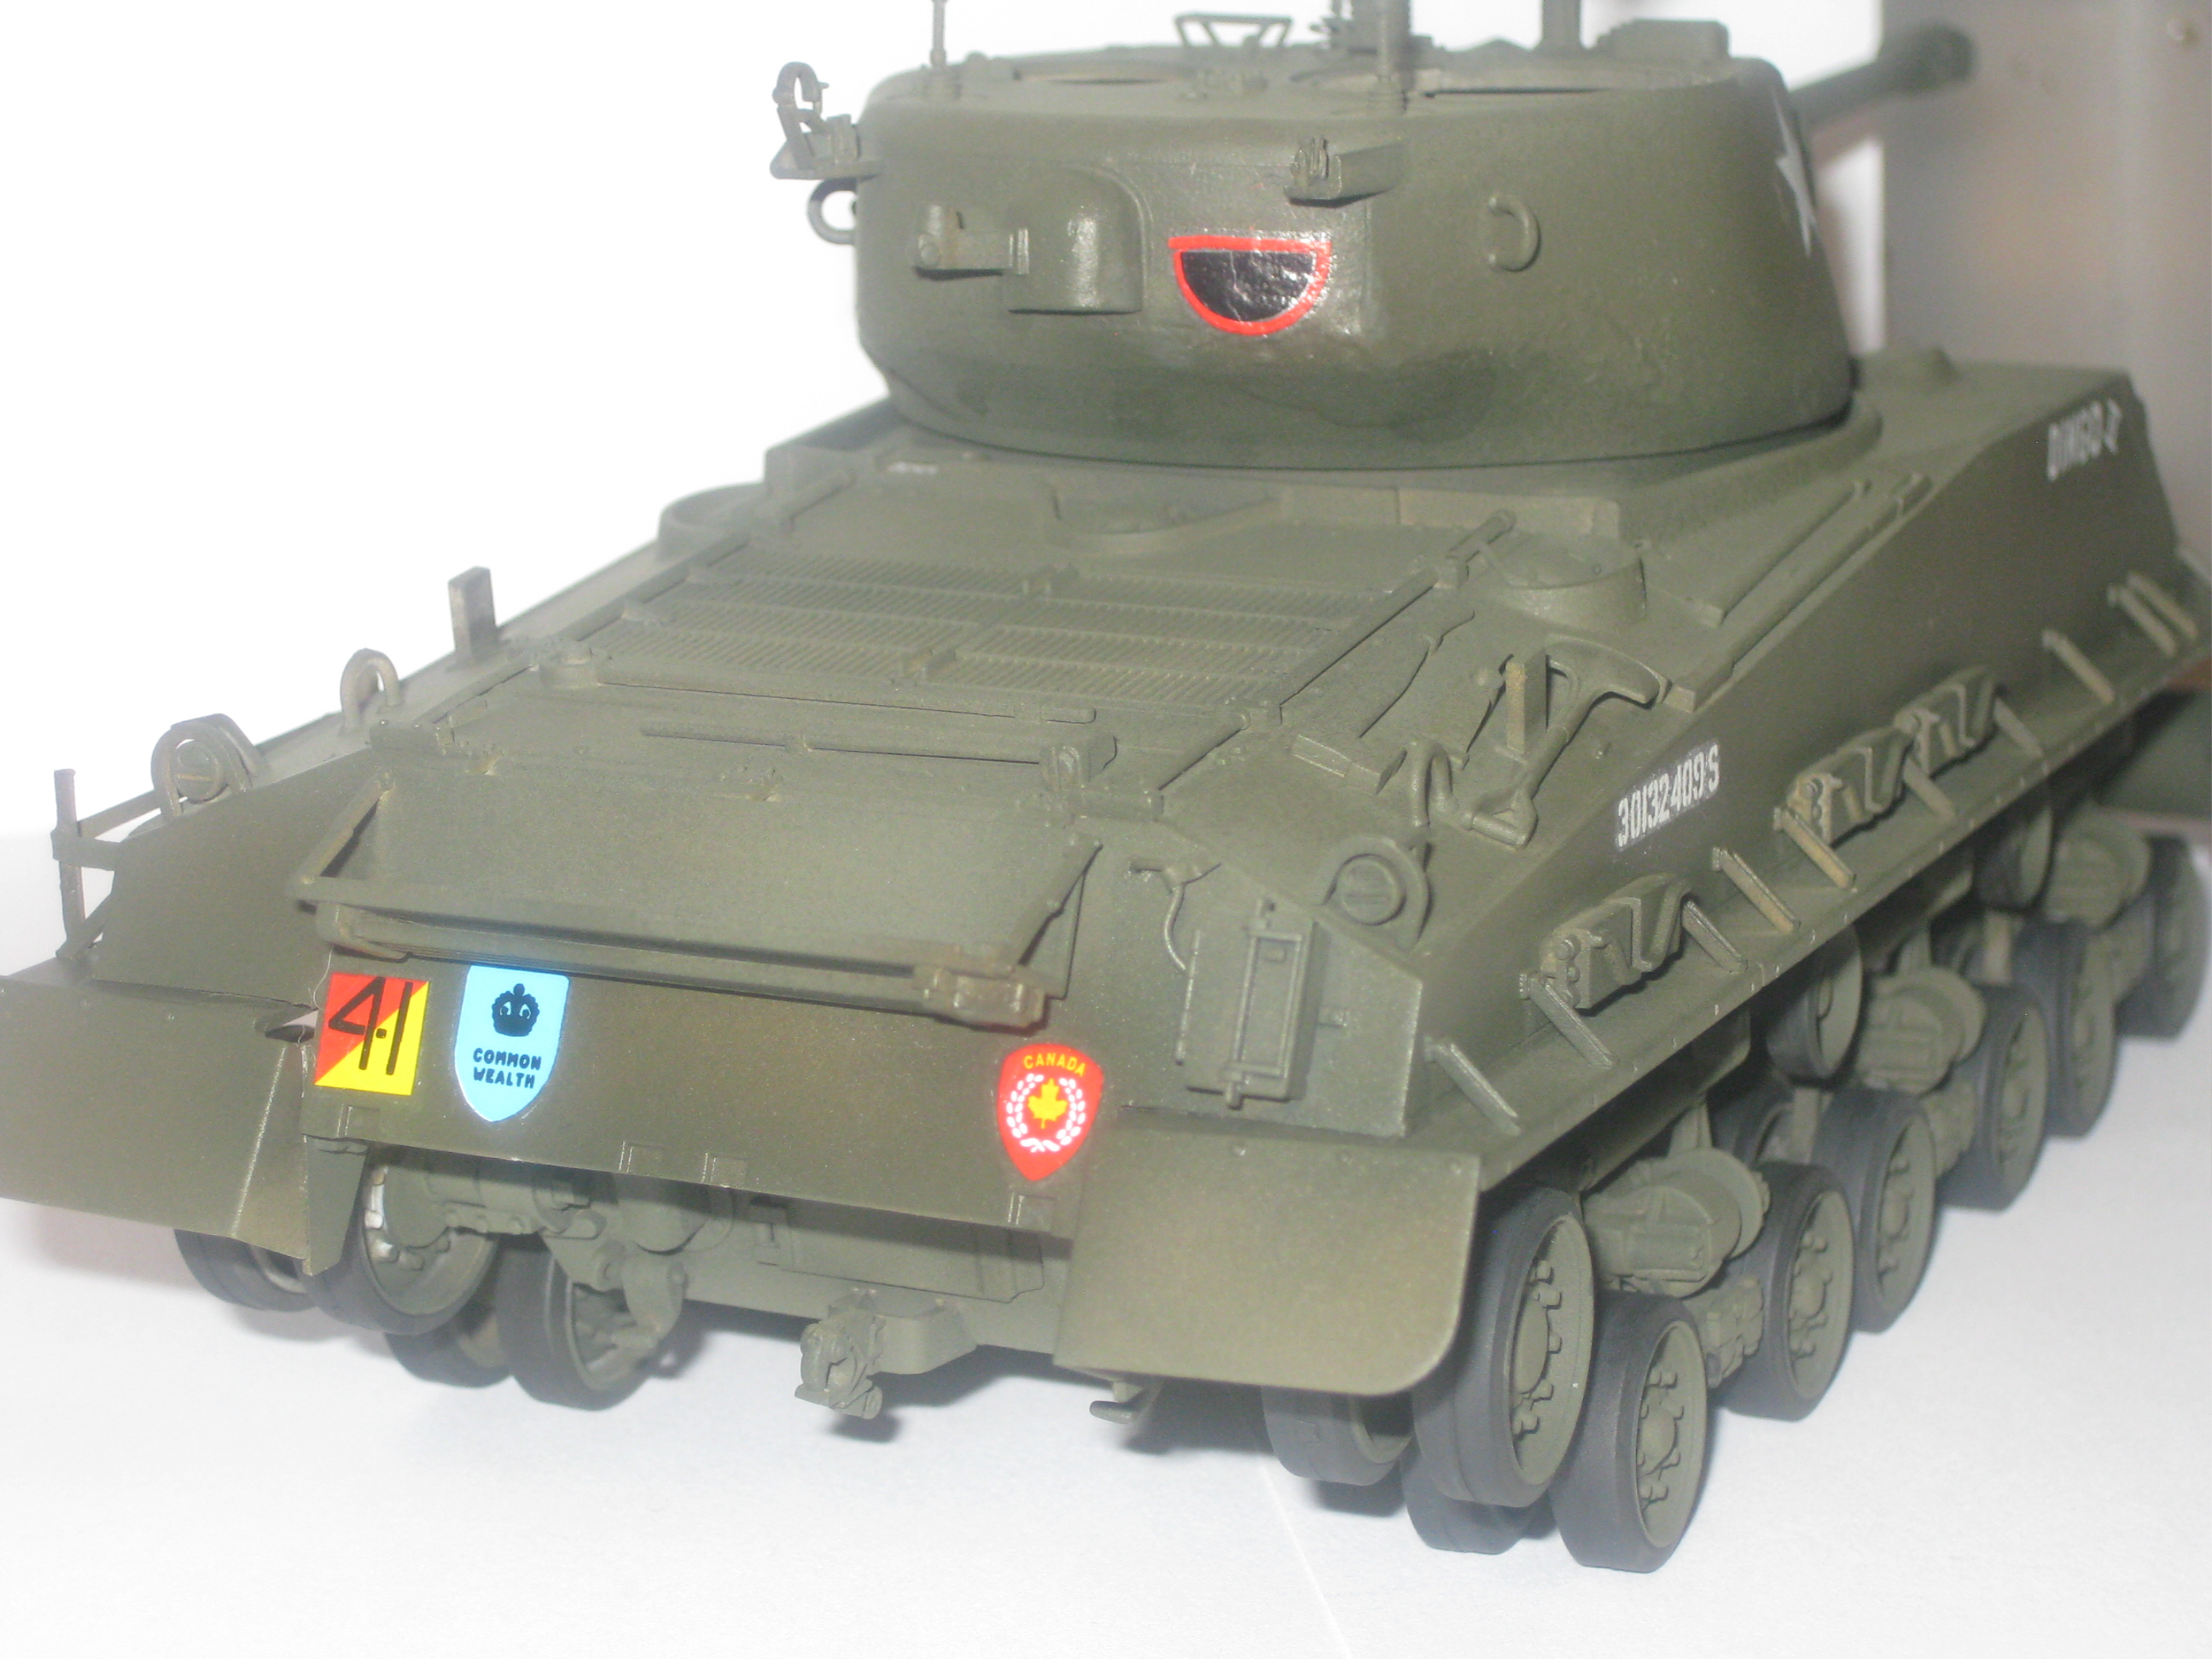
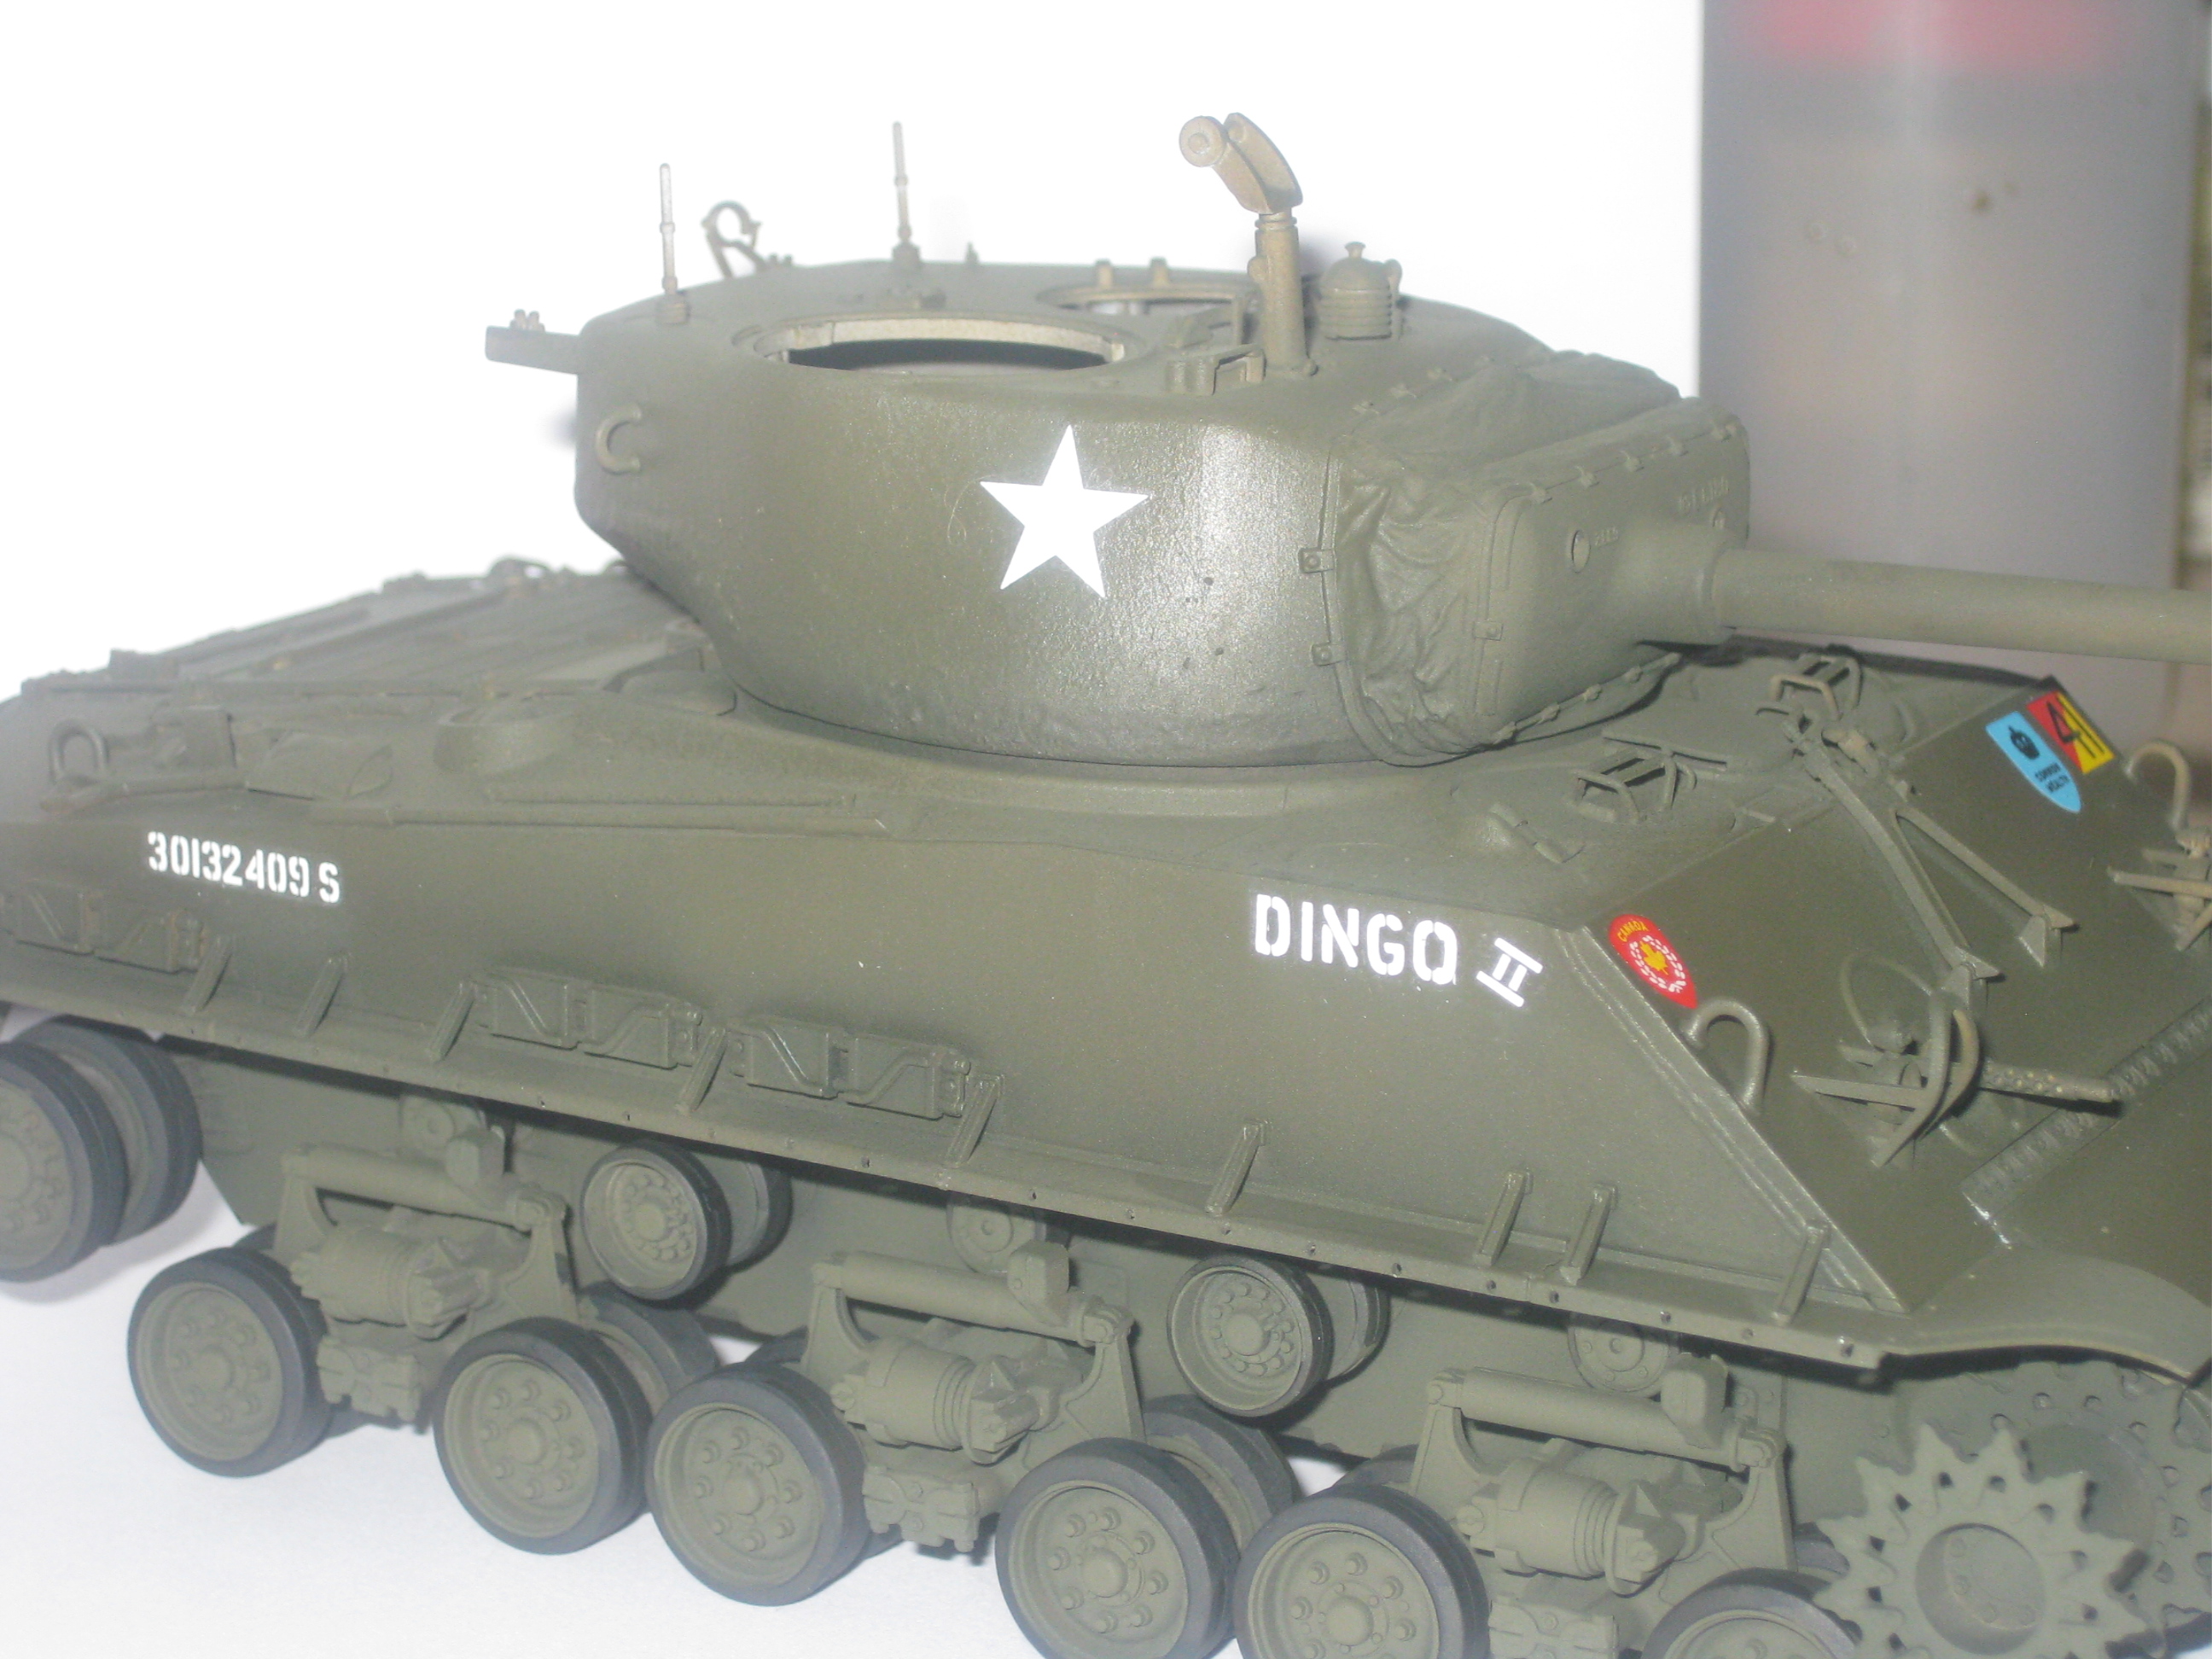
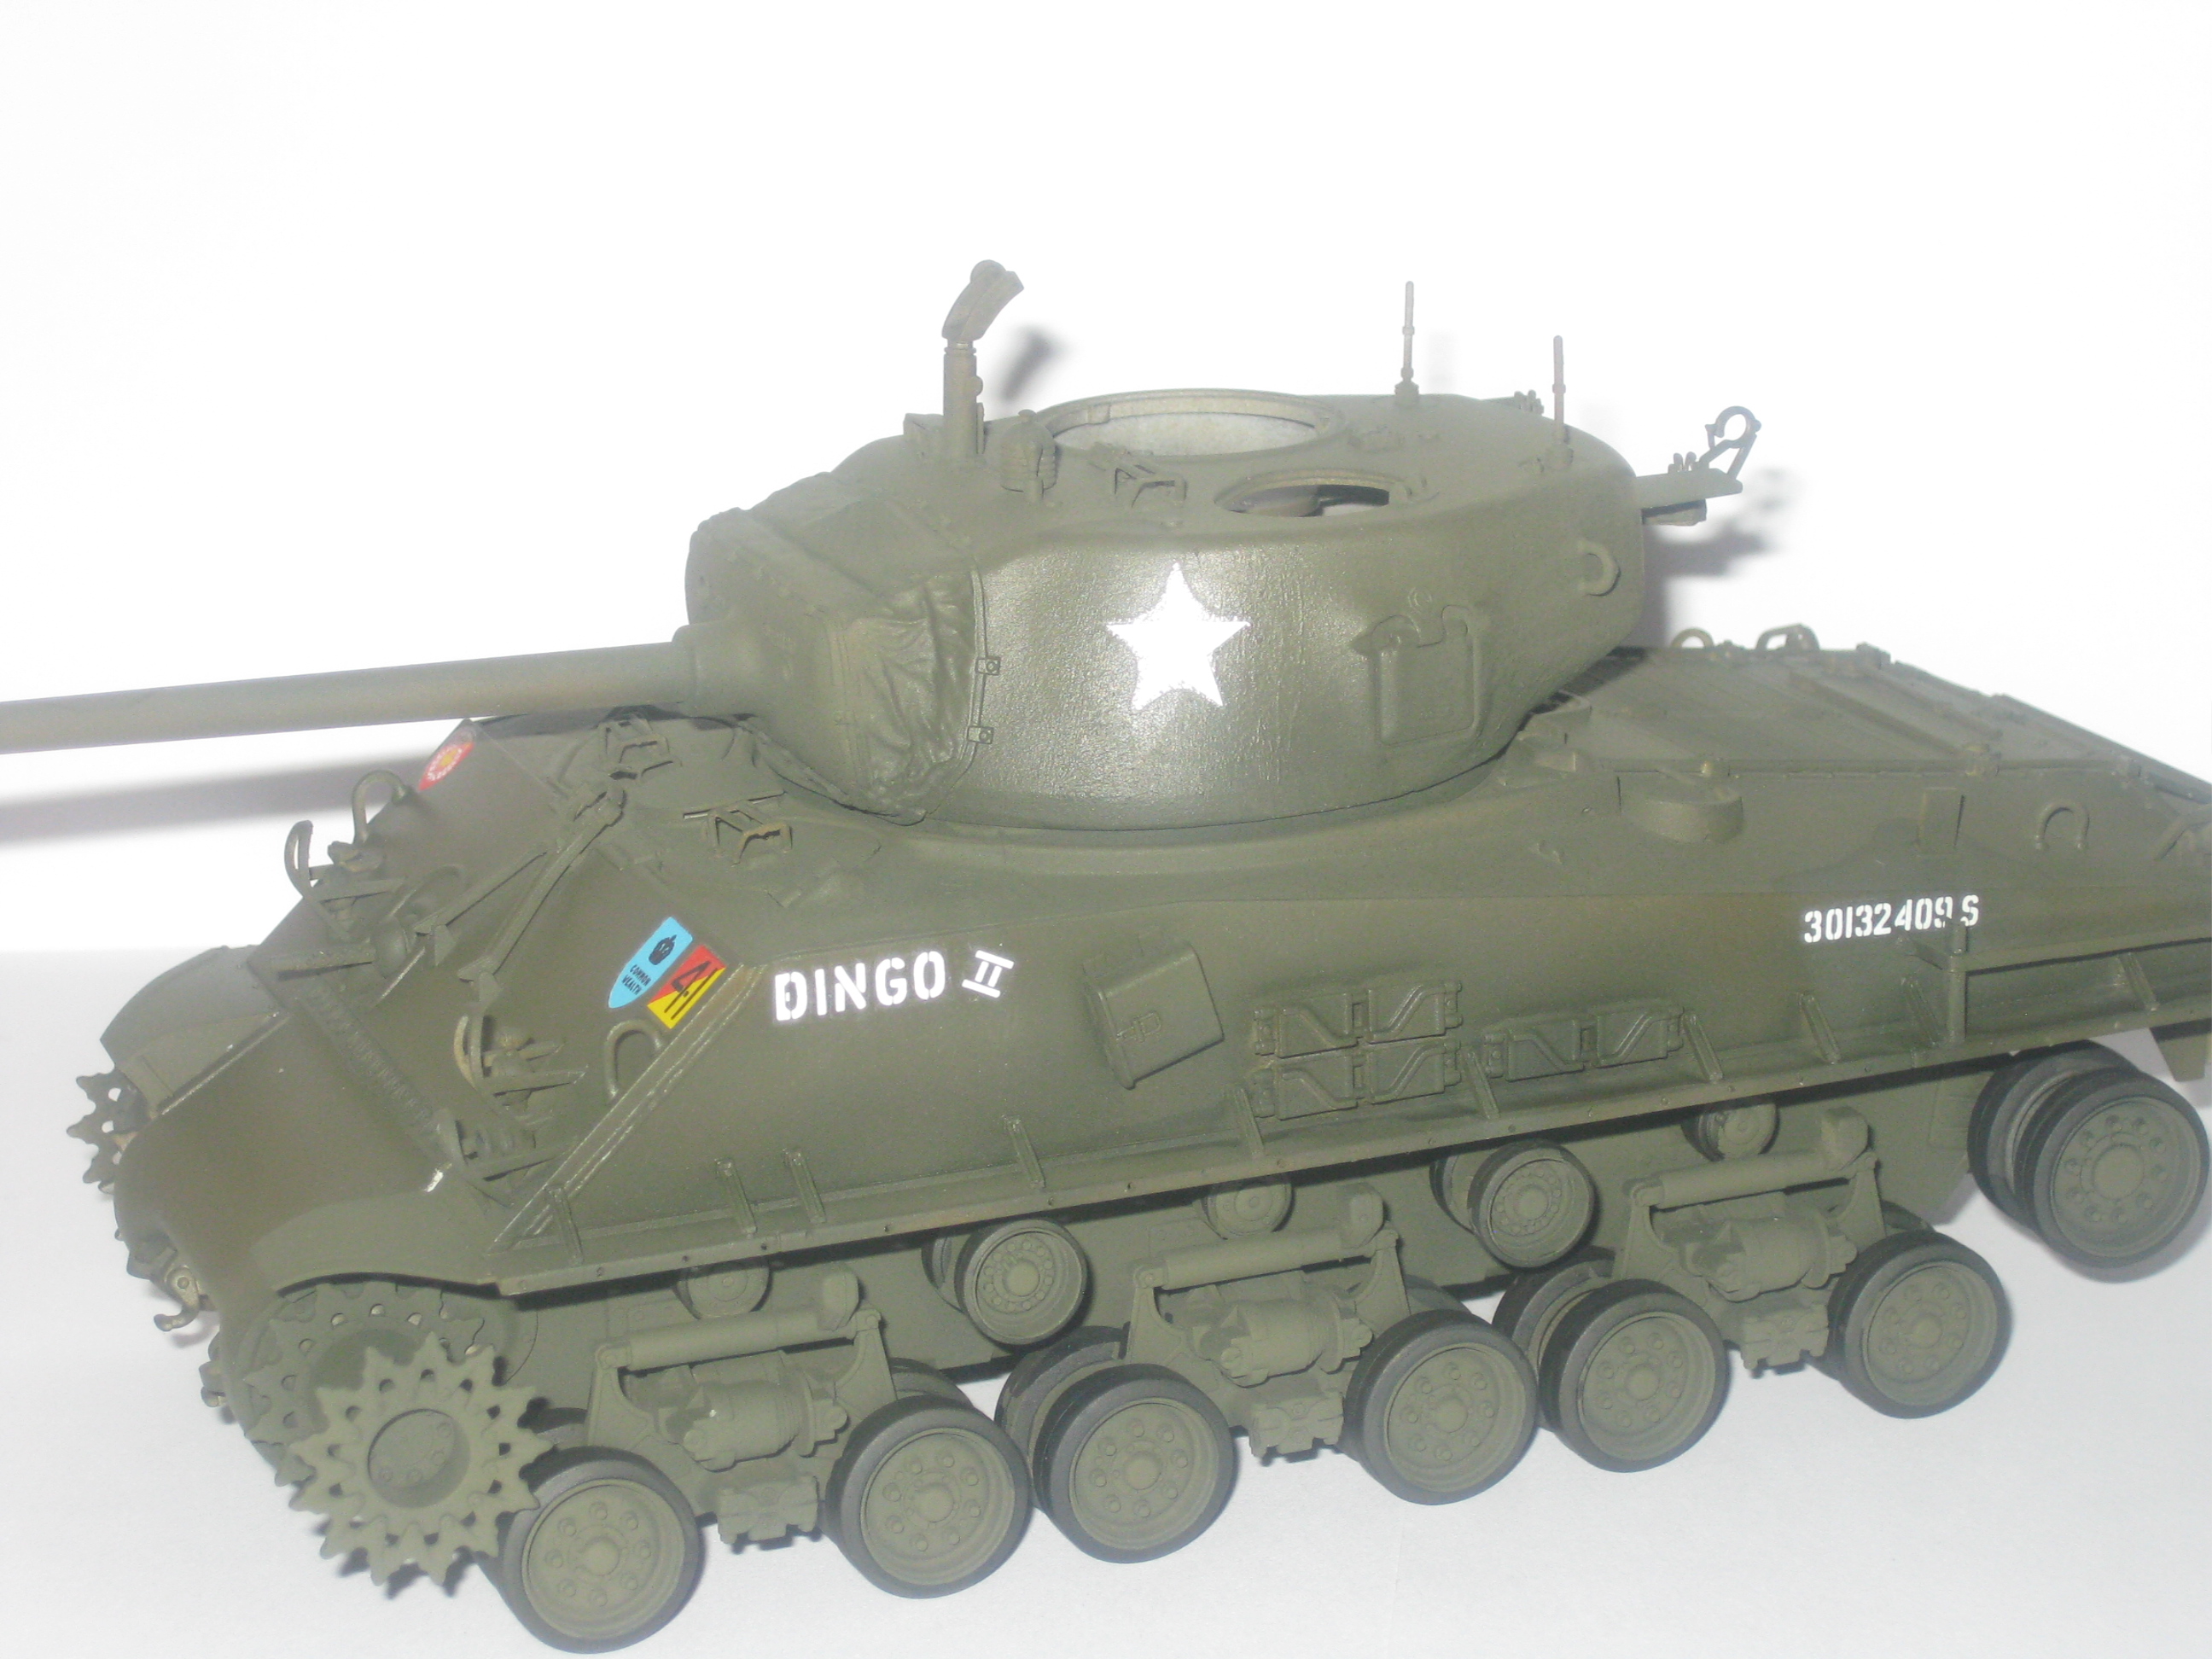
Ok, since I'm gabbing about the E8's so much, here are some update pics:
-Decals installed and clear coated
-Decals were a combo of the kit and after market decals. I cut apart some other tank names to use the lettering for the two tanks. Very tedious but fun and worth it
-Upper hulls only attached for photos
-tracks base coated in black, will be installed once a dirt / rust coat is sprayed
Before the pundits chirp up...
Korean War RCD Tank:
-I understand there was probably never a Dingo II serving with the RCD's in Korea. I thought I'd do something fun and a Dingo is an interesting mutt, just like most tankers
-Since this is a fictional vehicle, no one can bother me about how the Dalmation E8 never had the .50 cal moved forward on the turret, or other such points
-The RCD's did have what is described as a "lazy D" Squadron marking on the back of the turret. Since I could find no photo reference of this, I made my own out of decals.
- I've seen photo's with the blue Commonwealth shield painted on some soft skin Canadian vehicles in Korea. I thought they looked interesting and they added even more splash of colour to an OD tank.
The European E8 is another fictional vehicle:
- Beep's toy is an homage to my wife. Her dad had a sail boat many moons ago and my wife had a little run about row boat they named Beep's Toy which kind of uses her initials
- Once I put these decals on she was actually overjoyed at the tank and very interested. And this is why I have my own model building office and a huge stash of kits to build....


griffontech

Joined: November 21, 2007
KitMaker: 237 posts
Armorama: 231 posts

Posted: Sunday, March 03, 2019 - 10:23 AM UTC
Jason,
I looked at purchasing the book, and may do so in the future. As it stands right now this model is the only one I am building from the Canadians in Korea, and I can't justify the costs for a one off reference. I do love a good book though...
I understand what you are talking about when you describe the track hanging method. I'll use your description and come up with a mounting solution, just like the real guys had to do.
Appreciate the help.

KurtLaughlin

Joined: January 18, 2003
KitMaker: 2,402 posts
Armorama: 2,377 posts

Posted: Sunday, March 03, 2019 - 11:01 AM UTC
Quoted Text
I believe it was a short life that doomed the T-66. The T-80's were more robust and easier to work on, but the T-66 is a cooler looking track.
I have no documentary evidence but my belief is that it was a desire to have a common track for the M4 series tanks, M26 series tanks, and M6 tractors. Initially they all had unique designs.
KL

recceboy

Joined: July 20, 2006
KitMaker: 706 posts
Armorama: 665 posts

Posted: Sunday, March 03, 2019 - 05:00 PM UTC
Great Builds.
A few points on the Canadian RCD version.
The "lazy D" marking, needs to be upside down and on the other side of the turret rear, as seen on period photos.
You will need to change out your antennas , as the radios were swapped out with Canadian No 19 sets, and used a Type B & A antenna mounts.
As the RCD were the last squadron to use the borrowed tanks, the white stars were long gone, the first SQN rotation, C SQN painted them out.
Also, the tanks had spare road wheels added to the front sides, and brackets welded to the rear sides for stowage.
The Commonwealth shield , was never added .
The .50cal was moved forward during the second sqn rotation, which was B sqn, so most all of them had the .50cal moved forward.
Lots of information in this Canadian Cold War reference DVD, with loads of great and detailed reference material that covers all 4 sqns in files. Plus much more available from Trackjam Models.
https://www.trackjam.com/anthonysewards/AS012.htm
Anthony
griffontech

Joined: November 21, 2007
KitMaker: 237 posts
Armorama: 231 posts

Posted: Monday, March 04, 2019 - 04:53 AM UTC
Anthony,
Thanks for your reply and excellent info. I completely forgot about Trackjam, and after going to the site I now want to melt the credit card buying things. I may pick up the CD you mentioned. I do have a Centurion in the stash. Not sure if it is a Canadian appropriate one.
1) The lazy D was my best guess of what it should look like since I had zero photo ref. I did find one link which described it as a D, resting on it's side with the curve to the bottom. I took a 50 / 50 guess and placed it on the right side. ooops... Not sure if I will switch it out or not.
2) I knew about the radio swap out and completely forgot about the radio mounts. Did a quick Google search about antennas for the 19 set but came up dry. Will research it more.
3)The stars on the turret will be over painted as part of the weathering process. I was going to use straight OD as if it had been done in the maintenance shop.
4)I wanted to attach spare road wheels but the kits didn't provide them. When I can source a set (or make a cast of one from my other E8 in the stash) it will be added
5)I agree on the commonwealth shield, but as I stated this is not a 100% accurate tank for the unit. I'm doing a mix of what was and maybe what I would have had on my tank if I was the TC. Using a bit of artistic licence on this one.
HDSC2D

Joined: March 12, 2013
KitMaker: 170 posts
Armorama: 141 posts

Posted: Wednesday, March 06, 2019 - 04:13 PM UTC
I sell a set of E8 hubs and wheels on Shapeways
http://https://www.shapeways.com/product/C5AQ9A7TX/e8-wheels-and-hubs-set-for-sherman-tank?optionId=75936219&li=marketplace
Mike,
HDS
http://https://www.shapeways.com/product/C5AQ9A7TX/e8-wheels-and-hubs-set-for-sherman-tank?optionId=75936219&li=marketplace
Mike,
HDS
griffontech

Joined: November 21, 2007
KitMaker: 237 posts
Armorama: 231 posts

Posted: Saturday, March 16, 2019 - 06:18 AM UTC
Quick update:
-US E8 Tracks installed. They were painted black, weathered (rusted) with pastels, then clear coated to protect the pastel powder
-Still deciding on final weathering. Slightly muddy and wet, or dry and dusty. Might go the muddy and wet route.
-RCD E8 tracks have been painted black, and rubber pads oversprayed with rubber tire colour (basically a black / grey)
-I will be painting over the stars on the Canadian E8 turret
-Found a bonus item at Wheels and Wings in Toronto. I was going to make a figure sleeping on the back deck of the RCD E8 as seen in an earlier posted photo. I picked up a Verlinden resin "Sleeping Soldier". Same basic pose as the actually photo, just in mirror image. He comes with a US helmet on top of a small pack, so this will be moved to the US E8
-Michael, thanks for mentioning Shapeways. I will consider ordering I do have a mould making kit I purchased a while ago that I have been itching to try. I may pull out the Dragon E8 kit from the stash and practice casting a wheel from that kit. I should have done it with these kits but I was to eager to build them


Mmmmm...warm engine deck.... Only tankers will understand the pleasure

-US E8 Tracks installed. They were painted black, weathered (rusted) with pastels, then clear coated to protect the pastel powder
-Still deciding on final weathering. Slightly muddy and wet, or dry and dusty. Might go the muddy and wet route.
-RCD E8 tracks have been painted black, and rubber pads oversprayed with rubber tire colour (basically a black / grey)
-I will be painting over the stars on the Canadian E8 turret
-Found a bonus item at Wheels and Wings in Toronto. I was going to make a figure sleeping on the back deck of the RCD E8 as seen in an earlier posted photo. I picked up a Verlinden resin "Sleeping Soldier". Same basic pose as the actually photo, just in mirror image. He comes with a US helmet on top of a small pack, so this will be moved to the US E8
-Michael, thanks for mentioning Shapeways. I will consider ordering I do have a mould making kit I purchased a while ago that I have been itching to try. I may pull out the Dragon E8 kit from the stash and practice casting a wheel from that kit. I should have done it with these kits but I was to eager to build them


Mmmmm...warm engine deck.... Only tankers will understand the pleasure


 |


