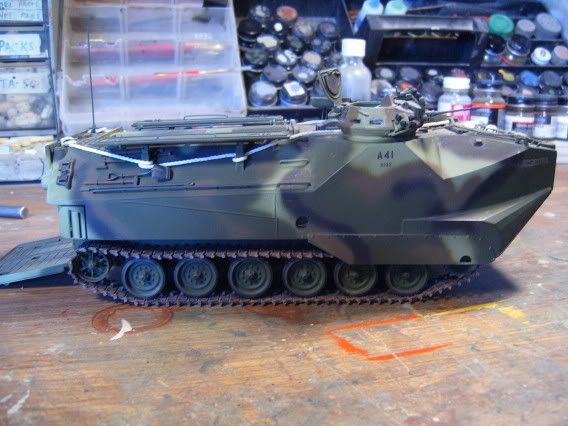
Here you got, finished all the details i wanna modify, and finally NO_MORE_WORK_ON _THIS_ONE :-) . Itīs now my official entry for the Amphibs Campaign. Comments and critics, welcome
Regards
Campaigns
Where Armorama group builds can be discussed, organized, and updates posted.
Hosted by Darren Baker, Richard S.
My Amphibs entry: 100% Complete (at last)
dexter059
Region de Valparaiso, Chile
Joined: July 28, 2005
KitMaker: 1,569 posts
Armorama: 1,385 posts
Joined: July 28, 2005
KitMaker: 1,569 posts
Armorama: 1,385 posts
Posted: Thursday, October 20, 2005 - 01:34 PM UTC
HeavyArty
Florida, United States
Joined: May 16, 2002
KitMaker: 17,694 posts
Armorama: 13,742 posts
Joined: May 16, 2002
KitMaker: 17,694 posts
Armorama: 13,742 posts
Posted: Thursday, October 20, 2005 - 03:17 PM UTC
Looks pretty good. Couple things I see though. The track should be laying on top of the road wheels, it is pretty slack and should not be as tight looking as you have it. I don't particularly care for the tires hung all over it. Especially the tire on the rear, how would you lower and raise the ramp with it there? Furthermore, they don't look very realistic since they are solid and you can see that they are. Also, the area you have black soot smeared around on the left side is not the exhaust. It is the pull handle for the HALON fire extinguisher and should have a red painted bar inside the opening. Your decals are pretty badly silvered as well. Next time try applying some glosscote to the area to be decalled. Apply the decal, then overcoat with a couple coats of dulcote once the decals have fully dried. Lastly, it looks as though you left the vision blocks on the turret open. They are actually glass and should be filled. You can try some thick white (PVA, Elmer's) glue and then paint them black. Another option is to blank them off with some sheet styrene and then paint them. Looks pretty good. A few tweeks and it will be great.
dexter059
Region de Valparaiso, Chile
Joined: July 28, 2005
KitMaker: 1,569 posts
Armorama: 1,385 posts
Joined: July 28, 2005
KitMaker: 1,569 posts
Armorama: 1,385 posts
Posted: Thursday, October 20, 2005 - 11:33 PM UTC
many thanks Gino, thatīs the kind of comment that really help us to improve. As for the tires, I was trying to show how would they look if the vehicle was Chilean, as we tend to use old tires to avoid bumps against the ship thatīs launching them (for example, from the LST Valdivia, Newport Class), . As I said, thanks again, iīll correct the exahust thing, that i didnīt know that one|:(
Best regards
Best regards
Martinnnn
Zuid-Holland, Netherlands
Joined: April 26, 2004
KitMaker: 5,435 posts
Armorama: 2,762 posts
Joined: April 26, 2004
KitMaker: 5,435 posts
Armorama: 2,762 posts
Posted: Monday, October 24, 2005 - 06:10 AM UTC
Well not much to add to Gino's reply.
Nice entry and thanks for joining this campaign!
Martin
Nice entry and thanks for joining this campaign!
Martin
jazza
Singapore / 新加坡
Joined: August 03, 2005
KitMaker: 2,709 posts
Armorama: 1,818 posts
Joined: August 03, 2005
KitMaker: 2,709 posts
Armorama: 1,818 posts
Posted: Monday, October 24, 2005 - 07:49 AM UTC
Compliments should definitely be given for the weathering that you did on this. I used to hang out tires on my amphib vehicle when i was in the combat engineers especially when we coupled our vehicles together out at sea.
Did the tires come with the kit or did you butcher it from another kit?
dexter059
Region de Valparaiso, Chile
Joined: July 28, 2005
KitMaker: 1,569 posts
Armorama: 1,385 posts
Joined: July 28, 2005
KitMaker: 1,569 posts
Armorama: 1,385 posts
Posted: Monday, October 24, 2005 - 11:29 AM UTC
Thanks Jeremy, at last someone that understand the use of old tires :-) :-) :-) :-) :-)
As for the tires, they come from and old and badly built Tamiya 88mm flak gun, that i messed up a few years ago. I was so angry about the horrible job i was doing (believe me, it was a true crime against the kit ) that throw it to the trash can, but for some unknown reason i kept the tires in the spare box......finally, thy become useful.
i made some of the corrections pointed by Gino, when i get a camera iīll post them. but i couldnīt fix the tracks, maybe somebody should help me.
Best Regards
As for the tires, they come from and old and badly built Tamiya 88mm flak gun, that i messed up a few years ago. I was so angry about the horrible job i was doing (believe me, it was a true crime against the kit ) that throw it to the trash can, but for some unknown reason i kept the tires in the spare box......finally, thy become useful.
i made some of the corrections pointed by Gino, when i get a camera iīll post them. but i couldnīt fix the tracks, maybe somebody should help me.
Best Regards
HeavyArty
Florida, United States
Joined: May 16, 2002
KitMaker: 17,694 posts
Armorama: 13,742 posts
Joined: May 16, 2002
KitMaker: 17,694 posts
Armorama: 13,742 posts
Posted: Monday, October 24, 2005 - 12:02 PM UTC
Quoted Text
Thanks Jeremy, at last someone that understand the use of old tires
Totally understand the purpose of them, just don't like the look. Also don't think the rear one looks right since it would hamper the operation of the rear ramp.
Quoted Text
but i couldnīt fix the tracks, maybe somebody should help me.
For the tracks, all you need to do is use a dab of superglue on top of each road wheel. Press the track down and wedge popsicle sticks between the hull and track to hold it in place while it sets up. Leave the popsicle sticks over night and it will be great.
Here is how they should look.
More here.
dexter059
Region de Valparaiso, Chile
Joined: July 28, 2005
KitMaker: 1,569 posts
Armorama: 1,385 posts
Joined: July 28, 2005
KitMaker: 1,569 posts
Armorama: 1,385 posts
Posted: Monday, October 24, 2005 - 12:35 PM UTC
Ok, ok, I just like them that way :-) :-) :-)
Thanx for the tip, iīll try it today
BTW: Lovely scratch built on the interior, i see you use some pieces from the spare box, what kits did they came from?
Best regards
Thanx for the tip, iīll try it today
BTW: Lovely scratch built on the interior, i see you use some pieces from the spare box, what kits did they came from?
Best regards
HeavyArty
Florida, United States
Joined: May 16, 2002
KitMaker: 17,694 posts
Armorama: 13,742 posts
Joined: May 16, 2002
KitMaker: 17,694 posts
Armorama: 13,742 posts
Posted: Monday, October 24, 2005 - 12:46 PM UTC
Quoted Text
BTW: Lovely scratch built on the interior, i see you use some pieces from the spare box, what kits did they came from?
Thanks, glad you like it. I used lots of spares box pieces. Most of them, seats, engine bulkhead, and others, are from an M2 Bradley kit. Fuel tank and troop bench seats are from an M113A2 kit. Lots of other small items from the spares box as well. It is not totally accurate, but was close enough at the time I built it, about 8 years ago.
I also plan to do an AAV7-A1 RAMS/RS with EAAK and a full interior as well, in OIF colors. It is on the to-do list and I have already collected all the needed parts for it. Someday I'l get to it...
jazza
Singapore / 新加坡
Joined: August 03, 2005
KitMaker: 2,709 posts
Armorama: 1,818 posts
Joined: August 03, 2005
KitMaker: 2,709 posts
Armorama: 1,818 posts
Posted: Monday, October 24, 2005 - 02:08 PM UTC
Could you guys advise me on what you use to simulate ropes and straps that are often used to secure duffel bags on the side of vehicles?
HeavyArty
Florida, United States
Joined: May 16, 2002
KitMaker: 17,694 posts
Armorama: 13,742 posts
Joined: May 16, 2002
KitMaker: 17,694 posts
Armorama: 13,742 posts
Posted: Monday, October 24, 2005 - 02:20 PM UTC
Quoted Text
Could you guys advise me on what you use to simulate ropes and straps that are often used to secure duffel bags on the side of vehicles?
Ropes - Thick thread or model ship rope works.
Straps - Either lead foil, like from the top of a wine bottle, paper, or masking tape cut to proper width.
SSG_Q
North Carolina, United States
Joined: June 21, 2005
KitMaker: 115 posts
Armorama: 0 posts
Joined: June 21, 2005
KitMaker: 115 posts
Armorama: 0 posts
Posted: Monday, October 24, 2005 - 02:34 PM UTC
Filthy, the way a grunt likes to ride!!! Beautiful job on the dust!!!
dexter059
Region de Valparaiso, Chile
Joined: July 28, 2005
KitMaker: 1,569 posts
Armorama: 1,385 posts
Joined: July 28, 2005
KitMaker: 1,569 posts
Armorama: 1,385 posts
Posted: Tuesday, October 25, 2005 - 02:42 AM UTC
Finally, i corrected most of the things tipped by Gino, sorry about the quality of the pictures, i have to improve my skills as a photographer.
Best regards and thanks for looking.
HeavyArty
Florida, United States
Joined: May 16, 2002
KitMaker: 17,694 posts
Armorama: 13,742 posts
Joined: May 16, 2002
KitMaker: 17,694 posts
Armorama: 13,742 posts
Posted: Tuesday, October 25, 2005 - 02:52 AM UTC
Looks much better. Good job. Tracks came out great.
dexter059
Region de Valparaiso, Chile
Joined: July 28, 2005
KitMaker: 1,569 posts
Armorama: 1,385 posts
Joined: July 28, 2005
KitMaker: 1,569 posts
Armorama: 1,385 posts
Posted: Tuesday, October 25, 2005 - 03:27 AM UTC
Thanks Gino, I Move the wheel over the ramps just for you :-) :-) :-) :-)
best regards
best regards
jazza
Singapore / 新加坡
Joined: August 03, 2005
KitMaker: 2,709 posts
Armorama: 1,818 posts
Joined: August 03, 2005
KitMaker: 2,709 posts
Armorama: 1,818 posts
Posted: Tuesday, October 25, 2005 - 07:43 AM UTC
Great work once again Klaus. I was going to mention that very few amphibs couple from the stern or bow. When they do, they would use portable "cushions" so moving the tire at the stern was a good idea.
The changes you made definitely gave it a much more realistic look to it.
dexter059
Region de Valparaiso, Chile
Joined: July 28, 2005
KitMaker: 1,569 posts
Armorama: 1,385 posts
Joined: July 28, 2005
KitMaker: 1,569 posts
Armorama: 1,385 posts
Posted: Tuesday, October 25, 2005 - 07:52 AM UTC
Thanks Jeremy, I was thinking exactly what youīre saying when I place the rubber tire in that spot. Well I guess finally this one is FINISHED :-) :-) :-)
Cheers
Cheers