Rhode Island, United States
Joined: May 10, 2002
KitMaker: 3,581 posts
Armorama: 2,782 posts
Posted: Sunday, March 05, 2006 - 04:39 AM UTC
Michigan, United States
Joined: December 11, 2003
KitMaker: 5,409 posts
Armorama: 3,777 posts
Posted: Sunday, March 05, 2006 - 04:47 AM UTC
Another Big Fugly!!! Awesome
You don't support the troops if you don't support the mission!
Wisconsin, United States
Joined: April 17, 2002
KitMaker: 2,314 posts
Armorama: 1,905 posts
Posted: Sunday, March 05, 2006 - 05:53 AM UTC
Lord Long List
Is this your first ever KV??? :-)
Seriously, -- its good to see your progress for Big and Beefy. These Trump kits are getting a big work out in this campaign, but I believe this is the first "Big Turret" I've seen. Going to have to break down and order one of these from Alpen

Keep us posted.
Steve
Rhode Island, United States
Joined: May 10, 2002
KitMaker: 3,581 posts
Armorama: 2,782 posts
Posted: Sunday, March 05, 2006 - 07:59 AM UTC
England - East Anglia, United Kingdom
Joined: February 12, 2005
KitMaker: 128 posts
Armorama: 0 posts
Posted: Monday, March 06, 2006 - 01:50 AM UTC
Ive always wanted to do a kv. If i get time i will enter the campaign and give it a go

Rhode Island, United States
Joined: May 10, 2002
KitMaker: 3,581 posts
Armorama: 2,782 posts
Posted: Monday, March 06, 2006 - 05:16 AM UTC
Well,it's GREEN!


I used Model master Russian Armor green,with a touch of dark Green

England - South East, United Kingdom
Joined: December 23, 2005
KitMaker: 141 posts
Armorama: 89 posts
Posted: Monday, March 06, 2006 - 07:07 PM UTC
Looks nice Carl, seeing as we are building the same kit and started on the same day, i'm getting scared on how much further behind I am!
I will post my progress pics later....
Ian
Rhode Island, United States
Joined: May 10, 2002
KitMaker: 3,581 posts
Armorama: 2,782 posts
Posted: Monday, March 06, 2006 - 07:36 PM UTC
Not to worry about speed,Ian.I have built nearly every KV Trumpetyeer has released,so I nearly can build them iin my sleep

Massachusetts, United States
Joined: May 21, 2003
KitMaker: 1,120 posts
Armorama: 1,002 posts
Posted: Monday, March 06, 2006 - 07:51 PM UTC
Good to go Carl. Seeing these pics will inspire me to work on my own Trumpeter KV-2

2 Questions: On the pic with the assembled turret, I see you used brass rod for the grab handles. 1) What did you use for the brass rod (size), and is that size accurate ? 2) What did you use to bend the handles to get the same size (Mission Models Grab-Handler ?).
I will be using your in-progress shots to see how I can improve my own KV-2 build, for this kit and the other Trumpeter KV kits I have yet to build.
Paint looks good. Good coverage.
Steve, I have plenty of Trumpeter KV kits in stock. Just let me know when you're ready

Cheers !!


Groningen, Netherlands
Joined: September 21, 2003
KitMaker: 3,040 posts
Armorama: 1,016 posts
Posted: Monday, March 06, 2006 - 09:47 PM UTC
Hi Carl!
Very nice build! Do you have some special plans with this kit?
Jurjen
Rhode Island, United States
Joined: May 10, 2002
KitMaker: 3,581 posts
Armorama: 2,782 posts
Posted: Monday, March 06, 2006 - 10:24 PM UTC
Rob,I stripped some copper wire and used that.Like Dragon,the Trumpeteer grab handles are attached to the sprue in their middle.Rather than try to clean up the attach nub,I opt for copper wire.
The wire was the same dia as the kit part,and I bent it w/ the mk 1Ac45 eyeball ( 2 per human)
Jurjen,My plans for this and my other KV's will be as individual entries in this season's shows.

New Jersey, United States
Joined: November 21, 2002
KitMaker: 2,085 posts
Armorama: 1,227 posts
Posted: Tuesday, March 07, 2006 - 01:06 AM UTC
Methinks it looks good Carl...
Needs some holes in the side though (++)

(++)
Lord Dave
You know you're a modeler when....
a:your fingers are forever encrusted with dried paint/cured glue
b:you smell of enamel thinner, glue, and paint 24/7
c:you shed a tear when the hobby shop closes.
piggy # 76 Lord Stomp and Mig hater
Rhode Island, United States
Joined: May 10, 2002
KitMaker: 3,581 posts
Armorama: 2,782 posts
Posted: Wednesday, March 08, 2006 - 05:50 AM UTC
This is how I skewer the roadwheels to paint them.The inner halves are now on the hull,so I can make track.


Rhode Island, United States
Joined: May 10, 2002
KitMaker: 3,581 posts
Armorama: 2,782 posts
Posted: Saturday, March 11, 2006 - 03:36 AM UTC
Tracks are on!Now a wash,and weathering.


United States
Joined: December 01, 2001
KitMaker: 3,172 posts
Armorama: 2,495 posts
Posted: Saturday, March 11, 2006 - 03:39 AM UTC
Carl
I knee I knee Muchie fine KV-2 But why wash? It looks clean now :-)
To fight the hordes,singing and crying,Valhalla I am coming
Massachusetts, United States
Joined: May 21, 2003
KitMaker: 1,120 posts
Armorama: 1,002 posts
Posted: Saturday, March 11, 2006 - 08:52 PM UTC
Carl. Did you use the same painting method on the Idler Wheels and the Drive Sprockets ?
Thanks,
Robert
Rhode Island, United States
Joined: May 10, 2002
KitMaker: 3,581 posts
Armorama: 2,782 posts
Posted: Saturday, March 11, 2006 - 09:01 PM UTC
I used Model Master Steel fo the wear on the idlers,centerguides,and roadwheels and sprockets.
I stirred the paint,recapped it and shook the bottle ,and removed the cap.
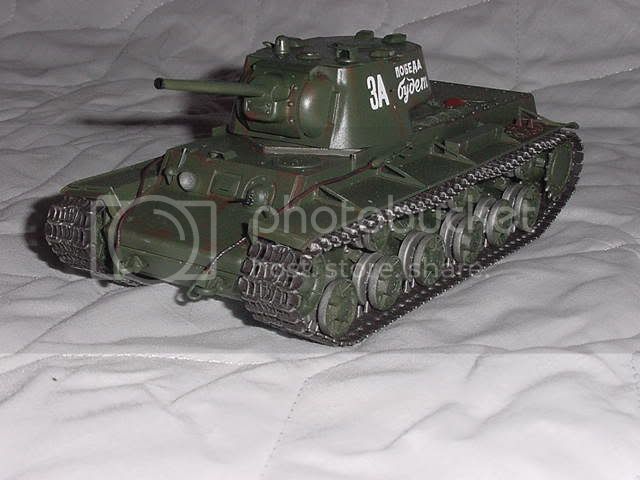
Then I dabbed a # 0 short bristled brush into the top , and wiped off the excess on a piece of paper.I drybrushed the remainder onto the sprocket teeth,and centerguides.The roadwheel edges,and idlers got regular painting style application.After weathering this will tone waaaay down.Today I will be painting the slogan on the turret.

Rhode Island, United States
Joined: May 10, 2002
KitMaker: 3,581 posts
Armorama: 2,782 posts
Posted: Sunday, March 12, 2006 - 03:37 AM UTC
Wet wash and slogan;


Ontario, Canada
Joined: January 11, 2003
KitMaker: 1,339 posts
Armorama: 637 posts
Posted: Monday, March 13, 2006 - 06:23 AM UTC
Hey Carl, nice looking KV..
I just so happened to have picked up the exact same kit.. I also joined the campaign.. Go figure... :-).. Anyways, I would be most appreciative if you could give me the number off the bottle of paint you used for it..
Dave
Rhode Island, United States
Joined: May 10, 2002
KitMaker: 3,581 posts
Armorama: 2,782 posts
Posted: Monday, March 13, 2006 - 07:00 AM UTC
Very well Dave,
If you can acess Model Master paints,here is what I used.
Model Master
Russian Armor Green
Steel
Rust
Burnt Umber
Flat black
Insignia red
Raw Sienna
The hull is russian armor green with a touch of dark Green.
The main track color is burnt umber.
I used silver inside the headlight reflector.


Wojewodztwo Pomorskie, Poland
Joined: May 26, 2003
KitMaker: 1,208 posts
Armorama: 1,023 posts
Posted: Sunday, March 19, 2006 - 05:29 PM UTC
Lord Mmhmm, you seem to be da right person to ask questions about trumpeteer KV's :-)
I've just assembled one run of the link and lenght tracks on my small turret KV1 (like anything on those tanks was small :-) )
Now it seems that the number of links per track in instructions is too much by half link?
And if I try to strech it on I seem to be able to go without that one extra link.
Did you encountered similar problem on any of your KV builds?
Cheers
Pedro

For those about to rock, we salute you!
Rhode Island, United States
Joined: May 10, 2002
KitMaker: 3,581 posts
Armorama: 2,782 posts
Posted: Monday, March 20, 2006 - 12:12 AM UTC
No problems for me.Check the arms are all level,not up or down.The top run takes 8 links around the sprocket to the short straight section.The idler may take 9.
Its easier to be a bit loose,with a bit of sag between the idler and the short straight section.
Wojewodztwo Pomorskie, Poland
Joined: May 26, 2003
KitMaker: 1,208 posts
Armorama: 1,023 posts
Posted: Monday, March 20, 2006 - 01:25 AM UTC
Instructions call for 9 links around sprocket and 8 links around idler.
The arms are all nice and level.
For now situation looks like this:


I went with 9 links around the sprocket as in the instructions.
I think i'll stretch it with 8 links, 9 seems to be giving too much sag for me.
What do you think Lord Mmhmm?
Pedro
For those about to rock, we salute you!
Rhode Island, United States
Joined: May 10, 2002
KitMaker: 3,581 posts
Armorama: 2,782 posts
Posted: Monday, March 20, 2006 - 04:58 AM UTC
Michigan, United States
Joined: December 11, 2003
KitMaker: 5,409 posts
Armorama: 3,777 posts
Posted: Monday, March 20, 2006 - 06:46 AM UTC
Carl. Looks good. Are all those KVs part of your little fleet?
You don't support the troops if you don't support the mission!










 (++)
(++) 


