_GOTOBOTTOM
Campaigns
Where Armorama group builds can be discussed, organized, and updates posted.
Modern Armor: Desert Storm Bradley
Tomek_K
Visit this Community
Wojewodztwo Dolnoslaskie, Poland
Joined: August 12, 2005
KitMaker: 150 posts
Armorama: 131 posts
Posted: Thursday, May 04, 2006 - 03:59 PM UTC
Hi all.

I'm building Tamiya's M2A2 Bradley from Operation Desert Storm. It's my first tracked vehicle and it will be only OOTB. I little afraid painting tracks.

Here are some pictures, but I don't have camera and make this with scanner.


I spray lower hull with Tamiya Surface Primer.

I'm not sure how to make this wheels. Like this

or like that?


Also I don't know how to paint swim barrier and mud guards. Sand like whole vehicle or black?

Help much appreciated and welcomed.
Sabot
Joined: December 18, 2001
KitMaker: 12,596 posts
Armorama: 9,071 posts
Posted: Thursday, May 04, 2006 - 05:36 PM UTC
The swim barrier is a thick, black rubber piece that is painted the vehicle color. It is really prone to chipping. Your best bet would be to paint it black before painting the base color. Then you can chip the base color off and let some black show through. The swim barrier was removed from vehicles after Desert Storm, but still in place during Desert storm.

Don't worry about the road wheels, they will be covered by the side skirts and out of sight. The top photo is the correct one though.
Tomek_K
Visit this Community
Wojewodztwo Dolnoslaskie, Poland
Joined: August 12, 2005
KitMaker: 150 posts
Armorama: 131 posts
Posted: Thursday, May 04, 2006 - 07:09 PM UTC

Quoted Text

Your best bet would be to paint it black before painting the base color. Then you can chip the base color off and let some black show through..


Thank you for fast reply.
I'll try to paint this like you say.
And I should paint mud guards in the same way?
ptruhe
Visit this Community
Texas, United States
Joined: March 05, 2003
KitMaker: 2,092 posts
Armorama: 1,607 posts
Posted: Friday, May 05, 2006 - 02:34 AM UTC

Quoted Text

And I should paint mud guards in the same way?


Yes. The rubber bits would get overspray of the sand but then the paint will crack off.

Paul
Tomek_K
Visit this Community
Wojewodztwo Dolnoslaskie, Poland
Joined: August 12, 2005
KitMaker: 150 posts
Armorama: 131 posts
Posted: Tuesday, May 09, 2006 - 12:15 AM UTC
Thank you for answer Paul.

This time I have regular photos of my build.


I've painted wheels, periscopes and started to paint hull. And of course I have new question. How to paint pioneer tools? With base vehicle color or like wood and metal?

Any comments welcome.
Sabot
Joined: December 18, 2001
KitMaker: 12,596 posts
Armorama: 9,071 posts
Posted: Tuesday, May 09, 2006 - 01:14 AM UTC
Either way is fine. Normally they look like they came from the store or come painted forest green. Sometimes troops paint them all black or OD green.
redneck
Visit this Community
Pennsylvania, United States
Joined: June 06, 2005
KitMaker: 1,602 posts
Armorama: 384 posts
Posted: Tuesday, May 09, 2006 - 01:16 AM UTC
Looks good so far.

I recently asked the same thing for on my bradley. It appears the metal parts would be painted black and the handles would ether be wood or painted olive drab.

Edit: looks like Robin beat me to it.
bison126
Visit this Community
Correze, France
Joined: June 10, 2004
KitMaker: 5,329 posts
Armorama: 5,204 posts
Posted: Tuesday, May 09, 2006 - 10:57 AM UTC
Nice looking Brad.

I think we have reached at least a battalion sized unit with all those Brad's in the modern armor campaign :-)

Don't be afraid by the tracks, just paint them black or dark grey then give them some washes of Earth or Brown to give them a worn look and finish with some graphite powder on the angles. Don't try to figure ust as in the desert, it doesn't stay long on the tracks as the vehicle drives in the sand.

Olivier
Tomek_K
Visit this Community
Wojewodztwo Dolnoslaskie, Poland
Joined: August 12, 2005
KitMaker: 150 posts
Armorama: 131 posts
Posted: Tuesday, May 09, 2006 - 06:09 PM UTC
Once again thank you very much for your help Guys.

Your Bradley Jacob also looks good. You build it as a Desert Storm vehicle too?


Quoted Text

I think we have reached at least a battalion sized unit with all those Brad's in the modern armor campaign


Maybe it's because the Bradley is a very cool AFV.

And a very small update - smoke dischargers painted:


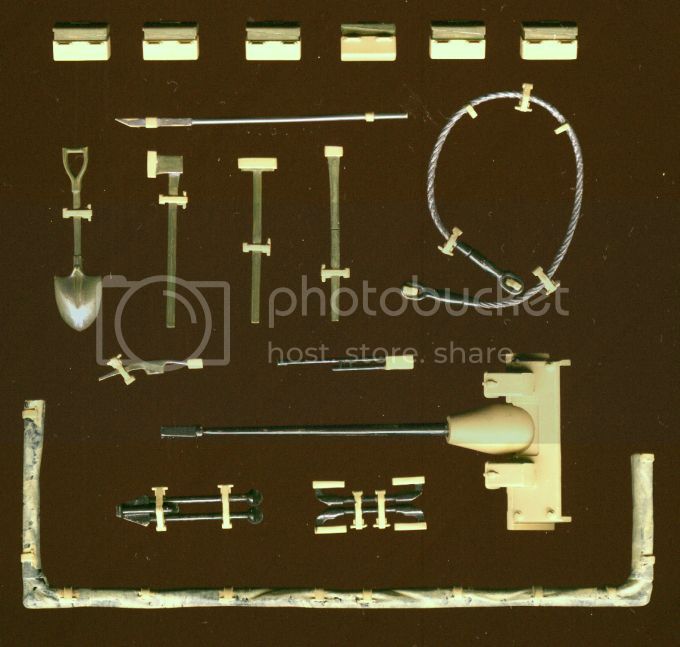
By the way, can you tell me what this tools is?
Epi
Visit this Community
Texas, United States
Joined: December 22, 2001
KitMaker: 3,586 posts
Armorama: 2,556 posts
Posted: Tuesday, May 09, 2006 - 06:31 PM UTC
Good looking Tomek!!!!!!!!!

To answer your question, the seconf item is called a "Breaker Bar." It's just a big pry bar. The second item is to pull the ends of the tracks together when the crew is attaching the ends together. There is sort of a bolt in the center and a wrench is used to tighten it pulling the two ends of the tracks toegther and hold them in place while the crew connects the tracks together. I'm not sure what the proper name is called, but I'm sure on of the tankers here can answer that.
Sabot
Joined: December 18, 2001
KitMaker: 12,596 posts
Armorama: 9,071 posts
Posted: Tuesday, May 09, 2006 - 07:31 PM UTC
That's not a breaker bar, it's a tanker's bar (if it is the full sized one) or PC bar if it is the smaller sized one that is standard on the M113 series (unsure of the size of the one on the Brad). A breaker bar is a different item and is normally stored in the tool bag.

The other item is a pair of track jacks. They are normally a dark, unpainted metal color, similar to gun metal. The four straight end pieces are part of the upper hull that the track jacks are secured to. The two center straps are rubber straps that are attached to the hull. They start out painted like the vehicle, but since they are rubber, the paint flakes off every time the straps are pulled to release or restow the track jacks.

The breaker bar is the large socket wrench (not the rachet) with the swivel head. When used with the "cheater pipe" (a 30" long metal pipe used for leverage) it helps "break" the lug nuts on the road wheels.

Here is a breaker bar:


Here's a track jack:
Epi
Visit this Community
Texas, United States
Joined: December 22, 2001
KitMaker: 3,586 posts
Armorama: 2,556 posts
Posted: Tuesday, May 09, 2006 - 08:06 PM UTC
I stand corrected SIR! I'm on the ground pushing down Texas!
redneck
Visit this Community
Pennsylvania, United States
Joined: June 06, 2005
KitMaker: 1,602 posts
Armorama: 384 posts
Posted: Tuesday, May 09, 2006 - 08:09 PM UTC

Quoted Text

Your Bradley Jacob also looks good. You build it as a Desert Storm vehicle too?


Thanks Tomek.
Your right mine is from Desert Storm as well. It will be a track with the 24th ID probably right about the time the entered Kuwait.
Tomek_K
Visit this Community
Wojewodztwo Dolnoslaskie, Poland
Joined: August 12, 2005
KitMaker: 150 posts
Armorama: 131 posts
Posted: Thursday, May 11, 2006 - 03:18 PM UTC
Thank you for explanation and I'm very appreciate that you help me.
Tomek_K
Visit this Community
Wojewodztwo Dolnoslaskie, Poland
Joined: August 12, 2005
KitMaker: 150 posts
Armorama: 131 posts
Posted: Thursday, May 18, 2006 - 04:32 PM UTC
Hello, it's me again, with a new set of questions.

But first I want to present you how my build is going. Unfortunately I have only pictures taken with scanner.
I finished painting suspension:


And I try to weather it:


Earlier I try do it only once with interior of Humvee, that I build. So I'm not very experienced in weathering.
Any comments very welcomed.

And now my problems:

1. Could you tell me how to paint range finder glasses, please? Because once I read, that one is blue and second is red and in Tamiya instructions both are blue.

2. Should I fill chink between this turet rings?


3. This ammo boxes on vehicle side should be straped somehow?

Thanks in advance.
Tomek_K
Visit this Community
Wojewodztwo Dolnoslaskie, Poland
Joined: August 12, 2005
KitMaker: 150 posts
Armorama: 131 posts
Posted: Tuesday, May 23, 2006 - 08:25 PM UTC
Here are some progress on my Bradley:


I finshed painting hull and tools. Tracks is not painted yet.

I don't managed to found answers of my former questions, so please help me.
HeavyArty
Visit this Community
Florida, United States
Joined: May 16, 2002
KitMaker: 17,694 posts
Armorama: 13,742 posts
Posted: Tuesday, May 23, 2006 - 09:16 PM UTC
It looks like it is coming along well. Here are some answers to your questions.

1. Could you tell me how to paint range finder glasses, please? Because once I read, that one is blue and second is red and in Tamiya instructions both are blue.

Glass is clear on the left side (when looking at it from the front), and tinted on the right. Depending on the angle and light, the tinted one can look either red, blue, purple, etc. Here is an example.


Best way to paint it is the right one with a coat of clear red over blue, and black for the left side.

2. Should I fill chink between this turet rings?
Don't worry about it. Once the turret is ion, it can't be seen.


3. This ammo boxes on vehicle side should be straped somehow?
Yes, there are straps that go from top to bottom around the ammo boxes.

Check out Vodnik's great article on Accurizing the Tamiya Bradley for more tips and techniques.
Epi
Visit this Community
Texas, United States
Joined: December 22, 2001
KitMaker: 3,586 posts
Armorama: 2,556 posts
Posted: Tuesday, May 23, 2006 - 09:35 PM UTC
Tomek,
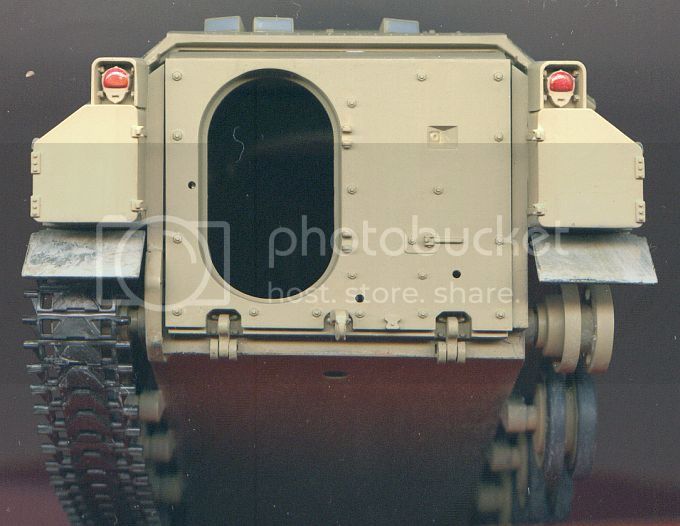
Here is another shot from head on of the "Dog House". This is an A0+ I have out back, but it is the same on an A2 vehicle. And I would go with Gino's recomendation on painting it.


One thing I did notice is the wading poleson your vehicle. Thos are the poles located left of the turret under the work platform, left rear under the ammo cans and right rear under the periscopes. Usually these are taken off as with the tools for painting, so I would paint them nato green, meduim green or even olive drab.

Tomek_K
Visit this Community
Wojewodztwo Dolnoslaskie, Poland
Joined: August 12, 2005
KitMaker: 150 posts
Armorama: 131 posts
Posted: Wednesday, May 24, 2006 - 07:16 PM UTC
Thank you so much for your help.
I hope you are not tired of my silly questions.


Quoted Text


One thing I did notice is the wading poleson your vehicle.


OK. I repaint them.

Tomek_K
Visit this Community
Wojewodztwo Dolnoslaskie, Poland
Joined: August 12, 2005
KitMaker: 150 posts
Armorama: 131 posts
Posted: Monday, June 12, 2006 - 12:18 AM UTC
Hello all.

This time my Bradley is nearly finished.
Painting tracks was not so hard as I was thinking.


As always any sugestions and comments very welcomed.
jazza
Visit this Community
Singapore / 新加坡
Joined: August 03, 2005
KitMaker: 2,709 posts
Armorama: 1,818 posts
Posted: Monday, June 12, 2006 - 03:00 AM UTC
Looks like its coming along fine.
Looking forward to the finished product.
Tomek_K
Visit this Community
Wojewodztwo Dolnoslaskie, Poland
Joined: August 12, 2005
KitMaker: 150 posts
Armorama: 131 posts
Posted: Thursday, June 29, 2006 - 02:27 AM UTC
Hi all.

Firs of all I want to thank our Campaign Leader Jeremy for the extra time that he gave me and I'm sorry I'm such a late.

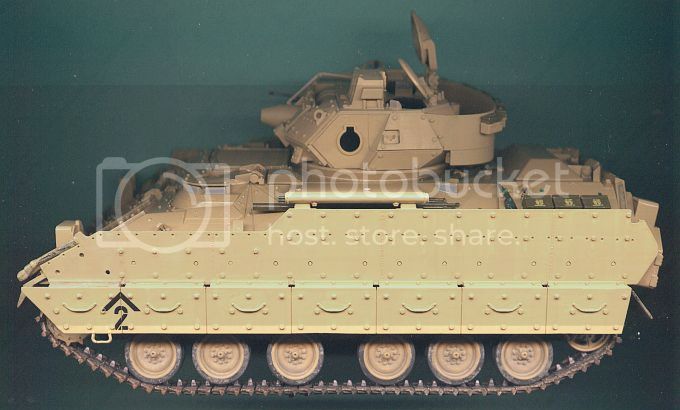
I finished building my Bradley few days ago. At last I succeed to borrow camera. I take just several photos (besides out of focus) and... batteries becomes exhausted. So I can only show you this 4 pictures.


I hope that tomorrow I will be able to present more, better quality photos. Of course any comments will be very welcomed.
jazza
Visit this Community
Singapore / 新加坡
Joined: August 03, 2005
KitMaker: 2,709 posts
Armorama: 1,818 posts
Posted: Thursday, June 29, 2006 - 02:58 AM UTC
Hey Tomek,

Thanks for participating in the campaign! Being my first lead campaign, i thought it was somewhat successful.

Great work on the kid once again. I've got the Tamiya kit for this one but i might add more equipment to give it a bit more character.

Congrats on completing the campaign!
Murdo
Visit this Community
Scotland, United Kingdom
Joined: May 25, 2005
KitMaker: 2,218 posts
Armorama: 1,050 posts
Posted: Thursday, June 29, 2006 - 03:10 AM UTC
Tomek_K
Visit this Community
Wojewodztwo Dolnoslaskie, Poland
Joined: August 12, 2005
KitMaker: 150 posts
Armorama: 131 posts
Posted: Thursday, June 29, 2006 - 06:41 PM UTC
Hello again and thanks for your comments.

I'm really proud of my first ribbon and participation in Campaign was a nice experience. Thank you Jeremy and all of you who answered my silly questions.

Now I have better pictures for you. (Please click on thumbnails)


When I finish Humvee I plan to put it together with Bradley on a diorama.

Equipment for my Bradley is in progress.


Please let me know what you think about my second completed model.
 _GOTOTOP