1⁄35Realistic Corrugated Iron
12
Comments

Corrugated Iron Sheets
Increasingly I am finding more fun in finding ways to scratch build things than building the models that go with them. Having said that I am pretty intolerant of a result that does not look 100% realistic, and work to the motto “More real than real”. I needed some corrugated iron sheets for building a shed, and was surprised to find little or no styrene sheet available for this. After a chat with Vinnie I discovered that Plastruct in US make a 1:32 scale sheet that is close enough in scale but too thick to be accurate. Having begged a section from Vinnie (thanks Vinnie), I went to work on making some.You will need
Aluminium kitchen foil PVA glue mixed 50/50 with water in a cheap spray atomiser A Hama ruler with a built in cutter ($10 - widely available – I got mine here, check worldwide distributors here ) Some Plastruct 1:32 corrugated styrene sheet ( here ) A soft cloth, and a very smooth (glass preferably) surface Note: The Hama cutter is a must – I have found no other way of cutting the foil accurately without tearing.Getting started
1. Cut about 30-40cm of foil from the roll (try and get a 900 cut) 2. Place on the smooth surface and rub with the soft cloth until smooth. 3. Carefully fold in half, create the sharp fold, and reopen 4. Spray some glue onto one of the inner halves, and spread thinly with some tissue until the whole surface is coated. 5. Working from the crease outwards, fold the two halves back together and smooth down again when finished. 6. Take the glued piece and repeat steps 3-5. Between each step repeat step 2 You will now have a solid sheet of smooth double folded foil. Working from the creased side, measure and trim excess to create a perfect rectangle. Now mearsure and cut as many 6x3cm sections as you can get from the section.Forming
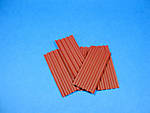
Take a single piece and place it lengthways on the styrene sheet so that the long edges are roughly along two of the raised sections of the profile (female section). Now take a (previously cut) thinner section of the sheet (male section), place it on top of the foil and press firmly downwards. Flip the foil over and repeat. Remove the created section. If it does not come out right, smooth it down and do it again.Painting
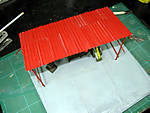
I primed mine with red and grey automotive primer (the red being visible in the dio). When spraying, do not fix them to the surface as removing them afterwards will seriously distort them – instead drop one at a time loose on a surface and give it a quick burst from a vertical angle. This is done for two reasons: 1. At any other angle it blow away 2. Spraying more than one will cause a wet one to blow onto another wet one and stick together (voice of experience) Once dry, run them through the forming process again to eliminate any bends/flats that were incurred during the spraying. They can then be applied to any structure you want, or used as debris.The Good bit.
Once painted the sections can be re-formed as many times as you want without damage or cracking/peeling of paint. You can also cut the sections to fit an angled roof, and reform it before sticking it down. You can apply totally realistic dents/creases/folds, and reform if not happy.Comments
What company made that drill press?
I gotta make me a 3D woodworking shop layout!
JUL 15, 2006 - 07:24 AM
Brad
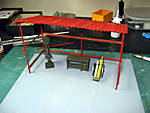
Heres a couple of pics that will give an idea of scale. If you are not happy with the profile scale, Plastruct have it in smaller scales (this is 1:32). I looked everywhere for a resin version but no one seems to make one. On the face of it, this method is far superior to casting as the sections are bendable/cutable/damageabe in a way that resin won't be.

 The workshop is a resin set from Plusmodel - also has a toolbox and PE tools
Brian

 The workshop is a resin set from Plusmodel - also has a toolbox and PE tools
Brian
The workshop is a resin set from Plusmodel - also has a toolbox and PE tools
BrianJUL 15, 2006 - 02:19 PM
Hi Brian,
Neat Looking Shed. Set against the 1/35 figure the length (hight) of the sheets looks about right. The ridges, if that's the correct word, seem a bit far apart though and more like some modern stuff I've see.
I've used kitchen foil in the past for individual bits which worked quite well, getting the right fold was the problem though.
Still if it comes in slightly smaller ridge sizes this might be a great and very useful product.
Thanks for the article, very useful.
Cheers
Al
JUL 16, 2006 - 11:17 AM
Good feature Brian,
this one, like your previous tarp feature, shows innovation and good ideas on your part ,mate! Thanks for sharing these with us, I've tried your tarp method and my results were great (although not as good looking as yours!...with practice, maybe! ) and I will be trying this method in the near future.
Cheers!
~Gunny
JUL 16, 2006 - 02:59 PM
Thanks Al - if anyone finds a decent UK supplier of different scales of corrugated styrene it wuld be great if they could post here
Brian
JUL 16, 2006 - 09:37 PM
Hi Brian,
Yip, trying to find a supplier is usually the probelm LOL, LOL. Still this is a great looking shed and a cleaver bit of work.
Cheers
Al
JUL 20, 2006 - 10:45 AM
I have the same question.[/quote]
Its ordinary soluble white glue - I think in the states its called Elmers glue?
Brian
JUL 24, 2006 - 11:50 AM
Copyright ©2021 by Brian Balkwill. Images and/or videos also by copyright holder unless otherwise noted. The views and opinions expressed herein are solely the views and opinions of the authors and/or contributors to this Web site and do not necessarily represent the views and/or opinions of Armorama, KitMaker Network, or Silver Star Enterrpises. All rights reserved. Originally published on: 2006-07-15 00:00:00. Unique Reads: 25791


