

1⁄35Making Sandbags from Milliput
Sandbags are used by all armed forces in the world, in many
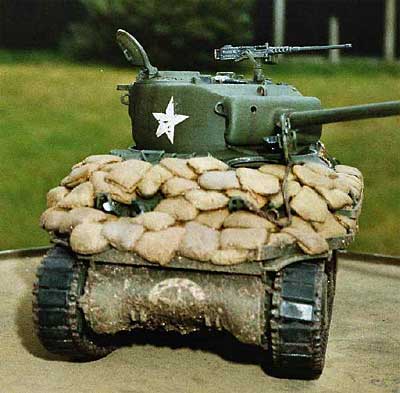
usages. This can be from adding extra armor on tanks, to extra protection at
bunkers, or MG stands and for bomb protection at buildings. This gives, us
modelers, a lot of freedom for using them. I was surprised how many times people
are asking this question is at the modeling forums all over the net. I am not a
expert but I have used the method I describe here and I had some very good
comments about it so here it is.
There are many ways to make sandbags and I am not telling this is the way but
it works for me and maybe for you to?
To make good sandbags you don't need many tools:
-
Milliput (or A+B Epoxy putty).
-
Smooth surface (glass or tile).
-
A knife.
-
A piece of cloth (cheese cloth ore fine mesh).
-
Your fingers.
|
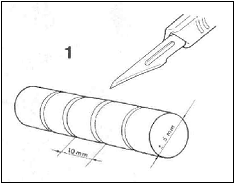
Mix the Milliput according to the instructions into a good homogeneous mixture. Use a smooth plate to work on (I always use a piece of glass). Roll from this mixture several sausages from about 8-10 cm long and 6mm in diameter (if necessary put a little Talcum powder on your glass plate to prevent the Milliput from sticking to much). Cut this sausage in to little pieces of about 1 cm (Pic. 1). |
 |
|
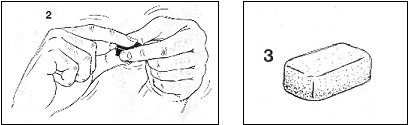
Take these little lumps of Milliput between your fingers and form them into little blocks (Pic. 2-3). |
 |
|
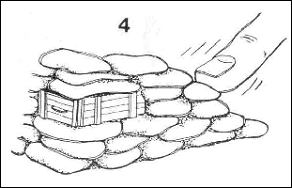
Now you have created rectangular shapes, which you can starting to stack onto each other, by using a little pressure when stacking them, they will form themselves like sandbags. Don't worry about the different shapes and sizes you create by applying pressure. This is very natural because of the material and content of real sandbags (Pic. 4). If you are using the sandbags to fortify a bunker or MG nest then you should also consider to put some wooden ammo boxes on the sides of the construction, these where placed to reinforce the sandbag construction. |
 |
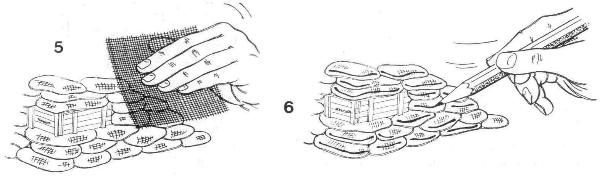
Let the sandbags dry for about 15 minutes then use some cloth and press lightly
on the bags to give them some texture (Pic. 5) Don't forget to scribe some seams
on the side of the bags using a pencil or knife (Pic. 6).
That is basically it!
When painting it is a good idea to give them a different color then your main
object, for example If you are using them on a tank with a Olive Drab basecoat
then give your sandbags a Dessert Yellow basecoat. This gives a good color
variation to your model.
Oh, if you are painting and weathering your sandbags, remember to give several
sandbags a different color (variations on your basecoat) otherwise they will
look like one even color, which is not very natural.
Using this way you can very easily create a lot of sandbags in a short time with
fine result. Oh, one last tip. If you plan to remove the sandbags from your
model (for painting) then you can put a small plastic sandwich bag on your model
first, this way the putty will form itself according to the model but you can
remove it without any problems.
(Authors note: The drawings are taken from the book ''the Verlinden way", published with permission.)
About the Author


FROM: ANTWERPEN, BELGIUM
Ola, my name is Ronny Noben and I am a plasticohalic. No serious, I started building around 10-11 and one of the first kits I remember is a model of the Nike Hercules Surface to Air Missile. It was the rocket my father was a engineer for in the Belgian Army. As a kid I mostly builded airplanes (vi...


All Rights Reserved. Please read our Conditions of Use and Privacy Policy.