

1⁄35Effective Pigments
18
Comments

Armor Modeling Today
Earth tones and effects such as dust and mud have become more accepted among armor modelers over the recent years. Modelers are now devoting more time and thought both to the research and realistic application of earth tones and effects on military models. Let me start this article by discussing some of my thoughts regarding these effects. There are still a number of armor modelers protesting the use of dust and mud. These individuals dispute large amounts of mud stating that it can be used to cover mistakes. Others quarrel that the increasing use of earth tones with their effects have resulted in a loss to the artistic appearance of armor models over the past years. Of course large amounts of mud can be used to hide mistakes on a model but this can cause other problems. Attempting to hide mistakes with earth colors and texture might cause people to loose the freedom of their application in an attempt to hide these errors. I have personally labeled this problem as Chasing the Finish, and this may affect the quality of the completed model. My recommendation to avoid Chasing the Finish is to simply construct each model carefully and with attention to detail prior to painting regardless of the amount of earth colors and mud texture that you intend to apply. This will give you complete freedom in applying the earth tones and mud texture allowing for the best results on your completed model.

Obtaining a Dusty Appearance to the Running Gear of an Amour Model
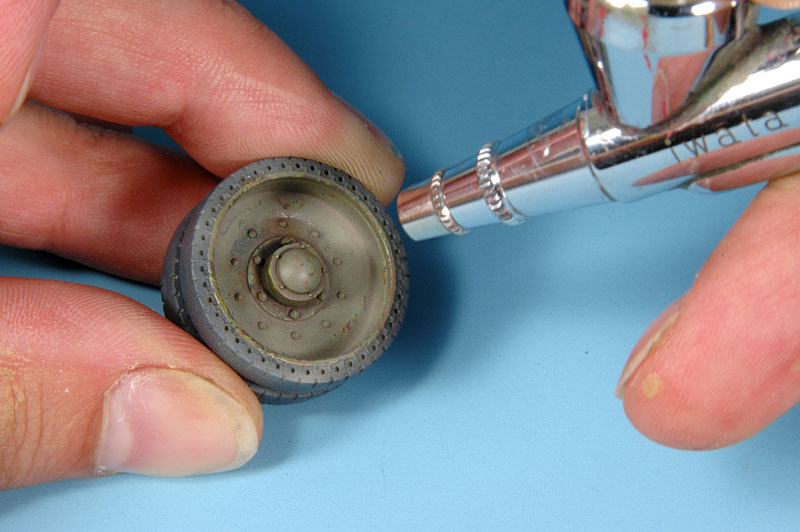
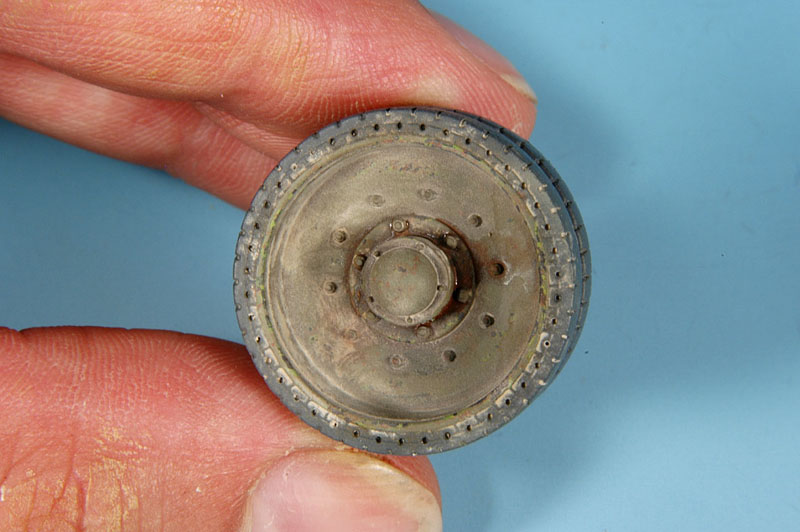
The earth tones and effects used in the first example were referenced from the color photos of Russian vehicles on operations in Chechnya. Other color photographs in the Missing Lynx Think Tank here were also studied. The Czech 38T focused in the first segment of this article was weathered to have a dusty appearance in an urban setting. Observation of the 38T shows the model to be dusty with the chips still evident on the running gear and hull. Note how the tracks are dusty and polished with limited mud texture. The examples in the step-by-step pictures for this part of the article are a T-34 wheel and some Friulmodel Steyr tracks. The steps and mediums used in these photos are identical to the ones used to weather the entire 38T. In one picture we can see two painted wheels. Both of the wheels were airbrushed using acrylic paints. A few coats of Vallejo Air Satin Varnish were then applied, again with an airbrush, to protect the acrylic base coat from the enamel washes used in the upcoming weathering steps. The wheel on the left has chips and other effects while the one on your right only contains a base-coat with a few washes applied. The left wheel is going to be used for our dusty example. You will want to have the chips evident under the dust.creating the mixture
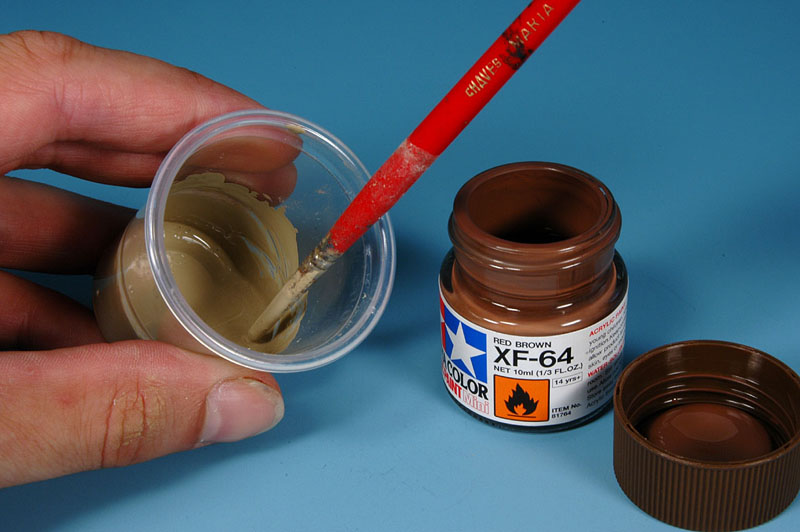
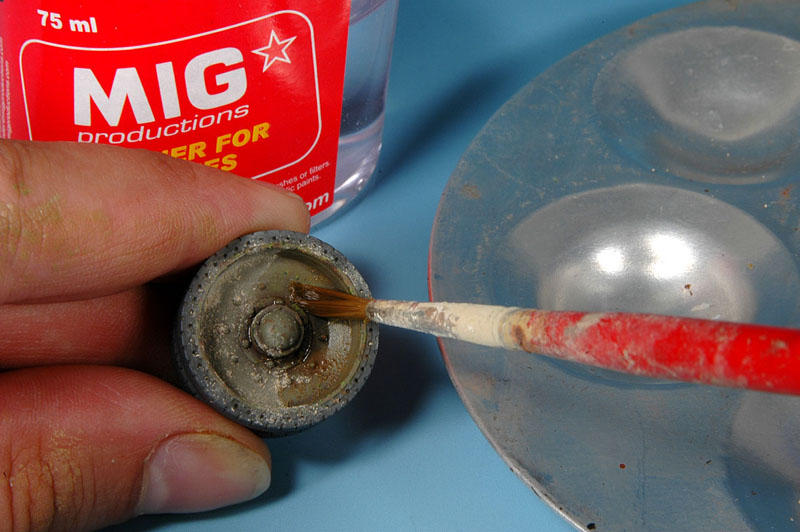
In the first four pictures, I am mixing the base color for the earth tones. Tamiya acrylics are perfect for this step. Tamiya acrylics are easy to airbrush and provide a nice matt coat. This matt coat will also provide you with a good surface for the pigments to adhere to. I always mix the colors in small disposable clear plastic containers as seen in the photos. I start with a base of Tamiya buff and add small amounts of German Grey and Red Brown slowly working up to the earth color tone I desire. I then add isopropyl alcohol to thin the acrylic paints for airbrushing. It is very important that you thin the paint properly to help you obtain a nice faint coat. I think the Tamiya paint to about three parts paint and four parts alcohol. Slowly tilt the clear container back and forth to see how quickly the paint runs down the side as seen in the picture. How quick the paint runs down the containers side will give you an understanding as to how diluted it is. Over time you will form your own liking as to how thin you want the paint for use in your airbrush. Spray the base-coat very lightly and randomly onto the wheels and model as displayed in photo four. Remember, we are only applying a light coat of dust. It could be very easy for one to overdue this step quickly nullifying all of the time he/she spent adding those nice paint chips.Applying pigments
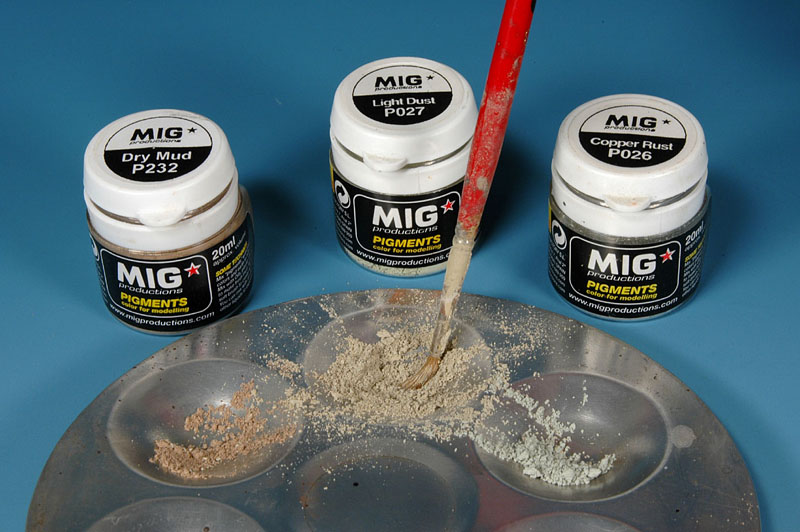
After airbrushing the light coat of dust I apply pigments. For eastern European tanks I generally apply a mixture of the three colors displayed in the fifth picture. It is important to remember that color 026 Copper Rust is now sold as Concrete Dust. I usually place the pigments into a tin separator and mix them to my liking. I used the light dust as a base then added the dry mud and Copper Rust until achieving my preferred hue. Again, reference color photos when ever possible. Break your model into imaginary sections. Apply your dust color to the model one section at a time using an old brush. It is better if you apply light amounts of pigments slowly working up to your desired amount instead of adding too much. After applying the pigments blend them using turpentine. This is where the importance of the satin varnish coat applied before the Tamiya earth base comes into play. Applying this step to one section of the model at a time gives you better control of how much dust you are adding to the model. After the turpentine has had time to evaporate you can remove the excess pigments using a ridged brush leaving a dusty appearance. The last picture displays the wheel completed. The chips are still evident under the dust adding to the finished appearance. Some old grease was also added. You can also apply more pigments to the wheel using a dry brush if you are not completely satisfied with the finish.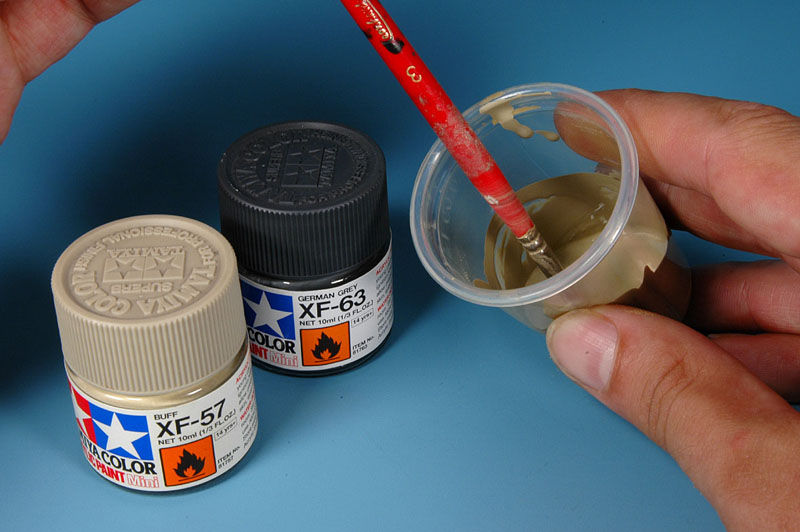


About the Author


Comments

Tony, Brian, Peter, Robert, Giacomo, Dave, Frank and Jon
Hello guys and thank you for responding to the article. I hope that you all enjoy it. It was a pleaser for me to write. Thanks again Vinnie for posting it.
Sincerely
ANPW
NOV 05, 2006 - 07:11 PM
Thank you very much for this very well written and so useful How-To
Cheers
Claude
NOV 05, 2006 - 07:38 PM
Thanks a lot Claude
I am glad that you enjoyed it. Again, it was a lot of fun to write.
Thanks for your posting
ANPW
NOV 07, 2006 - 11:17 PM


Wow..missed this one somehow. Excellent article Adam. Really explains with words and photos how to acieve such a realistic effect with this medium.
Thank you very much for taking the time to create this.
NOV 10, 2006 - 04:45 AM
Hello Stuke and Podporucznik
Thanks for the nice postings. Thanks for taking the time.
Talk to you soon and happy modeling
ANPW
NOV 14, 2006 - 12:42 AM

Thanks for this great article, full of loads of info. As a new member and someone who is returning to modelling after a 20 year break, I find these articles and forums a great boon. I myself have been using some pigments from CMK named 'star dust' you can see the interim effect on pics off my Tiger 1as yet unfinished in my album. Thanks again.
DEC 02, 2006 - 06:10 PM

Indeed very nice,i have the Osprey book on the T34/76,with your article and it's a great value for me.really like your work Adam.did you already have something like this done with a T34/85?/Would love to see one thanks for sharing....
greetings jeroen,.
DEC 02, 2006 - 06:24 PM

Great article! (I guess the others have already said that...) Would it be too much to ask to write more about the subject? It's one of the single most useful articles online. (Next to MIG's on missing-lynx.)
DEC 03, 2006 - 08:08 AM

Adam,
This is a terrific feature!
Might you be updating it with some of your new line of products?
Wilder products
DEC 27, 2014 - 08:11 PM
Copyright ©2021 by Adam Wilder. Images and/or videos also by copyright holder unless otherwise noted. The views and opinions expressed herein are solely the views and opinions of the authors and/or contributors to this Web site and do not necessarily represent the views and/or opinions of Armorama, KitMaker Network, or Silver Star Enterrpises. All rights reserved. Originally published on: 2006-11-04 00:00:00. Unique Reads: 109342

WEB HOSTING BY


Copyright ©2021 Armorama and Kitmaker Network, a subsidiary of Silver Star Enterprises
All Rights Reserved. Please read our Conditions of Use and Privacy Policy.
All Rights Reserved. Please read our Conditions of Use and Privacy Policy.