

Colour Modulation
29
Comments
getting started
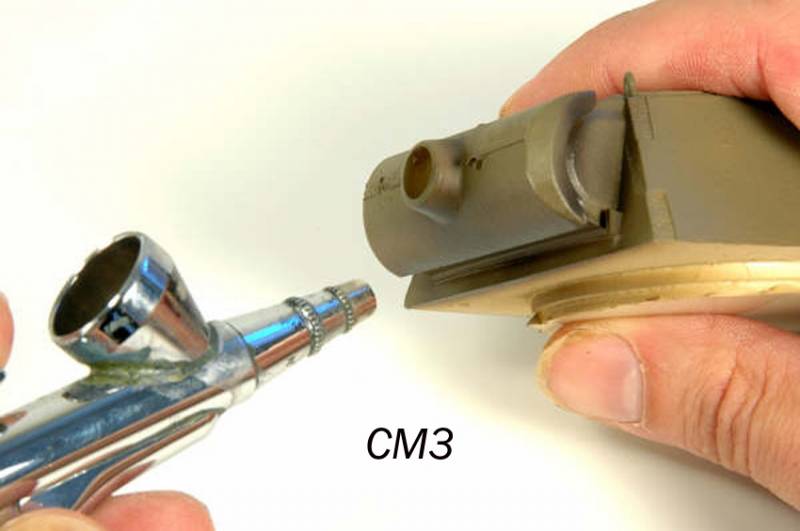
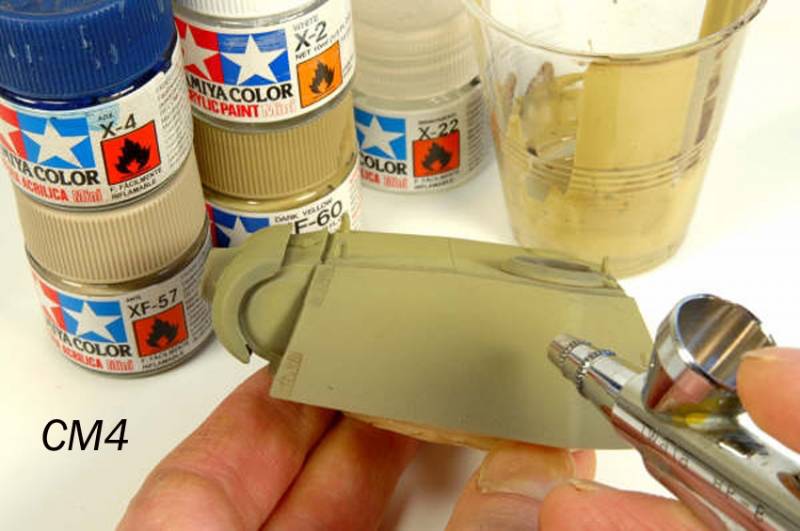
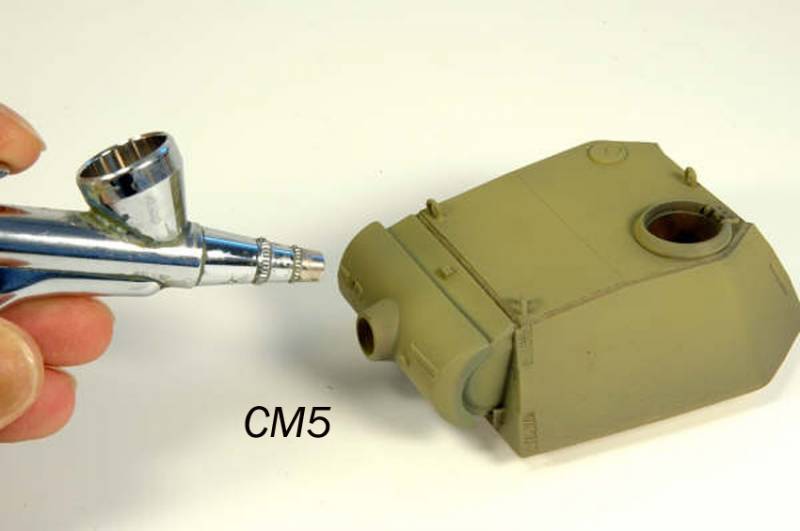
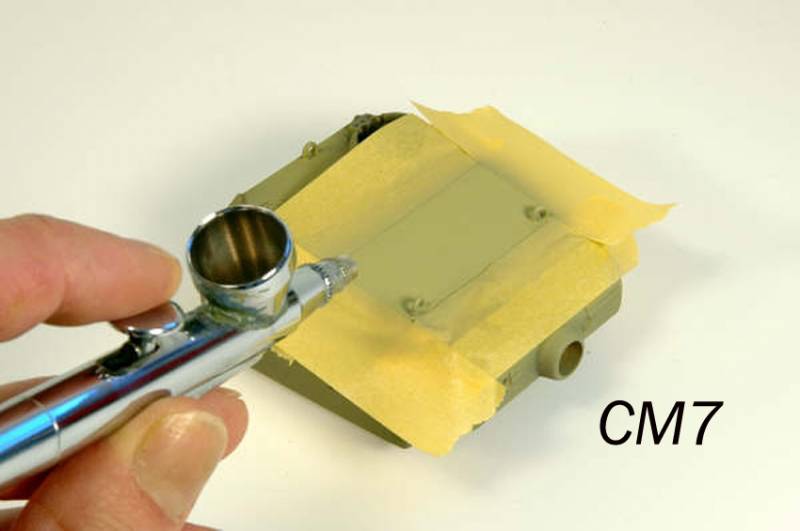
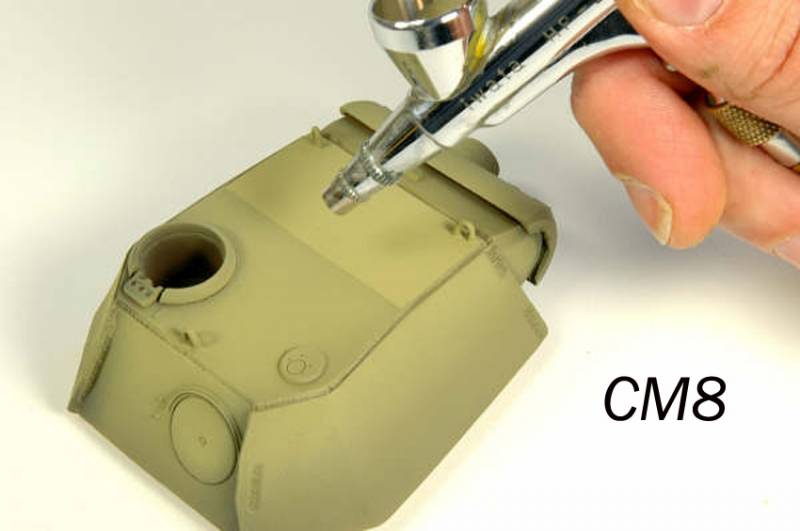
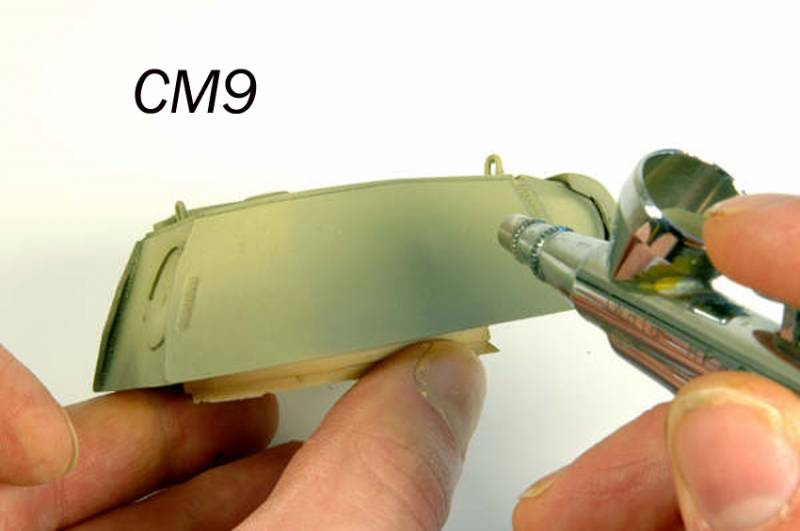
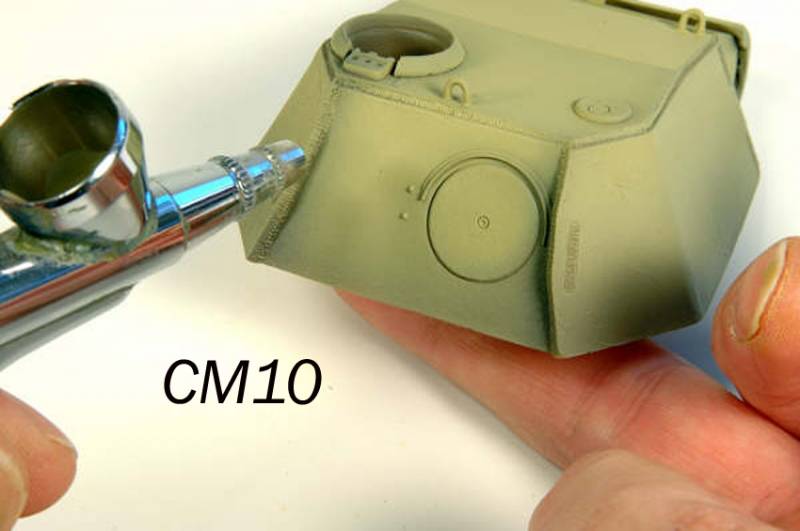
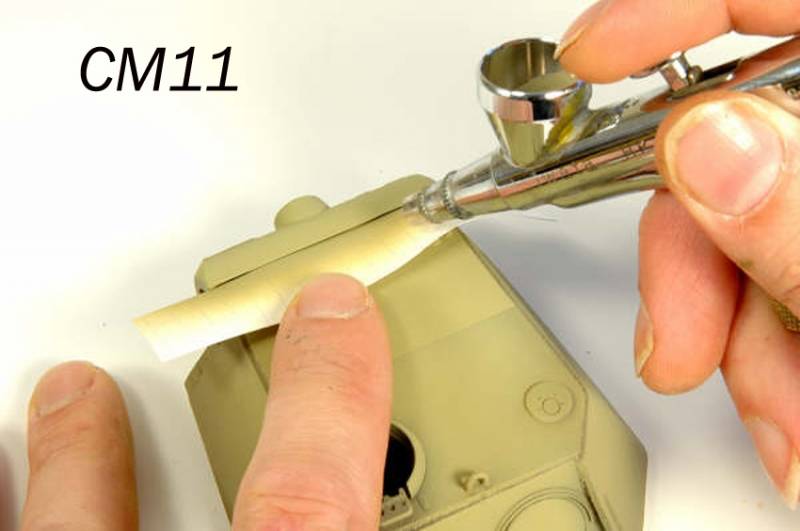
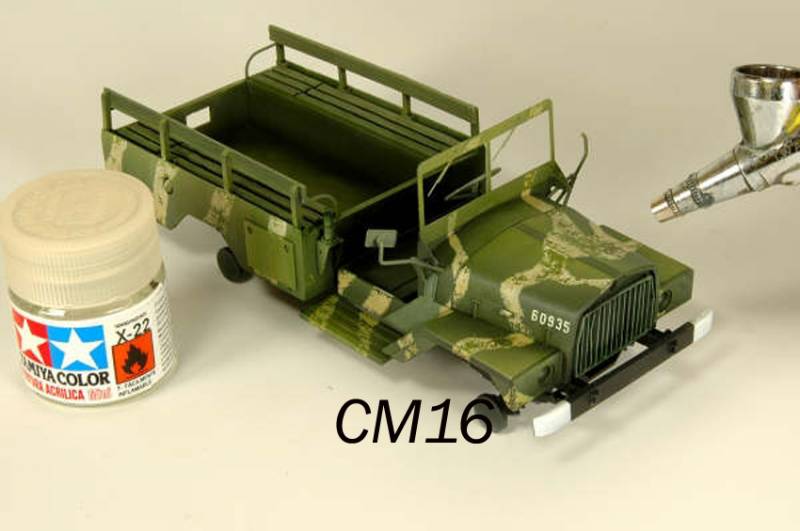
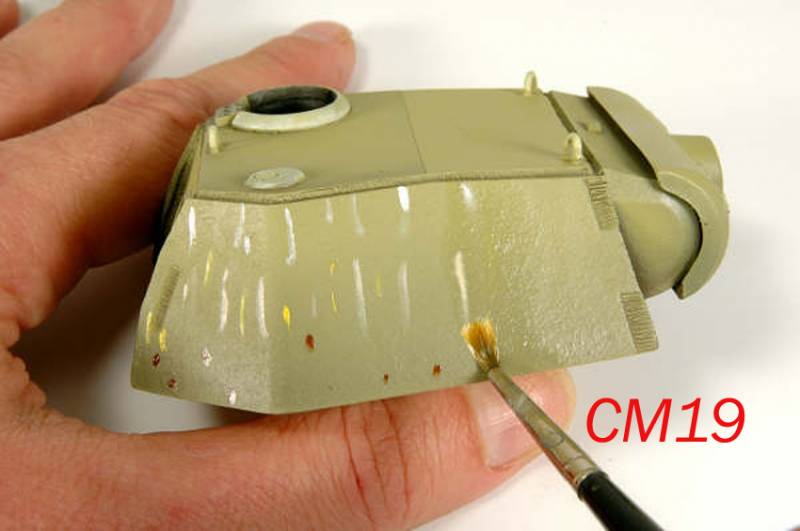
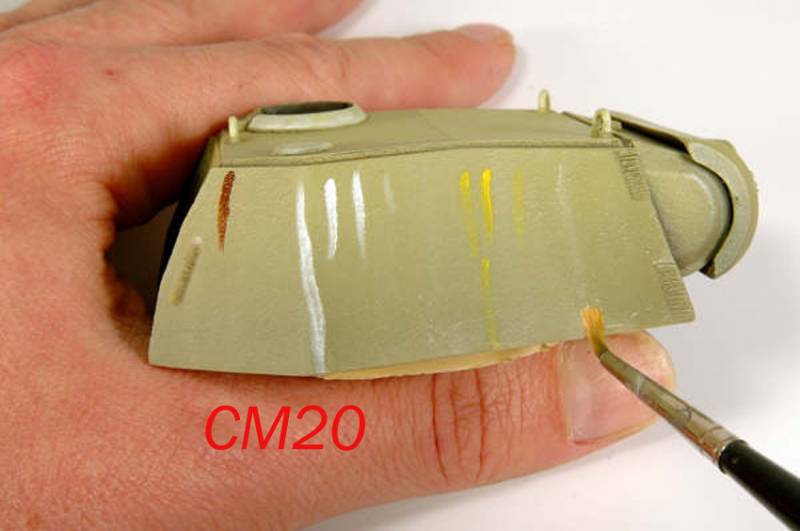
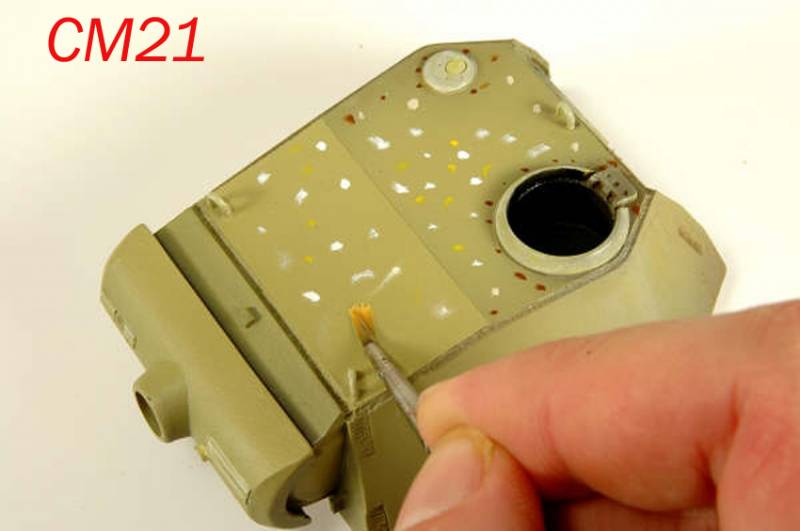
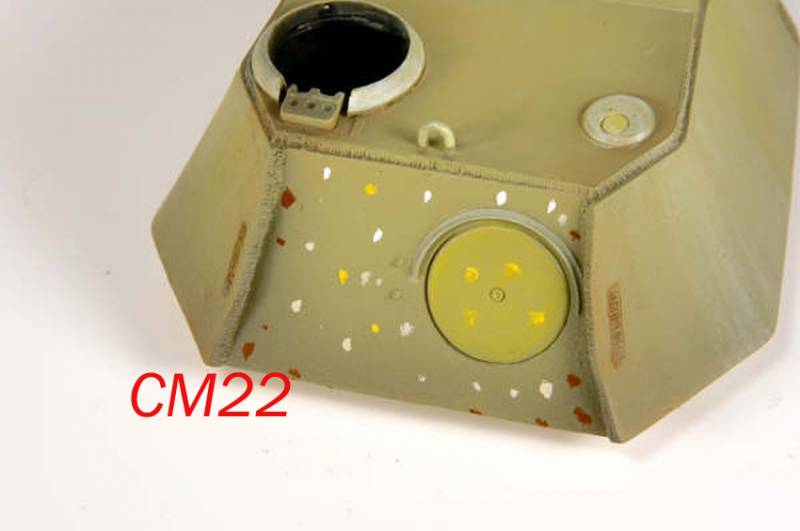
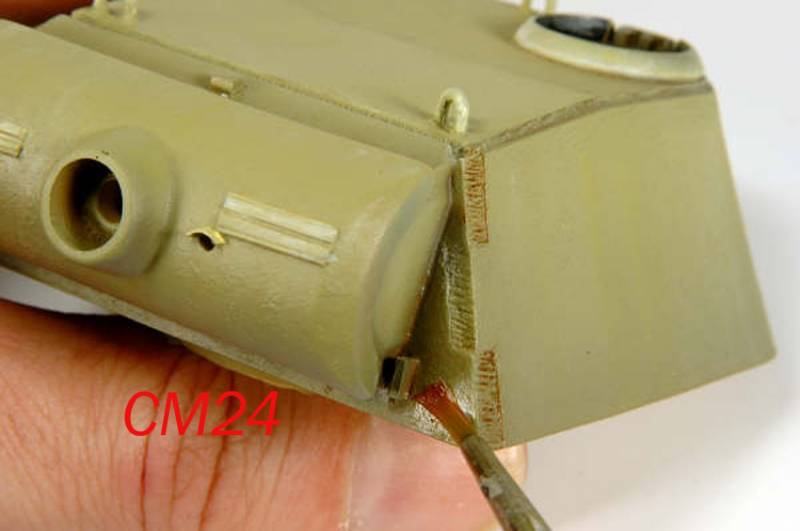
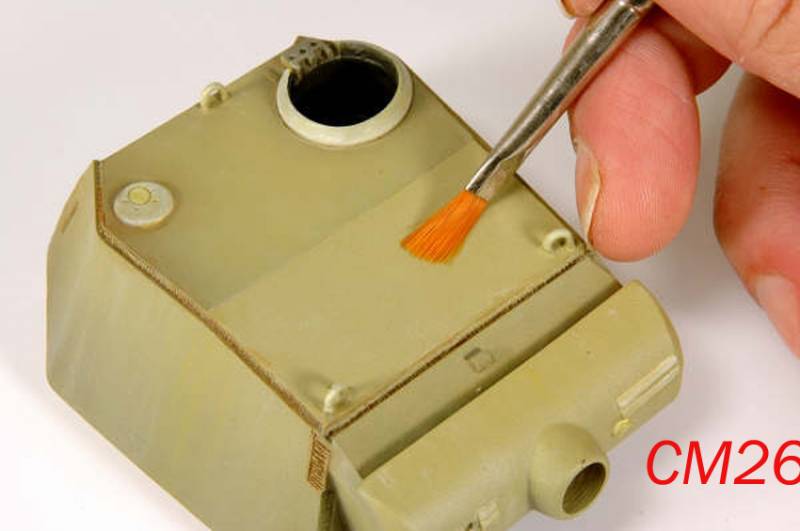
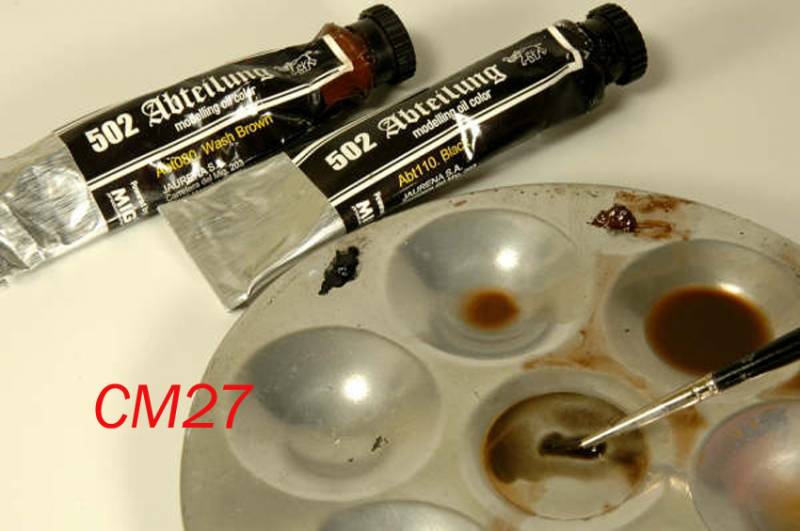
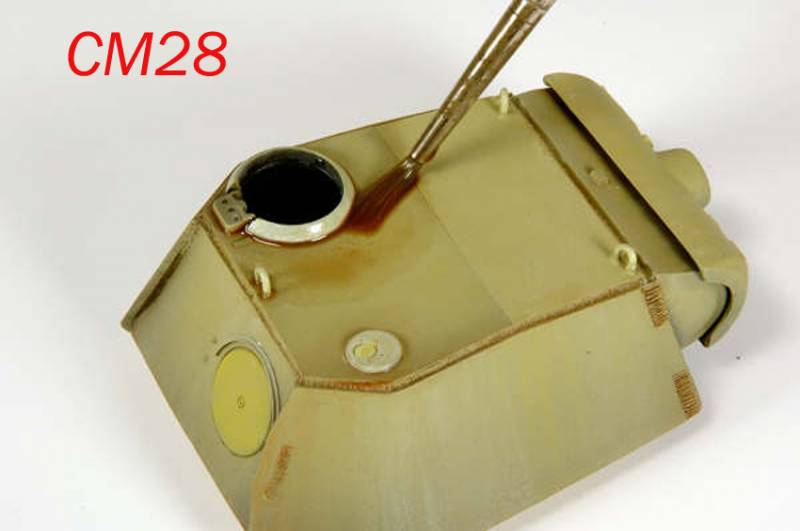
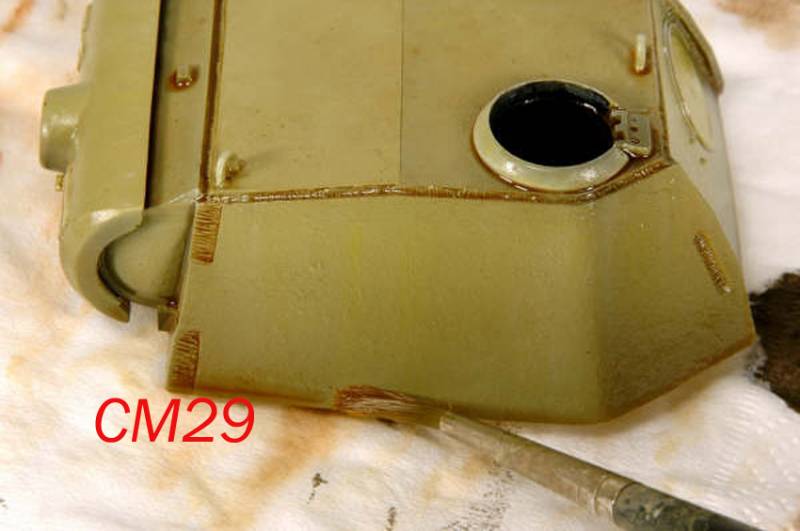
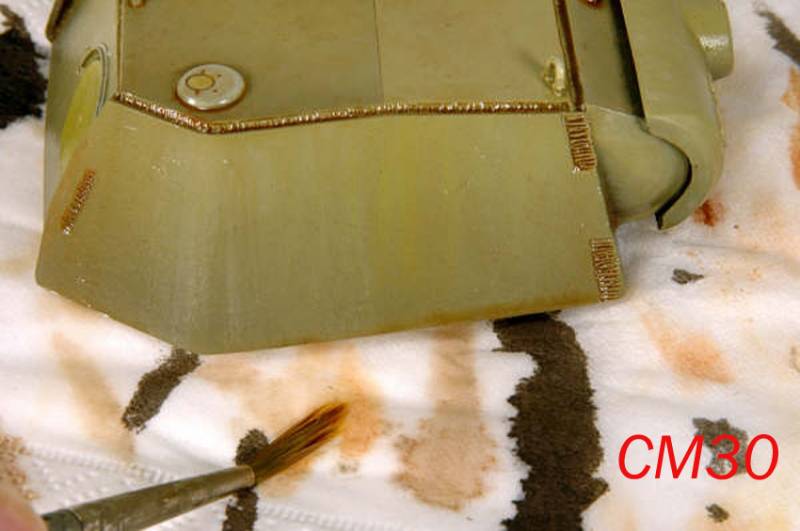
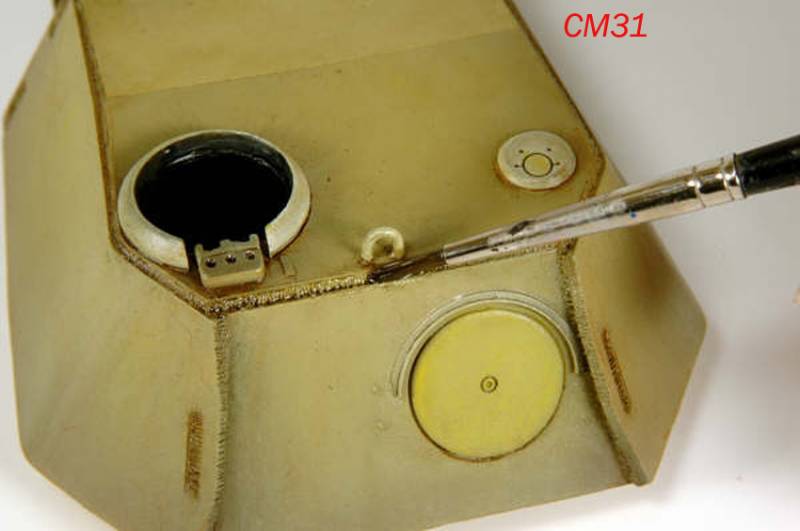
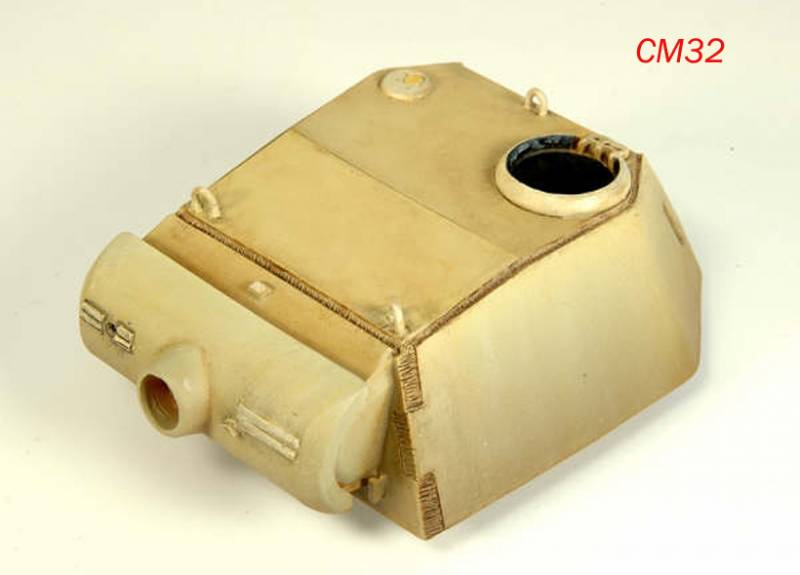
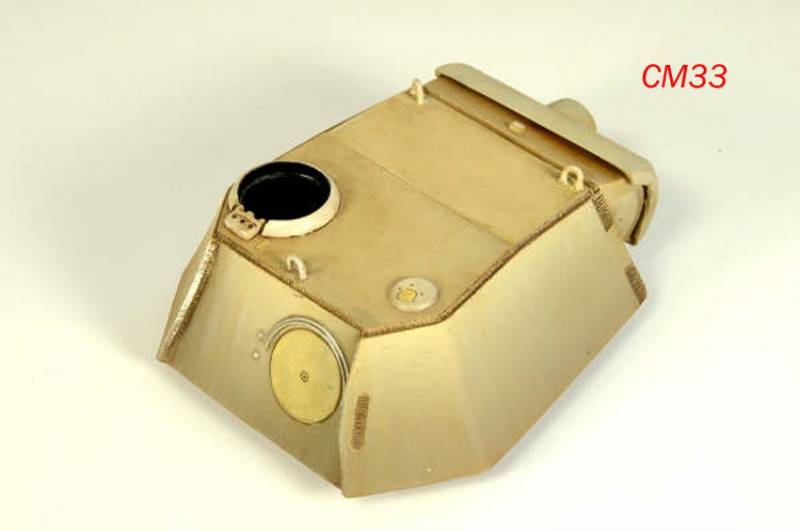
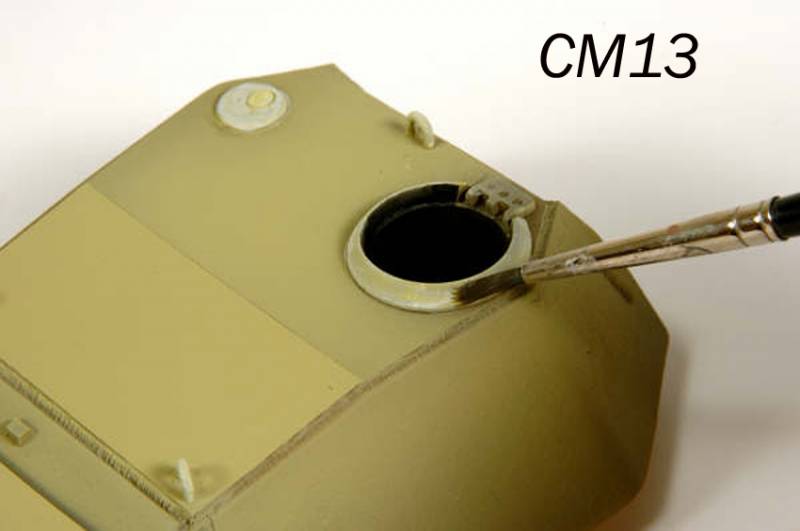
Photos 1 thru 3 I will be explaining the Color Modulation style in this example using a sand-yellow base-coat. To start, I applied a dark brown base over the turret focusing mostly in the lower and recessed areas. A darker mix of the color can be applied inside each of the corners and lower areas if you feel it necessary. Photos 4 and 5 Now it is time to apply a dark yellow over the brown. I focused on the mid and upper parts of the turret while quickly applying faint coats to the lower sides, front and rear for color. Note that the angle of the airbrush is tilted up. The dark yellow was applied on top of the turret at an angle from the front to keep the brown shadow under the mantlet. Photos 6 thru 10 After adding some Deck Tan to lighten the tone and a drop of Blue for added color, I airbrushed more highlights onto the turret. Note that I used tape to mask the lower part of the turret while applying this lighter shade to the upper part of the mantlet. You can even take it one step further by masking and applying lighter tones to individual components breaking up the model making it more three-dimensional. After removing the tape I simply continued airbrushing lighter coats onto the upper parts of the turret top and sides to subtly blend the different shades. Again, note the upward angle of the airbrush when applying the tones onto the sides of the model. You can also see how I angled the turret to keep overspray from getting on the top parts allowing me better control over the build-up of light tones. Photo 11 To finish the base-coat I applied almost a white color to the top of the mantlet, the most upper part of the model. Paper is also a quick means of masking areas where you do not want overspray. Now might be a good time to go back with the original bark brown for more shadows to the corners to cover any overspray that occurred while adding the lighter coats. Photos 12 thru 14 Before moving into the further finishing stages I added even more highlights and tones by brushing acrylics onto the hatches and other details extruding from the turret. Photo 14 shows the different tones adding depth and contrast make a simple turret with limited details much more interesting. Photos 15 thru 17 After a few good coats of clear we are ready to start adding the oils and other effects helping to subtly unify the different shades and colors. Photo 16 displays the previous steps applied to a vehicle containing a dark-green finish. Photo 17 shows the Panther at the same stage. Note that I applied and blended oils onto the areas where the hull plates connect for even more contrast. Photos 18 thru 22 Now we will discus how I applied the oils and washes to help unify all of the tones applied in the previous steps. The colors in photo 18 are great for fading a sand base-coat. The color Dark Rust is a good oil color for shadows. I applied and blended the oils on one part of the turret at a time starting with the turret sides. You can see how I applied the lighter oils toward the top of the sides while placing the darker colors onto the lower parts. Use vertical strokes with the brush when blending the oils on the sides. You can add more colors again immediately after the first set and blend them again for added tones if you choose. Use a tapping motion to blend the oils on the horizontal surfaces. Note how I placed the darker oils onto the areas where more shadows will be apparent. Photo 22 displays the layout of the oils on the rear turret wall prior to blending. Again, note the placement of the dark oils on the darker areas. Photos 23 thru 26 Photos 23 and 24 show how you can use different shades of blended oils for further shadows and contrast. Thinned dark brown oils where also added to all of the welds and seams at this time. After all of the oils where applied I went over the turret and further blended them using a clean flat dry brush. Photos 27 thru 31 The last step I want to show you was the rather easy step of applying dark filters and washes to further break up the components of the turret while also unifying all of the different tones in the base-coat. I always use trays to mix the washes because I like to apply them at different intensities. After mixing a brown shade I applied a filter over the entire turret. Use a brush to pick up and wipe the excess oils and thinner onto a clean diner napkin. With the turret still damp I mixed another darker wash and added it to the seams and welds. Photos 32 and 33 These two photos show a few views of the turret ready for chipping and weathering. The different tones in the base-coat, although subtly unified by the oil fading and washes, will still be noticeable to an observer before they immediately realize what they are seeing. Painting a model in this manner will give it depth and an impression of shadows making it much more attractive on your shelf.Finally
Further work with the colors will also be needed in the chipping and earth tones. You will be able to read more about this and the finishing of the Panther F in issue 40 of AFV Modeller. In the photos of the finished models you will see how the chipping and weathering play a further part in unifying all of the tones on the various components.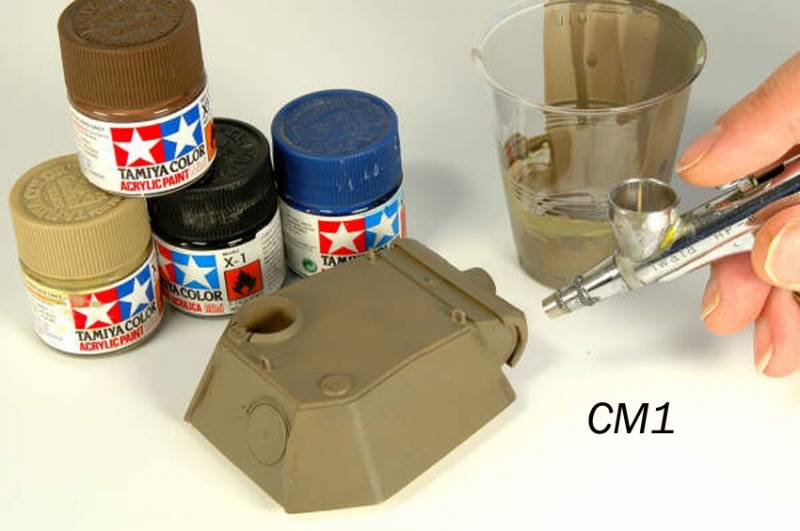


About the Author


Comments

I think everything you said is correct Jim, especially since you stated before hand that it is your own idea of what realism "is" as it pertains to military modeling. With the internet allowing all the folks here to develop and share their own ideas, its no big surprise that a "status quo" of techniques was born. Those modelers in the upper echelon, award winners and such, will always be followed for the quality of their work. People who are less skilled will always say "I want my model to look like that, how did you do it"?
I think the important thing at this point is to encourage modelers of all skill levels to experiment and dive in to the unknown rather than following a diagram of how it "should" be done. While I am brand new to this site, it is not hard to see the division between those who think for themselves and those comfortable with conformity.
As far as color modulation goes, I have seen it used on several of Bill Plunk's models, to some seriously subtle, but almost fascinating effect. To me the subtle blues and greens of natural fading in a Panzer Grey/German Grey painted vehicle are best represented this way. I'm sure there are other means of achieving it, however color modulation has been an artist's tool for a long long time and I'm sure you can imagine how it began.
Paint a picture. Seal it. Not happy with some shading, too uniform. Put a dab of color on. Thin Brush. Smear it in. Very effective. Easily manipulated.
It sounds like you really have to answer the question yourself. Since there is no side-by-side review, why don't you arrange for one? I'll help. I have never done any kind of weathering before except for dry brushing, so I'll be learning the techniques as we go. Right now I have a really bad, old, Tamiya kit of a Panzer II that I have just put the primer coat on.
JAN 11, 2009 - 10:47 AM

Hi Mike. truth be told i am still riding the learning curve on the whole weathering thing. anything i produce would not be the best representation of what this technique actually creates. as a control i thought the only fair way to do a comparison was applying the different techniques to the same base model all done by the same builder/finisher to minimize any disparities between finishing skill abilities and minimize any effect the various finishes would have emphasized or diminished as may happen between different models. a Tiger I finished one way and an Opel Blitz finished another way would probably not be fair to compare to each other. besides, different color plastics may also have an effect. the only multiple duplicate kits of military subjects I have are 6 1/48 Accurate Miniature P-51 Mustangs and 4 1/35 Tigers i have specific plans for. besides all that, i am incredibly SLOW at getting anything done because right now i don't have a committed work area. all my building and painting is done in my livingroom and only sporadically whenever i can get all my stuff out for a while without the silent reproach my wife is so good at shouting out.
JAN 11, 2009 - 10:32 PM

Hello
I am sorry in that I was unaware that this topic still had action. It is very obvious that a few of you have really put much thought into these very interesting postings. Again, I apologize.
I do not have two of the same models, one with and one without the CM style, to post next to each other at this time.
I came up with this style, before I even decided to call it a style, to try to add another dimension in the basecoat while giving more volume and bringing attention to certain areas on a model. Over time I further altered the tones of the basecoat between the hi-lights and the lows in an attempt to make it more apparent on the finished model. I also had to start changing the tones in the chipping and weathering as well. I wanted to force the lights and shadows adding more volume making the static model more dramatic. My Panther F, the focus of the article posted here, was the first model where I was able to finally get an idea of just how much I would need to alter the tones in each finishing step to obtain a look of colour variation and volume on the finished model.
As I said this style is a result of a certain finish I have been trying to obtain for a few years prior to this Panther. It is not my intention to change the hobby but simply have fun. Personally I prefer very dramatic looking models and my work has always gained me both very hard critiques along with nice complements and support. I was asked to make the Colour Modulation DVD after the success of the Panther F model.
Although I have added to this conversation I do not feel as though I have answered any major questions. I just wanted to give some more of my thoughts about how and why I can up with this style. I guess that I do not really have any at this time as only time can tell just how much of an effect, if any, this style will have on our hobby.
Sincerely
ANPW
JAN 15, 2009 - 12:52 AM
Hi Adam,
Nice article!
Now, I do have one 'serious' question though. I was wondering why the use of filters was not a part of this article (or a part of the modulation style as a whole). I mean, as I understand it, the purpose of such style is to allow for subtle tonal differences on the vehicle's base color to truly mimic the impact the environment may have had on them (hence the use of various shades of what basically is the same color and the oil dot method). Please forgive me if I don't get it but wasn't this [achiveing such tonal differences as it pertains to the base color] also a reason for such techniques as 'filtering'? Would filtering, in particular, be then a separate process, as a wash would be, applied after the modulation style is complete? I am really just curious about where filtering fits in all this.
Thanks,
Rob
JAN 15, 2009 - 06:14 AM
Great question on the filter Rob. Offhand I would think it would have to be selectively applied or it may adversely affect the subtleties of the modulation.
Adam: I really appreciate your response with this. My comment about the trend setters wasn't at all directed at you. It was just a general statement. As an example of what i meant the American gentleman, William Demmings I believe, who went to Japan after WWII and guided their industry, especially the auto industry, in its resurgence with his revolutionary ideas about manufacturing processes. He was ignored and about laughed out of the US because everybody thought his ideas were crazy. After what he did in Japan grabbed the world's attention, he was a much sought after consultant and his words and ideas were were almost Biblical. Certainly nobody was laughing at him any longer. For whatever reasons he felt the need to keep talking long after he had made and proven his points. In one of his last visionary proclamations given to industrial leaders he stated that what was needed to revitalize manufacturing was for everybody, especially engineers, to throw away their computers and go back to pencils and pads. Not the most intellectually glamorous statement a man of his accomplishments could have made, and, of course, fortunately nobody listened. That was what I was inferring with my comments about a cult of personality. Again, it wasn't directed at anyone personally, but just a comment that it isn't unusual for this to happen in any organization, any field, any activity.
Personally, I'm glad people like you ARE out there striving to push the envelope.
Last thing: Mig Jimenez was mentioned in a few earlier posts. What I find so unique about his view and approach on the art of model building is that he has formal art training. That understanding of color, light, the various forms and styles as well as technique brings something to the table that is most unique.
JAN 15, 2009 - 09:52 AM

Hello Rob
The Modulation Style is a way of adding volume to a model or maybe drawing attention to a certain area on the vehicle. The filter is a technique used to alter the tone of a colour if you are not satisfied with its hue. The filter can also be used to faintly unify a camouflage. The filter will also give a bit of a weathered appearance to your base-coat. But Filters are not always necessary. On the Panther I was content with the different tones on the basecoat. I just used the fading technique with oils (sometimes referred to as oil dot or dote filtering) to get the weathered appearance and various tones that I was looking for. I have used filters to unify the different tones on a basecoat if I felt the colour modulation to be a but exaggerated. Does this answer your question? Please let me know. These techniques can be confusing if you do not use them often.
I completely understood what you meant Jim and found your posting to be very interesting. Thanks again for devoting your thoughts. It means a lot to me.
Thanks again guys. Great conversation!
ANPW
JAN 19, 2009 - 04:09 AM

IMO, there appears to be two different thought groups.
Those who paint realistically ... and those who paint artistically. Who is correct?
Those who paint realistically, spray their model with a favourite or matched base colour and weather according to its settings. This is how the 1/1 model is seen ... is it realistic? Not in my opinion.
A 1/35 model can never catch light in the same way, or provide shadow and depth as a real vehicle, so these effects have to be artistically achieved. Those who paint more artistically have developed styles that have been popular, almost trendy, but I believe most have taken this route, to come to the same "end" as those who paint realistically, and IMO have captured the essence of the real 1/1 counterpart, more realistically than those who paint exactly as done in real life.
I believe the ending or goal, is the same with both groups as mentioned above, and it doesnt say anything different. Its not the journey, but the destination that counts in my books.
The fact that some modellers always question the "how to"s and strive to push the limit a step higher each time, will always be the fuel that drives my interest for this hobby.
Excellent article Adam. Its always a pleasure to see your work and the ideas that you bring to the table. As with all art, some will like it, some wont, some will try to interpret it literally and others will see the possibilities in the techniques and try to incorporate it in their own work. I guess Ill be one of those.
On a side note, for anybody interested Rick Lawler has used this technique to great effect on his Panzerjäger 38(t)
The above post is my opinion only .. no animals were harmed in any way during the writing of this post!
JAN 19, 2009 - 05:01 AM
That's a fine looking Marder at the link you provided, Frank. Thanks for listing it. It also made me a bit red faced because after looking at it I was was puzzled because it wasn't the color modulation technique I thought I was commenting on. It was the same technique I am working to master and one that I thing looks the best. The color modulation method I thought this thread was about was one I read about recently in which the surface areas were painted in larger areas with various colors, reds, blues, yellows, etc and then the finish was blended. The ides was the different colors produced more area specific color cariations. It wasn't the dot style. I had multiple windows open looking at both articles when I commented on them. I guess I put the right comments for the non dot one in the wrong thread. I cleaned out my old bookmarks recently so I lost the link to the other color modulation style. Does anybody remember the piece what I am talking about?
Rob- my answer about filters would be my opinion on the OTHER modulation style. Since it wa designed to show how light affected the finish gased on how and where the surface reflected it. Since this was a different was of showing a realistic effect of variations in the finish I could see that any wash or other surface treatment couldn't help but lessen the effect. With this dot color modulation these same extra touches work very well with with dot color modulation. I'm sorry for any confusion I may have caused. At least some on my comments are gernerically valid....
JAN 19, 2009 - 04:59 PM
Copyright ©2021 by Adam Wilder. Images and/or videos also by copyright holder unless otherwise noted. The views and opinions expressed herein are solely the views and opinions of the authors and/or contributors to this Web site and do not necessarily represent the views and/or opinions of Armorama, KitMaker Network, or Silver Star Enterrpises. All rights reserved. Originally published on: 2008-02-28 00:00:00. Unique Reads: 189817

WEB HOSTING BY


Copyright ©2021 Armorama and Kitmaker Network, a subsidiary of Silver Star Enterprises
All Rights Reserved. Please read our Conditions of Use and Privacy Policy.
All Rights Reserved. Please read our Conditions of Use and Privacy Policy.