

1⁄1Airbrush Triple Treat Comparison
20
Comments
Evaluations
The first part of this will be straight use of each brush with sole attention dedicated to the one brush. I will use each brush under the same conditions keep everything I can control equal. Variables that I will control for are: location; I will use my workspace that I have set aside for airbrushing. It has two lamps, a home made airbrush box/station with a lazy susan turn table. The air supply will be a 2 gallon tank unit with an electric compressor. I will keep the air pressure within normal limits, around 20psi give or take 5 depending on the situation. The paints I use are Tamiya, LifeColor, Polyscale, and Master Models. I will use the same batch of thinned paint or thin the batches equally.I will do everything I can to evaluate all three brushes equivalently.
Paasche Use
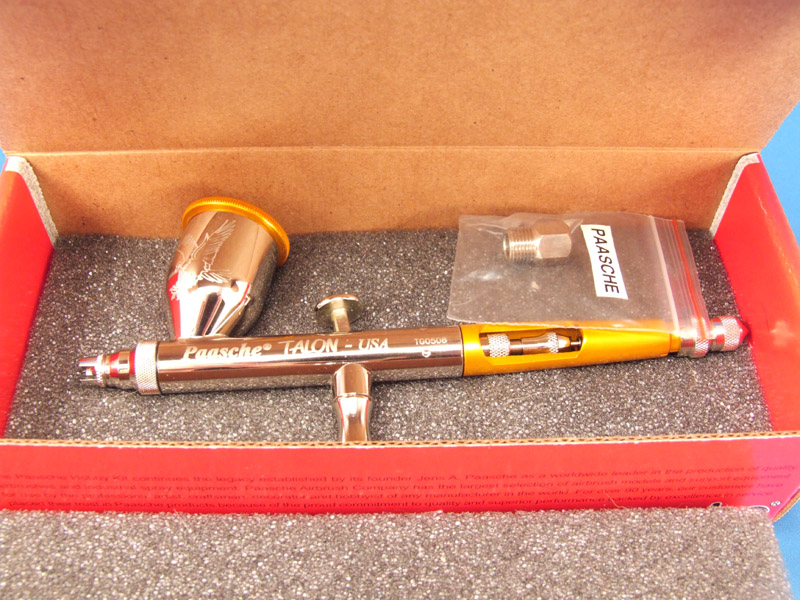
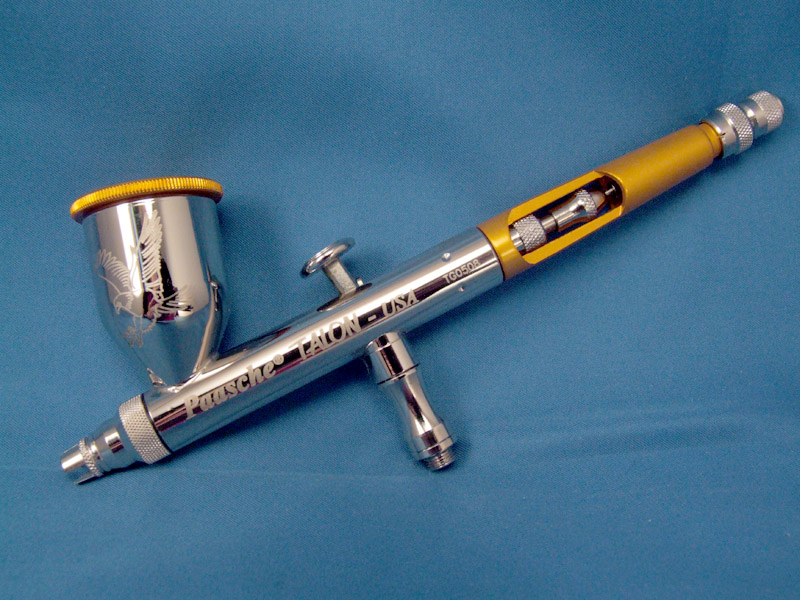
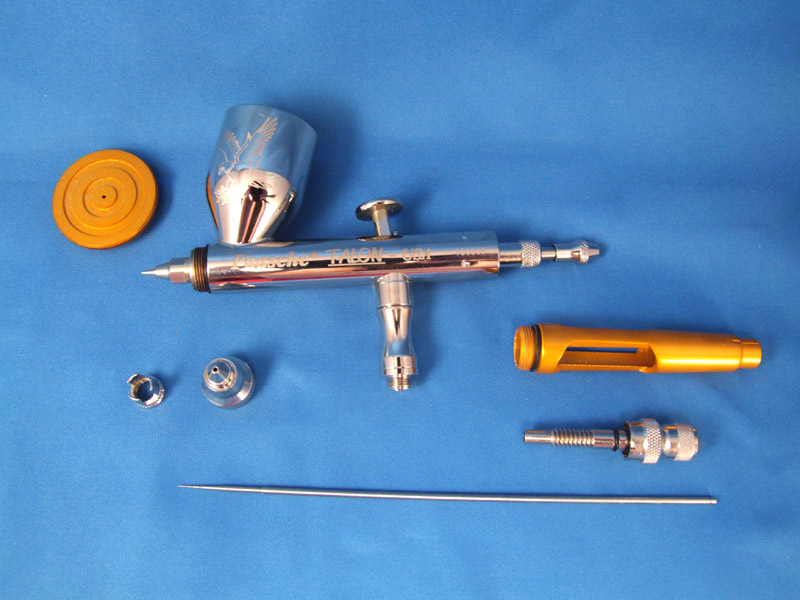
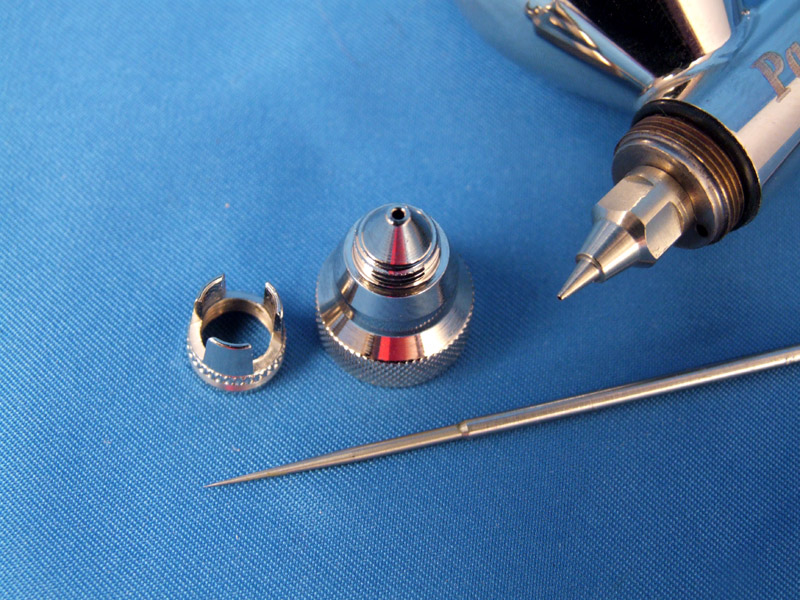
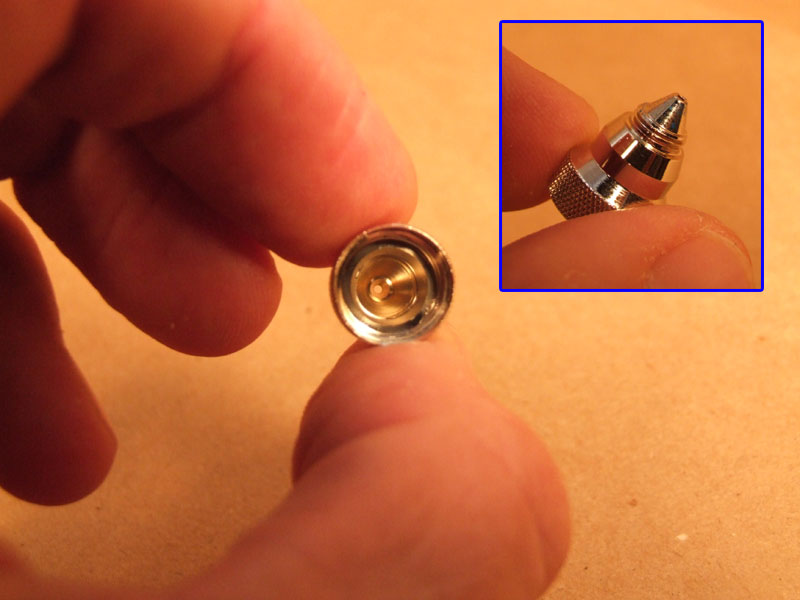
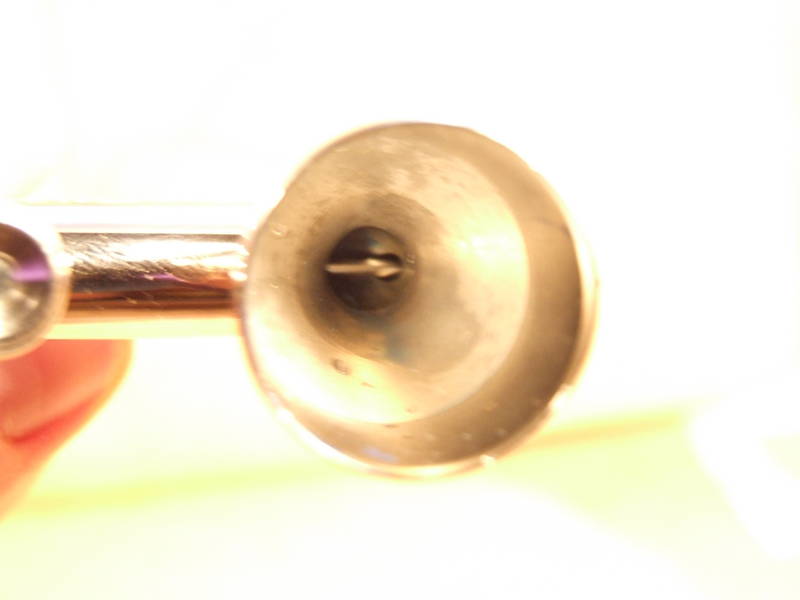
The Paasche is first up on the use rating.To get a good feel for the brush I disassembled it. This was fairly easy; I could remove all but the nozzle by hand. The needle tightening knob was extremely tight and made me question what I was doing at first. The nozzle was removed with a wrench. The pieces 'felt' good, the tip pieces were the nicest with the crispest and tightest feel. The needle had a bit of a rough feel when I removed it. I found rubber "O" rings everywhere. This has an immediate benefit of creating a tight seal and eliminating paint and air leaks. Over time this may become a problem in that they rubber may break down when exposed to cleaning chemicals.
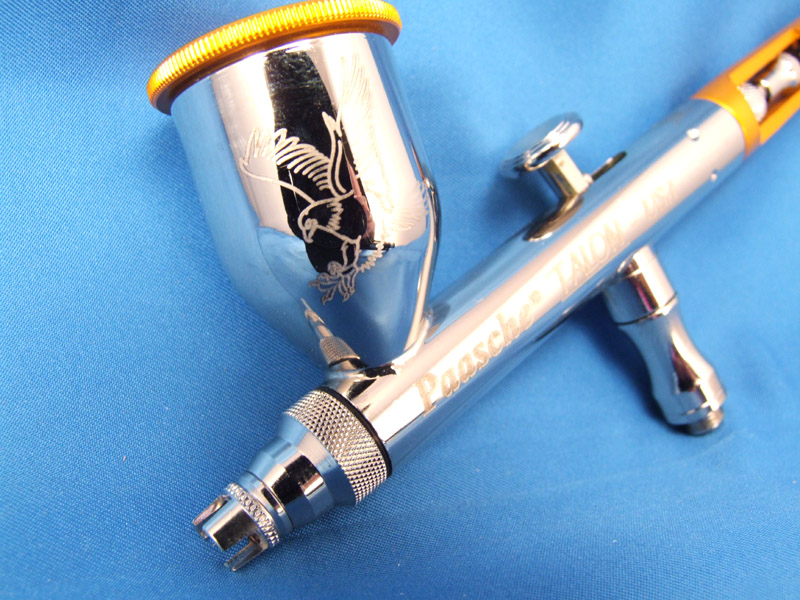
Features I noted as I examine this are a deep large cup for paint. This is nice for larger batch painting. A creative feature of this brush is an "Auto-Stop" knob at the back end of the brush. This knob is a stopper for the needle. When you tighten the knob it shortens the distance the needle can travel and prevents you from opening the needle 'wide open' and spraying to much paint. When you loosen the knob it lengthens the travel distance and allows you to spray more paint. I noticed the trigger was a bit rough and stiff on the down/air slide. The back and forth paint slide was fine and smooth. Another point I noticed that I will compare is the trigger type. The Talon has a round trigger with a recessed 'cup' trigger button. The reason I want to examine this is that there is a potential for finger slip or loss of control.
When I connected the brush to the hose I had to use the included attachment reduction connector to make it work. I really had to tighten the connector down on the hose attachment. My hose has a 'flexible' connection with an "O" ring inside to create a seal. The Paasche reduction connector has a slightly larger interior opening. To get the larger opening tightened down to the "O" ring took quite a bit of tightening. This isn't a bad thing, but if you use more than one brush you'll need to consider a second quick release hose so you don't have to break out a pair of pliers and wrench every time you want to remove the Paasche connector.
Spray
I first sprayed water through the brush to get an overall feel for how liquid goes through it. The water ran through well, it was nicely evenly atomized. The action was good and consistent. I tested the stopper knob and it worked. I found that it has two knobs, one major adjustment, one fine adjustments.
Test Patterns
To get a good feel for the brush I mixed a batch of Tamiya X4 Blue with water and a touch of soap (to break surface tension). I wanted to just draw lines and test the flow, control, and volume. One big aspect of the Talon is the auto stop knob. I setup a test sheet of project paper wrapped around a solid plastic plate.
As I was working with this brush I started with a wide open setting and adjusted to get a sense of feel. You can see the brush definitely has a wide range of line thicknesses. The line size ranges from about 10mm to 1mm. The pre-set needle stop knob was a very interesting feature. It performed its function: tighten it down and it forces you to a thin line. If you have a heavy quick trigger finger, this will help you avoid the overflow blotch syndrome. On the flip side, if your paint thickens or clumps up and you need to 'blow' out a bit of paint the auto stopper won't let you. You have to loosen/open up the stopper, blow out the paint, then re-adjust the preset needle stop.
The depth of the cup and size of the final drop zone (where the paint drops into the needle trough) negatively affect mixing paint in the cup. Even with a small toothpick I was unable to get this drop zone mixed. I recommend mixing in a separate container or if you do mix in the cup make sure you mix, then spray out the old color in the needle trough till you get to your new color.
Base Coat Test
I then moved on to a base coat spray to put paint on plastic. I mixed up a thinned down batch of light gray Tamiya paint and applied a base coat to a test subject. I left the brush on its wide open setting to get as wide a pattern as I could get. The brush did a good job. The trigger action was consistent and reliable. Atomization was nice (needle, nozzle, and airflow), the coverage was even and good. The overall size of the pattern was not big so it took quite a few passes to get my subject covered.
Subject Test
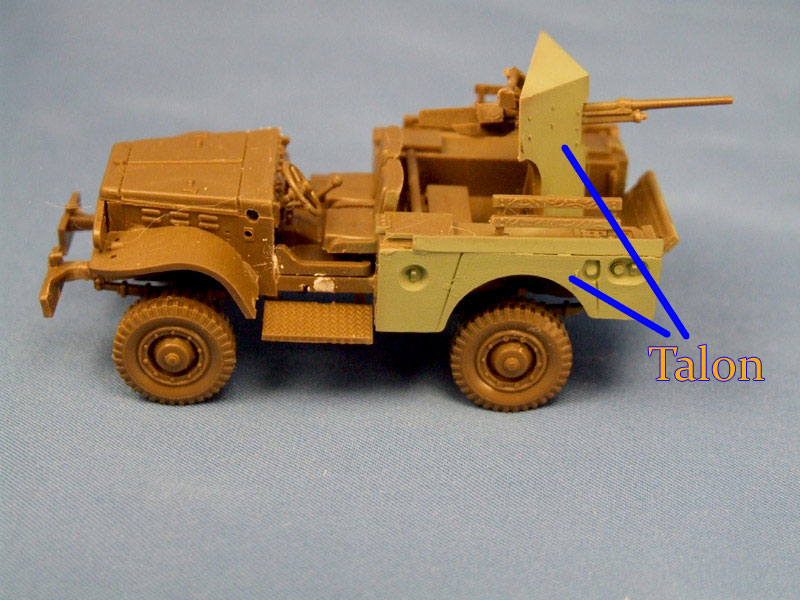
The next test I put it through was a 'control' test of tight lines on a model. I used two 1/72 scale kits for this, if you're getting control you need to paint small. My bridge test was to see how well the preset needle stop helped with painting a small area. I purposefully did not mask off the area to see how much over spray there is. I set the preset needle stop at about 1/2 and shot a line of stone and loaded up with some Tamiya paint. It was easy to paint and the over spray was very minimal. On the opposite side of the bridge I set the preset needle stop all the way down and did the same size block in three/four passes. I then pre-shaded some stone gaps and was happy with the result. The second control test was just free painting of another 1/72 subject, an M6 Anti Tank car. I used LifeColor paints on this test. I felt very comfortable with this, the feel and response of the brush made it easy to get in tight places.
Camo Test
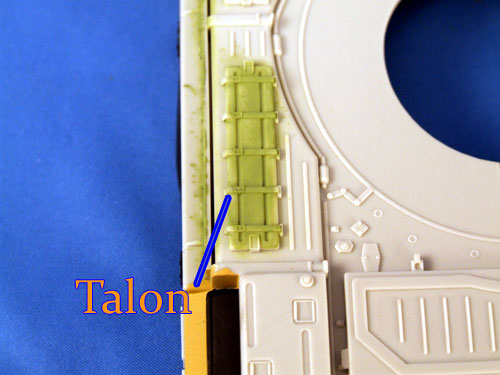
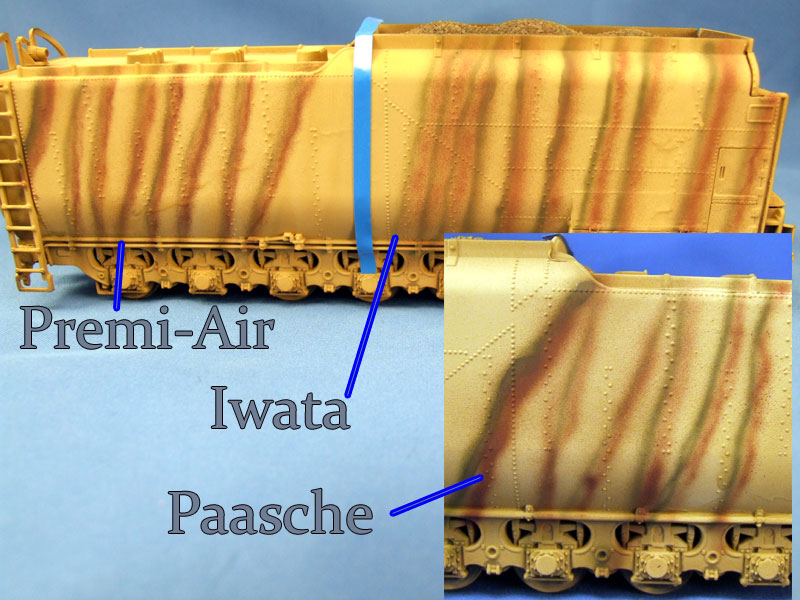
This test was a test to put multiple colors next to each other in a meaningful way. I went with something that 'might' be seen, sort of a three color tiger stripe camo pattern. I used a Revell coal tender, as it provided a nice large space to show the results (and it was available). The figure in the photo is a 1/35th scale resin figure, he's there for a scale reference.
I first put down a base coat of Tamiya dark yellow. I used the Paasche for this and set the auto stop wide open. I found the coverage to be good and wide. Nice even coverage was achieved with the Talon.
I let that dry and broke out some Model Masters paint in Olivgrun Rlm 80 Green. I mixed it a bit with a touch of water to thin it some. I tested the brush and adjusted the preset needle stop to get as fine a line as possible. This was a bit finicky, but I eventually got a satisfying line. Once I started spraying it was comforting to know I could just pull back on the trigger and not worry about over-spraying. In that sense it was comforting. I quickly and easily ran lines up and down the tender. The line was even, and thin. Each line was consistently thin. You will see I did try to touch up the far left line and over sprayed (user problem not airbrush). While these lines dried I sprayed out the green and quickly sprayed some water/cleaner through the brush, no disassembly. I then mixed some Tamiya Red Brown and adjusted the preset needle stop. I then shot lines next to the green lines. The Tamiya paint was a bit different and required a different feel and a different preset needle stop setting. The preset needle stop setting was a bit finicky. If you don't quite get the right paint mix you will find yourself opening up the preset needle stop to blow out paint. Then readjusting to the thin setting. The brush worked fine and you can see the resulting line.
Cleanup
Cleanup is the lifeblood of a long lasting airbrush. You must clean your airbrush. This one was not the easiest brush to clean. The first thing I did was to pour out the excess paint. Then spray a cup of water to get rid of as much pigment as possible. Then I sprayed cleaner through it. Then I moved to disassembly. There are lots of parts to remove and inspect. I ran into the tight needle chucking nut, it was hard to remove to free the needle. I found that the parts at the front end (needle cap, nozzle cap, and nozzle) all have slightly different diameters. This precludes you from cleaning it like a rifle. You can't take a QTip or rolled towel and insert it expecting to clean evenly in much other than the crown. You have to go in at both ends; the front and through the cup. There is a small ridge around the back end of the needle that prevents you from pulling the needle out the front of the brush. Pulling the needle through is one way I make sure the back end of the drop zone is free of paint. I dip the needle in cleaner, and then run it back to front pushing any paint out the front. You have to inspect everything, from the crown to the cone, to the cup, to the needle.
Cleaning was very tedious.
1. Spray Test YouTube Link
2. Base Coat Test YouTube Link
3. Bridge Test YouTube Link


About the Author


FROM: NORTH CAROLINA, UNITED STATES
I modeled when I was a teenager. College, family and work stopped me for a while. Then I picked it back up after about 12 years off. My main focus is dioramas. I like the complete artistic method of story telling. Dioramas involve so many aspects of modeling and I enjoy getting involved in the ...
Comments

Hi Scott,
Thank you for your effort - it was very interesting to read this review.
Just wanted to bring to your attention that Paasche is also offering fine nozzle/needle combination for the Talon. Please see the link here: LINK
I wonder if the Talon could show better results in terms of fine detail spaying with these ones.
Some idea: another airbrush worth looking at is Peak C-5 carried by bearair.com - it is made on Iwata's factory in Japan, has a 0.3 mm aperture and is basically a little bit altered old Iwata HP-C model with a needle travel adjusting knob thrown in.
Just for information of everybody, if you are interested in a more affordable airbrushes, you can look at PrecisionAire at Bear Air, Master airbrushes at TCP Global at LINK, and Airbrushcity Airbrushes at LINK
You can find affordable air compressors at LINK
In none of the cases I cannot comment on the quality.
HTH,
Regards,
Doncaster
NOV 08, 2008 - 04:07 PM

must say im quite geard towards getting the premi-air for xmas, anythings better than me old badger, plus for 100 £ i get a compressor with it
NOV 11, 2008 - 08:38 AM
I'm currently using the Paasche VL double action airbrush. It is a good tool, though there are several things I dislike about it, including the open gravity cup (moving about I have spilled a lot of paint!), the fragile needles that are often damaged by the need to remove them for cleaning (spraying any clear acrylic, for example, gunks it up big time), and the lack of any instruction manual that has left me to figure most things out for myself.
The three airbrushes reviewed here are all similar, but I noticed the Iwata is an entry-level product. I. I am interested for recommendations on something for a more-advanced modeler, though I can see the Paasche is supposed to cover the gamut. I know the Iwatas are admired, but I don't know which model would be best.
FYI I'm using the Paasche D500 30 psi compressor which seems fine with the airbrush I'm using.
NOV 11, 2008 - 08:50 AM
Hey guys
Can someone tell me if this is true, the rumors i have heard are that the Talon cannot shoot enamels? I really liked the look of the Talon and down the road was thinking about getting one but i use strictly enamels only.
Thanks in Advance.
Jerry
JAN 02, 2009 - 05:03 AM
Nice artical. However he did not mention that you can get the Iwata Revolution with a larger cup size and a .5mm nozzel for painting larger areas. I use mine for base coats and an Iwata HP-C for my fine work.
MAR 10, 2012 - 05:06 PM

That's a great article. One question, how would you evaluate the G35 for larger scales/areas to cover?
Matt
MAR 11, 2012 - 01:53 PM

I've been using a G35 for ages and I find it covers large areas with ease. The paint cup isn't too large though, so if you are doing a ship or a big base or something then a couple of re-fills will be needed but the actual spraying is brilliant- it is a real workhorse of an AB.
MAR 12, 2012 - 01:02 AM
Hi Matt,
I've got a G35 and use it for all my 1:35 tanks. It can take multiple passes to cover big areas, but then again I tend to "layer" my paint in thinned coats anyway to get some tonal variation so it's ok if I fail to get a good overlap. However, where I've needed a good solid coat it did the job well enough. If you're doing really big stuff and need to solidly cover more than a half-inch-wide stripe with each pass you'll probably need an external-mix firehose like the old Badger 350 that I also have.
Hope this helps!
Tom
MAR 12, 2012 - 01:10 AM
I may have to get one. My Badger is beginning to break down and I've been looking for a solid, reliable airbrush for basic use as a replacement. That prices is awfully hard to beat!
Matt
MAR 12, 2012 - 02:10 AM
Copyright ©2021 by Scott Lodder. Images and/or videos also by copyright holder unless otherwise noted. The views and opinions expressed herein are solely the views and opinions of the authors and/or contributors to this Web site and do not necessarily represent the views and/or opinions of Armorama, KitMaker Network, or Silver Star Enterrpises. All rights reserved. Originally published on: 2008-11-04 00:00:00. Unique Reads: 62234

WEB HOSTING BY


Copyright ©2021 Armorama and Kitmaker Network, a subsidiary of Silver Star Enterprises
All Rights Reserved. Please read our Conditions of Use and Privacy Policy.
All Rights Reserved. Please read our Conditions of Use and Privacy Policy.