

1⁄35The Workhorse
11
Comments
PAINTING & WEATHERING
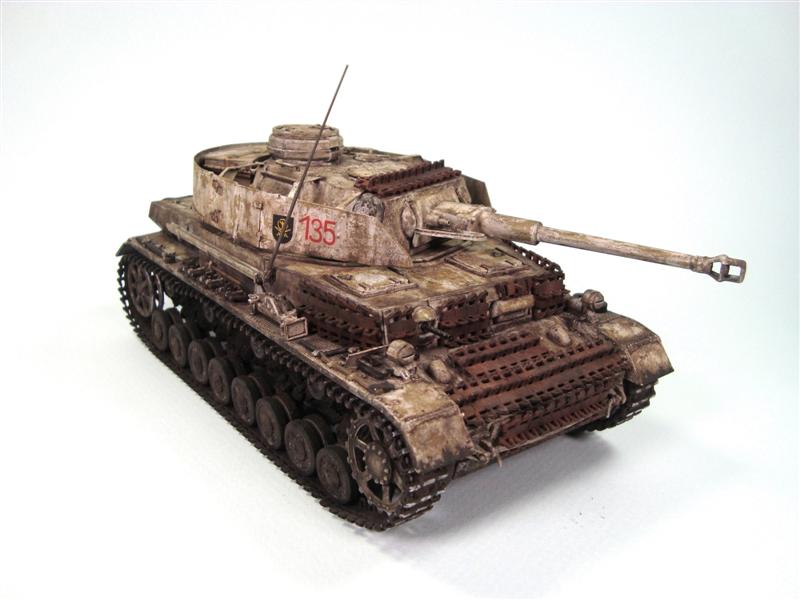
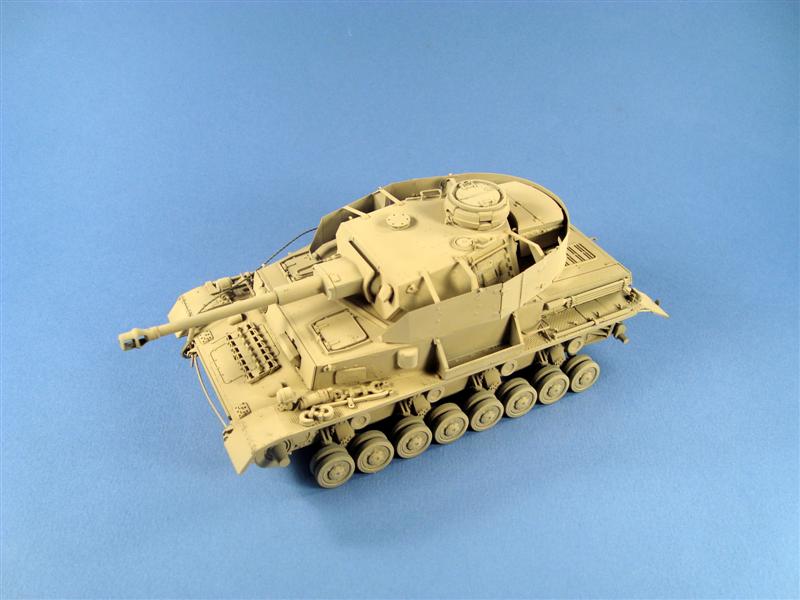
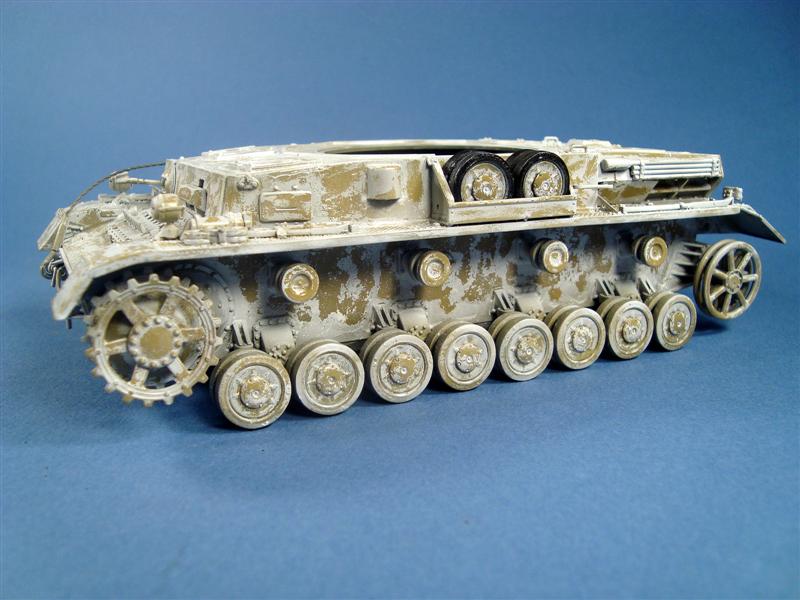
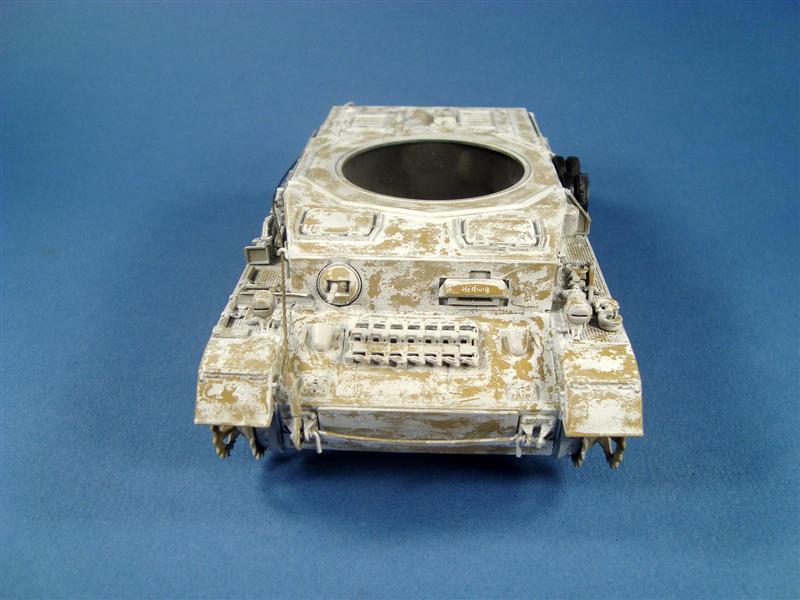
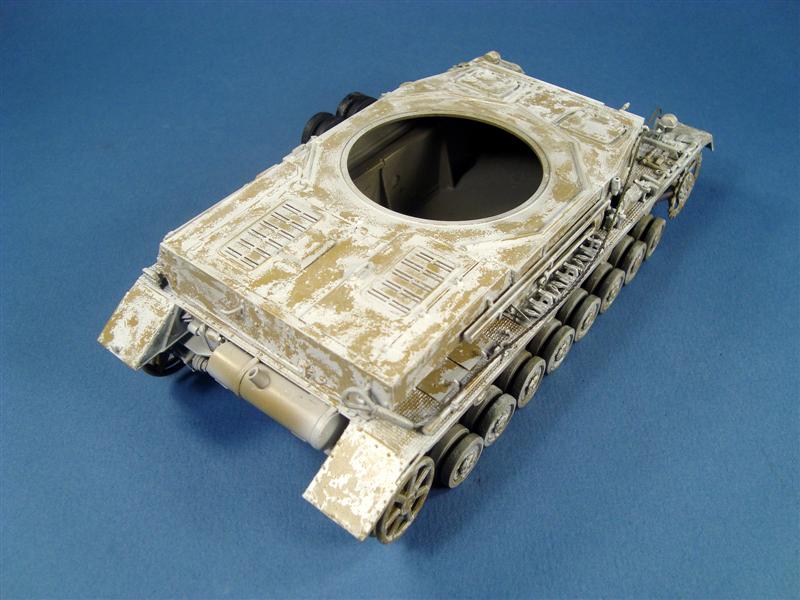
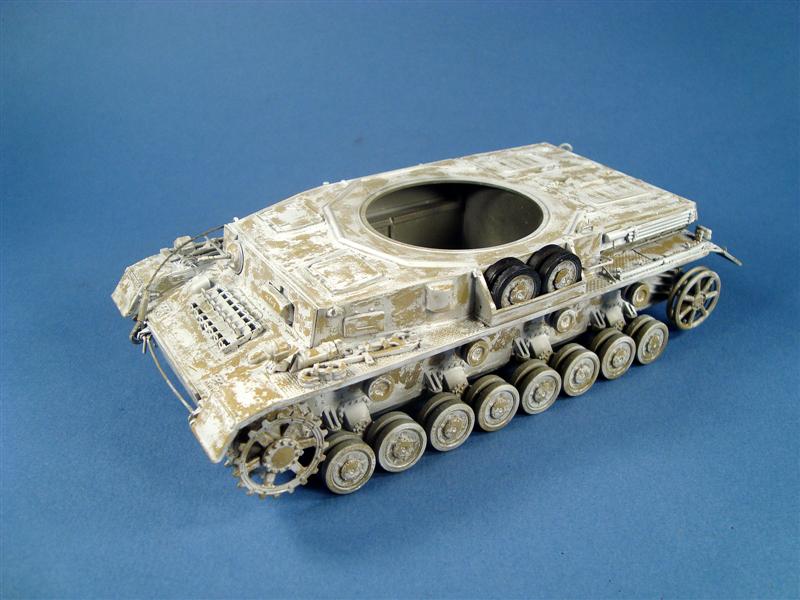
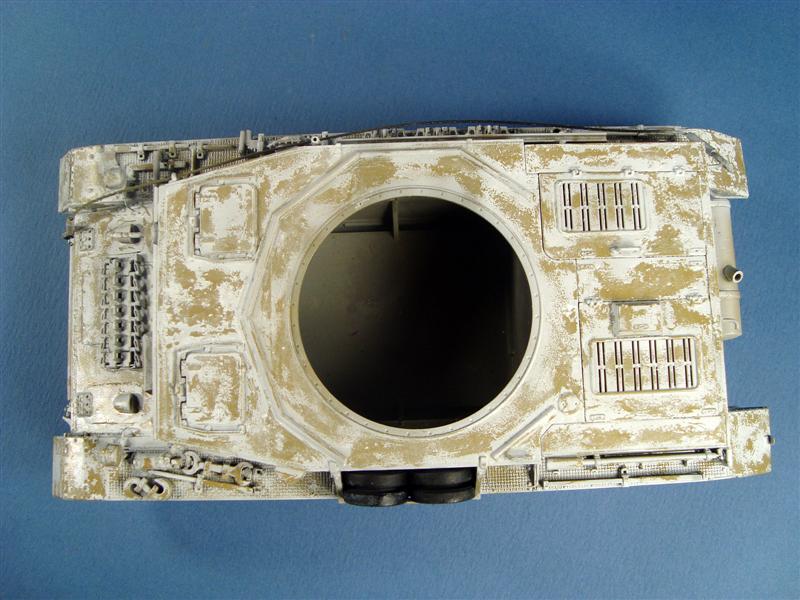
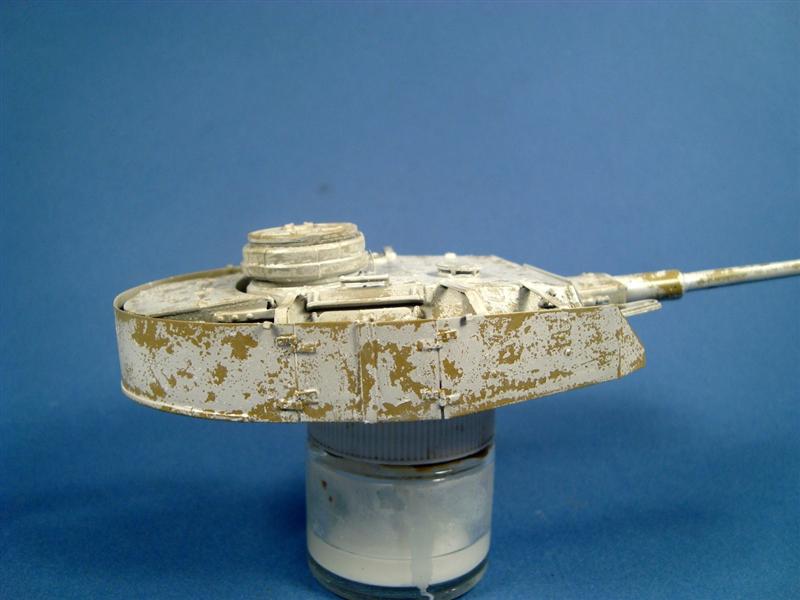
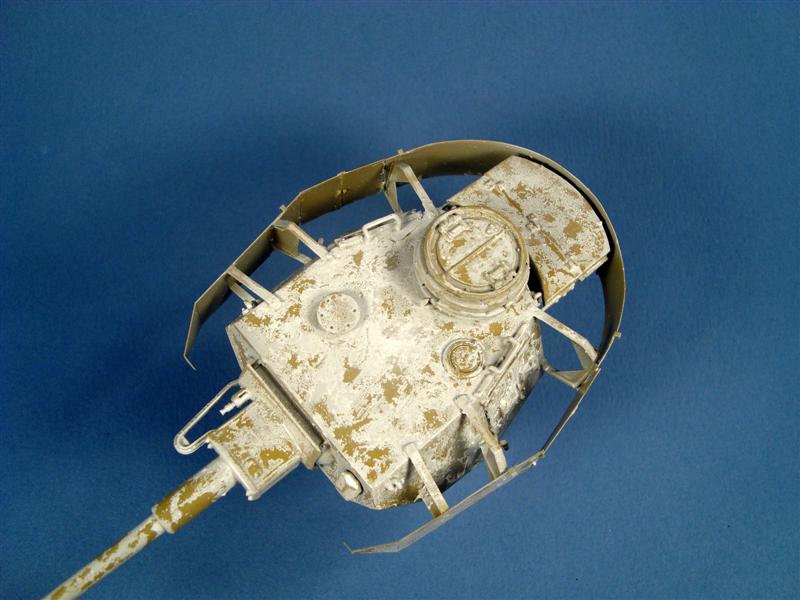
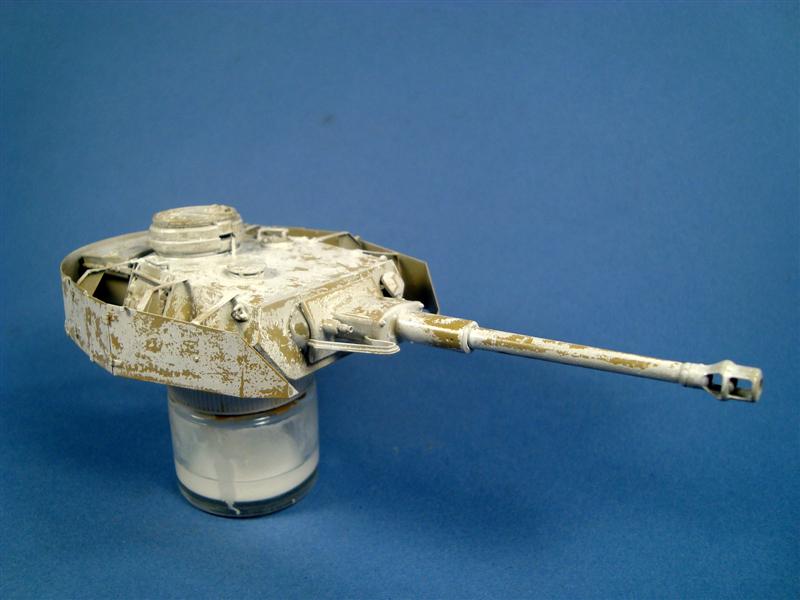
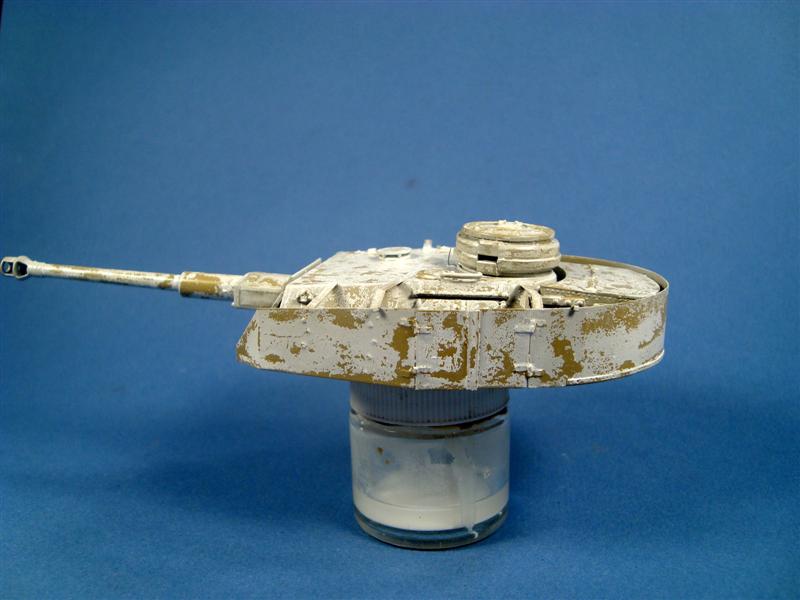
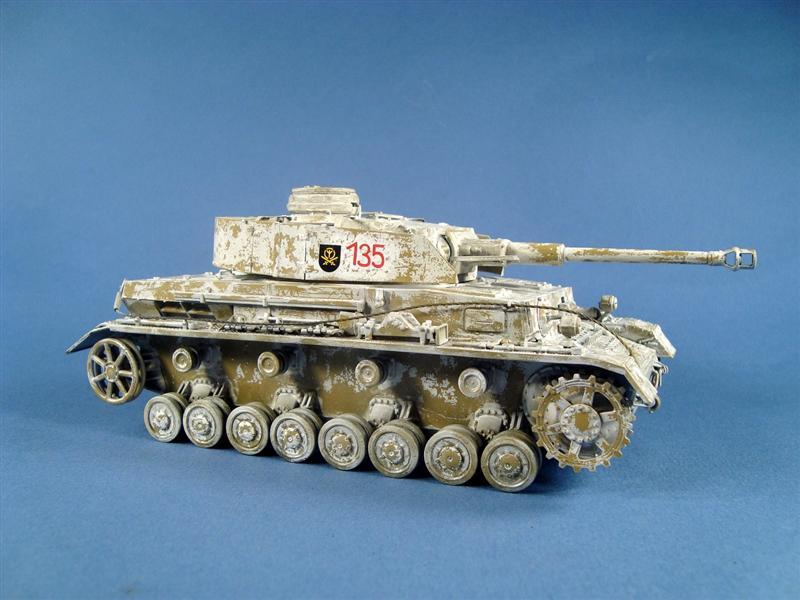
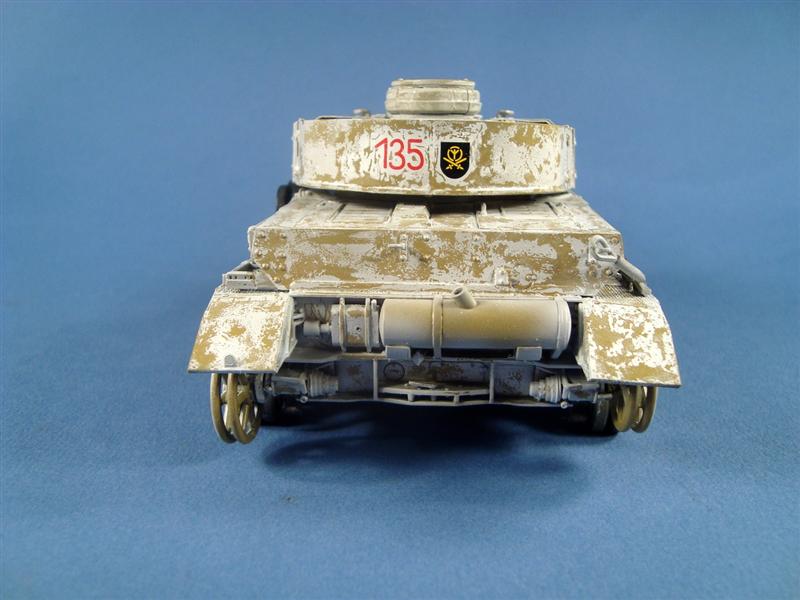
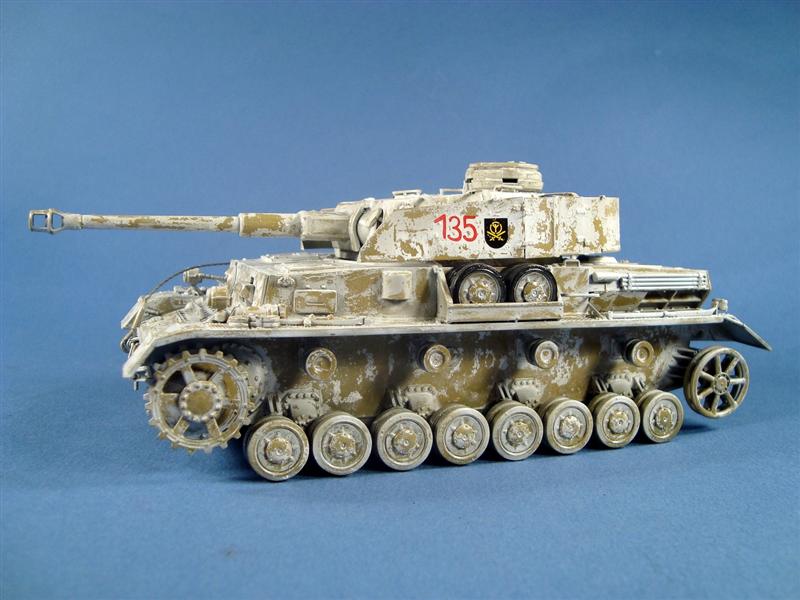
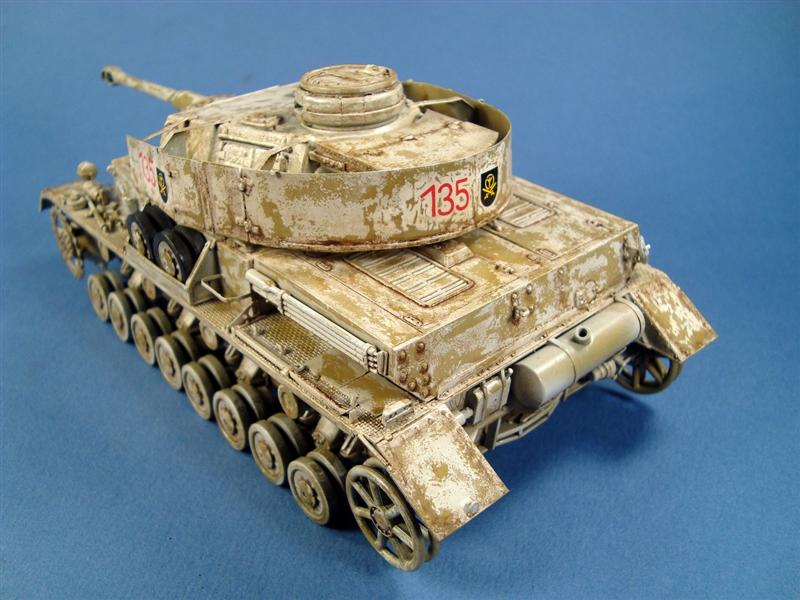
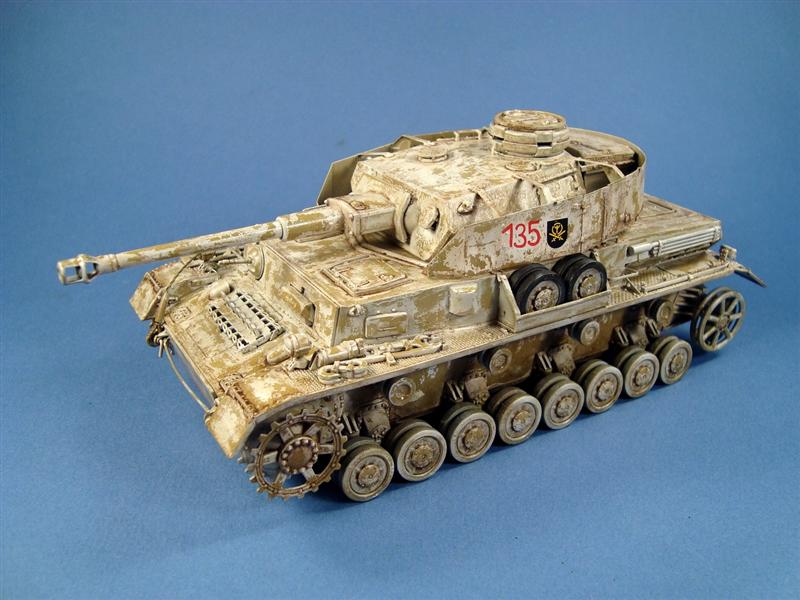
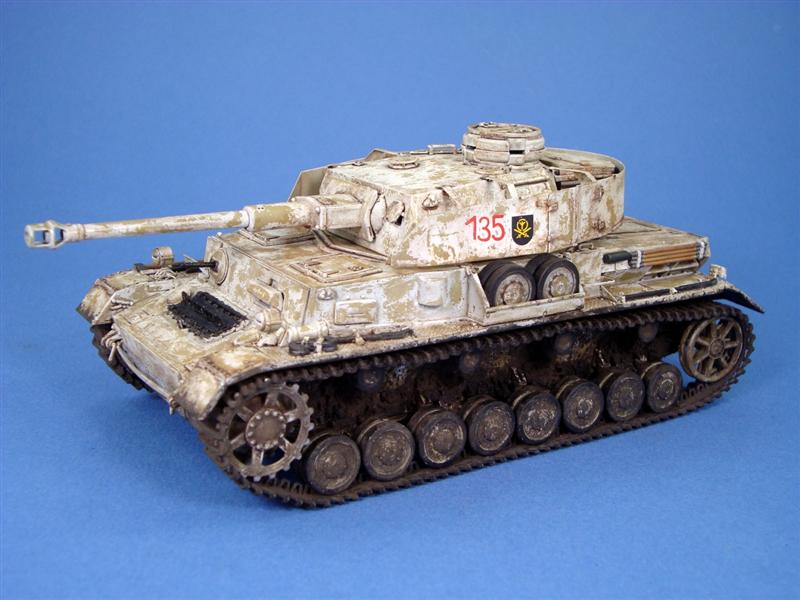
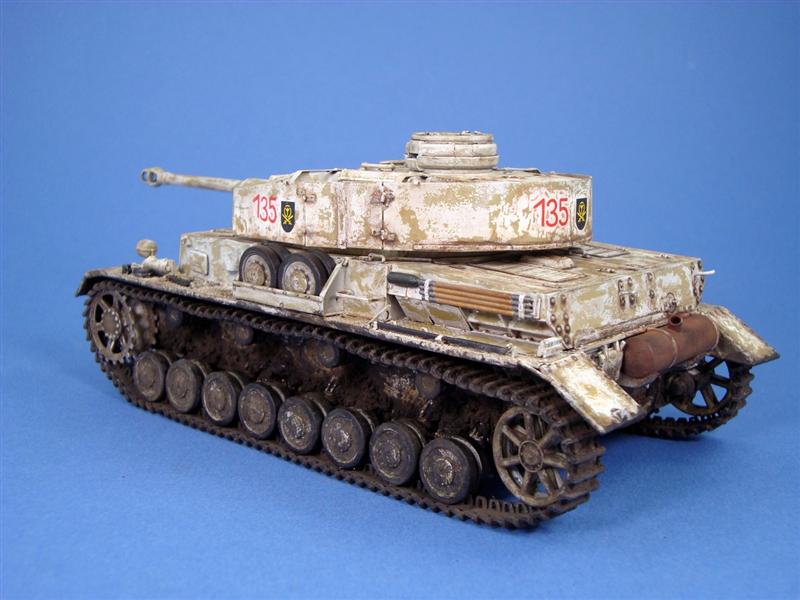
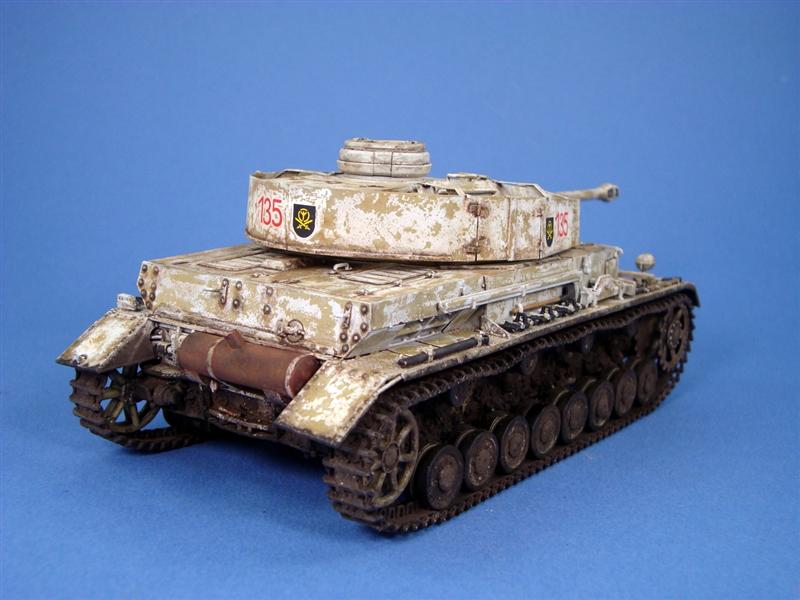
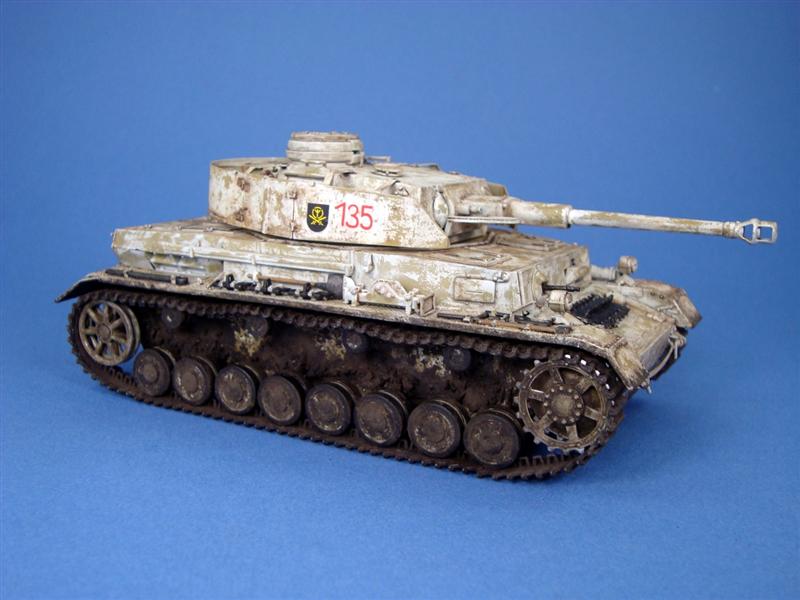
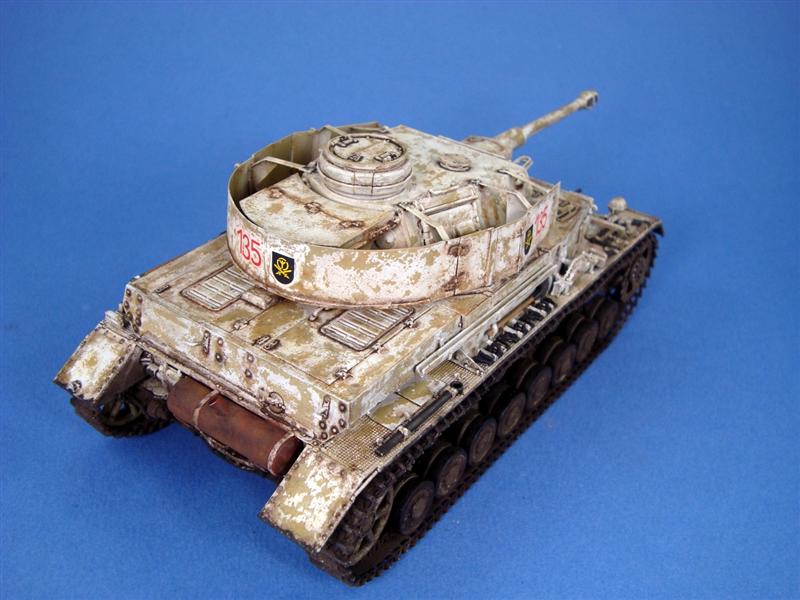
The whole model was primed with black enamel paint which was followed by a base coat of Tamiya XF-60 Dark Yellow mixed with some XF-57 Buff. I decided to use the hairspray method for the winter camouflage. In order to protect the yellow basecoat a layer of Tamiya Clear was evenly airbrushed all over the model. Next I picked up my wife's hairspray and sprayed the the whole model in two parts: hull and turret. Than, step by step and by picking up a small area to work on I sprayed Tamiya white paint thinned with Tamiyas own thinner. I have heard that for ease of removal of the paint it is better to use water but it was a personal choice and it turned out ok for me. After no more than few minutes, with the help of a stiff brush, a toothpick, and warm water with few drops of liquid soap, I started taking the paint off. I wanted a well worn white camouflage so I applied a lot of pressure when it came to scrapping off the paint. Once satisfied with the result I started applying the Echelon decals. They were really great and they were applied directly on the paint without any clear cote. The big 3 digits tactical numbers are pre-cut so the silvering problem was not a problem any more. After spraying the model with Kleer, and a very thin mix of umber oil paint and white spirit was applied all over the model. Then a brown wash from MIG was added in places where dirt would accumulate. To continue the weathering with oils more brown and earth colour washes were applied. After all washes dried I sprayed a cote of MM Dullcote which was well diluted with few drops of gloss. The next step was adding some mud splashes on the lower hull. Afterwards the vehicle equipment was painted with Vallejo acrylics. Metal tools and MG were dry brushed with a Model Master metalizer. At the end I applied the tracks. Prior to putting them on I painted them black, with the inside of the tracks having track brown and Russian Earth pigments from MIG applied. The outside of the tracks received a muddy mix of acrylic resin, plaster and dark earth colour pigments. The next day I added some more pigments fixed with white spirit. Before installing, all those tracks have been painted black and than given whole bunch of washes and earth and rusty pigments, I then added some black pigment over them to tone things down. Finally I could add all the additional spare tracks. It really changed the look of the Panzer. To finish the build I dusted the tank with the MIG's Russian earth pigment. I used only this pigment as I found its colour perfect for what I wanted to achieve. The treatment was pretty simple. I brushed the pigment on with a large brush and used white spirit to fix it or to get it off if I found there were too much of it after all. The process was repeated few times till I was fully satisfied.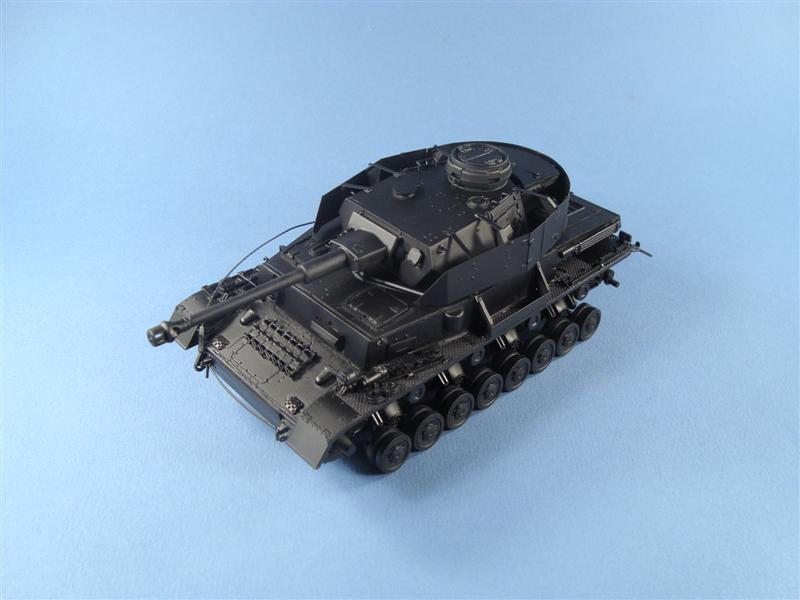


About the Author


Comments
Thank you Byron for your comment. I agree that in general your comment is right, but in this very case I was working with a historical picture. IMHO brand new vehicles during winter time got the white paint before they were fielded.
 spit
spit
spitJUL 10, 2010 - 09:45 AM

I liked how you've explained on doing winter camo. maybe i'll get encouraged by that and try it on my panzer for workhorse campaign
JUL 10, 2010 - 10:40 AM

Very nice model! I was going to gig you on not applying the markings to the base yellow coat but as noted, you have the picture to back up your work. Can't argue with that
Only thing that looks like was missed was the damaged left fender.
Great job on this one,
John
JUL 11, 2010 - 03:16 AM
Thanks, it was the first (and till now the only) time I used the Hair Spray method. The important thing is to... start. It's fairly easy just remember to apply the protective coats.
Thanks, for the fender I would have to use another PE set which wasn't planned.
spit
JUL 11, 2010 - 04:06 AM

Well if it isn't yet another build from the 'Media Mogul' that is Pawel!
I can't go online or open a magazine (or sometimes even my e-mail) without seeing your work!
This was a nice build and a change from the usual pussy cats for you my friend, but approached and executed with your excellent blend of historical accuracy and artistic licence.
I think you did this build justice and while at the time I thought you may have been a bit heavy with the dark washes on upper surfaces, my experience of machinery working in peat with frequent rain while I was in Ireland shows that similar grime effects do build up so another accuracy point for you to mark up!
Still no figure though!
Congrats on a job well done,
James
JUL 12, 2010 - 02:37 AM
Sorry for being a bit late with the answer.
Thanks for the kind words. I think the "media" time will be quickly finished as new builds... ehhh... what new builds? Life is too hard for now to model anything. All of my builds where born here on the big "A" and as I often told the blog and the build is getting better and better when people give you tips, good advices constructive critics etc.
"pussy cats"??!!! Well, I hope to see your medium "pussy cat" soon Mr LOL
Thanks about the input on the dirt. The next "white" Pz IV or III will be less dirty, at least a bit. Just to ttry something a bit different.
Spit
JUL 14, 2010 - 09:41 AM

Well Pawel, when you are rigth, you are very rigth. can't argue with that picture either. Very good work non the less.
Byron
JUL 17, 2010 - 02:55 PM

A real beauty Pawel. Nice article as well. Got to try this hairspray method for myself. The results look good, but I especially like the finish on the running gear and the spare tracks. I have this G kit as well, and all those extra tracks inspire me to make it and add some extra armor like this.
JUL 18, 2010 - 01:36 AM
Thanks Frank. I'm very glad you like it. Even if it's a bit of pain to assembly I would strongly advise to use some AM shurtzen (or even plastic). It changes completely the look of the tank and it's worth the extra time, swear and tears LOL.
spit
JUL 18, 2010 - 10:02 AM
Copyright ©2021 by Pawel Rzymski. Images and/or videos also by copyright holder unless otherwise noted. The views and opinions expressed herein are solely the views and opinions of the authors and/or contributors to this Web site and do not necessarily represent the views and/or opinions of Armorama, KitMaker Network, or Silver Star Enterrpises. All rights reserved. Originally published on: 2010-07-08 00:00:00. Unique Reads: 15873

WEB HOSTING BY


Copyright ©2021 Armorama and Kitmaker Network, a subsidiary of Silver Star Enterprises
All Rights Reserved. Please read our Conditions of Use and Privacy Policy.
All Rights Reserved. Please read our Conditions of Use and Privacy Policy.