

1⁄35How to Make a Clay or Terracotta Tile Roof
16
Comments

Making clay or terra cotta tile roof is not as hard as it looks. Take it from
me, I am what you would consider a beginner when it comes to dioramas because
this is actually my very first attempt to build a tile roof.
The clay tile roof that Im going to demonstrate is called a Spanish
tile or as others call it S-Tile. This type of roof tile
is commonly used in the Mediterranean areas such as Spain, Italy and North Africa.
Materials
The materials I used for building the roof is as follows:
- Corrugated Board
- Barbecue Sticks
- Wall Putty
- Brush - Preferably an old one
- Water
- PVC Glue
- Scissors
- Hobby Knife
- Paints
Technique
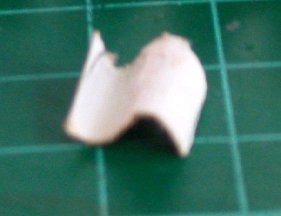
Step 1. Corrugated Board
Look for a discarded box with corrugated lining or anything similar. Peel off one of the backing sides carefully without destroying or damaging the corrugated part. Remove excess or leftover strips of paper by scraping the hobby knife across the corrugated part.
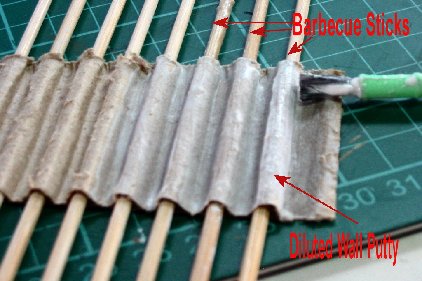
Step 2. Paint Corrugated Board
Dilute a considerable amount of wall putty with water. The mixture should be thin enough for brush painting or have the consistency of milk. Insert the barbecue sticks into the corrugated part before starting to paint the mixture. The barbecue sticks will hold the corrugated part in shape during the painting process.
Paint three to four coats of the mixture, but be sure to wait for each coat to dry before applying the next coating. Note: Prepare two sets of painted corrugated boards.
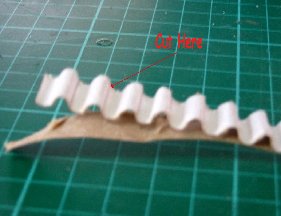
Step 3. Individual Tiles
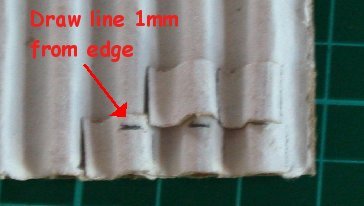
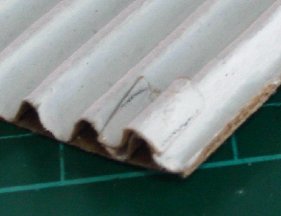
Using one of the painted corrugated boards, draw a line parallel to the corrugation (see picture on the right). Make sure that the line is near the base of the arch. After drawing the line, cut the corrugated board (horizontal to the corrugation) into strips measuring 10 to 12 mm. Cut as many strips as you can and dont worry about the excess because it could be used later for debris.
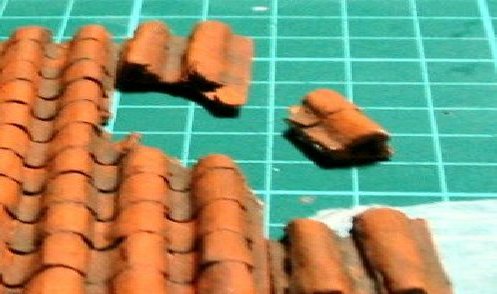
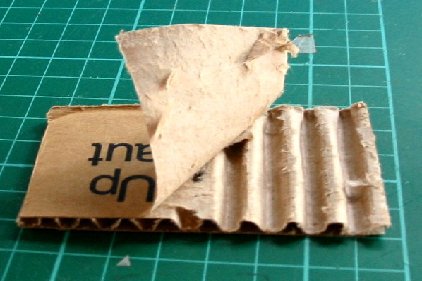
Remove the remaining backing side of the corrugated board . Once the backing side is removed, cut the corrugated strip across the line previously drawn. Viola! You now have an S-Tile or Spanish Tile.
Step 4. Glue S-Tiles
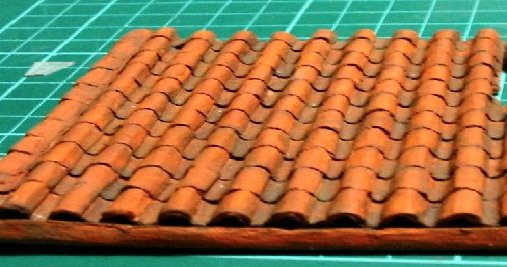
The easy part is over; now let us proceed to the tedious part. Using PVA glue, attach the S-tiles to the other corrugated board, one at a time starting from the right. Once the first row is completed proceed with the second row, but make sure that the second row overlaps the first row by at least a 1.0-mm. In order to make sure that the second row is aligned, draw a line on the first row of S-tiles to indicate the edge of the overlap.
Once all S-tiles are in place, cut off the excess on both sides of the corrugated board for a clean look.
Step 5. Paint Roof
Paint the finished roof with your desired color, I used a Delta Ceramcoat (brand name) pre-mixed terra cotta color as base coat. After the paint is thoroughly dry, I weathered it using a wash of Tamiya XF-27 (Black Green) to simulate the green moss usually found on roof tiles. I applied another wash using Tamiya XF-5 (Flat Green) to further highlight the greens. After the wash, I dry brushed the roof with the Terra Cotta colored paint.
The roof is now complete.
Simulating Roof Damage
In order simulate damage; the completed roof can be cut using a sharp hobby knife depending in the type of damage. Do not cut straight edges or angles because normally clay tiles have uneven edges when broken or damaged.
All edges where cuts were preformed should be repainted and weathered.
That's it....
Well, this wraps it up, now you have a roof. As you can see, its really quite easy to do, with a little imagination you can even modify the steps I demonstrated in order to meet your own requirements. I hope this document will be a useful reference to other beginners as well experienced modeling enthusiasts.
Thanks and Happy Modeling!
Arvin Warthog Arbolado

About the Author


Comments

Darn this is a nice feature, I have already printed it and saved in my map
JUN 10, 2004 - 06:15 PM


Thanks guys....hope it will be of use to you
bracomadar: BTW, In order to remove the backing board without destroying the corrugation use a hobby knife. Use the knife to cut those backing board that sticks to the corrugation (similar to removing meat from a bone)....
JUN 11, 2004 - 02:38 PM

This feature helped me so much. Thanks. I tried to make tile roofs with lead foils before, but this method is easier when painting and weathering, and much more lighter
JUN 11, 2004 - 08:02 PM


Many thanks Arvin for an excellent feature. I need to build model Italian farmhouses in 1:32 for my slot car track and was wondering how best to do it.
MAR 19, 2008 - 10:21 PM

this one comes very handy for my ongoing project
so cheap and you can massproduce them
very good
bazooka
MAR 19, 2008 - 11:06 PM


Great article. Nice to see some stuff that can be done with out shelling out big bucks for those of us who are "frugal", as my wife calls it.
MAR 20, 2008 - 04:29 AM
Copyright ©2021 by Arvin Arbolado. Images and/or videos also by copyright holder unless otherwise noted. The views and opinions expressed herein are solely the views and opinions of the authors and/or contributors to this Web site and do not necessarily represent the views and/or opinions of Armorama, KitMaker Network, or Silver Star Enterrpises. All rights reserved. Originally published on: 2004-06-10 00:00:00. Unique Reads: 231621

WEB HOSTING BY


Copyright ©2021 Armorama and Kitmaker Network, a subsidiary of Silver Star Enterprises
All Rights Reserved. Please read our Conditions of Use and Privacy Policy.
All Rights Reserved. Please read our Conditions of Use and Privacy Policy.