

1⁄35Chosin Resevoir
Figures
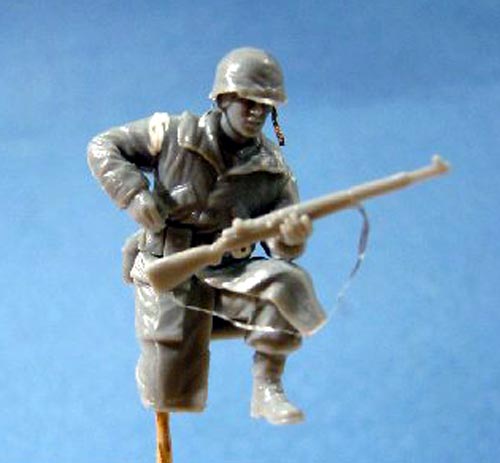
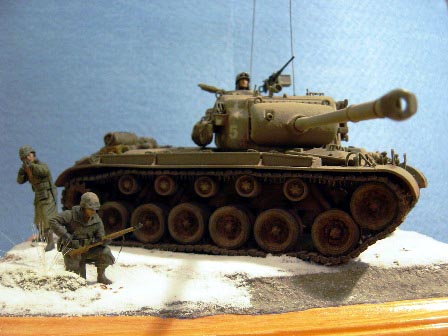
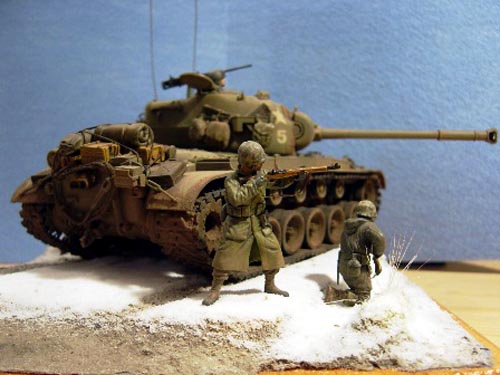
Dragon's Chosin Reservoir Marines assembled easily and with only a few small gaps in the assembly. I filled the gaps with Gunze's Mr. Dissolved Putty. I added gun slings and helmet chin straps using foil from yogurt and pudding cups. I decided to use one of the crew figures from the Warriors 35036 US Tank Crew (Winter Dress) set.Painting and Weathering
Initially, I primed the figures and the Pershing and then painted the base flesh coat on the faces. The next evening painted the base coat of Modelmaster Acryl (MM) Olive Drab 4728. Once the Pershing base coat had dried, I applied a gloss coat using MM Acryl Gloss Coat. The kit decals were added the following evening. I used decal setting solution to get the decals to settle down smoothly onto the tank. Applied more gloss coat over the decals.The figures' faces were painted with oils. Started with a Raw Umber staining and removed that. I made a mix of roughly 50/50 Flesh Hue and Yellow Ochre with a small amount of Titanium White and Red. This was applied to the figures. I then separated the mix out and mixed in more of the Titanium White for the highlights and painted that on and blended it into the base flesh. I added a bit of red to the highlight mix and painted the lips. I then decided the figures needed some additional shading so I went back with Raw Umber and added that to the appropriate shadow areas and blended that in.
Finally, I decided to try to add eyes to several of the figures. First I took some of the highlight flesh mix and added even more Titanium White to it and painted that into the eye areas of the appropriate figures.
I then whittled the point of a toothpick to an even smaller size and placed a small dot of Raw Umber in the eyes of the appropriate figures. This method avoided the bug eyed look that so many figures have while at the same time adding a bit of eye detail to the appropriate figures.
The figures were then set aside so that the flesh could dry completely before moving on to paint the uniforms and equipment.
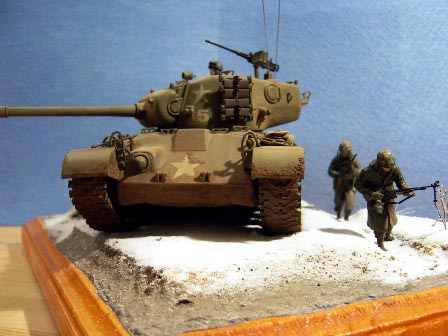
The Pershing received two oil washes. The first wash was an overall wash using Raw Umber and Lamp Black highly thinned. I then wiped this down using both a rag and Q-tips dampened with the thinner. After allowing that to dry for a while, I applied a second wash, this one a pin wash, using the residue of the black wash with a mix of Indian Red, Van Dyke Brown and Lamp Black. Once again, I went over this with dampened Q-tips. The Pershing was then set aside to dry completely.
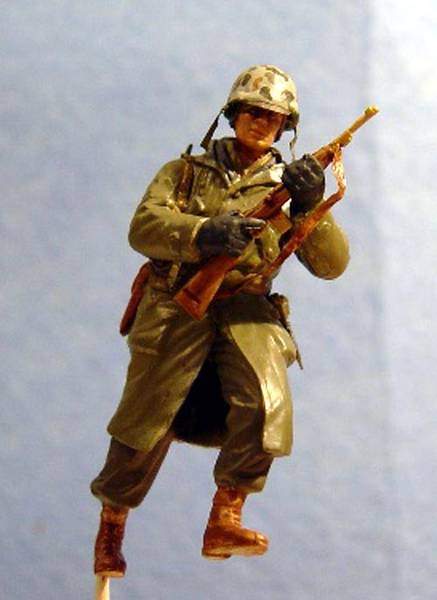
When painting the uniforms of figures, I try to vary the colors I use for a figure's pants, coats, etc. so that there will be some realistic variation in those colors. I use an assortment of acrylic paints, including MM, PollyScale (PS) as well as the craft store acrylics. (1) M1 Rifleman (Firing): Pants: PS Olive Drab F505370; Shirt/scarves: MM Field Drab; Coat: Delta Ceramcoat (DC) Timberline Green (2 coats); Coat linings and gloves PS Scale Black. (2) M1 Rifleman Kneeling: Pants DC Timberline Green (2 coats); Coat: PS Olive Drab. (3) BAR Rifleman: Coat: PS Olive Drab (2 coats); Gloves: MM Field Drab; Pants: PS USAAF Olive Drab (2 coats); Cartridge belt: MM US Khaki. (4) Carbine: Coat: MM Olive Drab (2 coats); Pants: PS Olive Drab for his pants (2 coats); Walkie Talkie: MM Green Drab and the strap MM Field Drab. (5) Tanker: Helmet: MM Green Drab; Jacket: PS USAAF Olive Drab (2 coats).
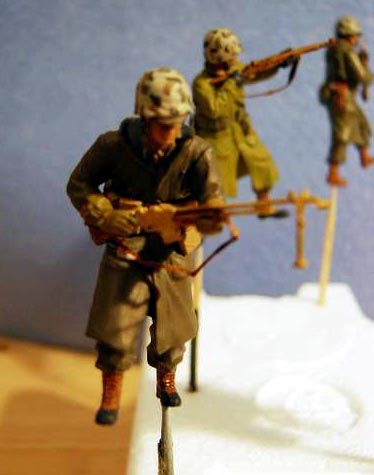
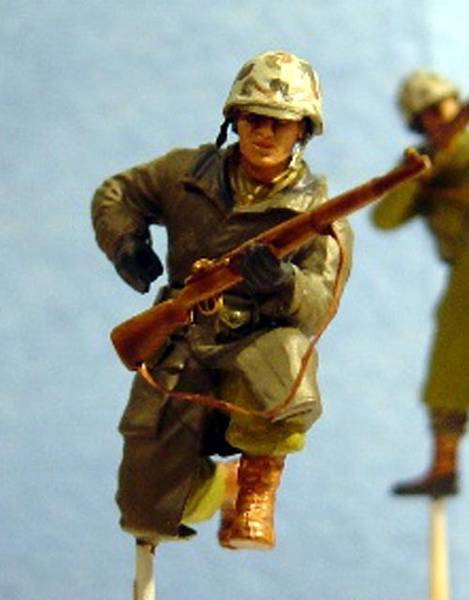
For the base color of the Marines' helmet covers I tried different colors: MM Pale Green (too bright) and Americana DecoArt (DA) Desert Sand. While this looked okay, I went back and checked my pictures taken at the Museum of the War in the Pacific in Fredericksburg, Texas and the helmet covers and uniforms seem to have a "base" color of a very pale green. So, I went back and repainted all four with MM Lt. Sea Gray. This color looks good for the faded pale green base. The camouflage pattern was then painted onto the helmet covers using: PS Dirt, MM Green Drab and MM Olive Drab. I painted all leather parts with MM leather (boots, boot tops, holster and rifles straps). Painted the bayonet scabbards MM Green Drab. Painted all shirts and scarves with MM Field Drab. The linings of the coats and the gloves of the Carbine and two M1s all in PS Scale Black.
After allowing the figures to dry overnight I applied relatively thick (approximately 70%-30%) oil washes to the figures' uniforms and equipment. First an overall wash of Greenish Umber including the helmet covers. Allowed that to dry for a few minutes and then applied a second wash: sepia, raw umber and lamp black mixed in the residue of the greenish umber wash. Once again allowed this to dry for a few minutes and I then cleaned the figures of excess wash using Q-tips dipped into clean thinner. I then repeated this dark wash process a second and finally a third time, but only in the creases of the uniforms, using Q-tips to clean up any overflow. The figures were then set aside to dry.
I used two oil colors to dry-brush the figures. First I used Warm Gray, and this was followed by Unbleached Titanium. Both were applied to the uniforms, helmet covers and cartridge belts. The figures were again set aside to dry. The Pershing was dry-brushed using Chris Mrosko's USA OD mix: yellow ochre, sap green and titanium white (found in his book Panzer Tactics). Finally, I applied a flat coat the figures and the Pershing using MM Acryl Flat Coat.
Stowage: After priming the stowage, it was painted using PS US Olive Drab, MM Wood, Green Drab or Olive Drab. Straps were added using aluminum foil. Once dry, an oil wash of raw umber, sepia and lamp black was applied. Dry-brushed the stowage with Unbleached titanium.
I applied a raw umber, sepia, lamp black wash on the tracks. The Pershing's tow cable was painted with a mixture of FolkArt (FA) Metallic Gunmetal and Graphite. The pioneer tools using MM wood and Humbrol gunmetal. Painted the 50 caliber and soldier's weapons with the Humbrol gunmetal. Finally, periscope lenses in the commander's cupola were painted flat black followed by Tamiya Clear Gloss (which was also added to the tank commander's goggles). An acrylic wash of flat black, raw umber, burnt umber, yellow ochre and burnt sienna was applied in successive washes to the tow cable. Instant Rust was added to the muffler.
Weathering the Pershing. Using a silver and then a steel Berol pencil, I applied some marks onto the tank and treads. After practicing on an old tank, I applied a relatively thick coating of mud on the lower level of the Pershing. This was done using Liquitex matte medium and this worked well. The method I used was to brush on a layer of the matte medium and then I either poured on a small amount of the MMP pigment using a manicure tool or brushed it on using an old brush. After allowing this to dry for a minute or so, the excess was removed.
The stowage was then attached to the Pershing using superglue. I cut a length of elastic string, dipped it in burnt umber paint, and used it to tie down the stowage on the Pershing. The tank commander was attached with superglue. The infantry figures were weathered with MMP pigments.
The base.
Initially, foamboard was glued onto the base to create the ditches on the side of the road. The edges of the base were then masked off with masking tape. Mixed my groundwork using Celluclay, Durhams Water Putty, Elmer's white glue and water along with raw umber and black acrylic paint. This was spread onto the already stained and sealed base using oil paint palette tools. After allowing the groundwork to dry for a few minutes, I inserted some dried plants and Woodland Scenics tall grass. I then added static grass, sand, cat litter and Woodland Scenics ballast. At this point I pressed the tank tracks into the road to get tread impressions. The base was then set aside to dry.The next evening I added Woodland Scenics snow. I first put some doubled up masking tape into the tread marks and then sprayed the surface with pump hairspray. Used a large make-up brush, I gradually added the snow. Periodically, I would add more hairspray. Once the depth of the snow looked good, I placed the Pershing onto the base and attached the figures.
To attach the figures, I first clipped off most of the toothpick that had been inserted into the figures to hold them while painting, drilled a small hole into the base, added a drop of superglue and inserted the stump of the toothpick into the hole. I cut some "brass" wire into short lengths to simulate fired shells from the two M1 riflemen.
This small diorama took almost exactly three months to complete: 8/15/04 through 11/17/04.

About the Author


Copyright ©2021 by Keith Middleton. Images and/or videos also by copyright holder unless otherwise noted. The views and opinions expressed herein are solely the views and opinions of the authors and/or contributors to this Web site and do not necessarily represent the views and/or opinions of Armorama, KitMaker Network, or Silver Star Enterrpises. All rights reserved. Originally published on: 2005-02-18 00:00:00. Unique Reads: 16217

WEB HOSTING BY


Copyright ©2021 Armorama and Kitmaker Network, a subsidiary of Silver Star Enterprises
All Rights Reserved. Please read our Conditions of Use and Privacy Policy.
All Rights Reserved. Please read our Conditions of Use and Privacy Policy.