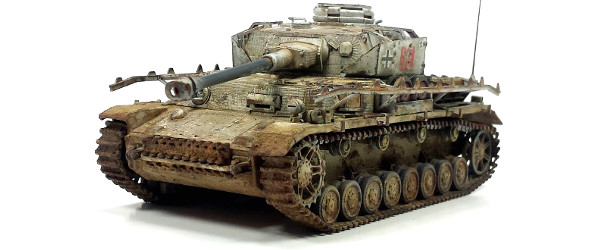
1⁄48Pz.Kpfw. IV Ausf. H
13
Comments
The Fun Part
It was finally time to start the fun stuff…painting! For the priming stage, I choose Vallejo’s German Red Brown 70.605. I figured I like to paint light and the hint of red oxide coloring in some of the corners and creases would add some definition. Next, I was looking to add a bit of camo even though I would be weathering things up pretty good; this would give a little depth in the end I thought. Unfortunately I did not have the AFV Set of paints from Vallejo I thought I had so I pulled out the Dunkelgelb AVF Set for the base and chose some appropriate colors to finish off the camouflage. I had decided to chip off a lot of the camo to show some wear and tear and went for the worn whitewash effect. After using some Chipping Medium I added some White and Aged White color to the finish. A simple wetting with a soft brush yielded an acceptable removal of the white from the surface.Into the weathering zone now. I can’t help the fact I like the look of a well-worn piece of equipment. So, some chipping was added to various corners and exposed areas I felt would be worn more than others followed by a first light round of a wash application. Oiled Earth from Vallejo’s Model Washes is kind of my go-to base wash as the mid-tone coloring gives a great balance to things. Applying a small amount of wash to edges and allowing it to dry for about a minute, the streaking was achieved through the use of a damp brush and lightly pulling the brush down over the surface in one direction a few times.
Once the washes were out of the way, it was time to put the finishing touches on this one. When using pigments, I play around with a few different ways to apply them. For a simple dusty appearance, I might just use water or thinner as a carrier by dampening the area and then applying the pigments. If you apply the pigments as a heavy wash and control them by placing them into corners and such, once dry, you can take a stiff brush and feather the dry pigments out. This will effectively dust the flat surfaces while leaving a nice build up of pigments into the creases. In order to get the heavier pigments to stay put when done, I will add some pigment binder. A second method I will use is to make a wash with pigments, airbrush thinner and a drop or two of matte varnish. If I need to add clumps of dirt, I tap dry pigments onto the damp/wet surface and allow the pigments to soak up the wash. To secure the pigments if needed, a little pigment fixer does the trick.
Conclusion
I have to say, even though Tamiya’s 1/48th scale Pz.Kpfw. IV Ausf. H kit is basically unchanged from their 2012 release of a similar panzer with the exception of a few minor parts and new side skirt armor, the kit is worth the effort of a build! The parts fit very well and the detailing in this scale is decent. There are a few minor issues like ejector pin marks in some locations, but easily filled and sanded. Every kit always has room for improvement, and this one is nothing different, but for the most part, the kit can be built out of the box with little to no effort by modelers of all skill levels. I did choose to replace the barrels due to the fact they were a cost effective solution to not cleaning the plastic two-piece barrel and drilling out the MG’s. In regards to the Tamiya Self-stick Zimerit I decided to use, I do think the product is worth the effort to pick up if this is the look you are going for. The cost is low and the overall result is not too bad at all. With careful cutting the aftermarket Zimmerit goes on with little to no problem onto a clean dry surface. It may be best to use a die punch for opening the new Zimmerit for fitting over the bolt heads, but careful drilling with an appropriate sized drill will work. In the end I will recommend this kit for anyone looking to have some fun! You can’t beat the lower than 1/35th scale armor price and the detail is pleasing! I think I might have to pick up the Ausf. J next!Comments
Nice!! Have fun with the new arrivals! You are correct...the mis-buy is a perfect opportunity to play around! You never know, it may turn out to be something special! I have had just as much fun with a 20 year old DML kit as with a $70 one. Side by side it is tough to tell really...especially when making wrecks...LOL!!
NOV 13, 2015 - 02:37 AM
Todd, You have done a great job with this. I am sure it will inspire many to at least dip into 1/48 armor.
Cheers,
Rick
NOV 13, 2015 - 06:40 AM
Not a big fan of the smaller stuff, but this one grabbed my attention. Very well executed and convincing looking battle worn veteran.0
NOV 13, 2015 - 07:50 AM
Rick and Armorsmith, thank you very much for the kind words! It's most appreciated!
NOV 13, 2015 - 05:04 PM
Lovely build & paint job Todd; it reminds me a great deal of Mig's 1/48 winter Tiger I that I saw on the web a couple of years ago.
NOV 24, 2015 - 02:08 AM
Thank you very much Bill! I remember Mig's Tiggy well! A fantastic piece! I believe it still resides on his Blog!
NOV 24, 2015 - 06:23 AM
Copyright ©2021 by Todd Michalak. Images and/or videos also by copyright holder unless otherwise noted. The views and opinions expressed herein are solely the views and opinions of the authors and/or contributors to this Web site and do not necessarily represent the views and/or opinions of Armorama, KitMaker Network, or Silver Star Enterrpises. All rights reserved. Originally published on: 2015-11-13 00:39:53. Unique Reads: 19162


