

1⁄35VK 45.01 (P) Tiger I Prototype
13
Comments
Introduction
From Wikipedia: https://en.wikipedia.org/wiki/VK_4501_(P) The VK 45.01 (P) was the official designation for an unsuccessful heavy tank prototype produced by Porsche in Germany in 1942. It was not selected for production and the Henschel design to the same specification was produced as the Tiger I. Most of the already produced chassis were instead rebuilt as Elefant tank destroyers. On 21 May 1942, Henschel and Porsche were asked to submit designs for a 45-ton heavy tank capable of mounting the high velocity 88 mm KwK L/56 gun which was derived from the German 88 mm flak gun. Both the Henschel and Porsche tanks were to be fitted with the same turret supplied by Krupp. The Porsche company worked on updating the VK 30.01 (P) medium tank, Porsche's medium tank prototype, and adapted parts used on it for the new tank. The new Porsche tank, designated the VK 45.01 (P) was to be powered by twin air cooled gasoline Porsche Type 101/1 engines which were mounted to the rear of the tank. Each of the twin engines would then drive a separate generator, one for either side of the tank, which would then power each of two electric motors, one powering each track. But the engines and drive system were very prone to break down due to their design and the poor quality copper. The electrical system needed almost constant maintenance to keep the tank running. This, and the tank being less maneuverable than its competitor, was the reason why Henschel's 88mm-armed VK 45.01 (H) H1 prototype, which became the Tiger I, was adopted for production instead. Only one tank went into service as a command tank in the Ferdinand (Elefant) unit, and served in Panzerjäger Abteilung 653. It was deployed in April 1944 and lost that subsequent July. I have a love of the technically odd. My father collects and restores British cars, so this should not come as much of a surprise. That being said, I've always wanted to build a model of one of the prototype vehicles. The problem has always been that there was no good starting point. The Italeri Elefant might have been a good one, but my skills at the time were not up to the kit-bashing level to pull it off. Cromwell model did a conversion of the Elefant to do the Panzerjäger Abteilung 653 vehicle, but it has zimmerit and doesn't represent a prototype. After many years, Italeri FINALLY brought out the version I was interested in, but the detail was soft and not really up to current standards. It did have the early turret I needed, the correct early engine deck and a usable front plate. DML also did one, too, but again this was the one that saw combat. It did not, however, have zimmerit on it, so it could provide parts to help bring the model up to current standards. For reference, I used Tom Jentz's fantastic book on the subject: Panzerkampfwagen VI (P). It provided line drawings for the engine deck and lots of photos of this rare vehicle. Finally, I purchased Chris Meddings' book: Scratchbuilding Masterclass. This showed me some of the techniques necessary to do the rebuilding necessary to pull it all off. And so it began.The Build
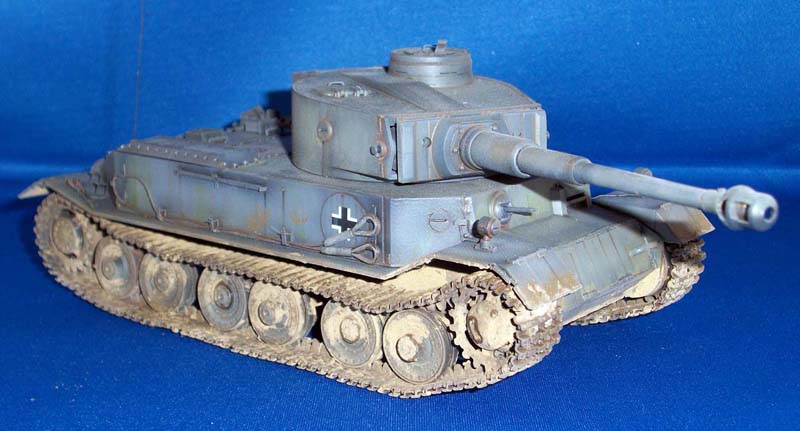
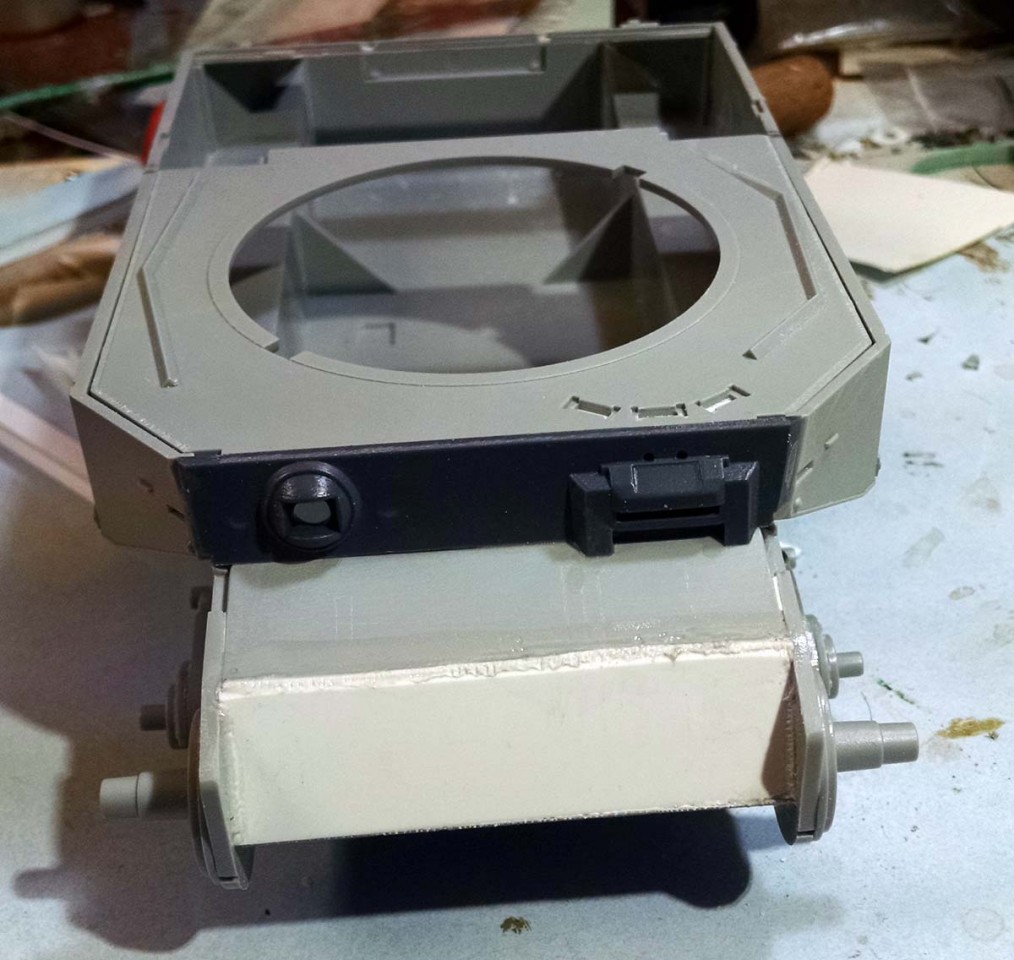
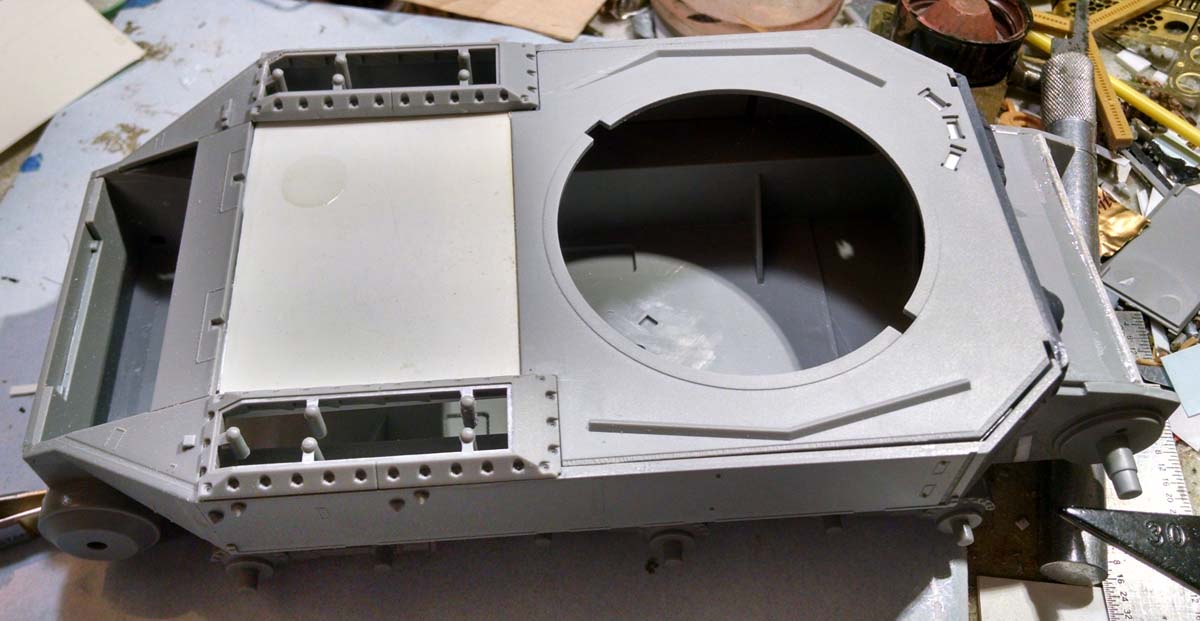
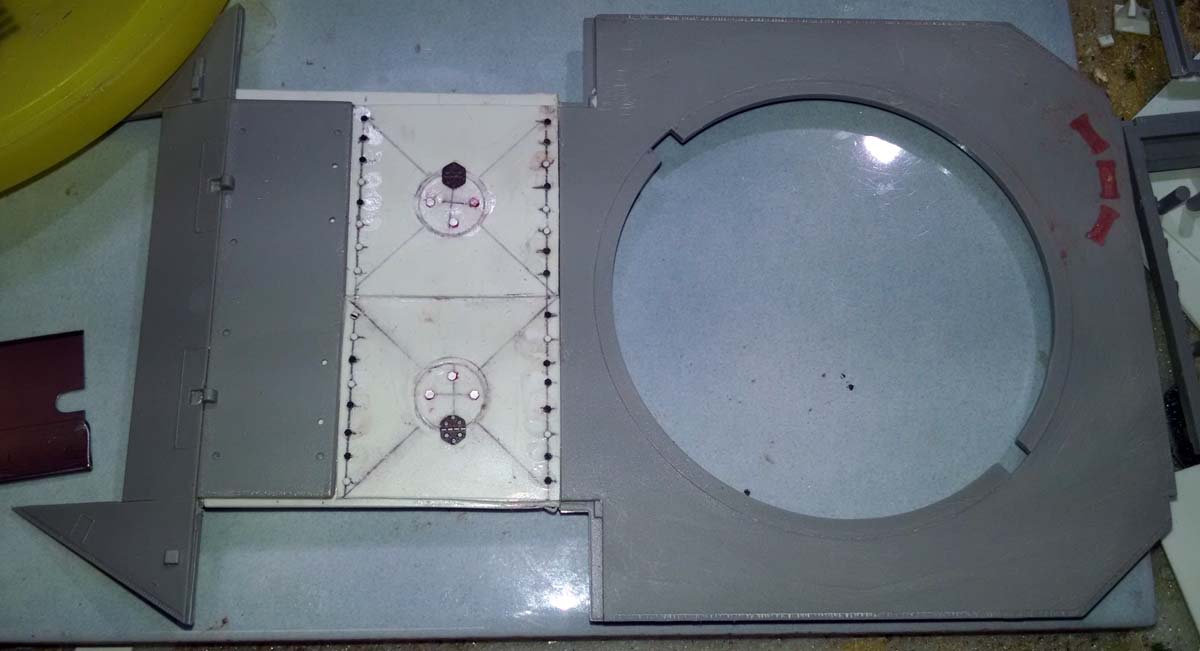
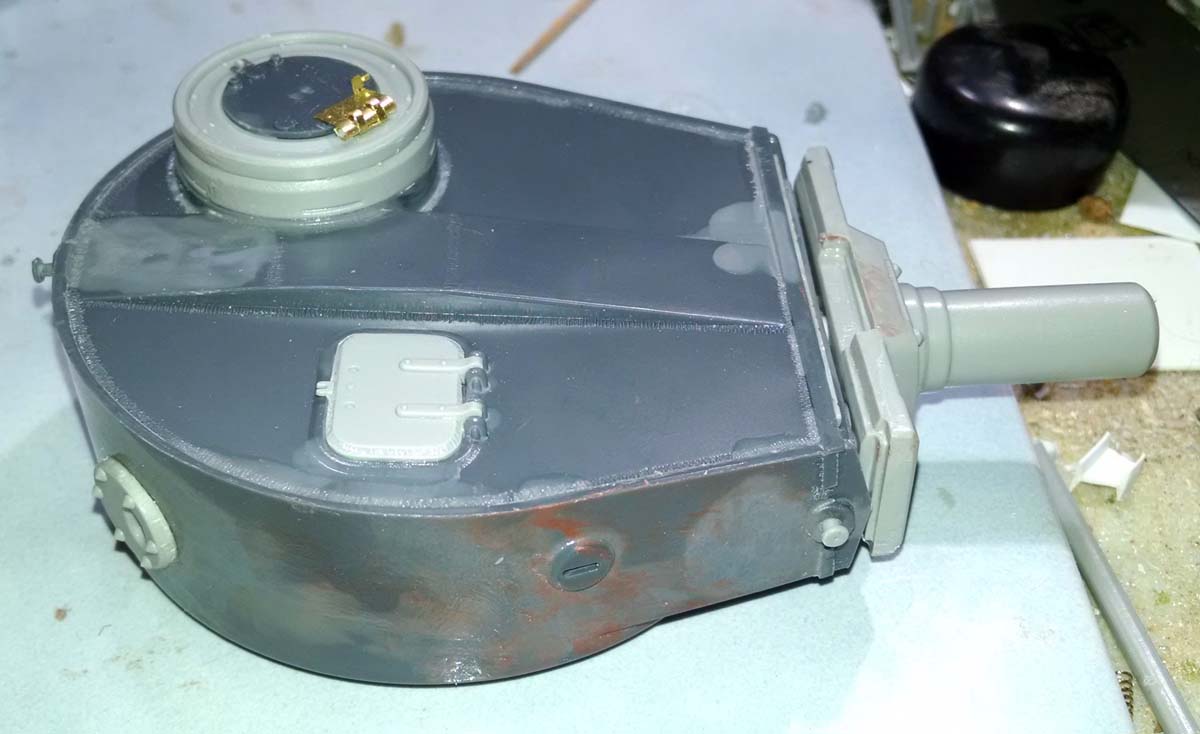
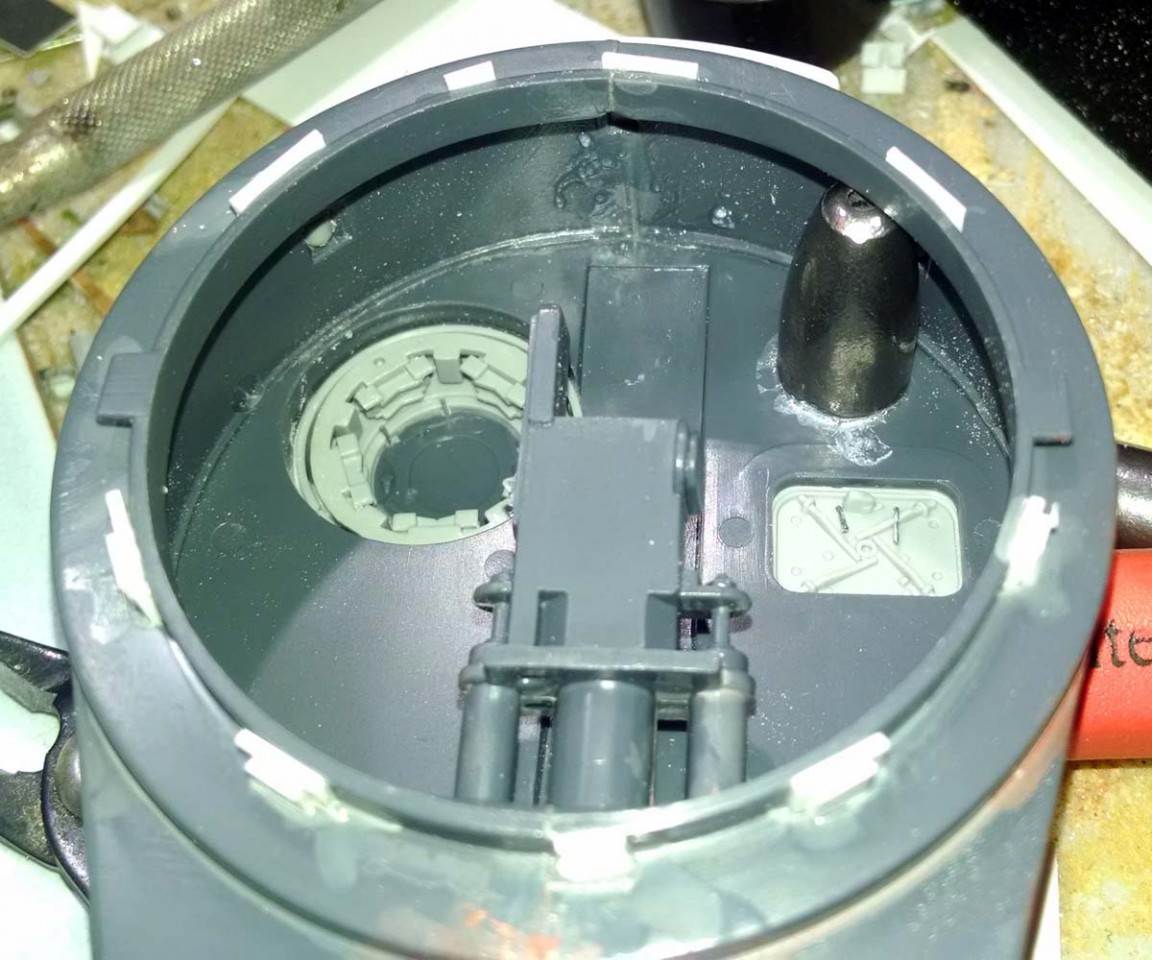
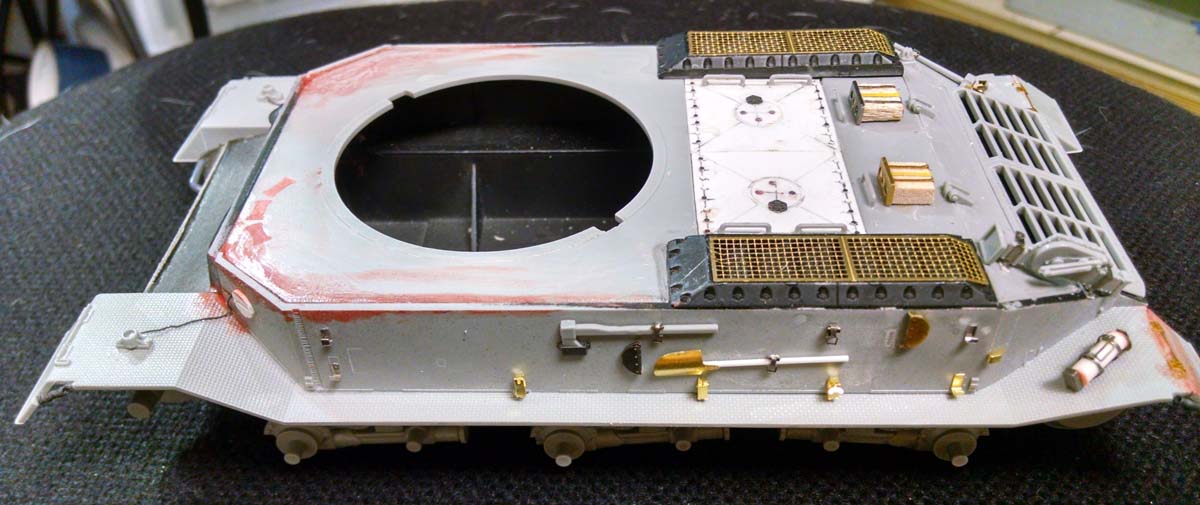
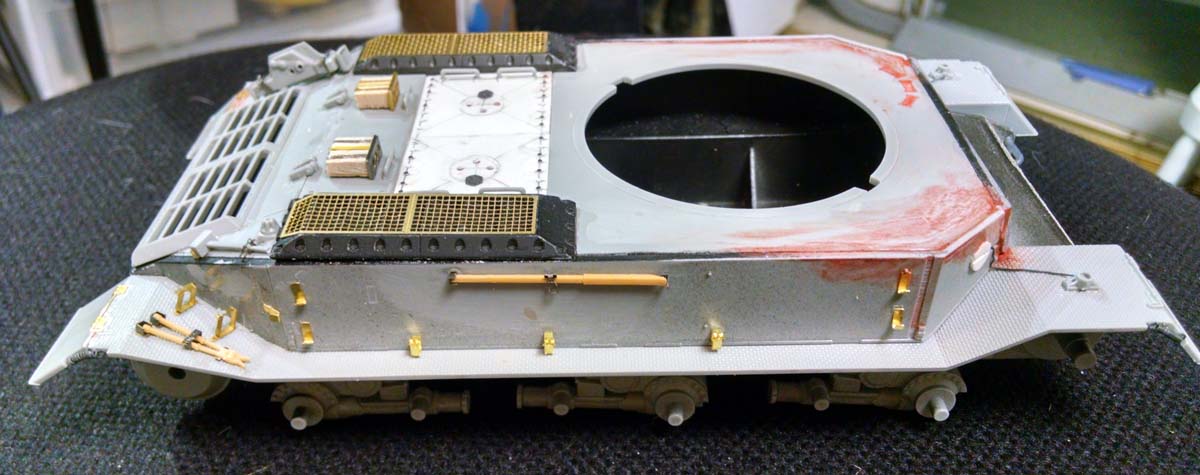
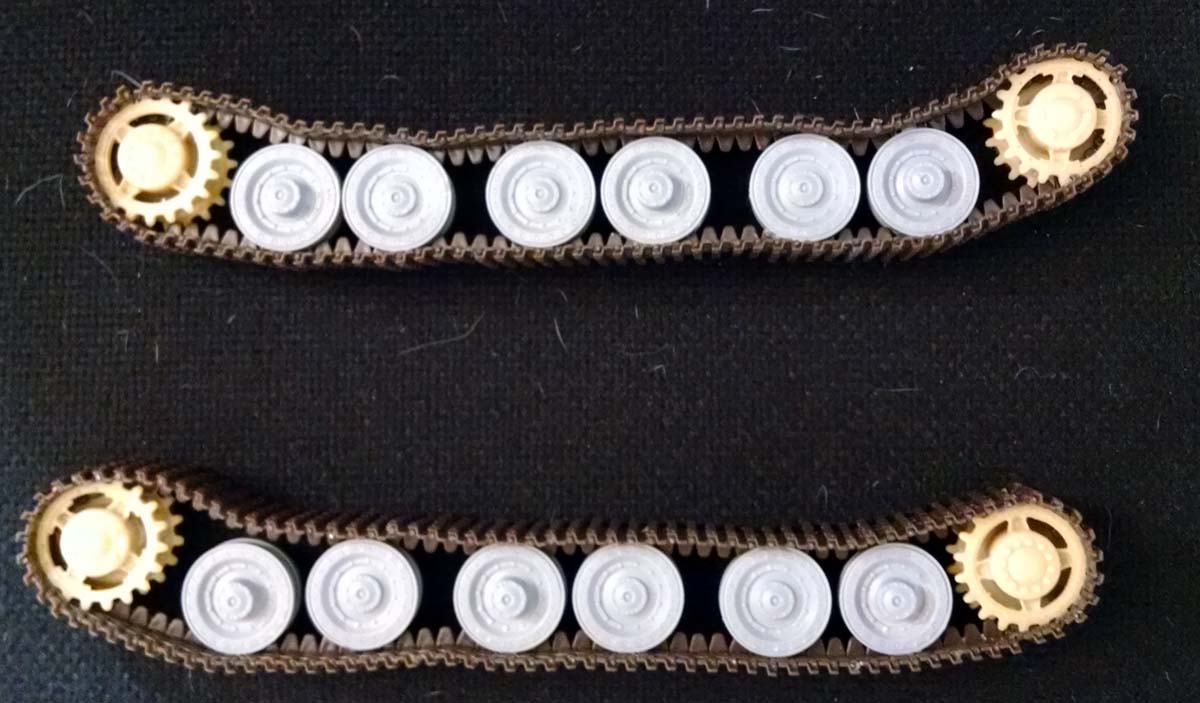
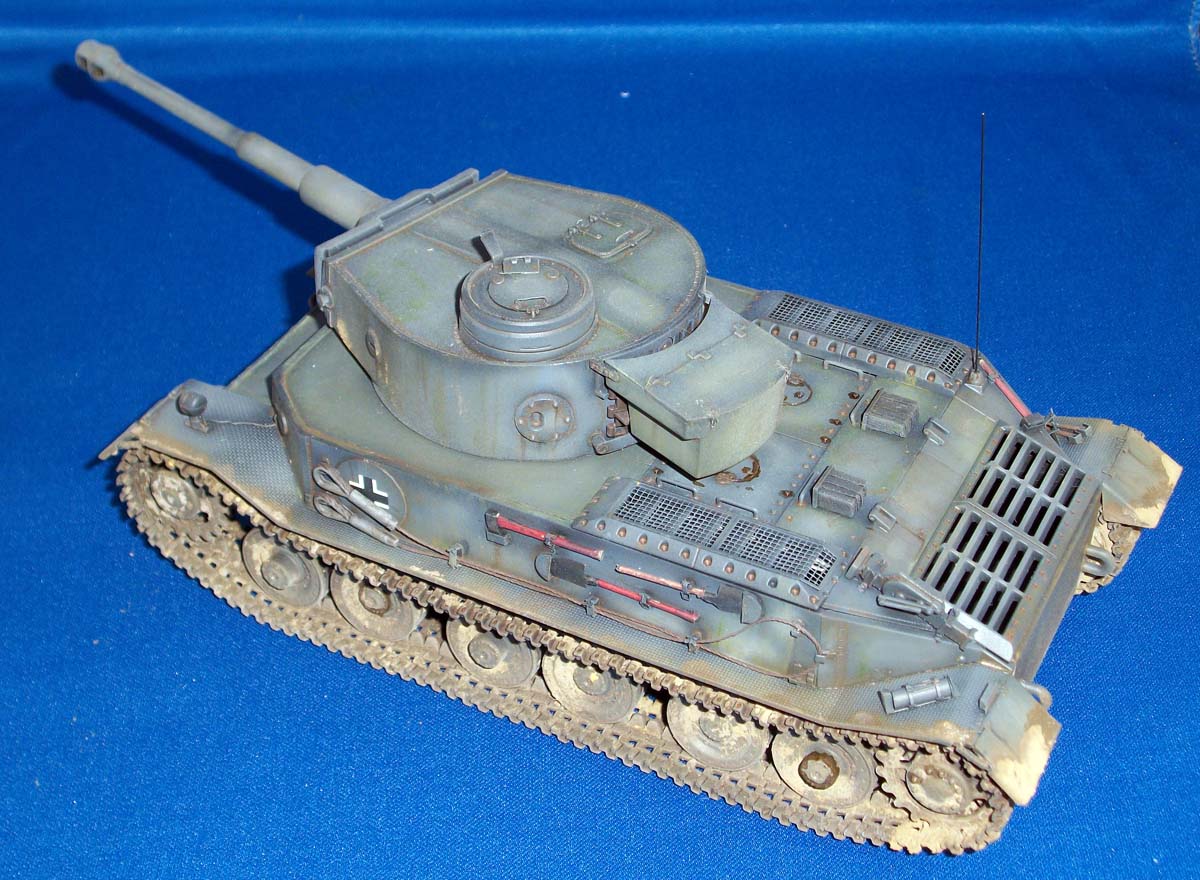
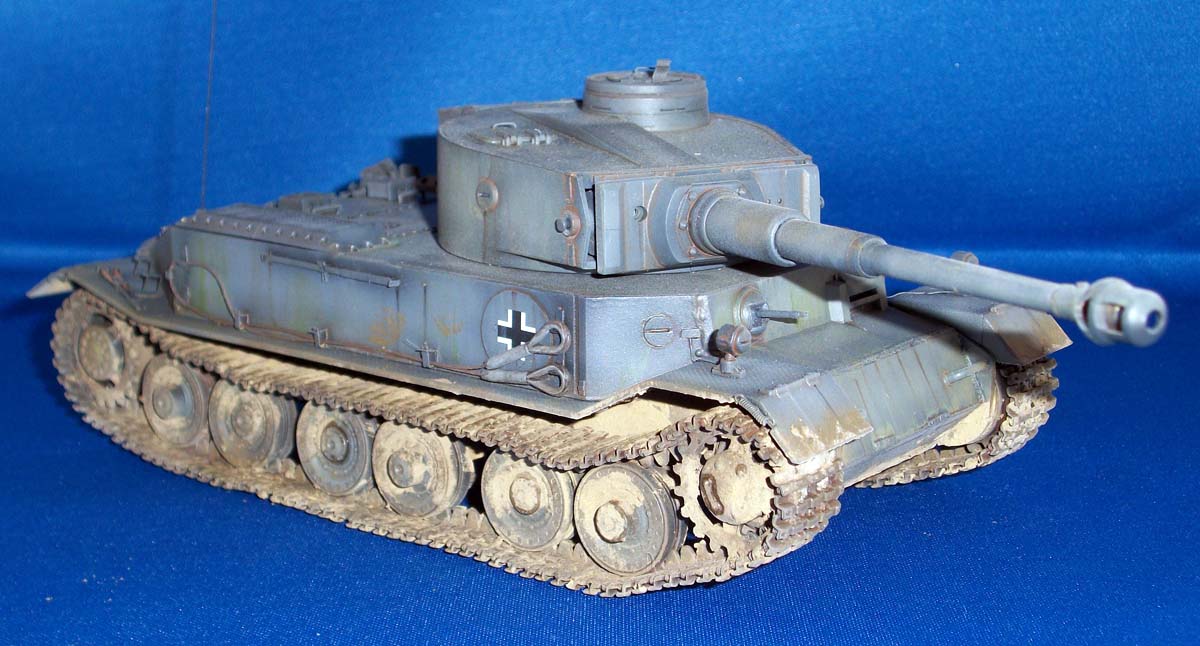
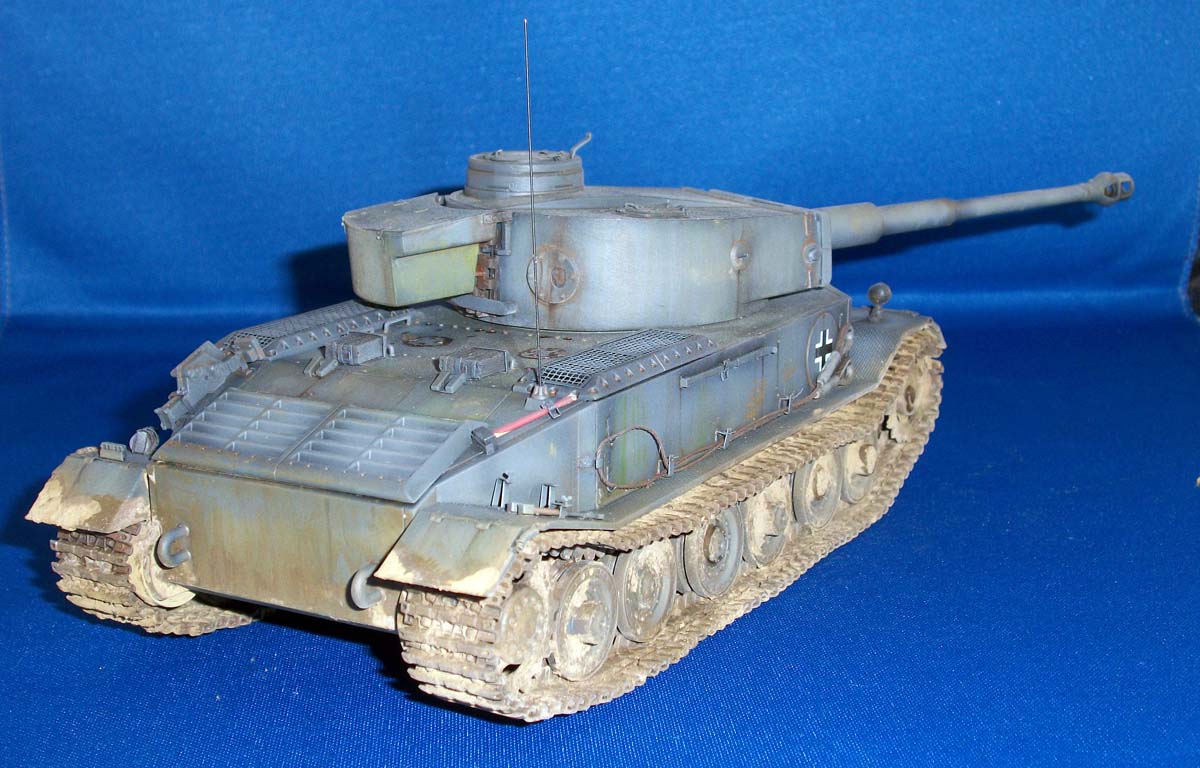
I pretty much built the lower hull as per the DML instructions, as the detail was crisper and didn't require the use of a hot screwdriver to put it together. I also filled the mounts for the mud scrapers, as these were added later. Next up was the front plate. The prototype tanks were not up-armored with the extra 100mm of armor. Since the DML kit had it and it was just a flat plate, it was replaced with a piece of styrene sheet. Welds were made from softened stretched sprue soaked in glue and textured with the back of a #11 X-Acto blade. I the used the Italeri parts for the towing bars and some punched styrene sheet to complete the front plate. The driver's plate was from the Italeri kit with a Tank MG-34 barrel. The biggest piece of work was the top deck, specifically the engine deck. The DML kit sports the later version designed for the Maybach water-cooled engines. The prototypes used Porsche air-cooled units. First, the engine deck was cut off completely. Using some styrene sheet, a subfloor was built. To ensure it stayed straight and flat, I used some left-over styrene "I" beams. With that in place, I fitted the rear engine hatch, using the kit part as a starting point. Two engine covers were built from some more styrene sheet. These were detailed with hex-punched styrene. The engine inspection hatches were also punched out and detailed with more styrene nuts and a photo-etch hinge. Screens over the engine air intakes were from the Aber photo-etch set. I also filled in the holes for the periscopes from the 1944 vehicle with putty. The turret was truly a "Frankentank" assembly. I wanted to use the earlier turret with the lower sides and the central rib to allow for gun depression. But, being an Italeri part, the details were kind of soft. I used DML parts from the kit to spruce it up. This included the cupola, loaders hatch, pistol ports and gun mantlet. The barrel was from the Aber detail set. It was at this juncture that my references saved me a ton of work (which is why you should always keep them handy and consult them often). I was getting ready to build up the hatch hinge on the cupola, only to find that it had only a very simple hinge without the spring-loaded assist! This observation saved me immense grief later. Next up on the turret was the rear stowage bin/track bracket. Only the Germans would come up with something like this. Anyway, looking at the Aber madness embodied in the stowage bin, I sort of whimped out and used a combination of DML box, Aber brackets, styrene lower bracket and Italeri upper track hanger. In addition, there were some other wire bits for handles and stuff. It went together pretty well and looked the part when completed. One problem I ran into was the gun barrel: it was really heavy and caused the turret to tilt out of the race on the hull. A trip to the local Wal-Mart sporting goods section fixed that nice and quick; I used a fishing weight to counterbalance the barrel. With the turret done, I now moved on to small details on the hull. I missed the fact that there were vision ports as kit parts and made my own from sheet styrene. Also, I replicated the welded-shut side hatches with thin styrene sheet (garage sale signs) cut and glued to the hull sides. I followed this with the tools and boy did this thing carry a lot! Two shovels, two jacks and the usual other tools covered the rear hull plates in various places. I cobbled together the tools from the Aber set (shovel heads), styrene tubing (the fire extinguisher with Eduard photo-etch details). I successfully resisted the urge to build another Aber jack. Life is just too short. The various tool clasps were Eduard and Aber parts (I built a complete set of Aber working clasps on my Pz II ausf C, never again!). Many of the tool holders were left empty or just had the tools dry-fitted so I could paint them later. I made return springs for the front and rear fenders from wire wrapped around a pin. The electrical wiring for the front headlights were also made with the same gauge wire. The tow cables were made from the DML kit ends with nylon kit string for the cables themselves (it stays flexible after being painted and has no frizz). The jack blocks were made from basswood, with Eduard photo-etch parts for the brackets and handles. By far the toughest job was the tracks! I had thought (very incorrectly) the vehicle used the same track as the Ferdinand, wrong! I turns out that the tracks were basically the toothed links from the Ferdinand. I decided to cheap-out and use the links from Armour track models. This was what might be called a mistake and I compounded my agony by stubbornly fighting them until they were done. Part of the problem was caused by the links that went around the sprockets that needed the alternating toothed/flat combination to fit properly. Because one set would only provide enough links for one side, I pirated the rest from a second set and even then came up short (I ended up alternating the links around the sprockets to stretch the number of toothed links further). Also, the Armour track links didn't fit together great when used properly, so I ended up gluing them solid to the drive sprockets and road-wheels for added strength (everything was left removable for painting). Eventually, I won, but not after much sweating, cursing and hair-pulling. My advice is to cough up the money and just get the Modelkasten set, again life is too short. For color schemes I had one choice: German gray. Since there were so many different materials that made up the model, I sprayed the entire model with flat black from the can. This is the cheapo stuff from Home Depot and makes a great base to start a paint scheme. From there, I misted on various Vallejo grays to highlight the panels. I use a Frankensteined Iwata HP-CS airbrush, using the CS body (with integral color cup), but with a 0.5 mm needle and tip. I use this set-up as I find it much less subject to clogging due to the pigment-heavy paint formulations that are now very popular (like Vallejo). To further mitigate this problem, I mix in a drop of acrylic paint retarder when I thin the paint. The road-wheels, tracks and running gear was painted with Tamiya XF-52 Flat Earth to represent dried mud. The tools were painted black to start, the wood parts were painted in light colors and then decaled with wood-grain decals from Decalcomaniacs! Once everything was dry, I sprayed the entire model with Tamiya clear from the can and placed the decals. Full disclosure: I have not found any picture of these vehicles with any markings whatsoever, but I needed a little splash of color in the form of the crosses on the sides. These were sealed with another coat of gloss. With the gloss fully dry, I began to use various colored filters all over the vehicle. Red, yellow, green, blue and brown were applied in a haphazard fashion to tint the base coat. Once that had dried, any spots I wasn't happy with got hit again. All of this was allowed to dry for 48 hours before I proceeded. From there, I used the Tamiya brown panel line wash as my pin wash. It worked pretty well, although I would not recommend the included brush; it's too big for the job. I let that dry overnight before proceeding. The dot filters went on without much drama and really added character to the model. The mud on the lower hull was made from a couple of different colors of pigments mixed with a little water and white glue. It was brushed on and more dry powder packed on. This was applied to everything, including the tracks. Once dry, I brushed off the spots on the tracks that would have come in direct contact with the ground. These spots were then dry-brushed with dark steel. At this point, final assembly took place. The tools were glued in place with small drops of super glue. The wheels and tracks were secured with regular cement and the rear stowage bin put in place. I threaded the tow cables into their mounts and glued on the ends. Once everything was dry, the model was sprayed with clear flat. After that, I used AK Interactive engine oil to show leaking seals on the running gear and oil stains on the engine deck (the original Porsche engines burned oil faster than gasoline!). With that, the model was done. I fixed it with a bolt through the bottom of the hull onto a base for shows and display.Conclusion
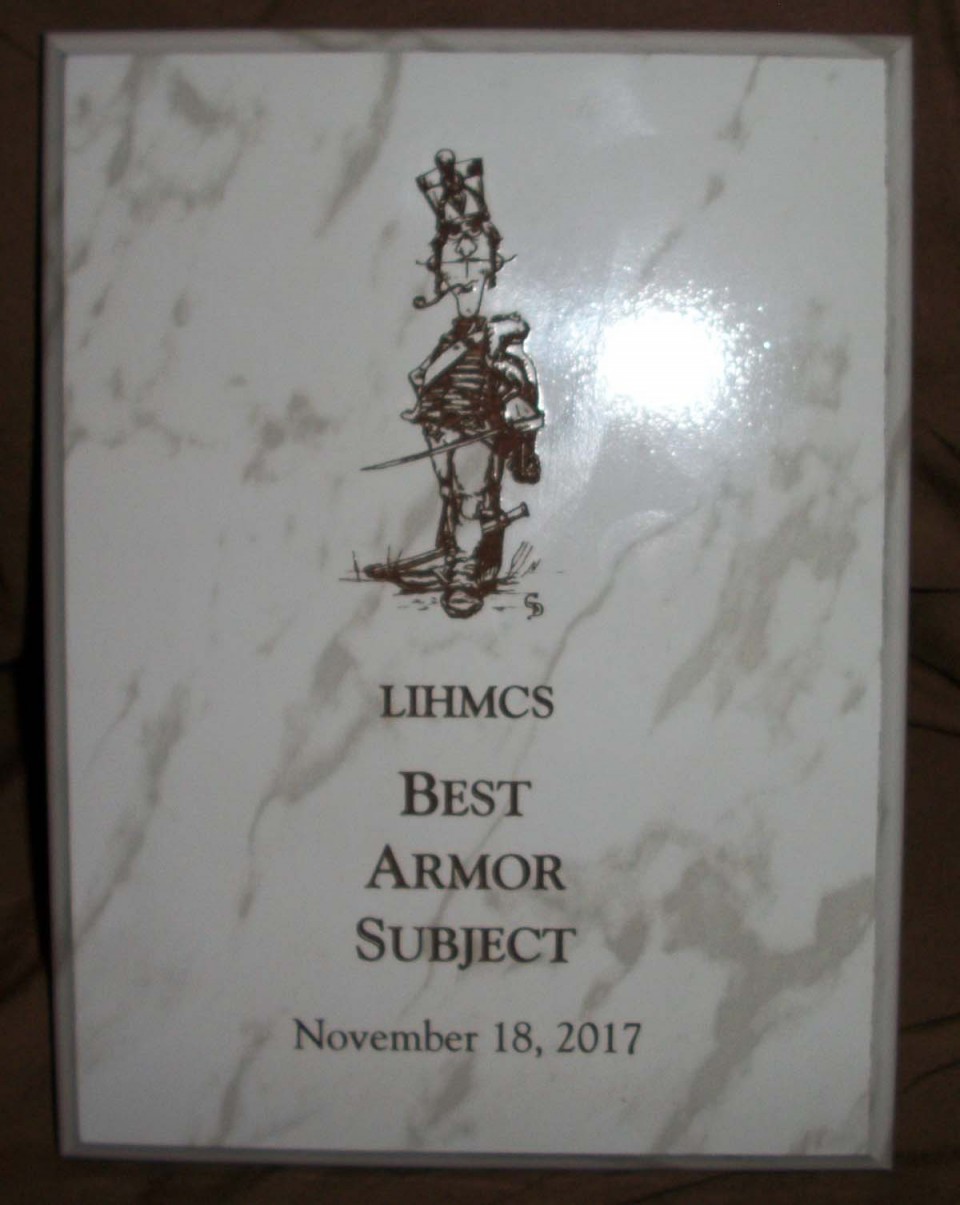
The model has done amazingly well in competition. It got a gold medal at the annual AMPS Armorcon show in September, 2017. This was followed with an honorable mention in the Axis Armor category at the Mid-Hudson IPMS show. In November, the model won a gold award and Best Armor at the Long Island Historical Miniatures Collectors Society show in Freeport, NY! I plan to take it to a couple more shows in the spring and then retire it for something new next year. Happy modeling!


About the Author


Comments

If it moves product and makes a profit, the company is happy.
DEC 13, 2017 - 09:02 PM

Love reference material like this, will have to look my Dragon kit over carefully.
DEC 15, 2017 - 04:15 AM

Great job on the kit bashing. Check your references for the drive sprockets. The prototypes should have 8 spokes instead of the 4 on seen on later models.
DEC 15, 2017 - 07:34 AM

Interesting shade of faded Panzer Gray. It looks like there is some blue in it. I always add a small amount of blue to make Panzer Gray and got into a heated argument with another member who claimed there should be NO bluish tint to the color. Personally, I think it looks better with a hint of blue.
DEC 15, 2017 - 11:57 PM
Because there is none. The bluish appearance is caused by the way grays interact with sunlight under different conditions. You can recreate this effect yourself.
http://www.greenwoodindianapolispainterpainting.com/why-does-grey-look-blue-or-green/
DEC 16, 2017 - 03:44 AM
Excellent build Georg! Fantastic kitbash and build log too. Love the nice modulation and really enjoyed seeing this up close and in person this past Fall!
DEC 18, 2017 - 09:03 PM

Nice job! I've been seeking out an old Accurate Armor kit since that one had the correct sprocket and tracks. Sadly, they don't have the masters or molds anymore so someday I'll have to just scratchbuild the bloody tracks. Ugh. . .
DEC 19, 2017 - 01:00 AM

Looks great, George! Nice build enhancements. The weathering brings the gray to life. It has well earned its awards.
DEC 19, 2017 - 11:35 PM
Having seen this one "live," it looks even better in person. Congrats, Pumpkin!
JAN 05, 2018 - 02:18 AM
Copyright ©2021 by Georg Eyerman. Images and/or videos also by copyright holder unless otherwise noted. The views and opinions expressed herein are solely the views and opinions of the authors and/or contributors to this Web site and do not necessarily represent the views and/or opinions of Armorama, KitMaker Network, or Silver Star Enterrpises. All rights reserved. Originally published on: 2017-12-14 04:31:13. Unique Reads: 17427

WEB HOSTING BY


Copyright ©2021 Armorama and Kitmaker Network, a subsidiary of Silver Star Enterprises
All Rights Reserved. Please read our Conditions of Use and Privacy Policy.
All Rights Reserved. Please read our Conditions of Use and Privacy Policy.