

1⁄25Panther Panzer
13
Comments
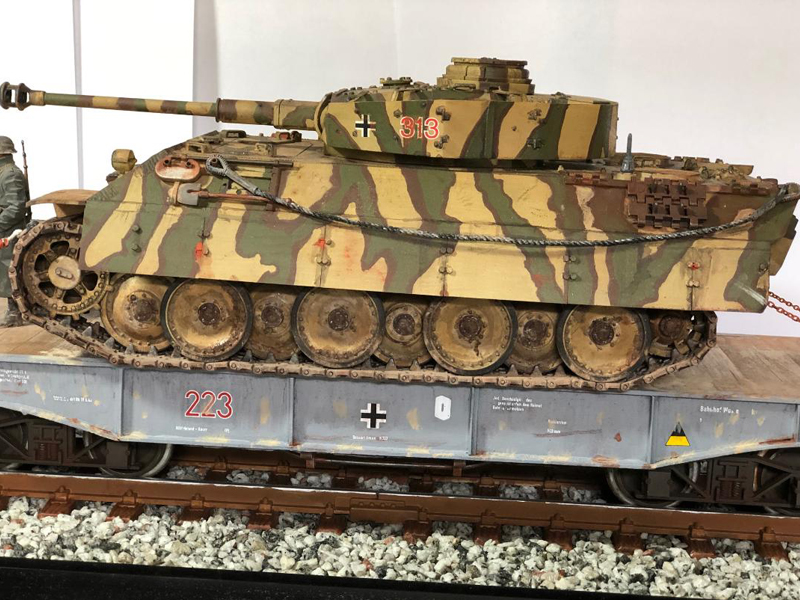
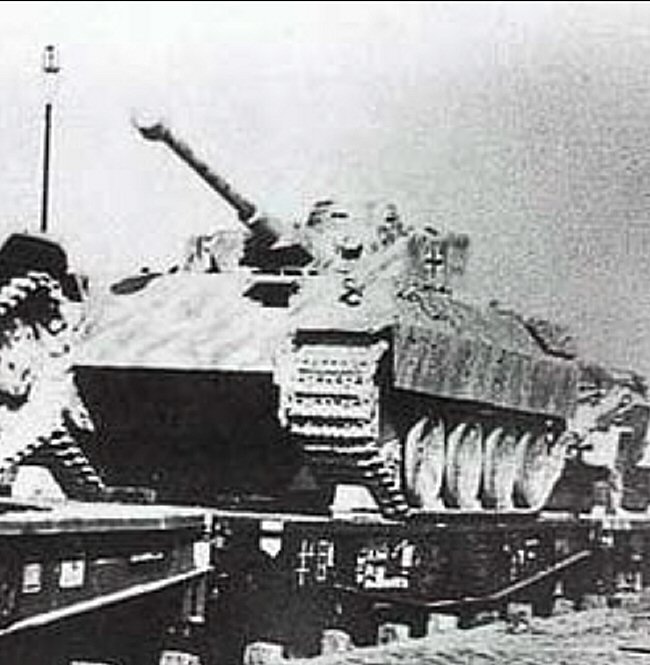
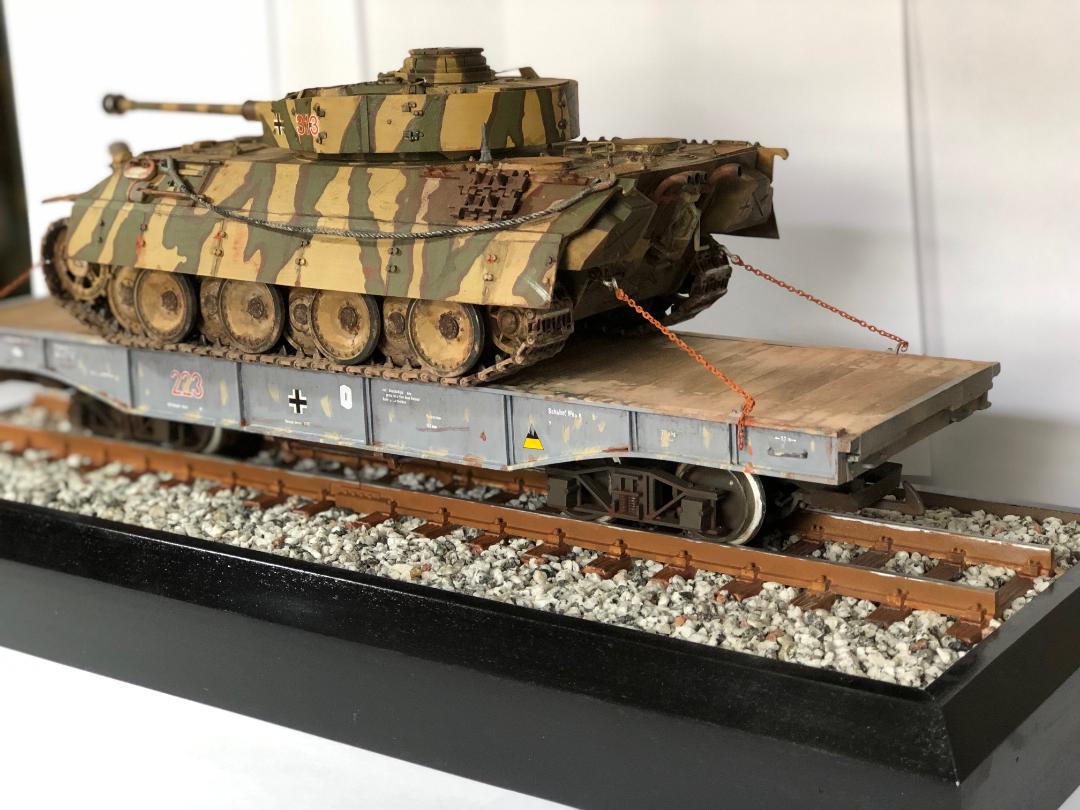
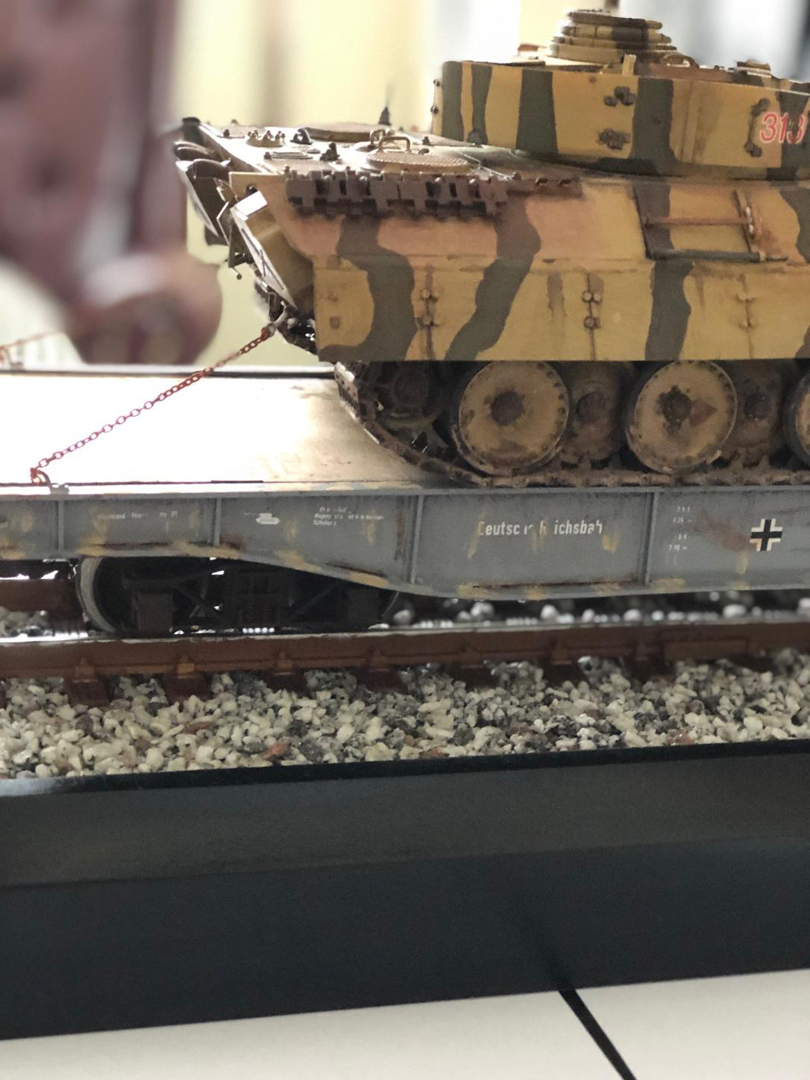
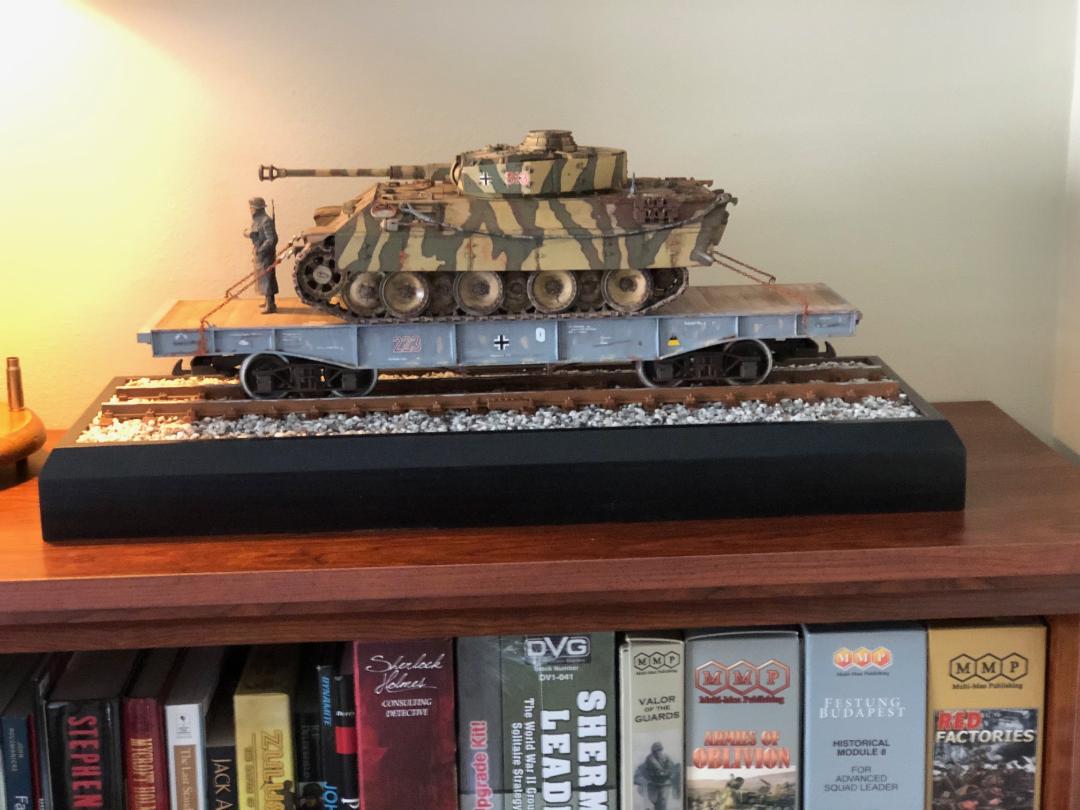
I had been told by a modeling friend that there were a couple of late war Panther Tanks that had Panzer IV turrets and researched the subject. The 653rd Heavy PanzerJaeger battalion welded Panzer IV turrets to 2 Bergepanthers to create Panther Assault guns. I found a picture of one of them being transported on a railcar and decided to replicate the scene.
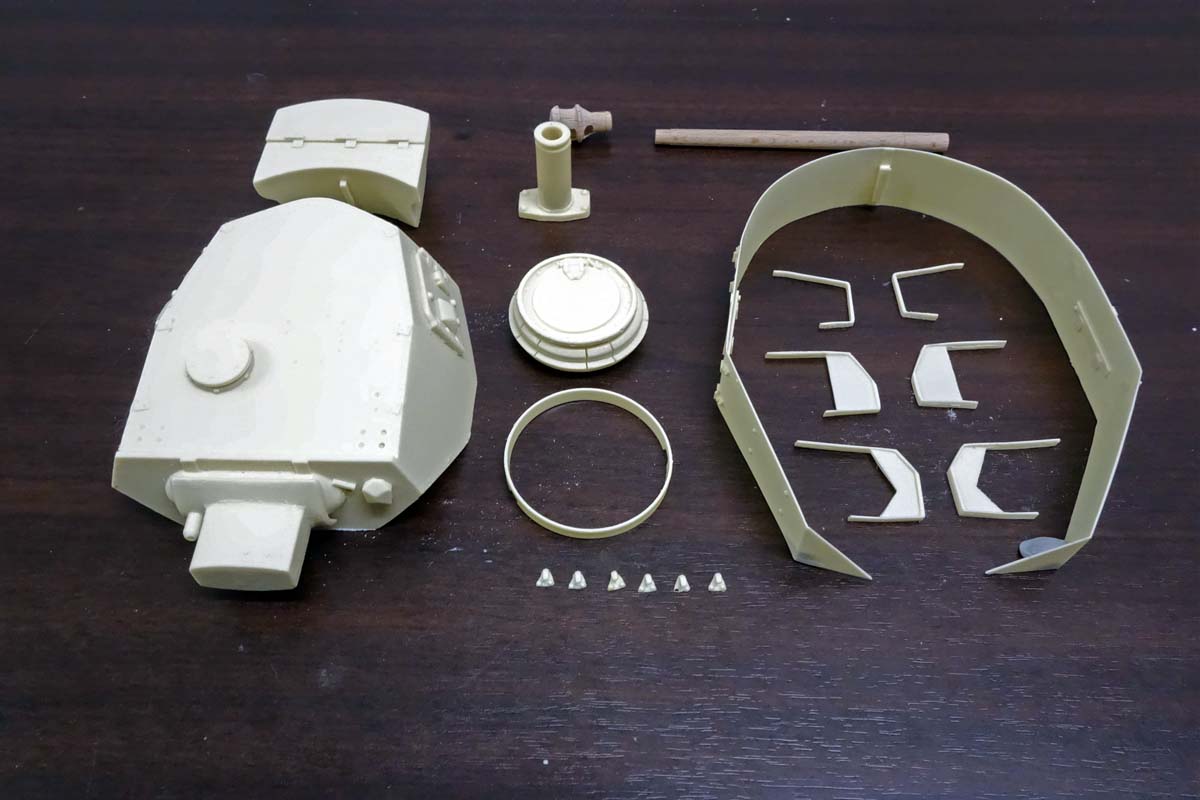
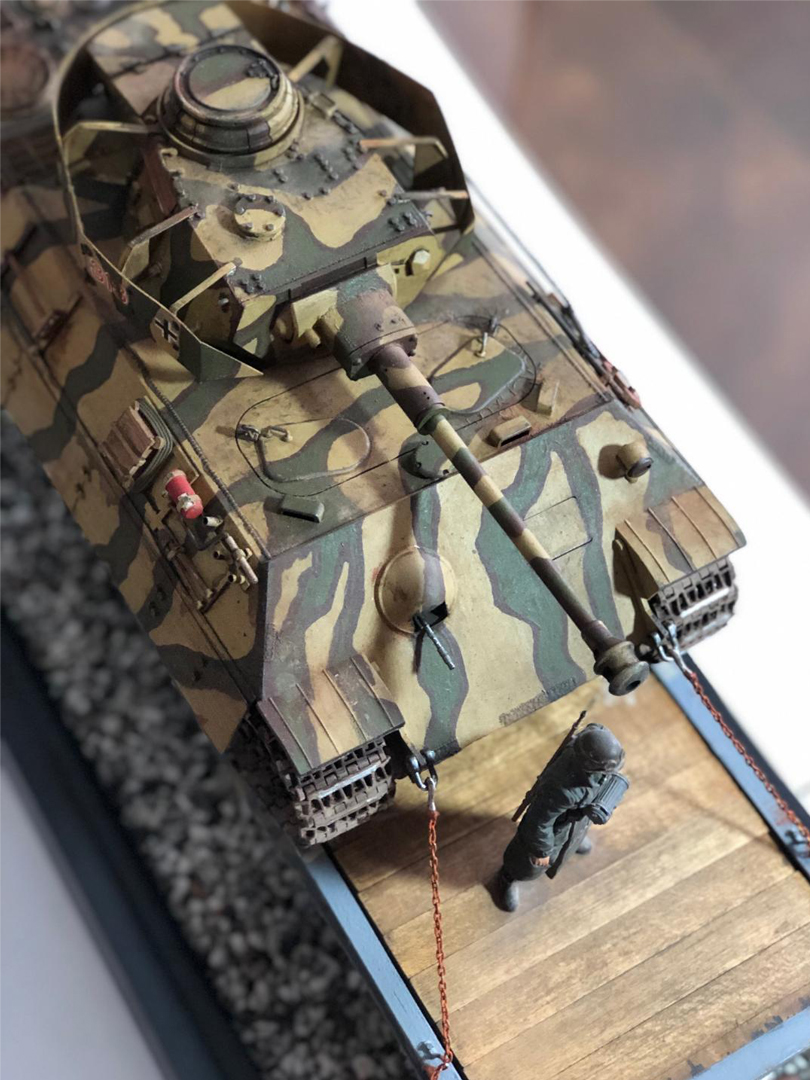
I have a friend in Australia, Danny Lapthorne, who is a modeler extraordinaire. He creates 1/25 scale resin model kits of full vehicles and partial vehicles. He had a1/25 Panzer IV turret that was exactly what I needed. I had a number of 1/25 scale Panther kits. I decided to use the Tamiya 1/25 Panther, but substituted the road wheels from the Academy 1/25 JagdPanther for accuracy.
The key to the diorama I planned was finding a 1/25th scale railcar. I poked around and was lucky to find exactly what I needed on Ebay. The listing was for a "Handcrafted Models G Gauge 1/25" Scale Short Flat Car Wooden Construction kit".
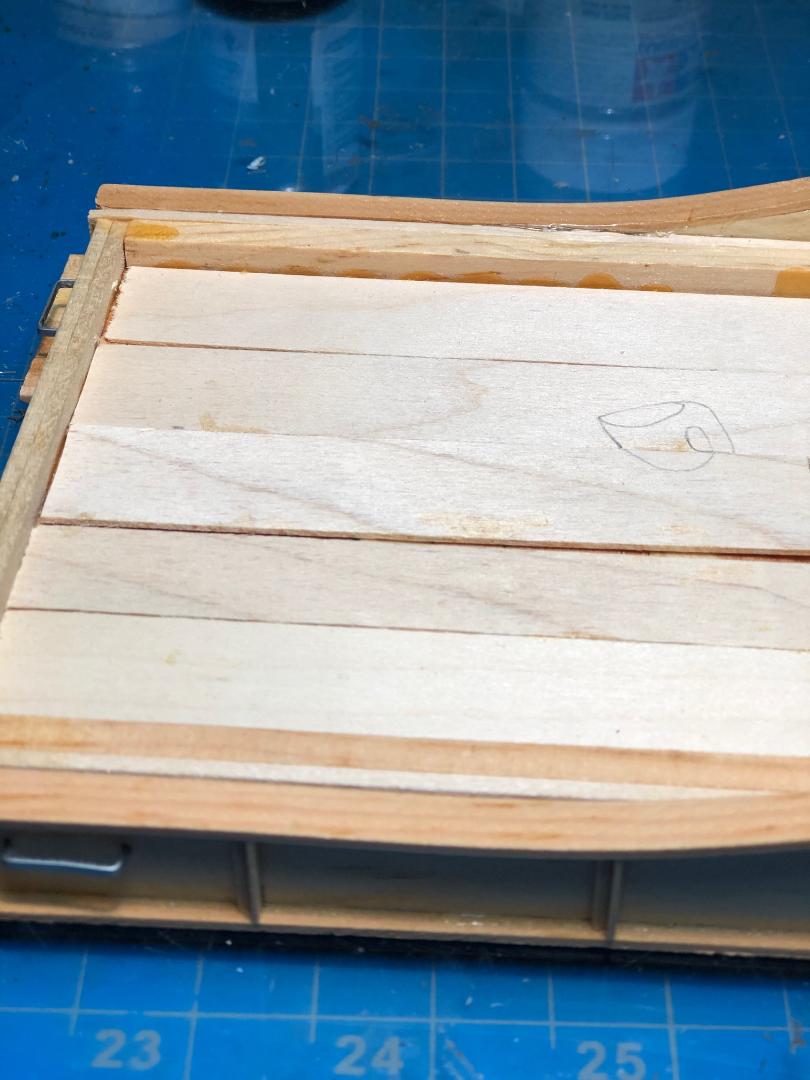
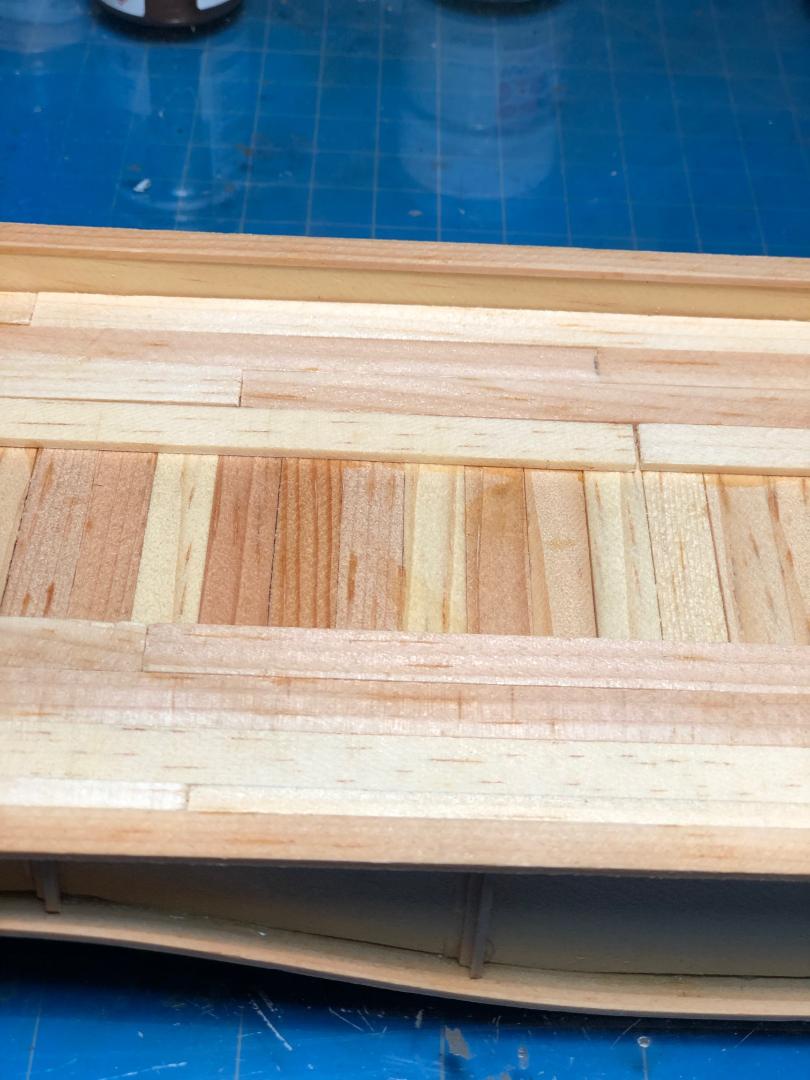
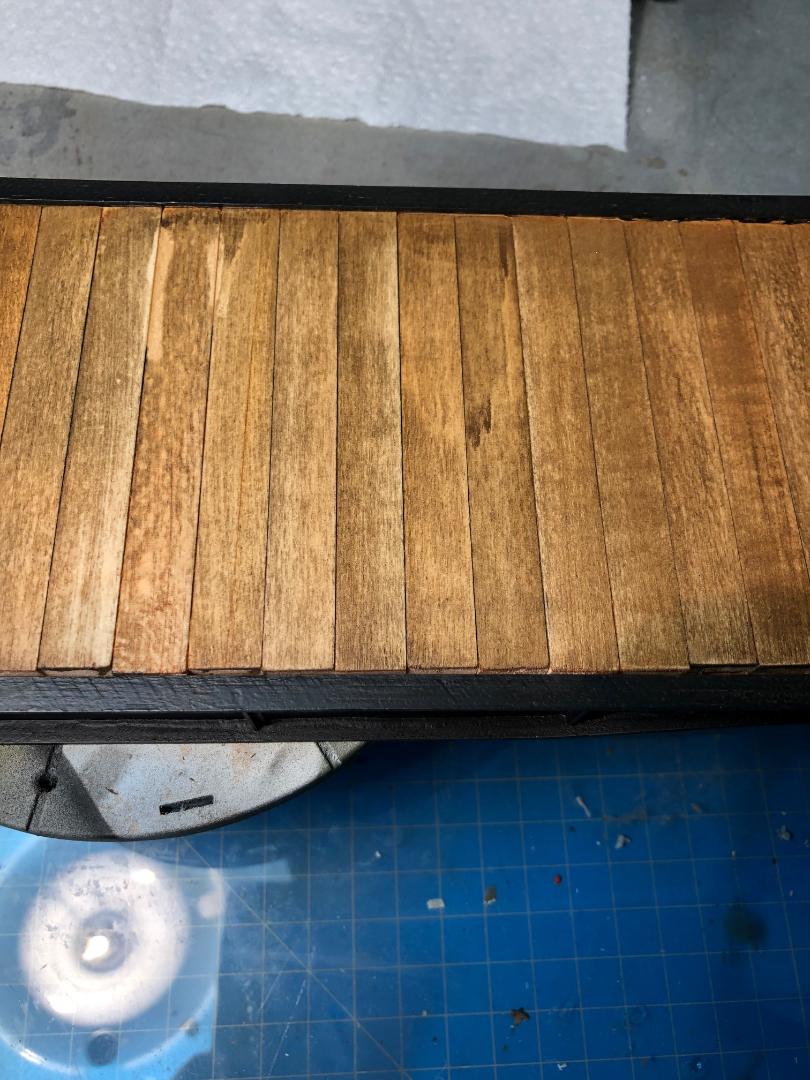
The Flat car needed the addition of wooden slats to create a flat surface for Tank transport, as it had a depression across the complete length of the car. I purchased 1/2 X 1/4 lengths of wooden stock and cut the necessary number to span the length of the railcar. I shellacked them and was very pleased at the resulting color and look. The flatcar had no frame, supports, trucks or couplers so I nosed around again and found exactly what I needed on Ebay. I purchased "USA Trains MaineFrame with Supports, Truck Wheels and Couplers". I attached all the parts and painted them in various acryllics. I then primed the flatcar with Vallejo acrylic Polyurthane primer and painted it light grey with Vallejo acrylic.
I looked for 1/25 scale German railway markings but couldn't find any. The closest I could come was the Archer Fine Transfer 1/35 Leopold set, which includes all kinds of railway markings, so I used that. Unfortunately, the set I received had issues with adhesion to the film which resulted in damaged and/or partial markings getting onto the flatcar, but I felt that a Tank transport railcar would be scratched up, marked up and stained by dirt and oil so I let my results stand. ( Archer Transfers sent me a free set to replace the damaged one. They are a great company!
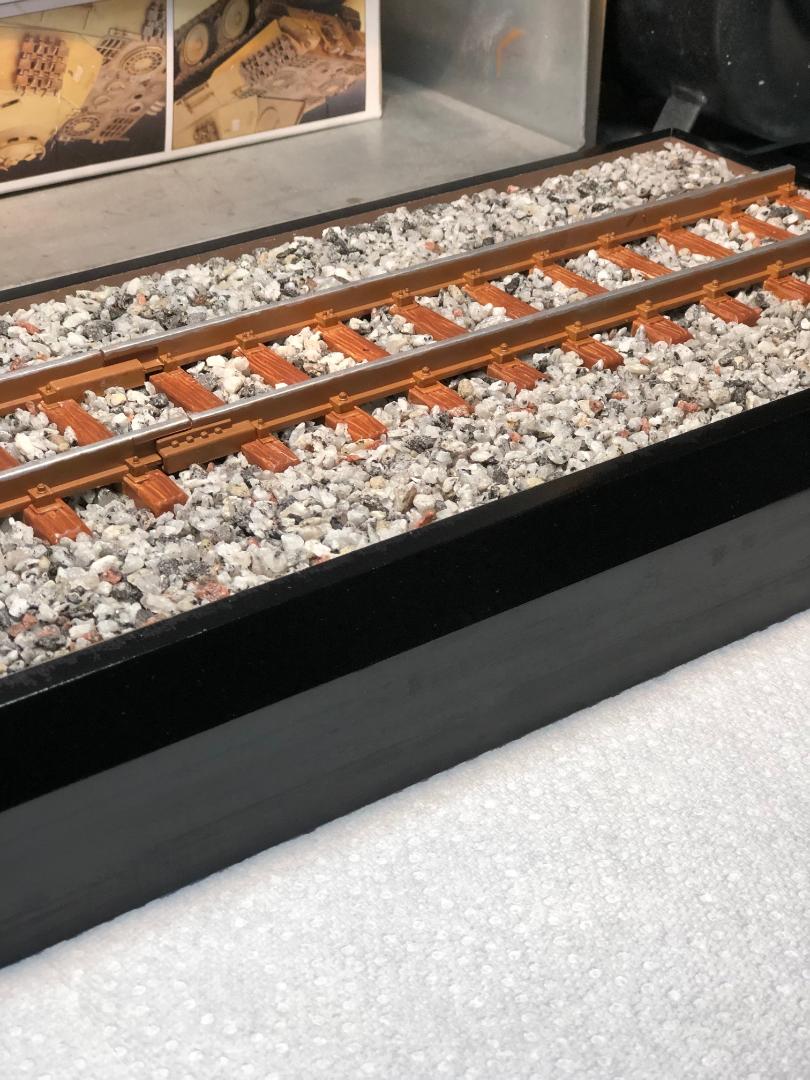
I searched out 1/25 scale track and found it on line. The version I found which served my purposes was plastic. One section was too short and 2 sections too long so I bought 2 and cut them with a razor saw on the ends and connected them in the middle.
I found 1/25 scale ballast on a railroad site and bought about 6 pounds of it. I had my good friend and expert base-maker Seth Semenza ( he makes all my diorama bases ) create a 22 1/2 inch long base with a raised section in the center that served as the concrete bed of the railroad track. I shellacked the interior of the base to protect it from the moisture of the watered down scenic glue I would use to fix the ballast in place. I painted the bed using Polly Scale acrylic Concrete.I used the AK interactive wood paint set for the ties and Modelers Decals and Paint Rail Brown acrylic for the rails. I used Deco Arts Dazzling Metallics Shimmering Silver for the top of the rails.
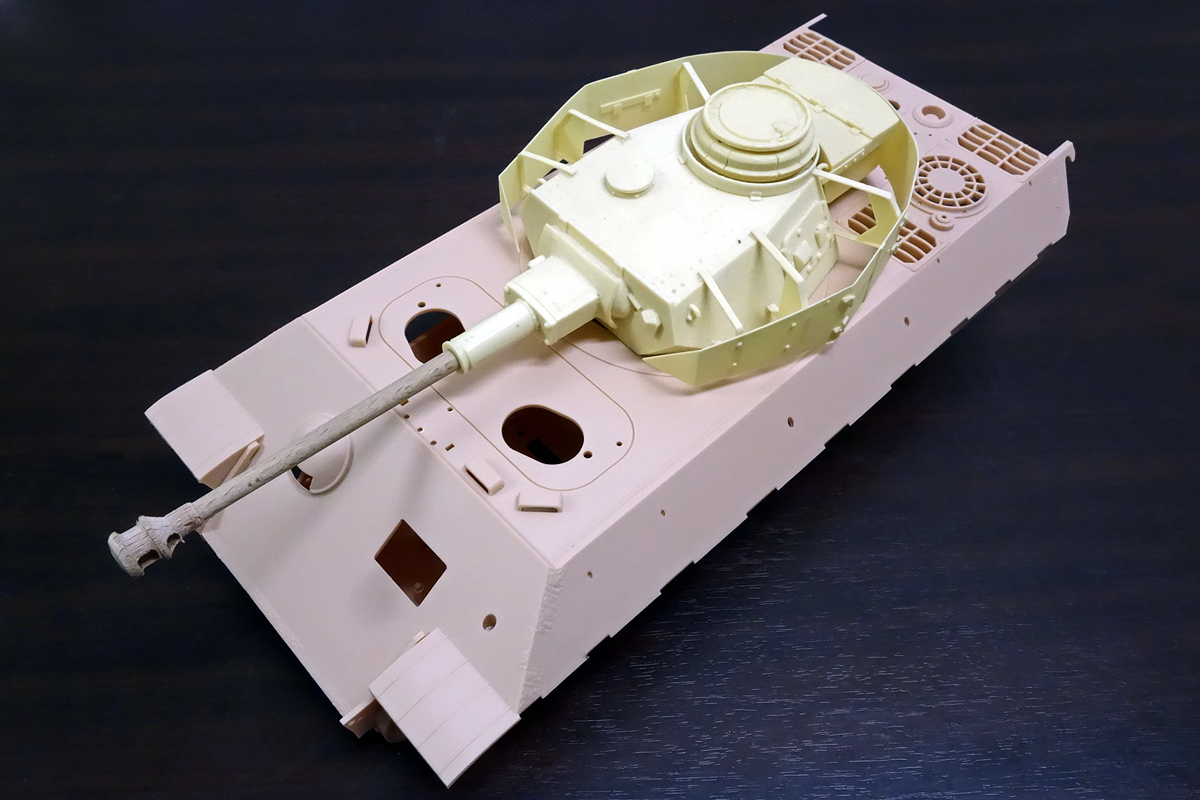
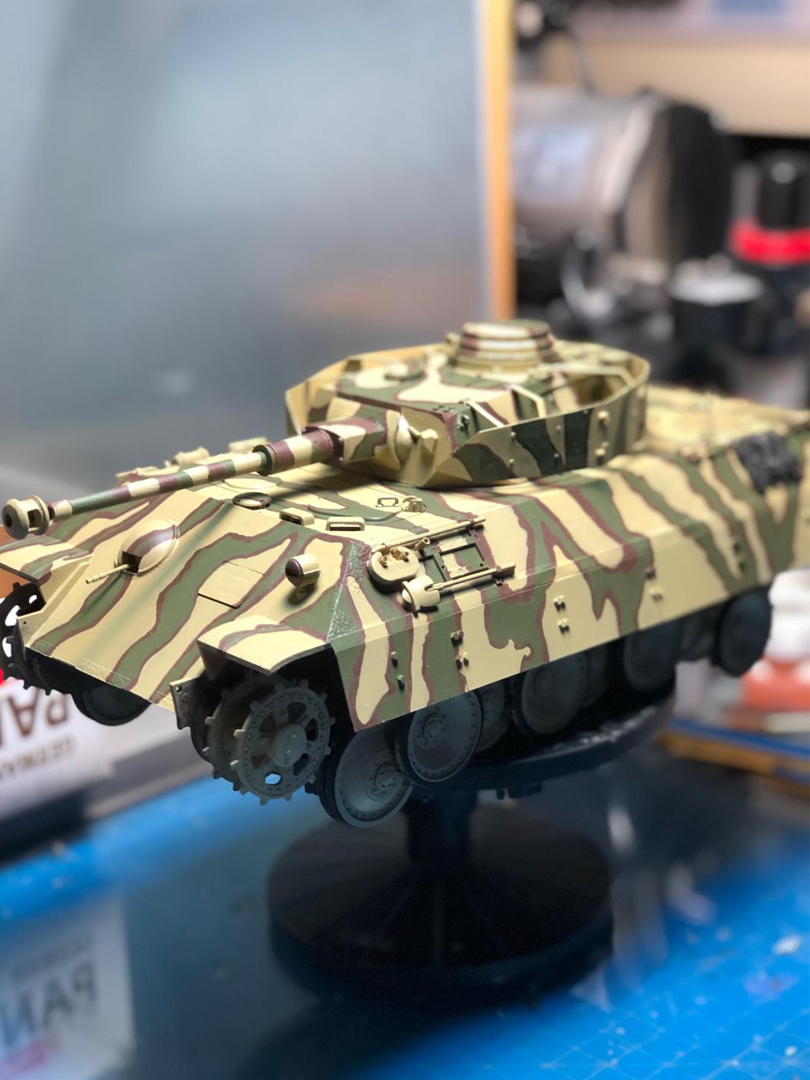
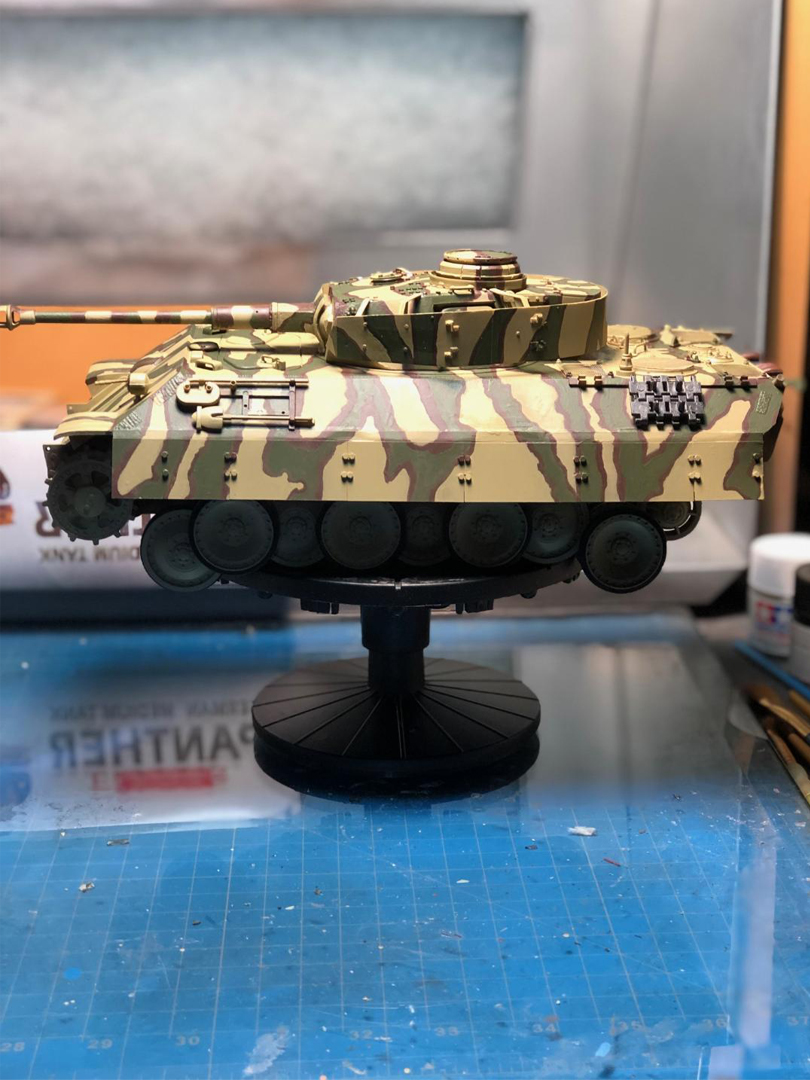
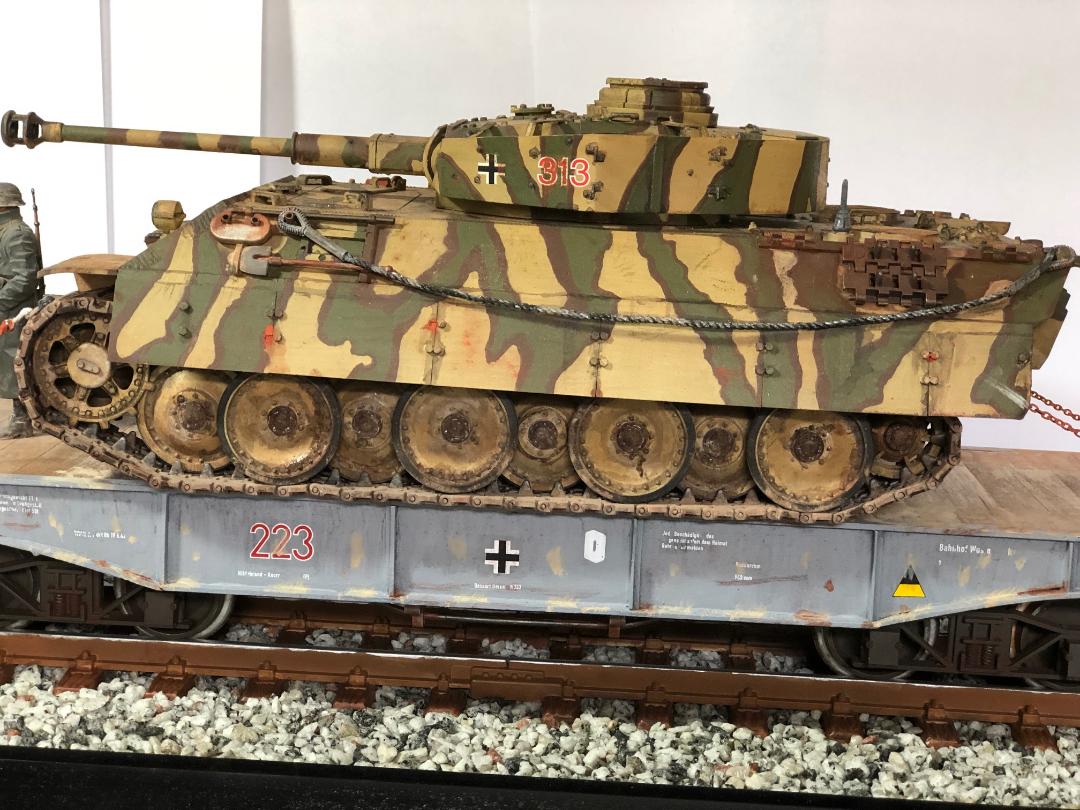
I assembled the Panther hull, suspension, etc. As previously mentioned, I substituted the road wheels from the Academy 1/25 JagdPanther as I was told that they were more accurate than those included in the Tamiya kit. I used the Aber 1/25 Grilles for Panther A & D set and the Aber 1/25 photo etched side skirts for Panther A & D. I affixed the side skirts in my own make shift way as the method shown in the instructions is SO tedious and difficult and, even in 1/25 scale includes parts that seem almost microscopic. I use Evergreen Models Sheet Styrene in .4mm thickness. I cut sections that I glue to the hull sides and bend them when dry. I then affix the side skirts ( I use ZAP cyanoacrylate glue for both ). I then use MENG 1/35 large plastic nuts and bolts to portray the fasteners. Not accurate, I know, but they look good. I also used those bolt heads on the Panzer IV turret.
After priming, I used Lifecolors German WWII Tanks set 1 colors Dunkelgelb, Rotbraun/Schokoladen Braun and Olivgrun, along with their Dunkelgelb primer to paint the camouflage scheme.
I applied a few decals, using 1/35 scale because the Panzer IV turret/skirt surface is much smaller than a Panther and the 1/25 Panther decals were too large. Mig Ammo Satin Varnish was applied. I hen started the weathering process. I used the Mig Tan filter for traditional Camo to tie the Camo colors together. Pin washes with Tamiya Panel Line Accent Color in Dark Brown came next. I used Mig rust pigments in all three shades for the exhaust pipes and elsewhere on the tank.
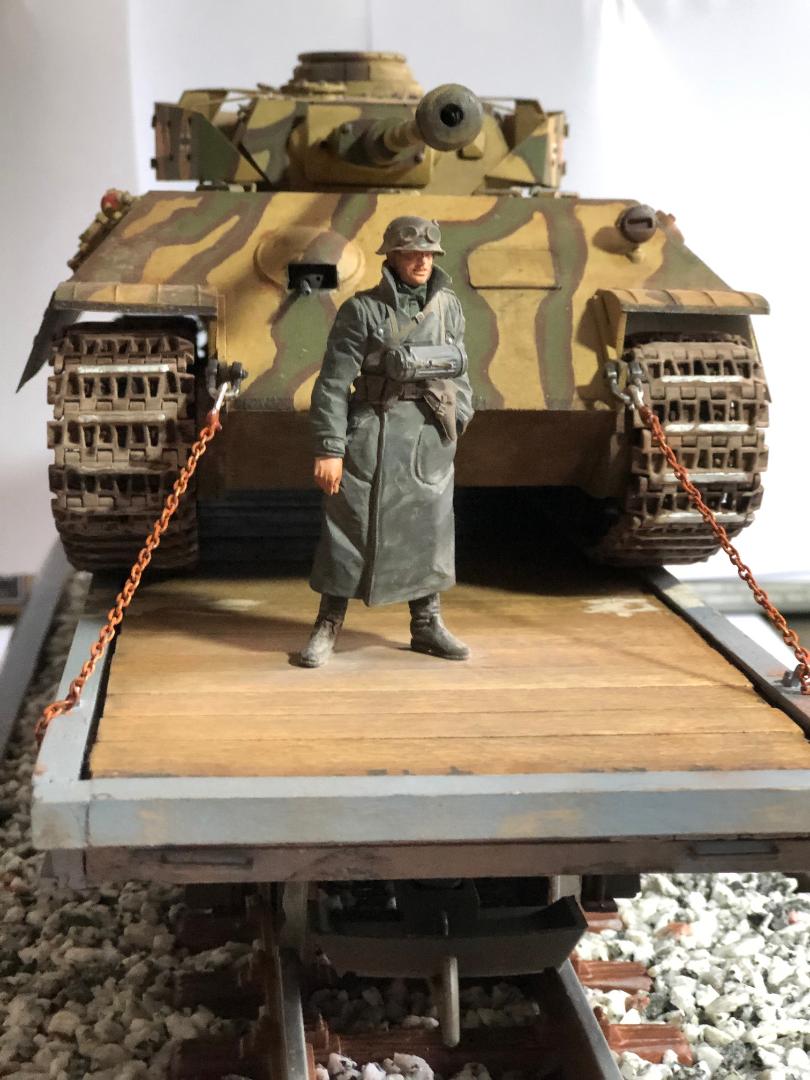
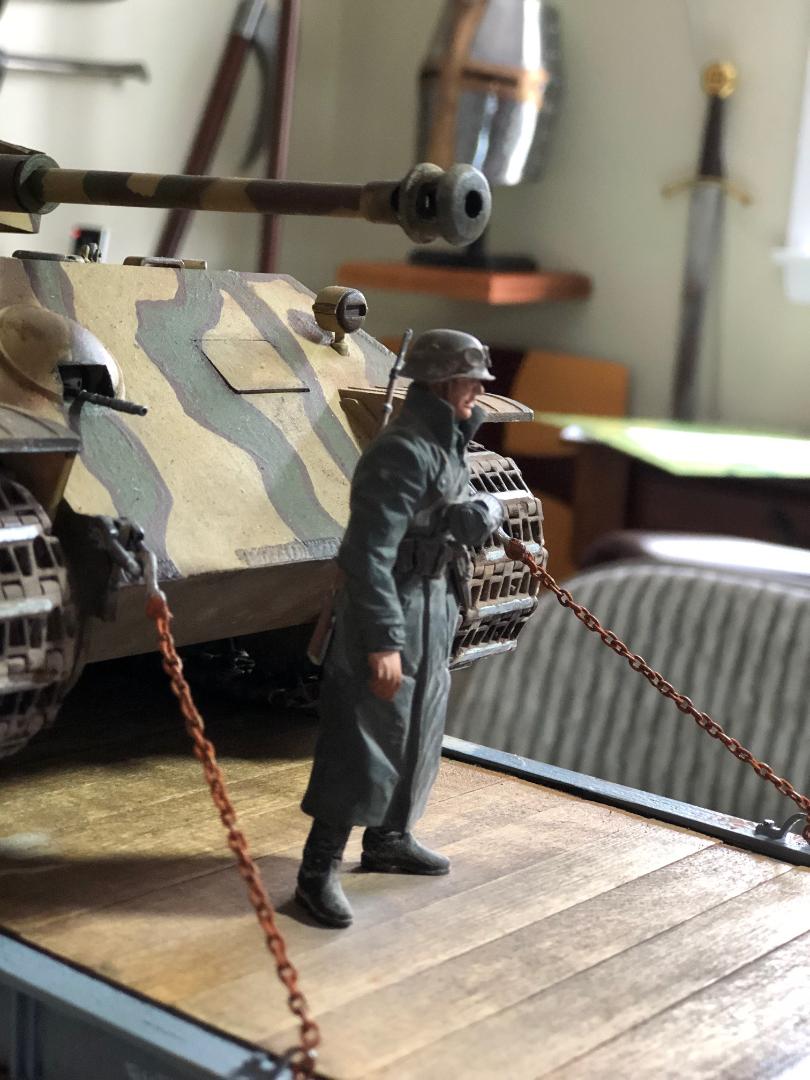
A figure...a good one...can really help to set off a diorama. It adds perspective regarding the size of the vehicle and an additional element to the narrative of the scene. It adds life! I chose Tanker Crafts 1/24 German Motorcyclist resin figure. It's very easy to assemble and the large area of the great coat makes it easy to paint. I used the Lifecolor Flesh paint set, the AK Interactive Leather and Buckles paint set and Lifecolor Guns and Weapons paint set for the figure.
When the time came to put it all together, I thought about how the tank would be anchored to the flatcar. I was unable to find appropriate chocks and wasn't able to scratch build any that I thought looked good. I found the BNL Resins 1/25 Towing Chain set, which includes chains and hooks. I added 4 anchor points to the flatcar using some parts from another kit that looked good and would serve my purpose. I weathered the chain with Mig rust pigments and actually hooked them to the vehicle towing hooks and anchor points on the flatcar. I figured that mud would collect on the flatcar from the loading of the tank so used Mig Heavy Mud and mud pigments applied using extra track sections to leave track marks as well as mud puddles on the flatcar.
The finished diorama came out really nice in my opinion. It was certainly a labor of love and I was very pleased to be able to bring my vision to life and do justice to the picture I based my diorama upon.
Thanks for coming along with me on this project.
I have a friend in Australia, Danny Lapthorne, who is a modeler extraordinaire. He creates 1/25 scale resin model kits of full vehicles and partial vehicles. He had a1/25 Panzer IV turret that was exactly what I needed. I had a number of 1/25 scale Panther kits. I decided to use the Tamiya 1/25 Panther, but substituted the road wheels from the Academy 1/25 JagdPanther for accuracy.
The key to the diorama I planned was finding a 1/25th scale railcar. I poked around and was lucky to find exactly what I needed on Ebay. The listing was for a "Handcrafted Models G Gauge 1/25" Scale Short Flat Car Wooden Construction kit".
The Flat car needed the addition of wooden slats to create a flat surface for Tank transport, as it had a depression across the complete length of the car. I purchased 1/2 X 1/4 lengths of wooden stock and cut the necessary number to span the length of the railcar. I shellacked them and was very pleased at the resulting color and look. The flatcar had no frame, supports, trucks or couplers so I nosed around again and found exactly what I needed on Ebay. I purchased "USA Trains MaineFrame with Supports, Truck Wheels and Couplers". I attached all the parts and painted them in various acryllics. I then primed the flatcar with Vallejo acrylic Polyurthane primer and painted it light grey with Vallejo acrylic.
I looked for 1/25 scale German railway markings but couldn't find any. The closest I could come was the Archer Fine Transfer 1/35 Leopold set, which includes all kinds of railway markings, so I used that. Unfortunately, the set I received had issues with adhesion to the film which resulted in damaged and/or partial markings getting onto the flatcar, but I felt that a Tank transport railcar would be scratched up, marked up and stained by dirt and oil so I let my results stand. ( Archer Transfers sent me a free set to replace the damaged one. They are a great company!
I searched out 1/25 scale track and found it on line. The version I found which served my purposes was plastic. One section was too short and 2 sections too long so I bought 2 and cut them with a razor saw on the ends and connected them in the middle.
I found 1/25 scale ballast on a railroad site and bought about 6 pounds of it. I had my good friend and expert base-maker Seth Semenza ( he makes all my diorama bases ) create a 22 1/2 inch long base with a raised section in the center that served as the concrete bed of the railroad track. I shellacked the interior of the base to protect it from the moisture of the watered down scenic glue I would use to fix the ballast in place. I painted the bed using Polly Scale acrylic Concrete.I used the AK interactive wood paint set for the ties and Modelers Decals and Paint Rail Brown acrylic for the rails. I used Deco Arts Dazzling Metallics Shimmering Silver for the top of the rails.
I assembled the Panther hull, suspension, etc. As previously mentioned, I substituted the road wheels from the Academy 1/25 JagdPanther as I was told that they were more accurate than those included in the Tamiya kit. I used the Aber 1/25 Grilles for Panther A & D set and the Aber 1/25 photo etched side skirts for Panther A & D. I affixed the side skirts in my own make shift way as the method shown in the instructions is SO tedious and difficult and, even in 1/25 scale includes parts that seem almost microscopic. I use Evergreen Models Sheet Styrene in .4mm thickness. I cut sections that I glue to the hull sides and bend them when dry. I then affix the side skirts ( I use ZAP cyanoacrylate glue for both ). I then use MENG 1/35 large plastic nuts and bolts to portray the fasteners. Not accurate, I know, but they look good. I also used those bolt heads on the Panzer IV turret.
After priming, I used Lifecolors German WWII Tanks set 1 colors Dunkelgelb, Rotbraun/Schokoladen Braun and Olivgrun, along with their Dunkelgelb primer to paint the camouflage scheme.
I applied a few decals, using 1/35 scale because the Panzer IV turret/skirt surface is much smaller than a Panther and the 1/25 Panther decals were too large. Mig Ammo Satin Varnish was applied. I hen started the weathering process. I used the Mig Tan filter for traditional Camo to tie the Camo colors together. Pin washes with Tamiya Panel Line Accent Color in Dark Brown came next. I used Mig rust pigments in all three shades for the exhaust pipes and elsewhere on the tank.
A figure...a good one...can really help to set off a diorama. It adds perspective regarding the size of the vehicle and an additional element to the narrative of the scene. It adds life! I chose Tanker Crafts 1/24 German Motorcyclist resin figure. It's very easy to assemble and the large area of the great coat makes it easy to paint. I used the Lifecolor Flesh paint set, the AK Interactive Leather and Buckles paint set and Lifecolor Guns and Weapons paint set for the figure.
When the time came to put it all together, I thought about how the tank would be anchored to the flatcar. I was unable to find appropriate chocks and wasn't able to scratch build any that I thought looked good. I found the BNL Resins 1/25 Towing Chain set, which includes chains and hooks. I added 4 anchor points to the flatcar using some parts from another kit that looked good and would serve my purpose. I weathered the chain with Mig rust pigments and actually hooked them to the vehicle towing hooks and anchor points on the flatcar. I figured that mud would collect on the flatcar from the loading of the tank so used Mig Heavy Mud and mud pigments applied using extra track sections to leave track marks as well as mud puddles on the flatcar.
The finished diorama came out really nice in my opinion. It was certainly a labor of love and I was very pleased to be able to bring my vision to life and do justice to the picture I based my diorama upon.
Thanks for coming along with me on this project.

About the Author


Comments

Fun topic and a nice setting, Joe. I like the camo and the overall look of the build. Congrats!
OCT 04, 2019 - 07:35 AM

I like what you've built and hate to nitpick but.... I really don't believe that any Reichbahn rolling stock including transport cars like this carried the Balken crosses on their sides as you've chosen to do. Even military rolling stock didn't as it was completely unnecessary. "Oh look, it's a German train as I can see the crosses" probably didn't come up very often in conversations trackside. Otherwise I really like the build. And as to the rear bin and turret skirts on the Pz IV turret you've got mounted on the Panther hull: to the best of my knowledge this vehicle was only used by S.Pz ABT. 653 as a command variant and in Munch's book on the unit there are numerous pics of that particular tank, including a side shot illustration on the numbered equivalent of p. 460 in the colour plates section that shows it as you've built it EXCEPT for the turret numbers that you've chosen to apply. I guess engine access was a lady. You decide.
OCT 04, 2019 - 09:46 PM
Please note that I used the b-word and not "lady" as the prig program chose to render it. Oh look, we've got a NUN on overwatch! Swearing has little place on any conversation but this is a minor word that we as adults should be able to banter about as a fitting descriptive as applied here.
OCT 04, 2019 - 09:49 PM

Great build!!!
I had been playing with the idea of doing something very similar. As I have been looking at photos, I haven't noticed any with tie-downs. Looks like they would roll it up on the front chock, then jam the back ones in then roll it back.
Not sure if they had any kind of spikes to embed them in the wooden deck?
OCT 05, 2019 - 01:12 AM
Using spikes in the wooden deck sounds like a time-consuming and destructive option. Normal practice would be to chock with wooden baulks and chain down using tensioners to tighten the chains. That doesnt damage to rolling stock and makes it easy to secure and release the load.
OCT 05, 2019 - 10:19 AM
The metal chocks that the US Army uses have molded on teeth specifically for that purpose. Tears up the decking, but the tank hopefully won't move very far.
Then the chains go on. But like I said, I haven't found photos that show the Germans used tie downs. The box art for Saber models SSYS and Takom has a Panther with a flatcar and neither show cables. Not trying to bag on your build, just was curious to the German railhead procedures
Would it be a weight issue? or a Speed issue as to whether they need them? I Don't know.
We would railhead 14 M-1's, a M88 and 2 M-113's and that train seemed like it was flying. And we would torque those things down.
OCT 05, 2019 - 02:32 PM
Ah, I misinterpreted your use of the word spikes, by which I assumed you meant something like pitons! Teeth on the chocks sounds much less dramatic.
OCT 05, 2019 - 07:33 PM
Great looking build Joe, especially like the wood flooring on the flat car and the camo treatment on this baby. Glad you got this posted and hope to see more in the future. BTW,is this one heading to Albany in Dec?
OCT 06, 2019 - 02:49 PM
Regardless of evidence of tie downs being used in real life. I think the chains look good and add an extra dimension to the dio.
Seth
OCT 07, 2019 - 06:37 AM
Copyright ©2021 by Joseph Leoce. Images and/or videos also by copyright holder unless otherwise noted. The views and opinions expressed herein are solely the views and opinions of the authors and/or contributors to this Web site and do not necessarily represent the views and/or opinions of Armorama, KitMaker Network, or Silver Star Enterrpises. All rights reserved. Originally published on: 2019-10-04 02:39:19. Unique Reads: 6055

WEB HOSTING BY


Copyright ©2021 Armorama and Kitmaker Network, a subsidiary of Silver Star Enterprises
All Rights Reserved. Please read our Conditions of Use and Privacy Policy.
All Rights Reserved. Please read our Conditions of Use and Privacy Policy.