Amazing work on the windmill! I like the camo on the Tiger too. What paint is used on the darker shade and what brand? Is it a wine color?
Jeff
Dioramas
Do you love dioramas & vignettes? We sure do.
Do you love dioramas & vignettes? We sure do.
Hosted by Darren Baker, Mario Matijasic
Ardennes tower mill diorama

PantherF

Joined: June 10, 2005
KitMaker: 6,188 posts
Armorama: 5,960 posts

Posted: Thursday, September 06, 2007 - 12:16 PM UTC
wedgetail

Joined: December 01, 2001
KitMaker: 93 posts
Armorama: 90 posts

Posted: Thursday, September 06, 2007 - 01:02 PM UTC
Tony
Good grief ! I've been building armour models for nearly 30 years and wouldn't tackle something that complex - you have me in awe.
A few comments (hopefully constructive):
1. If it's supposed to be a scene from the Ardennes offensive, November is too early - the offensive kicked off on 16 December.
2. I think the spots on your camo may be a bit large, but I stand to be corrected on that.
3. I agree about the wheels - I usually paint mine in dark yellow and then the same colour as the ground - they became very dirty very quickly particularly in slushy terrain.
4. Suggestion for the base material is tile grout. It's very fine grained, precoloured and cheap. Here I can buy a 2 kilo bag for about $A8, which will last me for quite few dios. In addition, it comes in a wide range of useful earthy colours.
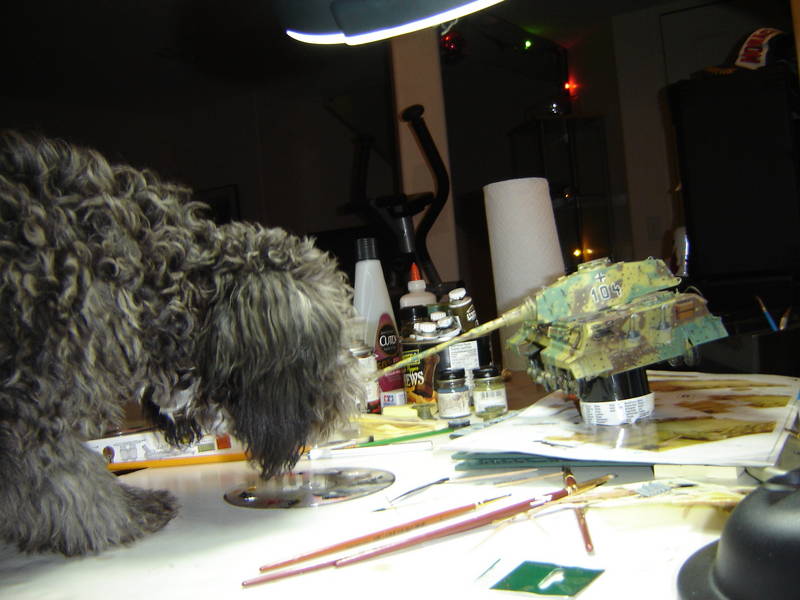
Hope the dog is helpful - I usually have a cat keeping an eye on what I'm doing.
Regards
Rob

873rdJoltinJosie

Joined: June 09, 2007
KitMaker: 45 posts
Armorama: 43 posts

Posted: Friday, September 07, 2007 - 09:35 AM UTC
Awesome work.
I love the tree...you should make and sell them!
Camo is outstanding.
Leave the mill...
I love the tree...you should make and sell them!
Camo is outstanding.
Leave the mill...
skortch

Joined: November 11, 2006
KitMaker: 28 posts
Armorama: 27 posts

Posted: Saturday, September 08, 2007 - 06:29 PM UTC
I truly cannot believe these responses and was not prepared for this. I am overwhelmed by all the kind and positive constructive feedback as I really had no idea that I would recieve many responses at all. I have not posted here before although I have been on this site since last November and I guess was a little timid to post my pictures not knowing what kind of responses I'd receive.
Thanks James, Mike, petros, Thomas, Bob, jafo, Matthew, Simon, haviklahagus, Jeff, Rob & J T for your recent messages.
Petros, I think I'll follow that advice. I started putting the observation crew together as one of them can be seen in the cutout side pic of the tower. That would make for 16 men altogether and was thinking of cutting some out. I think I'll take your advice, maybe practice painting on the obsevation guys and stick with the original dragon crew. Don't expect too much talent here. I bought all the stuff to paint, but I'm nervous to even start them. I thought I'd try artist oils. Thanks alot.
Bob, those are great sites, tks. I hate to admit it, but I tried to make this dio to fit in my glass cabinet (yeah, bought one of those too) and yet try to keep a decent scale. and believe me, it's a tight fit. I didn't want to tree to impede the sails but tried to think that the mill might have been decomissioned for long enough for the tree to grow close. That's kinda how big the tree ended up after I was finished and so.. tight for room. I didn't know about the extra stages for different mills. Tks for that but I don't think I can make this mill higher now. Do you have any suggestion for changes to make this more accurate? I'll look at those sites for some ideas. I'd like to maybe keep the tree. Would a compromise be to build a bigger base to stretch things out or do you think that's getting carried away for a first dio and just cut the chase? Suggestions?
matthew, thanks again. I think you and Steve may be right with the wheel colors. I'm trying to remember where I got this idea of mixed colors and can only find in Osprey King Tiger 1942-45 by Tom Jentz & Hilary Doyle that showed them with at least 2 colors with no symmetry though. If I can't locate where I started with this, well, then I think I might follow your direction. Tks.
Simon. Making the dog was tough. Had that guy for 15 years but unfortunately this project outlived him. I hope to finish his work and promise to show you the final result. tks.
haviklahagus. (havik lives several hundred miles from here and I persuaded him to join this site as I was spending much time trying to get into this hobby). We spent many hours looking at other members work and you've inspired much of this dio with great ideas and have been great honest support and critic and convincing me to post here.
Thanks haviklahagus. I think you own half this work.
Jeff. After basecoat and black preshading, I used ModelMaster Acryls: panzer dunkelgelb 1943 1/2, olivgrun and for the brown I used panzer schokoladenbraun. What a tough act. I think I bought every Tamiya color of green and browns at the hobby shop in town and still couldn't get things right. See the color practice card. I made lots of cards blending colors prior to finding what I thought might be close and ended up in the end finally using these ModelMaster colors.
I checked this and many other sites and tried to match things.
(http://www.panzerworld.net/colours.html : 1944-08-19: all tanks were painted factory pattern called Hinterhault-tarnung, base coat of dukelgelb RAL 7028, with olivgrun RAL 6003 & rotbraun and RAL 8017 stripes. However in Sept '44 base coat went to red primer and then Oct '44 order was for camo of 7028, 6003 & 8017. Whatever all that is. Info overload for me.)
I thought I'd try to keep a slight soft edge to the camo.
Then I added a clear coat of future, dabbed the dots (with a piece of putty used for the outline prior to airbrushing), decals, pinwash, coat of satin future, then 10 filter coats with artist oils/thinner (burnt sienna, mars black, titatian white, yellow ochre, sap green) in different blends. 'Painting still probably only half finished.
Rob.
1) I'm no expert with this campaign. Obviously.
I couldn't figure out if this tank was sent to the front by train or got there on its own. So I was assuming that it might have travelled there and in my wild imagination, it somehow stopped overnight next to this towermill. Somewhere prior to or at Ardennes after leaving the Rhienland area and then would have had to leave a bit earlier, say in November to make the battle. It would have needed a fuel suppy though. Man, is this ever starting to sound like a science fiction movie.
I saw pics of towermills in germany but probably further to the east?
2) Good observation. I looked at books tonight. You're right. But after filters have since been done, big dots it is. Tks.
3) I think I'm convinced. Yellow wheels are going to look pretty good. Tks again.
4) Thanks for the tip as I thinking of using premixed wall plaster and maybe mix the top layer with Woodland Scenics earth color burnt umber. Although I wasn't sure if I should airbrush the surface black instead and then hand paint some more textures before adding grass and stuff. What do you think? Preshade the surface?
The dog was very useful. Old dogs and modeling kinda go together. I've since got a new apprentice but I think so far she would only p.. on my work.
J Titus. Wow. The toughest of all decisions. To keep or toss the mill for another project and then the tree might as well go as well.
Unless someone finds the ruins of a towermill where I think this should be, my accuracy is out to lunch. I'm probably going to have some greater mistakes here yet.
Thanks alot for this encouragement. Appreciated.
Tony
wedgetail

Joined: December 01, 2001
KitMaker: 93 posts
Armorama: 90 posts

Posted: Saturday, September 08, 2007 - 08:56 PM UTC
Rob.
1) I'm no expert with this campaign. Obviously.
I couldn't figure out if this tank was sent to the front by train or got there on its own.
One of the big problems with the KT was their mechanical reliability - the engine and drive train were just not adequate for the 70 ton weight of the vehicle. They were moved by train wherever possible
2) Good observation. I looked at books tonight. You're right. But after filters have since been done, big dots it is. Tks.
Such is life . . . .
3) I think I'm convinced. Yellow wheels are going to look pretty good. Tks again.
Not a problem
4) Thanks for the tip as I thinking of using premixed wall plaster and maybe mix the top layer with Woodland Scenics earth color burnt umber. Although I wasn't sure if I should airbrush the surface black instead and then hand paint some more textures before adding grass and stuff. What do you think? Preshade the surface?
The only problem with preshading the surface is that you can guarantee that when you chip the surface, you'll have a fleck of white (or whatever) showing where you don't want it.
Have fun.

skortch

Joined: November 11, 2006
KitMaker: 28 posts
Armorama: 27 posts

Posted: Tuesday, February 17, 2009 - 06:46 PM UTC
It's been quite a while since I last updated this post as I moved houses last year, things got busy and I lost some progress.
I decided to put aside the base and spent the last 3 months working on the figures. I used Grumbacher oil paints and finished them off with a couple coats of matt future. Again, a real learning experience went down here. What I did learn is that they were a tough act. But enjoyable.
I also conceded to keeping the tiger with this diorama. I guess mainly because that was the initial idea. Don't let that hold back on your comments.
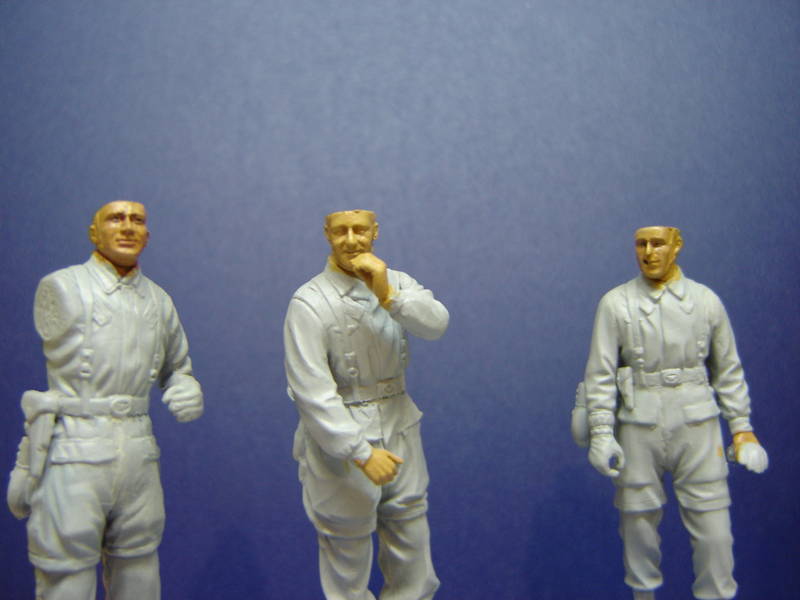
Two of the three camo colors on the fallschirmjagers.
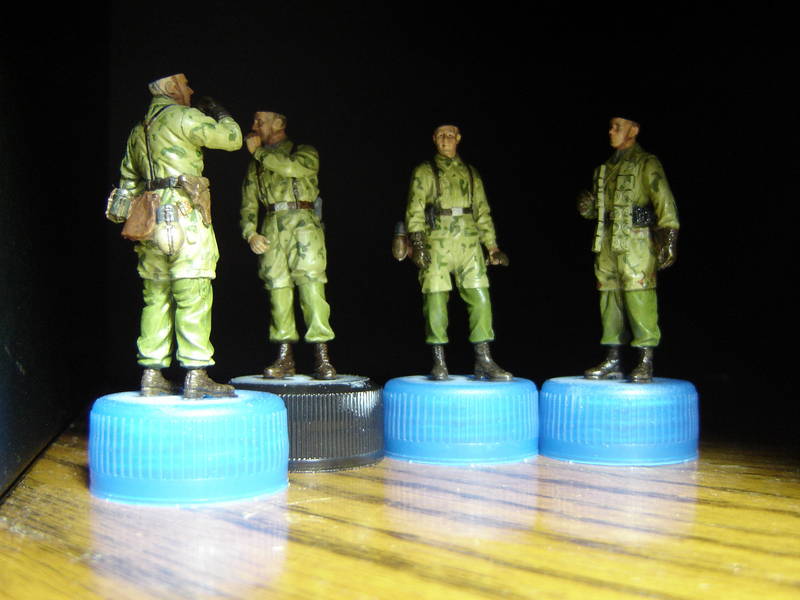
Three of the completed figures after matt future coat.

The Dragon figures along with a few of the Tamiya observation crew.
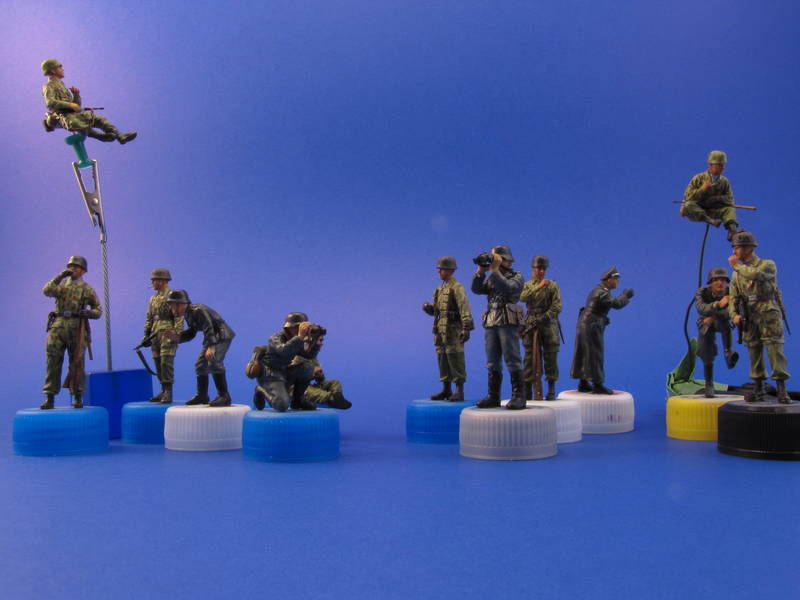
I decided to put aside the base and spent the last 3 months working on the figures. I used Grumbacher oil paints and finished them off with a couple coats of matt future. Again, a real learning experience went down here. What I did learn is that they were a tough act. But enjoyable.
I also conceded to keeping the tiger with this diorama. I guess mainly because that was the initial idea. Don't let that hold back on your comments.


Two of the three camo colors on the fallschirmjagers.

Three of the completed figures after matt future coat.
The Dragon figures along with a few of the Tamiya observation crew.

calvin_ng

Joined: June 23, 2008
KitMaker: 1,024 posts
Armorama: 753 posts

Posted: Tuesday, February 17, 2009 - 07:02 PM UTC
great looking KT and i love the way you made the windmill, its reminds me of the battle of the bulge campaign in medal of honor allied assault 


 great work


 great work
Petran

Joined: October 30, 2007
KitMaker: 134 posts
Armorama: 119 posts

Posted: Tuesday, February 17, 2009 - 11:01 PM UTC
Hey Tony great job 
the miniatures are very good painted and the windmill looks perfect

the miniatures are very good painted and the windmill looks perfect
slodder

Joined: February 22, 2002
KitMaker: 11,718 posts
Armorama: 7,138 posts

Posted: Tuesday, February 17, 2009 - 11:18 PM UTC
The figures are nicely done. Weathering to come I assume.
I hope the meeting between your dog and your cat went well
I hope the meeting between your dog and your cat went well

alanmac

Joined: February 25, 2007
KitMaker: 3,033 posts
Armorama: 2,953 posts

Posted: Tuesday, February 17, 2009 - 11:28 PM UTC
Hi Tony
Outstanding work on the diorama. Great building techniques and finishes. Can't find fault in the modelling or the diorama, just the title. Although most tend to associate windmills with Holland, they do of course appear in many other countries I just think you'd be hard pressed to find one in the area your basing this diorama on by the title. Easy enough to change and certainly would not detract from the work you've already done. I guess its finding out if it's possible to have the Tiger in an area known to have windmills our replace it with a tank that is.
Great stuff.
Alan

koenele

Joined: January 17, 2006
KitMaker: 4,194 posts
Armorama: 408 posts

Posted: Wednesday, February 18, 2009 - 12:13 AM UTC
very nice work!
cant wait to see it finished!!
thanks for sharing
Koen
cant wait to see it finished!!
thanks for sharing
Koen
Bowman18

Joined: July 19, 2008
KitMaker: 317 posts
Armorama: 286 posts

Posted: Wednesday, February 18, 2009 - 12:57 AM UTC
Great idea, good groundwork and setting, should look great when painted. 


PolishBrigade12

Joined: January 31, 2009
KitMaker: 380 posts
Armorama: 366 posts

Posted: Wednesday, February 18, 2009 - 05:02 AM UTC
Tony,
Great subject matter, and great imagination. Getting a dio idea can be challenging at times. Question; you tree has the plater coat, was it sprayed on and if so what did you use to accomplish that effect? I've read several articles on wire trees, but yours looks pretty convincing.
Thx, Ski. Just south of you a few clicks.

smitsan

Joined: September 05, 2008
KitMaker: 51 posts
Armorama: 50 posts

Posted: Thursday, February 19, 2009 - 09:07 PM UTC
 very nice diorama is coming!

skortch

Joined: November 11, 2006
KitMaker: 28 posts
Armorama: 27 posts

Posted: Friday, February 20, 2009 - 05:14 PM UTC
Calvin, I also like hanging out in the windmills in Battlefield 1942. It gets me in the mood to to get back to work on this. 
Scott: I tried to take a decent pic of the figures but can't seem to get the light right as I did shading with the oils but not sure how much I should weather with chalks. They do look dirtier in real life. I'm a little hesitant to overdo it. Maybe I'll start with dirt on the boots etc. Definitely my hats off to everyone in here that paints figures. I have a whole lot of new respect for everyones work.
I started weathering the tiger the other day and now I'm really nervous. I'm using chalks by diluting with oil paint thinner and dabbing. I'm not sure if you'd recommend that technique and whether I should use the same for figures?
And hey, that 1 pounder 'is' my new dog.
Alan, thanks for the comments. Yes, the title sure appears to be off the mark and the situation unlikely to have actually happened but I hope to try and explain it when I'm done. I guess there's no doubt about it that these guys are not where they're supposed to be.
Koen, Phil & smitsan. Again, thanks for the comments. I started this post asking about tips on ground cover and soon I'll probably be back to ask for feedback on that part of it as I'm very soon to start back at that again.
Ski. I'm adding a few pics of the tree in progress that I hope help show how it was done.
I put several coats of plaster on the wire working from the inside out. I manhandled the little branches as I went along to get to the inside areas. I tried to bend the little branches into place as I progressed. Sometimes the plaster would break off if it was dry and I'd have to touch-up. I kept a little water in a dish on hand to keep the paint brush fluid.


I carved the bark into the tree on as much of it as I could reach. Maybe dabbing/pressing something like a sponge into the last layer of wet plaster could also have done a neat effect.
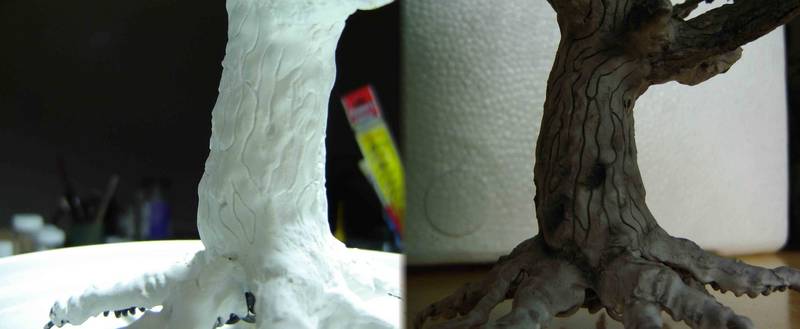
This was the tree plaster finished and in the paint booth. I tried painting with acrylics but it looked like mud. I also tried washes but the plaster just soaked it up. Then I put a coat of future on it, painted it grey and then put several washes over it. That seemed to work a lot better. Then I painted the branch tips with very heavy dark washes. I put the leaves (oregano) on individually with white glue. I also added some extra little branches with spanish moss. I used little pieces of moss, dragged them through a solution of white glue / water and then rolled the wet pieces in a bowl of oregano. Then I put them into the tree in different areas.
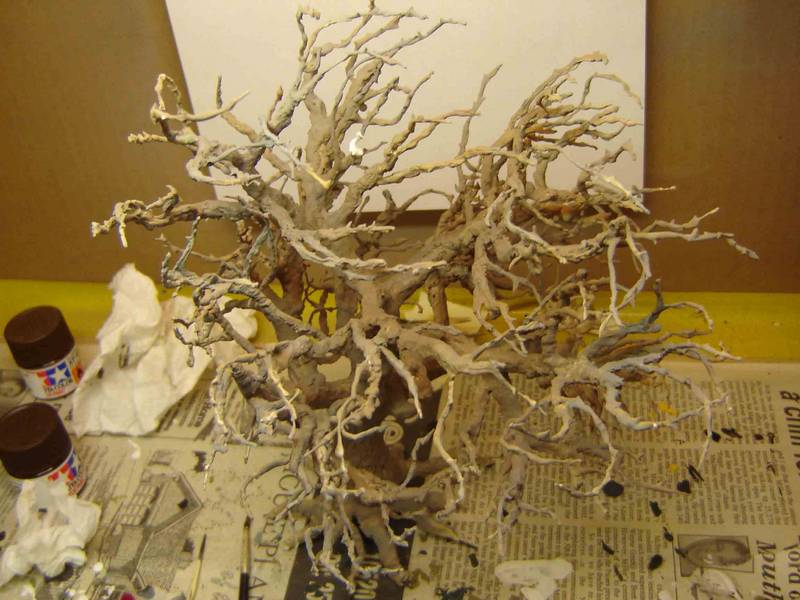
I thought I'd throw in this picture. On the top shelf of the cabinet is the two trees I built that were supposed to originally go into this dio. Also there is my first model I built just before this dio (fw190d11). Railroad type trees. I was really proud of those trees. That was about the time I found this site and got some tips on wire ones. (I still kinda like those old trees).
Thanks guys,
Tony
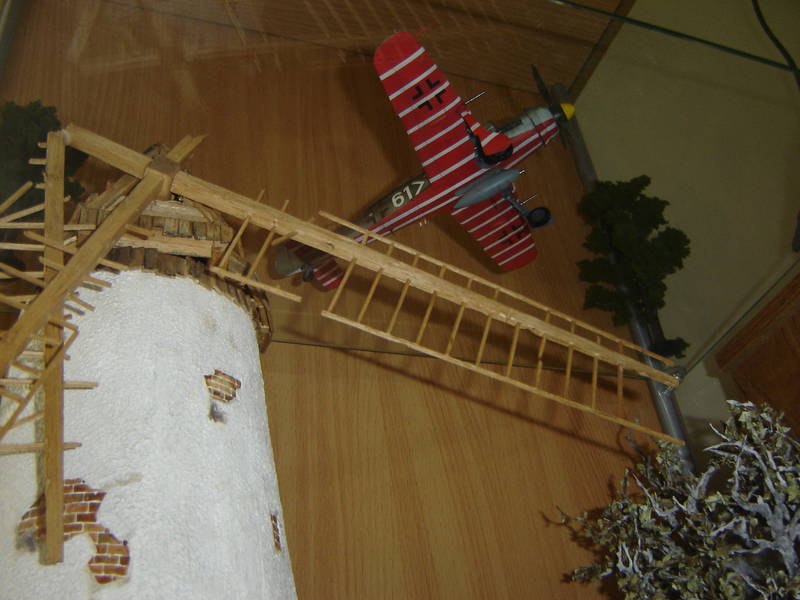

Scott: I tried to take a decent pic of the figures but can't seem to get the light right as I did shading with the oils but not sure how much I should weather with chalks. They do look dirtier in real life. I'm a little hesitant to overdo it. Maybe I'll start with dirt on the boots etc. Definitely my hats off to everyone in here that paints figures. I have a whole lot of new respect for everyones work.
I started weathering the tiger the other day and now I'm really nervous. I'm using chalks by diluting with oil paint thinner and dabbing. I'm not sure if you'd recommend that technique and whether I should use the same for figures?
And hey, that 1 pounder 'is' my new dog.

Alan, thanks for the comments. Yes, the title sure appears to be off the mark and the situation unlikely to have actually happened but I hope to try and explain it when I'm done. I guess there's no doubt about it that these guys are not where they're supposed to be.
Koen, Phil & smitsan. Again, thanks for the comments. I started this post asking about tips on ground cover and soon I'll probably be back to ask for feedback on that part of it as I'm very soon to start back at that again.
Ski. I'm adding a few pics of the tree in progress that I hope help show how it was done.
I put several coats of plaster on the wire working from the inside out. I manhandled the little branches as I went along to get to the inside areas. I tried to bend the little branches into place as I progressed. Sometimes the plaster would break off if it was dry and I'd have to touch-up. I kept a little water in a dish on hand to keep the paint brush fluid.


I carved the bark into the tree on as much of it as I could reach. Maybe dabbing/pressing something like a sponge into the last layer of wet plaster could also have done a neat effect.

This was the tree plaster finished and in the paint booth. I tried painting with acrylics but it looked like mud. I also tried washes but the plaster just soaked it up. Then I put a coat of future on it, painted it grey and then put several washes over it. That seemed to work a lot better. Then I painted the branch tips with very heavy dark washes. I put the leaves (oregano) on individually with white glue. I also added some extra little branches with spanish moss. I used little pieces of moss, dragged them through a solution of white glue / water and then rolled the wet pieces in a bowl of oregano. Then I put them into the tree in different areas.

I thought I'd throw in this picture. On the top shelf of the cabinet is the two trees I built that were supposed to originally go into this dio. Also there is my first model I built just before this dio (fw190d11). Railroad type trees. I was really proud of those trees. That was about the time I found this site and got some tips on wire ones. (I still kinda like those old trees).

Thanks guys,
Tony

motorbreath23

Joined: December 29, 2008
KitMaker: 159 posts
Armorama: 138 posts

Posted: Friday, February 20, 2009 - 07:08 PM UTC
Tony I'm glad you mentioned BF 1942 cuz that's what your windmill immediately reminded me of. The Bocage map to be precise, without looking at the title I would have thought you were doing a Normandy dio.
The work looks great! Keep it up.
The work looks great! Keep it up.

Posted: Friday, February 20, 2009 - 09:48 PM UTC
Hi Tony,
Just dropped in on this one, very imprerssive work all round. Everything is coming together really well..
Great stuff.
Al
Just dropped in on this one, very imprerssive work all round. Everything is coming together really well..
Great stuff.
Al
BobCard

Joined: August 09, 2006
KitMaker: 1,008 posts
Armorama: 847 posts

Posted: Saturday, February 21, 2009 - 01:50 AM UTC
Hello again,
Nice to run into this again and see your going to finish it.
Again The windmill is great the way you have it and the figures your adding look great.
The only recommendations I can suggest is the painting of the sails, I agree with your idea about how tall you can make it.
Great to see your going to finish,
Bob

tjkelly

Joined: May 04, 2007
KitMaker: 1,132 posts
Armorama: 1,123 posts

Posted: Sunday, February 22, 2009 - 05:45 AM UTC
Great progress Tony! Your figures are excellent! Am enjoying this one, you've done a lot of fantastic work! Thanks for sharing your progress.
Cheers -
Tim
Cheers -
Tim

skortch

Joined: November 11, 2006
KitMaker: 28 posts
Armorama: 27 posts

Posted: Friday, March 27, 2009 - 05:13 PM UTC
I wasn't so sure anyone really wants to see these progress pics but maybe you can see some humor in the amateur approach to starting the ground cover.
The ground cover has been a lot of my concern and I think my first question when I started posting here.
This first photo is me trying several different things. I had covered over the foam underlay with plaster. On the left side you can see I tried painting it brown for ground color. That looked bad. Just below, well I don't know what that blob was mixed with. On the right side I mixed different colors with more wet plaster (kinda grey). That looked really bad. Then I even put some static grass and dirt on top to see what that would look like. I realized that was about as bad as bad gets.

I decided to cover all of the foam underlay with plaster. Then I painted it with some acrylic sand stone colored paint thinking I'd put grass over top of that and it would look OK. You can see the plaster shrunk a bit and cracked near the bottom. It did that in a few more places that I had to re-cover again with more plaster.

At this point I realized I didn't have much for any 'feature' things in the ground so I had to backtrack and cut a hole to put in some rocks.

I put the rocks in place on a bunch of glue. That looked pretty bad too.

I got rid of the glue, washed off the rocks and placed them with some premixed mud.
After researching around this site, I decided to mix some sand I got at a nearby river bank. I baked the sand in the oven and then made a mixture of sand and white glue/water together.
It seemed to work pretty good so I used a bunch of this under the rocks and pressed them into place. I decided to use this mixture for the rest of the dio ground cover.

This is a picture showing the mixture of sand and glue. Easy to apply with a brush. I found it doesn't have to be that wet. In fact since I was away from this dio for better part of a year, the sealed container was in the (beer) fridge for the whole time and was still OK.

I started planting some grass using some premade clumps and drilling holes in the top cover. That sand / glue mix hardens like nails. I later found I could just stick the grass in the mix as I was applying it wet. Really a bonus.

I went out and bought some Woodland Scenics light green field grass to add to the field on the right side of the dio. I thought it was a nice addition because it really looked like something was missing here. I then drove 2 hours again to get some medium green grass to add to some of the other areas.
A lot of time has been spent looking at other dioramas to try and get the grass right. Much discussions in here about how to get it stand up etc. Tough act alright with using industrial equipment. I am using Woodland Scenics static grass flock medium green with some burnt grass thrown in a few places. I haven't painted any of the grass and not sure if I should.
I've did a little drybrushing on the ground and probably should do some more. I find if I work the ground over with wet brushing/paint, it helps to smooth out the rough sand texture a bit.

I was trying to go with a bit sparse cover around the mill. My vision is the tank would be facing a field of grass overlooking a valley on the other side.
Next step is add debris inside the mill, mount the tank (I'll update later on the weathering on it) and place the tree. A couple figures are already in the mill.
Actually next step is to see if any of you see how I can improve this ground cover before proceding.

In response to last comments. Thank you Chris, Alan, Bob & Tim.
Chris, the bocage mill. Yeah I can hang in there and listen to it squeak just for kicks.
Bob, you would have obviously noticed the missing sails in these pics. My 3yr old grandson was doing a dio inspection on his own. A little more battle damage ensued. lol. A little reconstruction and put away for now. I was thinking of staining the sails and weathering with oil wash like the rest of the cap because I was thinking paint would be worn off on an old mill like this. Your comments always appreciated again. And I love the De Arend mill you did. I spend quite a bit of time looking at that dio.

The ground cover has been a lot of my concern and I think my first question when I started posting here.
This first photo is me trying several different things. I had covered over the foam underlay with plaster. On the left side you can see I tried painting it brown for ground color. That looked bad. Just below, well I don't know what that blob was mixed with. On the right side I mixed different colors with more wet plaster (kinda grey). That looked really bad. Then I even put some static grass and dirt on top to see what that would look like. I realized that was about as bad as bad gets.

I decided to cover all of the foam underlay with plaster. Then I painted it with some acrylic sand stone colored paint thinking I'd put grass over top of that and it would look OK. You can see the plaster shrunk a bit and cracked near the bottom. It did that in a few more places that I had to re-cover again with more plaster.

At this point I realized I didn't have much for any 'feature' things in the ground so I had to backtrack and cut a hole to put in some rocks.

I put the rocks in place on a bunch of glue. That looked pretty bad too.

I got rid of the glue, washed off the rocks and placed them with some premixed mud.
After researching around this site, I decided to mix some sand I got at a nearby river bank. I baked the sand in the oven and then made a mixture of sand and white glue/water together.
It seemed to work pretty good so I used a bunch of this under the rocks and pressed them into place. I decided to use this mixture for the rest of the dio ground cover.

This is a picture showing the mixture of sand and glue. Easy to apply with a brush. I found it doesn't have to be that wet. In fact since I was away from this dio for better part of a year, the sealed container was in the (beer) fridge for the whole time and was still OK.

I started planting some grass using some premade clumps and drilling holes in the top cover. That sand / glue mix hardens like nails. I later found I could just stick the grass in the mix as I was applying it wet. Really a bonus.

I went out and bought some Woodland Scenics light green field grass to add to the field on the right side of the dio. I thought it was a nice addition because it really looked like something was missing here. I then drove 2 hours again to get some medium green grass to add to some of the other areas.
A lot of time has been spent looking at other dioramas to try and get the grass right. Much discussions in here about how to get it stand up etc. Tough act alright with using industrial equipment. I am using Woodland Scenics static grass flock medium green with some burnt grass thrown in a few places. I haven't painted any of the grass and not sure if I should.
I've did a little drybrushing on the ground and probably should do some more. I find if I work the ground over with wet brushing/paint, it helps to smooth out the rough sand texture a bit.

I was trying to go with a bit sparse cover around the mill. My vision is the tank would be facing a field of grass overlooking a valley on the other side.
Next step is add debris inside the mill, mount the tank (I'll update later on the weathering on it) and place the tree. A couple figures are already in the mill.
Actually next step is to see if any of you see how I can improve this ground cover before proceding.

In response to last comments. Thank you Chris, Alan, Bob & Tim.
Chris, the bocage mill. Yeah I can hang in there and listen to it squeak just for kicks.
Bob, you would have obviously noticed the missing sails in these pics. My 3yr old grandson was doing a dio inspection on his own. A little more battle damage ensued. lol. A little reconstruction and put away for now. I was thinking of staining the sails and weathering with oil wash like the rest of the cap because I was thinking paint would be worn off on an old mill like this. Your comments always appreciated again. And I love the De Arend mill you did. I spend quite a bit of time looking at that dio.

dioman13

Joined: August 19, 2007
KitMaker: 2,184 posts
Armorama: 1,468 posts

Posted: Saturday, March 28, 2009 - 06:12 AM UTC
Tony, Good dio but as said, the title dosen't match the place. Small potatoes though. I have had to go back and do surgery to add also, most of us do. A good way to paint your ground work is to add paint in your ground mixture as you mix it up. Wait untill your local art shop has a clearance and pick up some water base browns cheap. One thing you could add is an advertizement to the side of the mill. Would give it a touch of color and a deffenite place of location but, make sure it's from the right time period. Other than that, I want to build a mill now that I've seen yours.Great dio.
youpey

Joined: March 11, 2008
KitMaker: 528 posts
Armorama: 468 posts

Posted: Saturday, March 28, 2009 - 08:26 AM UTC
how did you age the wood pieces like that, it looks very realistic
psilocyber

Joined: January 25, 2006
KitMaker: 78 posts
Armorama: 49 posts

Posted: Saturday, March 28, 2009 - 09:51 AM UTC
Nice groundwork 


skortch

Joined: November 11, 2006
KitMaker: 28 posts
Armorama: 27 posts

Posted: Sunday, March 29, 2009 - 11:28 AM UTC
Here's a few photos of the tiger after weathering before I mount it to the dio.
I have to admit I was a bit shell shy to throw dirt on it.
I've used up my space on this site for pics so I threw these on photobucket.
Bob. Too late now to change my title. I'm already in deep with everyone in here about it. It probably won't be the final title of the dio when done. Thanks for your comments and the tips on ground cover / paint etc. I was thinking of a sign under the mill cap. I guess I need to still figure out where the heck I'm at. The De Arend mill that Bob Card made sure does look terrific with the painting on the side but I was thinking of just old plain for this one.
Mike. I used regular pine colored Minwax wood stain for the (balsa) wood and then put a dirty wash of artist oils and thinner after that which seemed to fade it a bit.
Yngve. Tks for the comment. I guess that's kinda what I was after. tks.


Tanker9

Joined: January 31, 2009
KitMaker: 165 posts
Armorama: 141 posts

Posted: Sunday, April 05, 2009 - 01:59 PM UTC
Wow, Fantastic work! I really like that windmill! Your first attempt at dios is superb!
Keep up the great work!
Keep up the great work!
 |


