_GOTOBOTTOM
Armor/AFV: Allied - WWII
Armor and ground forces of the Allied forces during World War II.
Hosted by Darren Baker
Bronco Hotchkiss H39 WIP
Pedro
Visit this Community
Wojewodztwo Pomorskie, Poland
Joined: May 26, 2003
KitMaker: 1,208 posts
Armorama: 1,023 posts
Posted: Sunday, April 13, 2008 - 11:13 AM UTC
Hello fellow modelers!

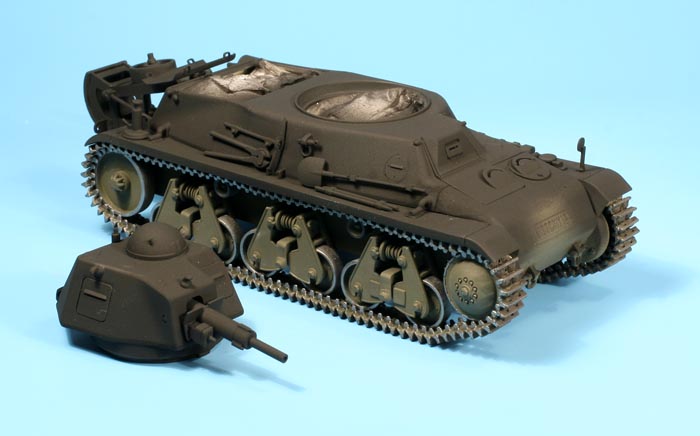
I will post here my progress with Bronco models Hotchkiss H39. It was started several months ago, but was on hold due to compressor failure. Just recently I had painted the interior, put on the tracks and put the whole thing together so it could be painted.

It is a nice kit, some areas take care during assembly, like putting the tracks around the sprockets (going around the sprocket link by link, top to bottom gives best results and easiest fit) and I modified some details per photos. Its been an enjoyable build nonetheless and now awaits painting (I will post progress on that in this thread). BTW, best online reference on the subject is this: Hotchkiss H39 @ Chars francais
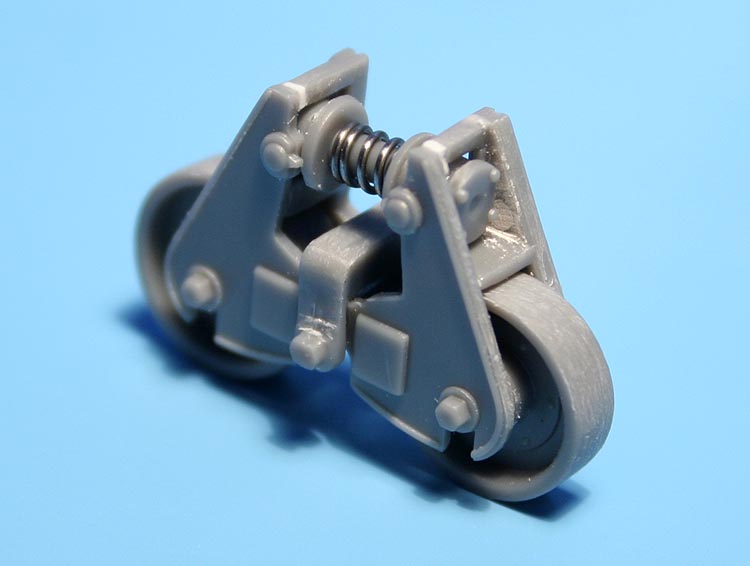

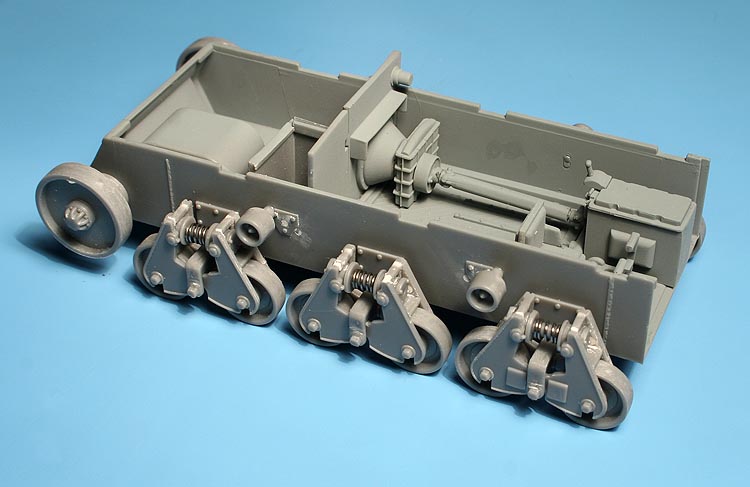
First step : suspension stations assembly, an ok fit but the upper joining stubs are to short on most parts and need to be extended with evergreen (you get the springs in the box)
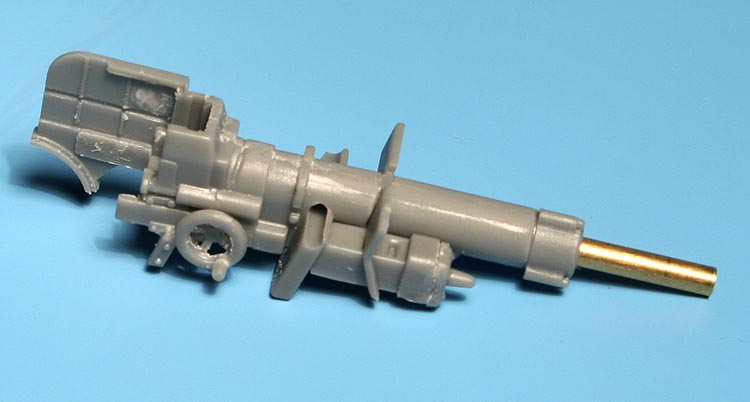

Gun and breech assembly: no problems here just some ejector marks, turned barrel is box stock
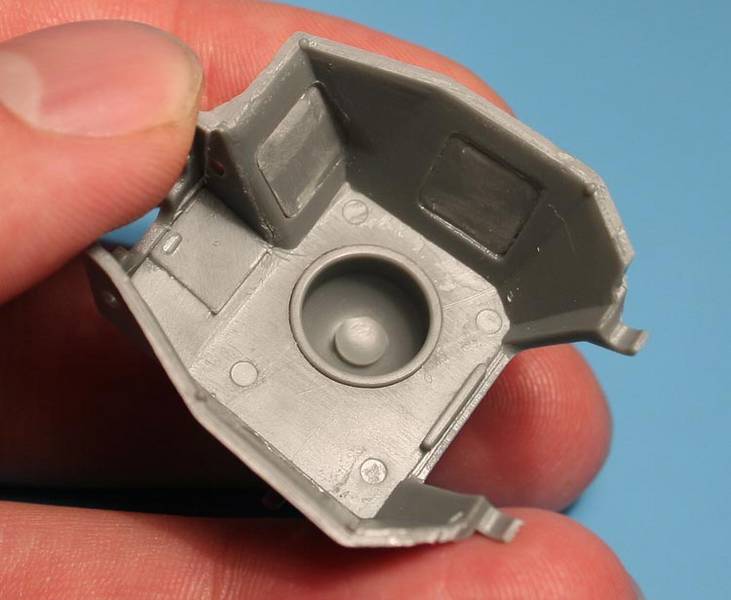

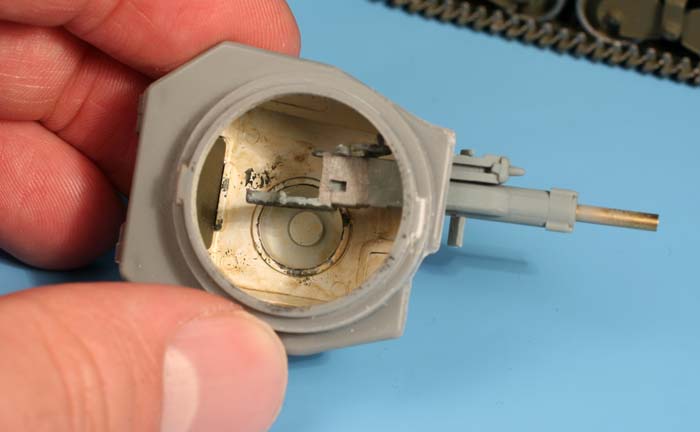
Turret interior: simplified, I only deleted locating tabs on the vision port plates, all interior goes OOB in this one
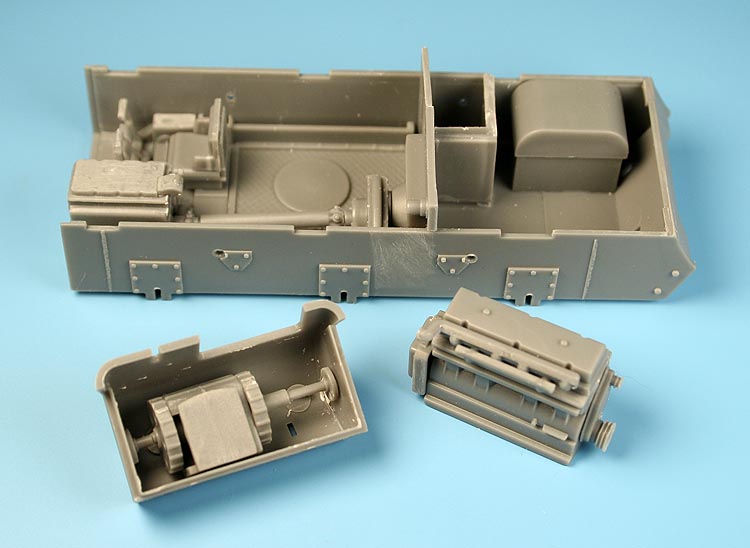

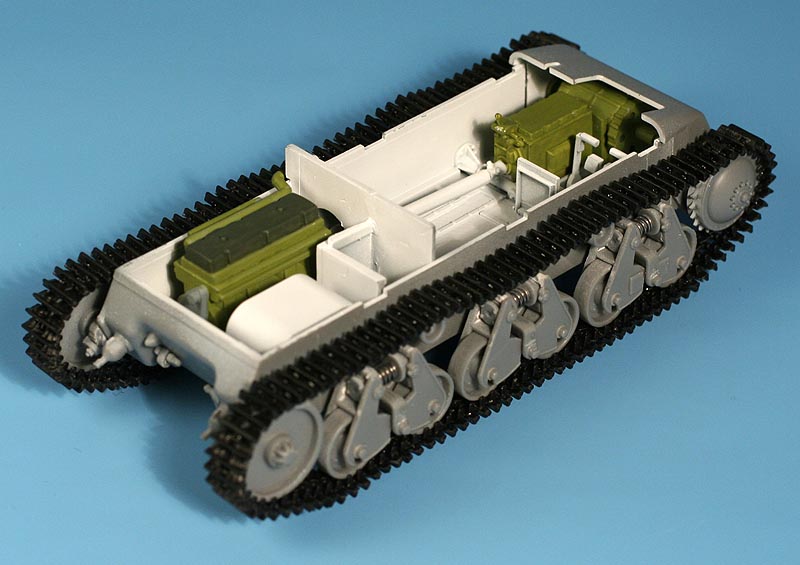
Major interior components, to be put together after painting.


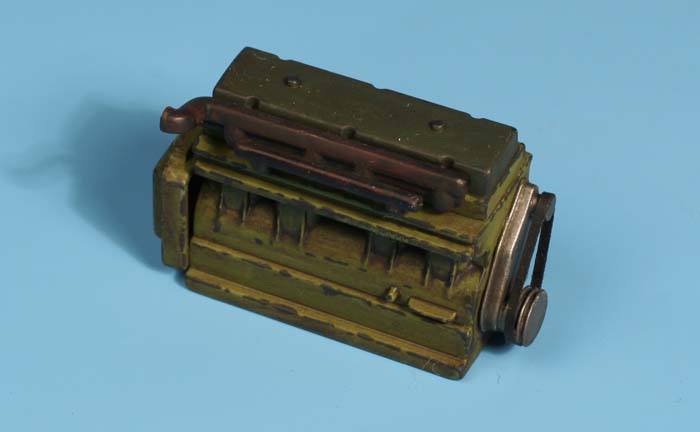
Painted engine, only item added in the interior: the belt ( it won't be even visible after engine hatch will be closed)
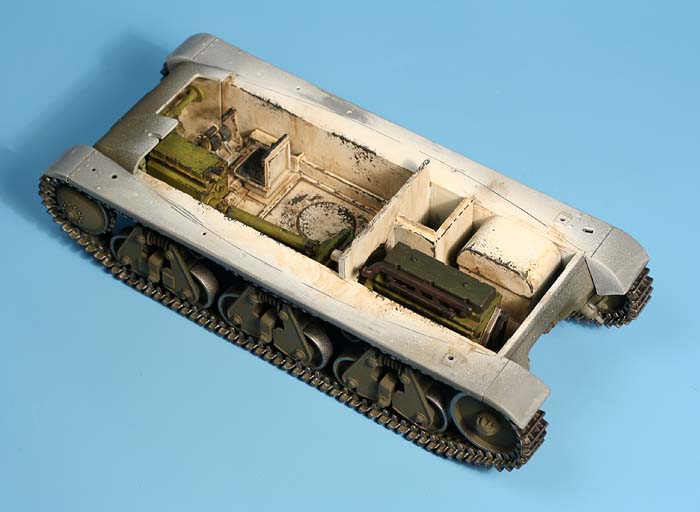

Interior painted and weathered, went a bit overboard with weathering, though again most of it would not be seen again after hull assembly

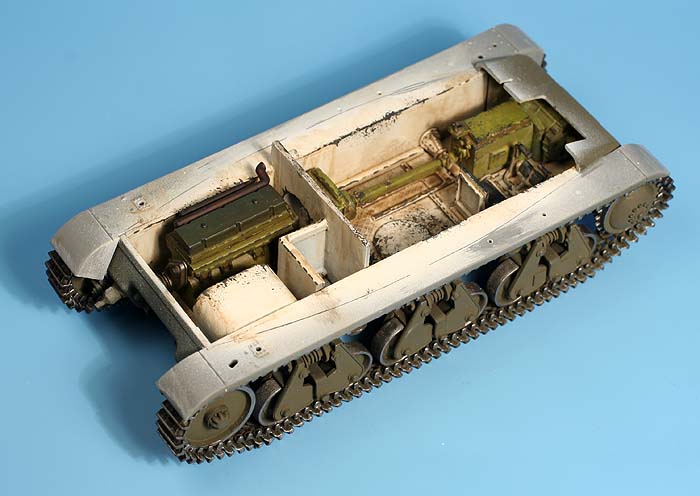
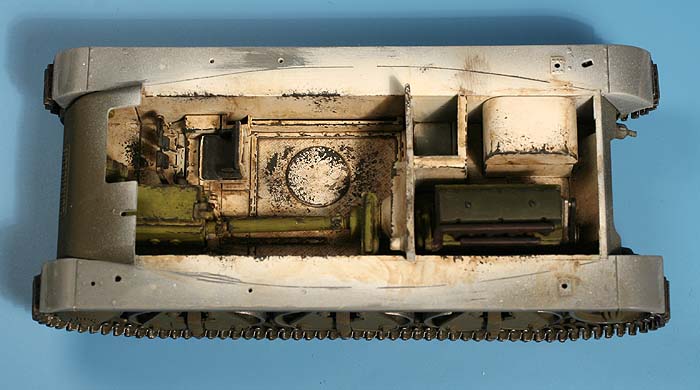
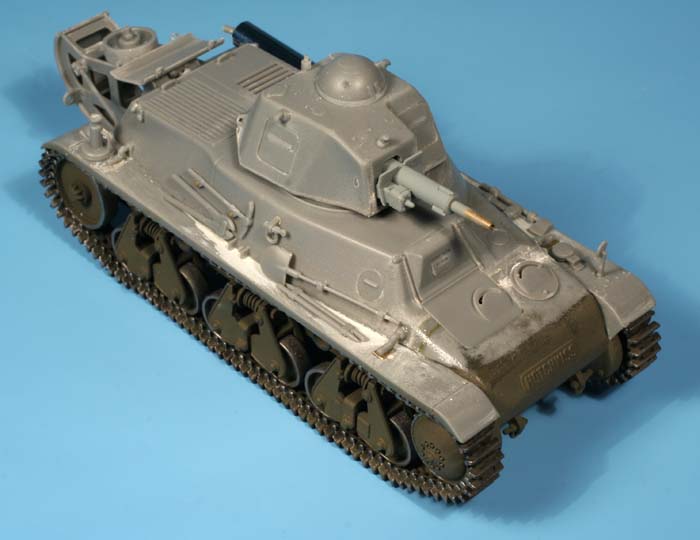


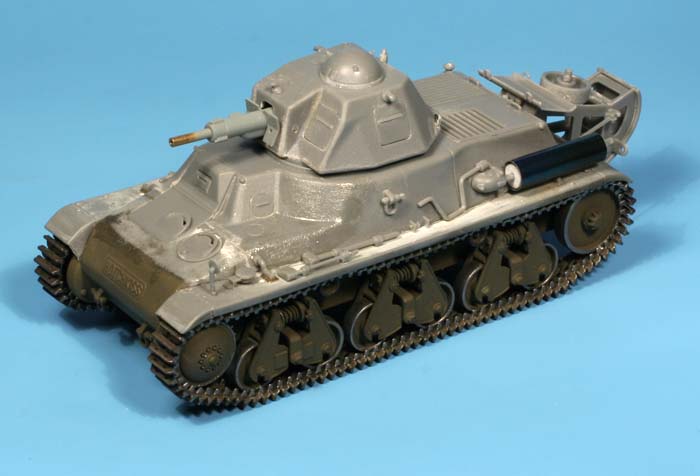
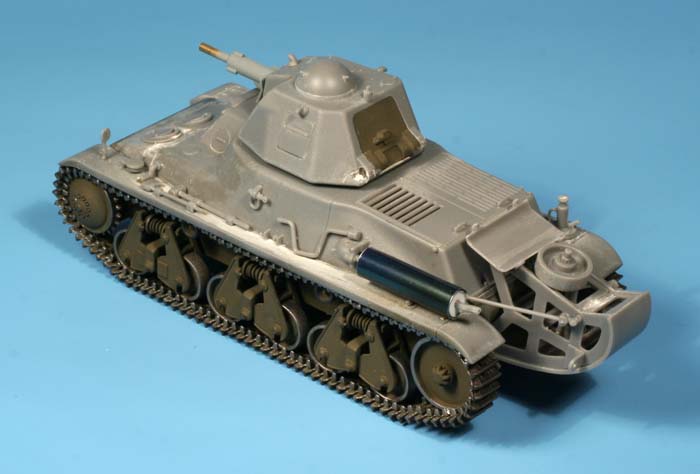
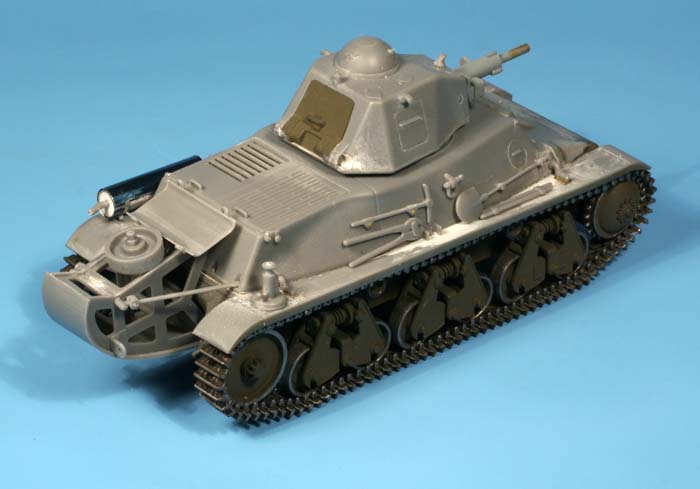
Whole thing together: hull/ final transmission armor parting line had to be repositioned some 2.5 mm to the rear. Previous line was filled with stretched sprue and sanded smooth, after tracing new line, cast texture was added using liquid styrene glue technique. This also involved moving fender supports 2.5 mm to the back. I also added plastic bolt heads to pickaxe brackets.
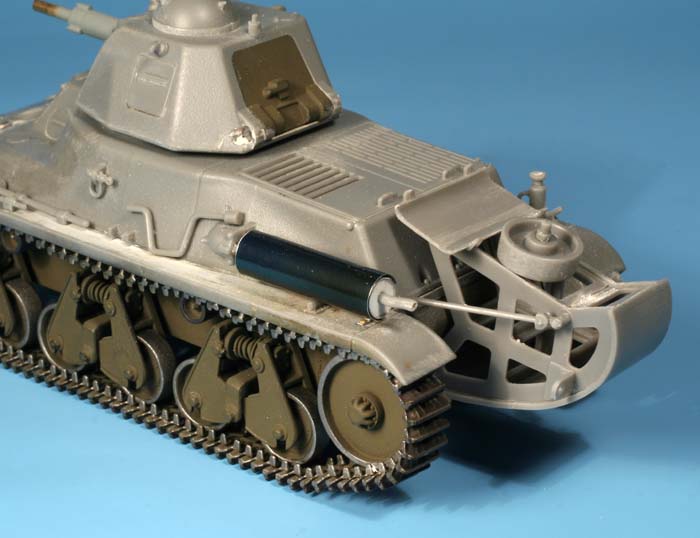

Muffler was completely redone using kits part body as a base. Stowage tray on the trench crossing device had its sides cut down by about 2.5 mm to match its appearance in the photos.
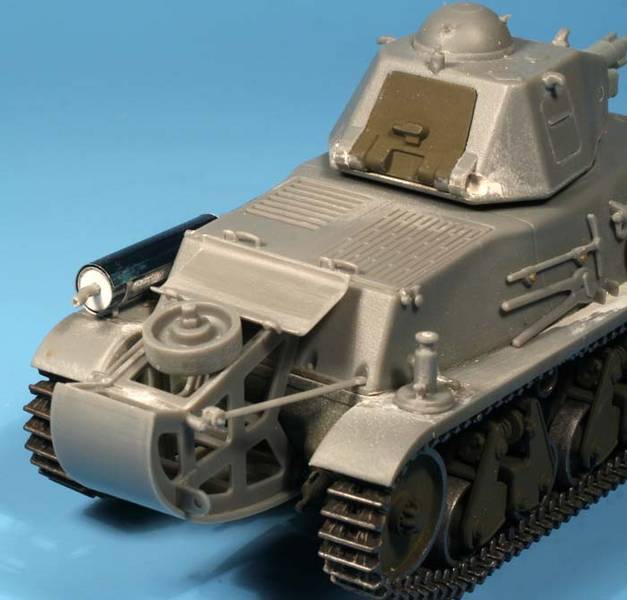


Cheers
Greg
GaryKato
Visit this Community
California, United States
Joined: December 06, 2004
KitMaker: 3,694 posts
Armorama: 2,693 posts
Posted: Sunday, April 13, 2008 - 03:17 PM UTC
Nice build! I can't wait to see the final paint job.
dispatcher
Visit this Community
Illinois, United States
Joined: November 04, 2007
KitMaker: 396 posts
Armorama: 325 posts
Posted: Sunday, April 13, 2008 - 04:35 PM UTC
I built the heller kit several years ago. Always wanted to know what the inside looked like. I wanted to build mine as a munitions supply vehicle. Now I can try and build an inside for it by looking at your build. Looking nice, keep up the good work
Joe
Pedro
Visit this Community
Wojewodztwo Pomorskie, Poland
Joined: May 26, 2003
KitMaker: 1,208 posts
Armorama: 1,023 posts
Posted: Sunday, April 13, 2008 - 08:20 PM UTC
Thanks Gary and Joe!

Joe, for the small details for your build you may want to use the photos of the preserved Hotchkiss that are in the link I posted above. Broncos interior is really very basic, though major components are still there Don't forget to post photos of your build!

Cheers
Greg
Jamesite
Visit this Community
United Kingdom
Joined: December 05, 2006
KitMaker: 2,208 posts
Armorama: 2,152 posts
Posted: Sunday, April 13, 2008 - 10:53 PM UTC
Hi Greg!

Man am I glad to see this thread!
I'm building the Trumpeter version of this (well it's a 38 (H) actually) at the moment, as Joe mentions, as a German Munitions Schlepper / Moerserzugmittel, and its great to see someone else building this little tank.

The trumpeter interior is very similar and so its nice to see yours painted up so well, giving me some idea of what my finished peice will look like. At the minute I have the bulk of the interior and lower hull finished, and am waiting on Eduard's PE set to arrive through the post, in order to add the final interior details, as without the turret a lot of the interior will be exposed.
There are then a few German mods to add to the exterior.

One question I had is what were the individual links like to put together? where they time consuming to clean up and attach?
At the minute i'm torn between using Trumpeter's rubber band offerings, (that while well formed and a good representation of the tracks, are too long and will require some modification to the return roller mounts), and hobby boss's indy links that I presume will be pretty similar to Bronco's indy links.

As I said, great to see someone else building this. I think you've done a great job so far and look forward to seeing your progress.

Cheers,

James
Pedro
Visit this Community
Wojewodztwo Pomorskie, Poland
Joined: May 26, 2003
KitMaker: 1,208 posts
Armorama: 1,023 posts
Posted: Monday, April 14, 2008 - 12:28 AM UTC
Hi James!

Thanks for the kudos!
As to track links in the kit, well they were pretty straightforward to build and there were no ejector marks . Only really necessary cleanup were 2 attachment points on sides of each link. Everything went pretty quick, apart from the mentioned troubles around sprocket (due to too small number of teeth on the sprocket perhaps? should be 24 and are 22 on the model).

Cheers
Greg
Jamesite
Visit this Community
United Kingdom
Joined: December 05, 2006
KitMaker: 2,208 posts
Armorama: 2,152 posts
Posted: Monday, April 14, 2008 - 01:13 AM UTC

Quoted Text

Hi James!

Thanks for the kudos!
As to track links in the kit, well they were pretty straightforward to build and there were no ejector marks . Only really necessary cleanup were 2 attachment points on sides of each link. Everything went pretty quick, apart from the mentioned troubles around sprocket (due to too small number of teeth on the sprocket perhaps? should be 24 and are 22 on the model).

Cheers
Greg


Thanks for the tips Greg, I think i'm going to have another play with the kit tracks tonight and otherwise order the indy-links.
Just noticed however, that after going to the effort to build and paint your interior, you have left all of your hatches closed. Are they just placed shut or are you going to leave them like that?

Cheers,

James
Pedro
Visit this Community
Wojewodztwo Pomorskie, Poland
Joined: May 26, 2003
KitMaker: 1,208 posts
Armorama: 1,023 posts
Posted: Monday, April 14, 2008 - 01:36 AM UTC
All the hatches are not glued yet. After painting I'll glue upper drivers hatch in opened position, turret hatch is sort of moveable and I'll leave engine hatch unglued.

Just out of curiosity I looked for HobbyBoss' tracks pictures on the net. Only picture I found was on their site and it showed three attachment points on each link so I reckon that there aren't any similarity between HB tracks and Broncos.

Cheers
Greg
Jamesite
Visit this Community
United Kingdom
Joined: December 05, 2006
KitMaker: 2,208 posts
Armorama: 2,152 posts
Posted: Monday, April 14, 2008 - 02:27 AM UTC

Quoted Text

All the hatches are not glued yet. After painting I'll glue upper drivers hatch in opened position, turret hatch is sort of moveable and I'll leave engine hatch unglued.

Just out of curiosity I looked for HobbyBoss' tracks pictures on the net. Only picture I found was on their site and it showed three attachment points on each link so I reckon that there aren't any similarity between HB tracks and Broncos.

Cheers
Greg


well researched Greg!

I had a look at the site too, and you are right, you can compare this to the PMMS review of the bronco kit you can see the links are indeed moulded differently. However, it's the time involved I was more interested in as I sometimes find individual track links to be a real bore!

Good news on the hatches, it'd be a shame to hide that detail away!

James
Drader
Visit this Community
Wales, United Kingdom
Joined: July 20, 2004
KitMaker: 3,791 posts
Armorama: 2,798 posts
Posted: Monday, April 14, 2008 - 02:32 AM UTC
Hi James

Trumpeter's rubber bands fit a whole lot better when shortened by 3 links, which may be the reason why they give you such an overlap.

Bronco's turret interior is a bit iffy (t put it politely) - what's the handwheel on the Reibel coax for? Could it be a wild stab at the 150 round 'Camembert' magazine?

David
Pedro
Visit this Community
Wojewodztwo Pomorskie, Poland
Joined: May 26, 2003
KitMaker: 1,208 posts
Armorama: 1,023 posts
Posted: Monday, April 14, 2008 - 03:48 AM UTC
Hi David,

I didn't even noticed it has a coax, will have to drill the end of its barrel now .
As to the Bronco's interior, I'm aware it's generally lacking That's why I didn't even attempted to add all the missing details.

Cheers
Greg
Jamesite
Visit this Community
United Kingdom
Joined: December 05, 2006
KitMaker: 2,208 posts
Armorama: 2,152 posts
Posted: Monday, April 14, 2008 - 04:26 AM UTC

Quoted Text

Hi James

Trumpeter's rubber bands fit a whole lot better when shortened by 3 links, which may be the reason why they give you such an overlap.

Bronco's turret interior is a bit iffy (t put it politely) - what's the handwheel on the Reibel coax for? Could it be a wild stab at the 150 round 'Camembert' magazine?

David


Thanks David, I was thinking that either shortening the tracks or moving the rear idler wheel back would help. I don't think i've helped matters by correcting the placement of the drive sprockets which trumpeter would have you attach several mm too far forward.

How would you suggest to best re-attach the links after shortening? I wouldn't think they would glue together very well, and there are no areas to hide staples or the like.

Cheers,

James
Drader
Visit this Community
Wales, United Kingdom
Joined: July 20, 2004
KitMaker: 3,791 posts
Armorama: 2,798 posts
Posted: Monday, April 14, 2008 - 08:16 PM UTC
Hi James

You're better off using the L-shaped idler mount A9 and pushing it down as far as you can - otherwise the idler fouls the trackguard (guess how I found out). Either way, test fit the trackguard before the idler sets - you know it makes sense

As for the tracks, after cutting off three links I glued the last set of pins with flexible superglue and the tracks have held together so far. BTW I ignored the instruction to fit the sprocket mounts into the sprockets early on and glued the mounts straight to the final drives. The sprockets dry-fit fine so I added them along with the tracks which made things a lot easier.

David
Jamesite
Visit this Community
United Kingdom
Joined: December 05, 2006
KitMaker: 2,208 posts
Armorama: 2,152 posts
Posted: Monday, April 14, 2008 - 09:10 PM UTC

Quoted Text

Hi James

You're better off using the L-shaped idler mount A9 and pushing it down as far as you can - otherwise the idler fouls the trackguard (guess how I found out). Either way, test fit the trackguard before the idler sets - you know it makes sense

As for the tracks, after cutting off three links I glued the last set of pins with flexible superglue and the tracks have held together so far. BTW I ignored the instruction to fit the sprocket mounts into the sprockets early on and glued the mounts straight to the final drives. The sprockets dry-fit fine so I added them along with the tracks which made things a lot easier.

David


Thanks for the tips David,
I had another play around with the idlers and tracks last night and can definately see where you are coming from.
Still in two minds about the indy links. I know they will look better in the end, and at £4.99 the price is not an issue. I'ts just the time involved, I find the tracks the dullest part of a build and having just done a full set for a T-34 over the weekend, I can't bring myself to begin again, especially as the links are so small! However, i'd probably spend a similar amount of time messing around with the vinyl tracks and the idler!
Sounds like i've just convinced myself!

Right, i'm off to netmerchants, later guys!

James
Jamesite
Visit this Community
United Kingdom
Joined: December 05, 2006
KitMaker: 2,208 posts
Armorama: 2,152 posts
Posted: Monday, April 21, 2008 - 03:18 AM UTC
An update for you on my progress Greg.

I bought the Hobby Boss indy links and have now assembled them. They went together very quickly and easily and would highly recommend them!

Have now finished the interior build and am ready to break out the paint. I went to a little effort to add some detail as being a munitions panzer it has no turret and the interior will be clearly visible.


I have started a thread HERE for all feedback.

Look forward to seeing some progress on your build Greg!

James
Pedro
Visit this Community
Wojewodztwo Pomorskie, Poland
Joined: May 26, 2003
KitMaker: 1,208 posts
Armorama: 1,023 posts
Posted: Monday, July 21, 2008 - 08:04 AM UTC
Hi ,
Now that I have graduated from the Academy, I'm back at the bench again!
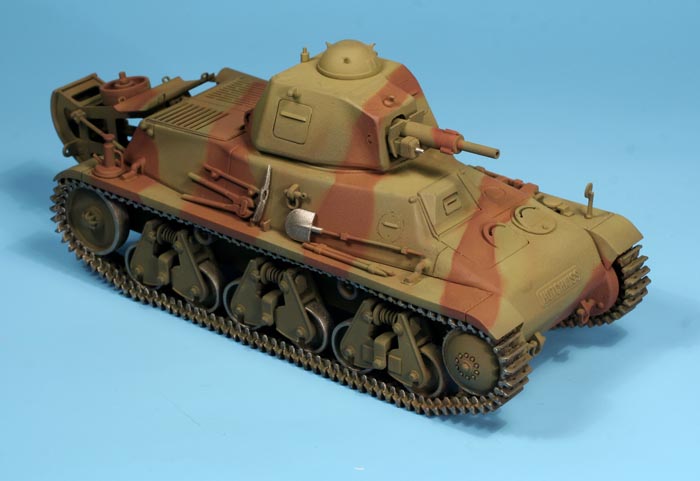
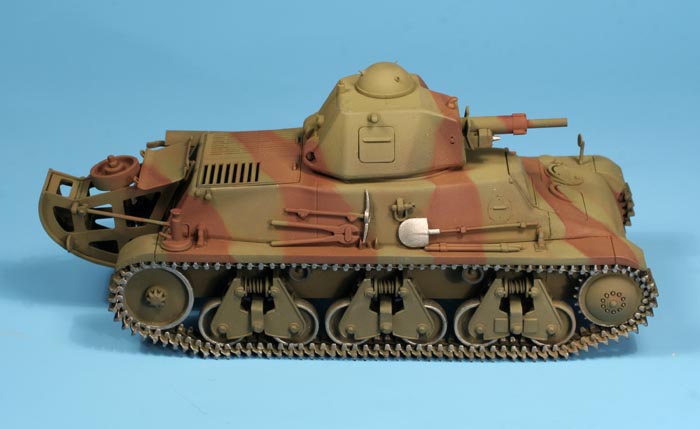
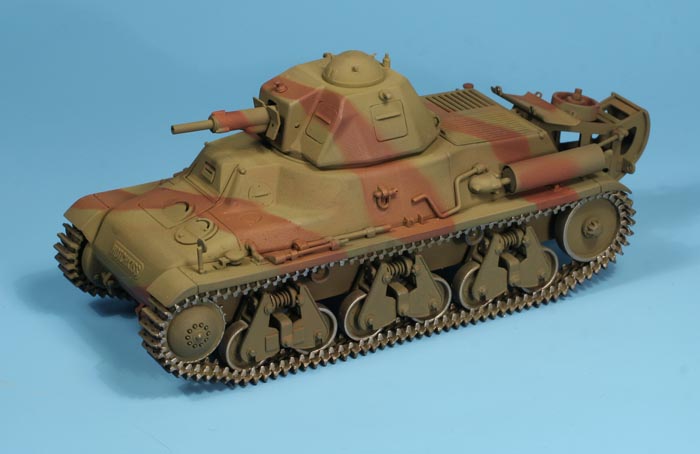
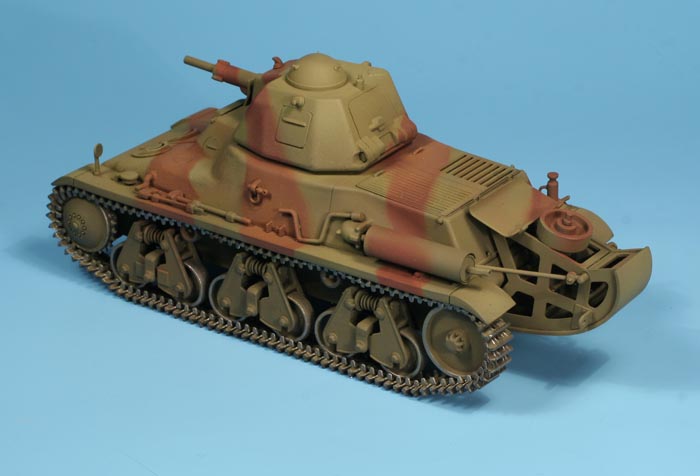
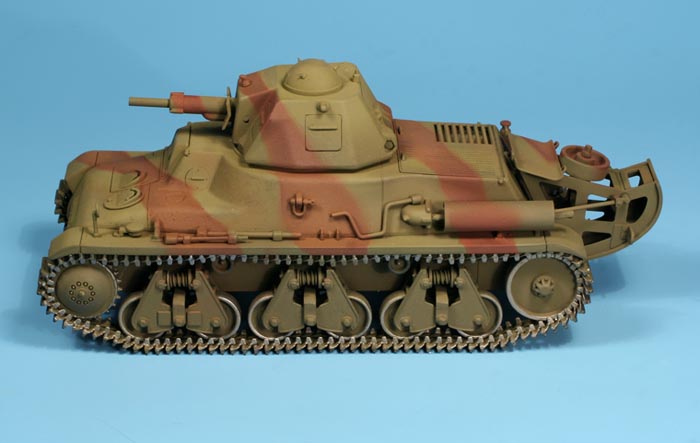
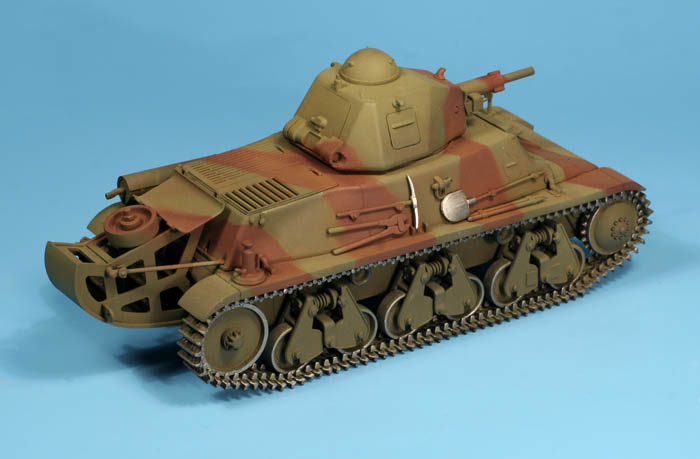
Superstructure was primed with Humbrol 33, basecoat is the Vallejo ModelColor olive drab, and red brown stripes are mixed from red and OD acrylic paint. I did a little fading on the camo but it's really subtle. Not my cleanest spraying , but it should pass under the weathering. Next will be detail painting, decals and paint chips, weathering for dessert.

Cheers,
Greg


yelvhontu
Visit this Community
Mongolia
Joined: June 02, 2008
KitMaker: 46 posts
Armorama: 42 posts
Posted: Monday, July 21, 2008 - 06:52 PM UTC
nice built work!great!
hackman
Visit this Community
Sweden
Joined: June 23, 2008
KitMaker: 130 posts
Armorama: 120 posts
Posted: Monday, July 21, 2008 - 09:53 PM UTC
Great work on a hard model. Clean and nice.
Pedro
Visit this Community
Wojewodztwo Pomorskie, Poland
Joined: May 26, 2003
KitMaker: 1,208 posts
Armorama: 1,023 posts
Posted: Tuesday, July 22, 2008 - 09:27 AM UTC
Thanks for the kudos !
Jan, it's not that hard at all. If I was to build this kit OOB, the only real concern would be the suspension back plate having the "connecting stubs" too short. Other than that the fit is spot on All the mods I have made are solely for my "accuracy ego"

Cheers
Greg
Pedro
Visit this Community
Wojewodztwo Pomorskie, Poland
Joined: May 26, 2003
KitMaker: 1,208 posts
Armorama: 1,023 posts
Posted: Thursday, September 18, 2008 - 07:56 AM UTC
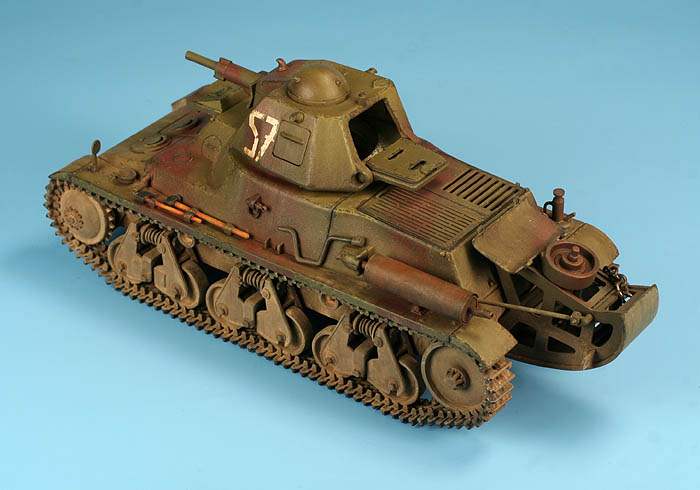
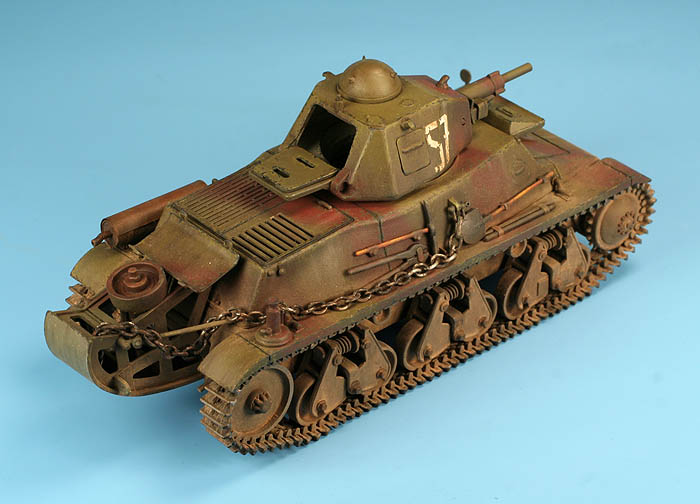
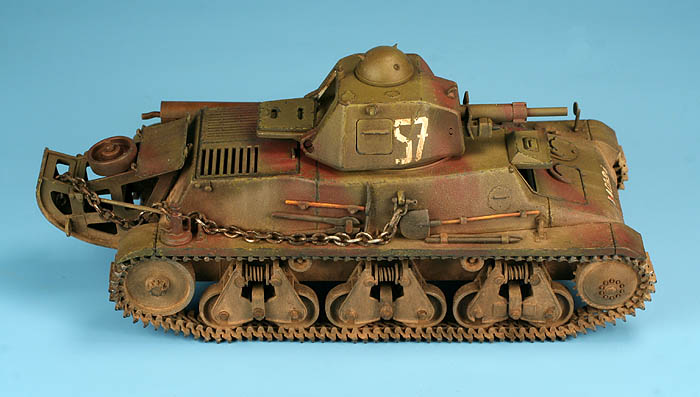
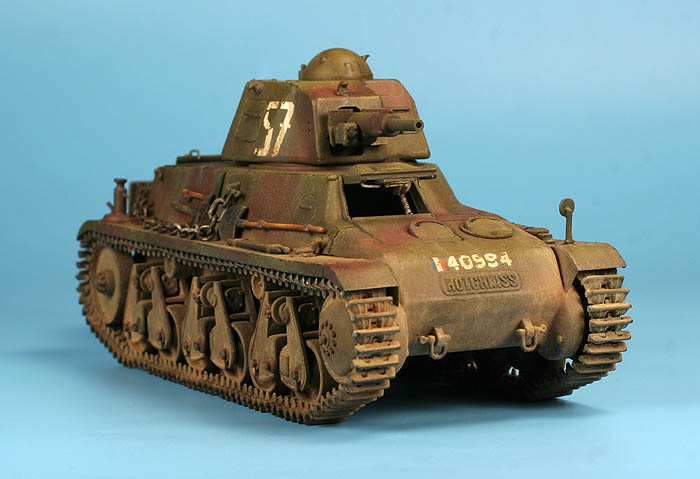
Hello everyone,

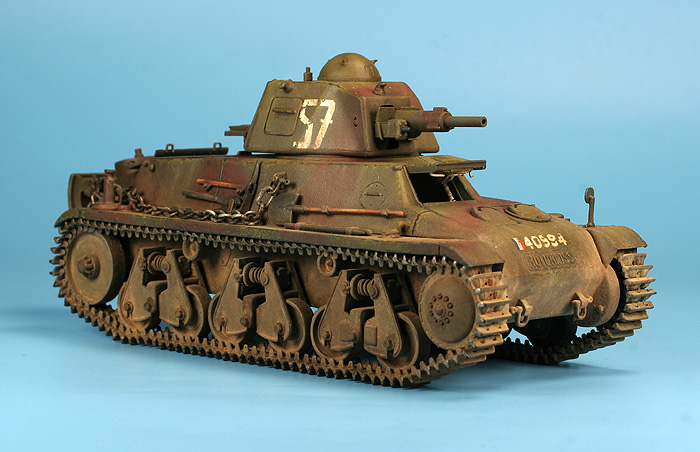
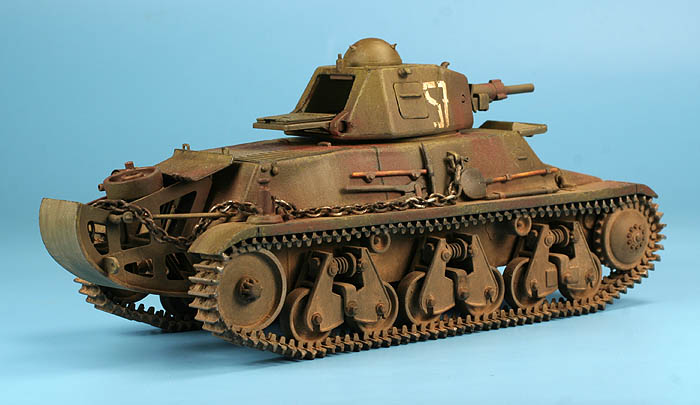
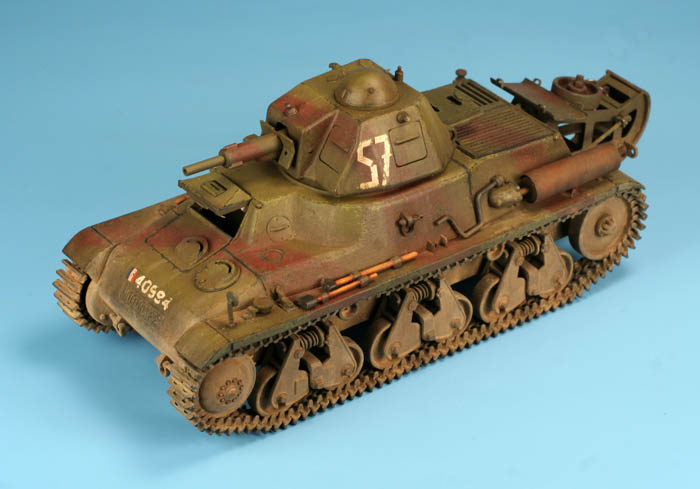
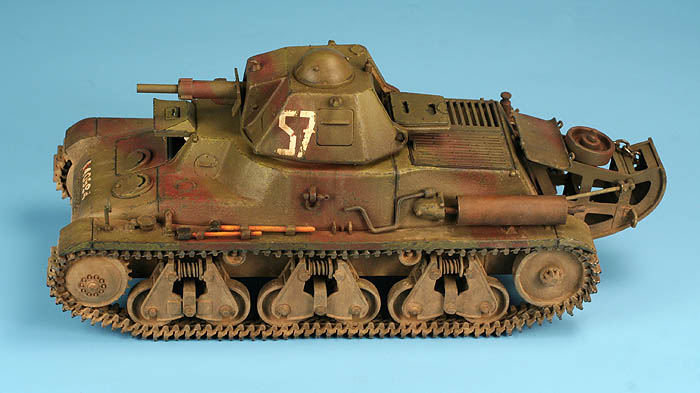
I'm calling this li'l tank finished It will stay in box until I will finish a simple base for her. I had also painted a tankers figure to accompany the tank on a base but it was recently stated that none of the available figures are of a cavalry tanker. With mine tank bearing cavalry markings, I was wondering what would it take to convert infantry tanker to cavalry one?
Anyway, detail painting was done with Vallejo and GW acrylics. Weathering consisted of artist oil filter and dusting was done with MIG pigment called European dust.

Enjoy the pictures, any comments are welcome!

Cheers
Greg


vanize
Visit this Community
Texas, United States
Joined: January 30, 2006
KitMaker: 1,954 posts
Armorama: 629 posts
Posted: Thursday, September 18, 2008 - 08:49 AM UTC
she looks lovely.

nice work Pedro!
AlanL
Visit this Community
England - East Anglia, United Kingdom
Joined: August 12, 2005
KitMaker: 14,499 posts
Armorama: 11,675 posts
Posted: Thursday, September 18, 2008 - 09:24 AM UTC
Hi Greg,

Excellent stuff, really enjoyed the thread. Thanks for posting, kit looks great.

Al
whittman181
Visit this Community
Massachusetts, United States
Joined: December 30, 2006
KitMaker: 646 posts
Armorama: 473 posts
Posted: Thursday, September 18, 2008 - 09:29 AM UTC
Very nice looking tank. Great job on the weathering Bob
Plasticbattle
#003
Visit this Community
Donegal, Ireland
Joined: May 14, 2002
KitMaker: 9,763 posts
Armorama: 7,444 posts
Posted: Thursday, September 18, 2008 - 06:57 PM UTC
Hej Greg. Great finishing and weathering on the hotchkiss. Hopefully mines turns out as good. I like your camo choice ... might be going this route as well.
Jamesite
Visit this Community
United Kingdom
Joined: December 05, 2006
KitMaker: 2,208 posts
Armorama: 2,152 posts
Posted: Thursday, September 18, 2008 - 10:29 PM UTC
Very nice!

Great to see the finished product.
Unfortunately I have done nothing with mine since my earlier posts!

Great job, a really nice little tank, can't fault it.

James
 _GOTOTOP