_GOTOBOTTOM
Armor/AFV: Modern - USA
Modern Armor, AFVs, and Support vehicles.
Hosted by Darren Baker
Tamiya M1046 HMMWV TOW Missle Carrier
sgtsauer
#065
Visit this Community
Missouri, United States
Joined: March 30, 2002
KitMaker: 2,605 posts
Armorama: 1,814 posts
Posted: Wednesday, April 23, 2008 - 04:29 PM UTC
This is the first model that I have completed in several years (4 to 6 years I think).

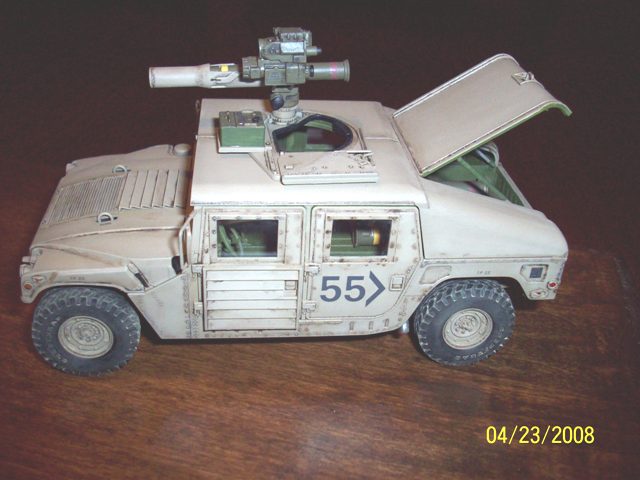
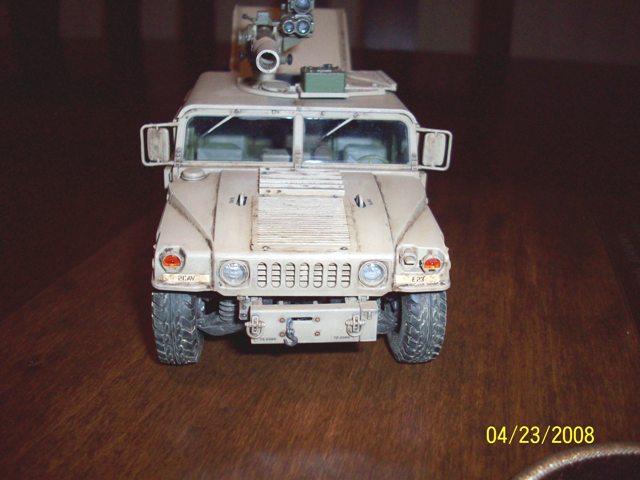
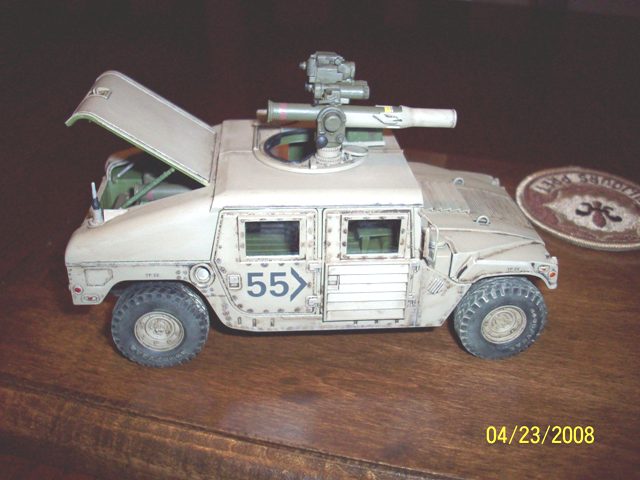
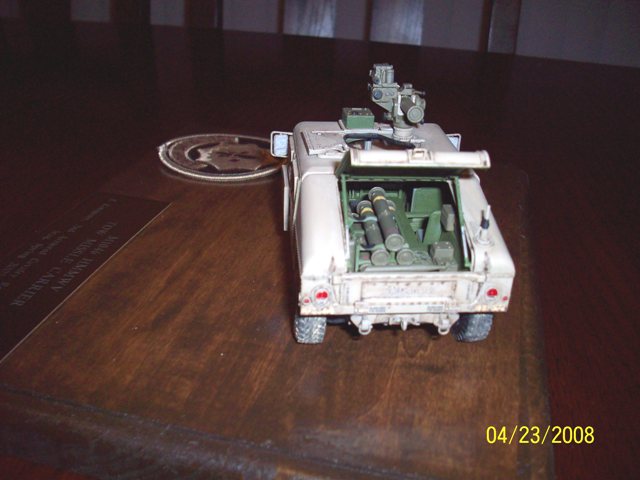
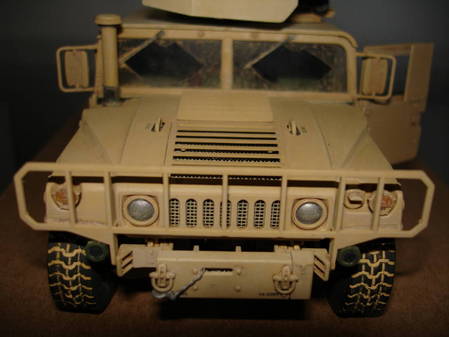
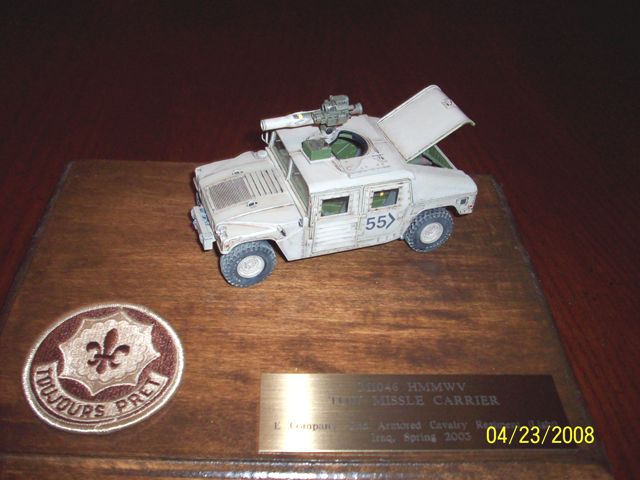
The kit is the 1/35th scale Tamiya M1046 TOW Missle Carrier and was built straight out-of-box. The kit went to together flawlessly. Overall I was extremely happy with the quality of the kit. The only strike that I would give the kit is the omission of the proper SINCGARs radio. The kit has an obsolete/incorrect PRC-77 (vehicle mounted) radio.

The interior was painted with Model Master Medium Green and the exterior was painted with Model Master Armor Sand. The wash was done with raw umber oil paint thinned with turpenoid. Mig powder was used for the "dusting". I wasn't too happy with the wash however. I feel the wash around the bolt heads on the doors and other places appears to heavy. I was not able to get the "subtle" effect that I was looking for. It seemed to be either a heavily weathered appearance, or a lightly weathered almost clean effect. I couldn't get anything to settle around the bolt heads without putting the wash on a heavier. So, I went with the heavily weathered appearance.

I served with the 2nd Armored Cavalry Regiment in southern Iraq in 2004 so choosing the markings for the 2nd ACR was an easy choice for me. On the base (not attached yet) is one of my desert bdu combat patches from the 2nd ACR.

I hope to hear some thoughts/opinions (good or bad).


bison126
Visit this Community
Correze, France
Joined: June 10, 2004
KitMaker: 5,329 posts
Armorama: 5,204 posts
Posted: Wednesday, April 23, 2008 - 05:52 PM UTC
Hi Brent,
very nice kit from the box, that's why I like Tamiya.
The base is simple but the shoulder patch and the brass plate give an excellent final touch.
Just one point, on the picture showing the front it looks like the "cabin" is not parallel to the chassis.

Olivier
sgtsauer
#065
Visit this Community
Missouri, United States
Joined: March 30, 2002
KitMaker: 2,605 posts
Armorama: 1,814 posts
Posted: Wednesday, April 23, 2008 - 06:17 PM UTC
Good eye Olivier. I had not noticed that until you mentioned it. It isn't as obvious in person. The body and the frame are parallel/square. It is the winch assembly that is out of spec. Evidently, the winch housing/assembly shifted after I glued it. Dang it!!!

I hadn't attached anything to the base yet. I haven't decide for sure what I want to do with it. I may just leave it as is (attach everything of course) and move on to completing some other kits.
GaryKato
Visit this Community
California, United States
Joined: December 06, 2004
KitMaker: 3,694 posts
Armorama: 2,693 posts
Posted: Wednesday, April 23, 2008 - 08:31 PM UTC
Maybe it's just the photos but the hard top seems cleaner than the rest of the vehicle. Of course, the surface is probably smoother so maybe there's less to catch dirt/sand. I think it's great that you got the kit built, painted, and weathered. I can't remember the last time I completed a kit.
sgtreef
Visit this Community
Oklahoma, United States
Joined: March 01, 2002
KitMaker: 6,043 posts
Armorama: 4,347 posts
Posted: Wednesday, April 23, 2008 - 10:54 PM UTC
Nice job Brent I did one last year.
A nice kit indeed.
Great fit.
I like the weathering on yours.
sgtsauer
#065
Visit this Community
Missouri, United States
Joined: March 30, 2002
KitMaker: 2,605 posts
Armorama: 1,814 posts
Posted: Thursday, April 24, 2008 - 01:34 AM UTC
Thanks for the comments so far guys.

Gary, in reference to your comment about the hard top appearing shiny, it must have been the reflection of the flash that is causing that.

It was about 11:00 pm or so when I took the photos and obviously, the light wasn't very good. I will take a different set of pics in some natural daylight when i get the chance. There are storms forcasted here for two days so it won't be soon.

Thanks again for the comments and taking the time to post in response to my work.
troubble27
Visit this Community
New Jersey, United States
Joined: October 10, 2003
KitMaker: 783 posts
Armorama: 637 posts
Posted: Thursday, April 24, 2008 - 01:52 AM UTC
Brent,

Sweeeet job on the humvee. Looks great even coming straight from the box. The only thing I would add (IMHO) would be a dirty windshield with clean spots where the wipers arced. What did you use for the wash and weathering??
sgtsauer
#065
Visit this Community
Missouri, United States
Joined: March 30, 2002
KitMaker: 2,605 posts
Armorama: 1,814 posts
Posted: Thursday, April 24, 2008 - 05:54 AM UTC

Quoted Text

Brent,

Sweeeet job on the humvee. Looks great even coming straight from the box. The only thing I would add (IMHO) would be a dirty windshield with clean spots where the wipers arced. What did you use for the wash and weathering??


Hi Gary...I pondered the windshield issue that you mention. I decided not to do it because I don't have any reference for a technique to "dirty" the windshield and I didn't want to take the chance of ruining the "glass". If anyone has a technique, I am certainly open to it.

I used Raw Umber oil paint thinned with turpenoid for the wash. Mig "Desert" pigments were used for the additional weathering. I actually intended on the vehicle being lightly weathered but it ended up looking much different. I think my wash was probably to thick.
mauserman
Visit this Community
Maryland, United States
Joined: September 27, 2004
KitMaker: 1,183 posts
Armorama: 628 posts
Posted: Thursday, April 24, 2008 - 11:19 AM UTC
Hi Brent. Looks good. I did one last year as well and thought it was a great kit OOB. If you don't like what the bolt heads look like, maybe do a light drybrushing with the MM Sand over them. That might tone down the dark color.

As for the windshield, what I have done in the past is mask off the clean spot and then just hit the windshield with some Dull Kote. I think it comes out looking pretty good.
bison126
Visit this Community
Correze, France
Joined: June 10, 2004
KitMaker: 5,329 posts
Armorama: 5,204 posts
Posted: Thursday, April 24, 2008 - 08:06 PM UTC
Hi Brent,
here is mine with the windscreen covered with dust.


The technique I used is quite simple in fact.
I only mark the part I want to get clean and I spray a solution of water with just a few drops of Tamiya Buff. When dry, this gives a dusty looks. Don't spray too much water as at first it appears as nothing happens.

PS: more pics on my site
Olivier
troubble27
Visit this Community
New Jersey, United States
Joined: October 10, 2003
KitMaker: 783 posts
Armorama: 637 posts
Posted: Friday, April 25, 2008 - 07:41 AM UTC
I do mine kinda like Oliver does. I use a circle template to cut out little wiper arm masks, put them on the windshield, but instead of dullcoat, I use ground up pastels mixed with alcohol and stipple them on with a stiff brush. Comes out looking like this one........
 _GOTOTOP