_GOTOBOTTOM
Яusso-Soviэt Forum: Cold War Soviet Armor
For discussions related to cold war era Russo-Soviet armor.
T-80U m1988
Jacques
Visit this Community
Minnesota, United States
Joined: March 04, 2003
KitMaker: 4,630 posts
Armorama: 4,498 posts
Posted: Thursday, May 01, 2008 - 04:52 AM UTC
Since I have to do quite a bit of work on promoting and answering questions on the new SP Designs T-80U upper hull, and prep for the new kit T-80U m93/94, I thought I would put my work progress on the site for you all to enjoy. And maybe get some extra help in building because this can be a pain.

First, the new upper hull piece was sent to me seperately to sell to those who had previously bought SP Designs conversions of the T-80U with the seperate engine deck, which was a pain to add in. These upper hulls are not inclusive of all parts needed and are also a bit different from the older conversions and so older conversions will have to be modified to fit this all new master. Hooray.

But the upper hull piece looks VERY good and it bodes well for the new conversion. Pics of the upper hull and initial comments can be found with this link

More to come.
Jacques
Visit this Community
Minnesota, United States
Joined: March 04, 2003
KitMaker: 4,630 posts
Armorama: 4,498 posts
Posted: Thursday, May 01, 2008 - 04:18 PM UTC
As noted on the SAAM website, the older rear hull plate needs to be narrowed to fit the new upper hull.


Then the filling and putty needed to be done. The side of the hull in this place needs to be, basically, smooth. There are no close in shots that show weld beads in this area, so I just finshed it off smooth. Also, not much of this wil be visable after all the fenders, skirts, fuel tanks, and Aux power unit. So I filled, puttied, and sanded. hooray.

Also, I drilled out the engine screens and added the Eduard ones for the DML T-80. They sort of work, but are a bit too wide. I am looking into something better, but for now they stay.


Overview


Lastly, I added the filler for between the final drive bulges. It should not have a weld bead across the top, so it will be removed.


Turret work and detail tomorrow.
ml_st
Visit this Community
Brest, Belarus
Joined: April 18, 2006
KitMaker: 3 posts
Armorama: 2 posts
Posted: Friday, May 02, 2008 - 07:45 AM UTC
Looks nice! But need some corrections.
Lower rear hull:


And exhaust grating looks completely different:
Jacques
Visit this Community
Minnesota, United States
Joined: March 04, 2003
KitMaker: 4,630 posts
Armorama: 4,498 posts
Posted: Saturday, May 03, 2008 - 04:17 AM UTC
Viachaslau, good to see you here.

Can you provide me with your thoughts on the changes needed?

Here is a link to what the new conversion will look like. I only have the upper hull on hand, so I cannot comment on any other detail aspects of the kit.

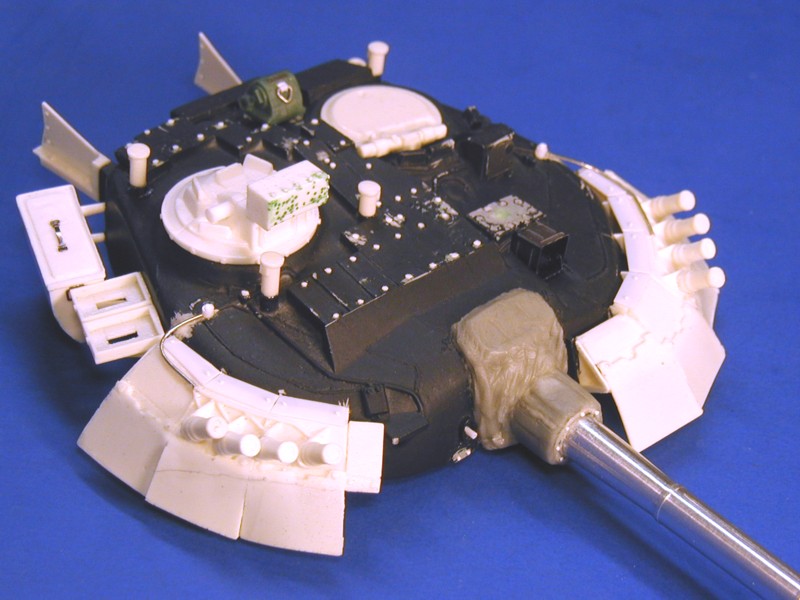
More work has been done. The turret I have is the hollow version but it was COVERED in pinholes. What to do? What i do is to take Squadron green putty and thin it about 50/50 with testors liquid glue and then spread it on with a old testors paint brush, you know, the really cheap plastic one. I just cut the bristles down for better handeling (I will post a photo later). Coat, sand, prime, recheck, recoat, resand, reprime, and good. Some of the bolt heads on the ERA needed to be replaced due to miscast or loss to sanding.


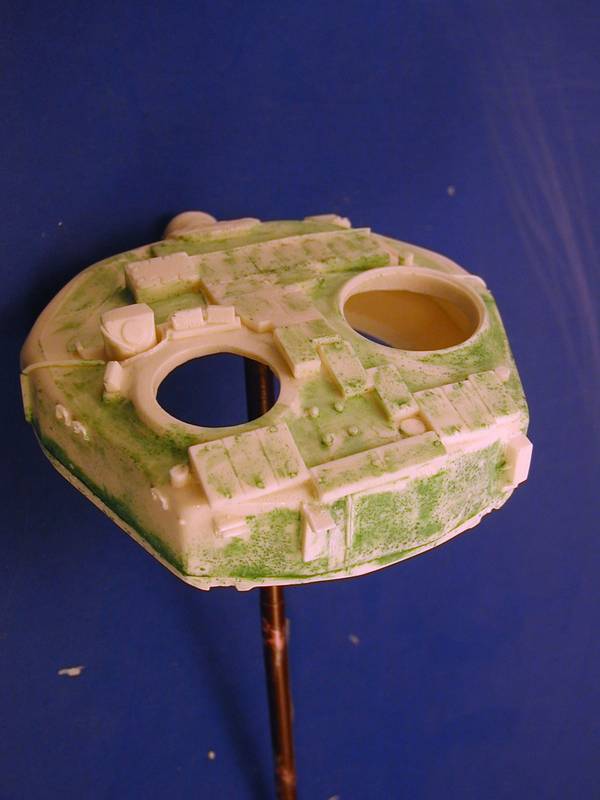
I also cut off the barrel mount and replaced it with a piece of evergreen tubing that was a close fit for the Model Point barrel I have for this build. (As a note, on the new SP Designs conversion the mantlet has been redone to be more accurate, the gun "mount" is reduced to a proper size, and a resin barrel will be provided.)


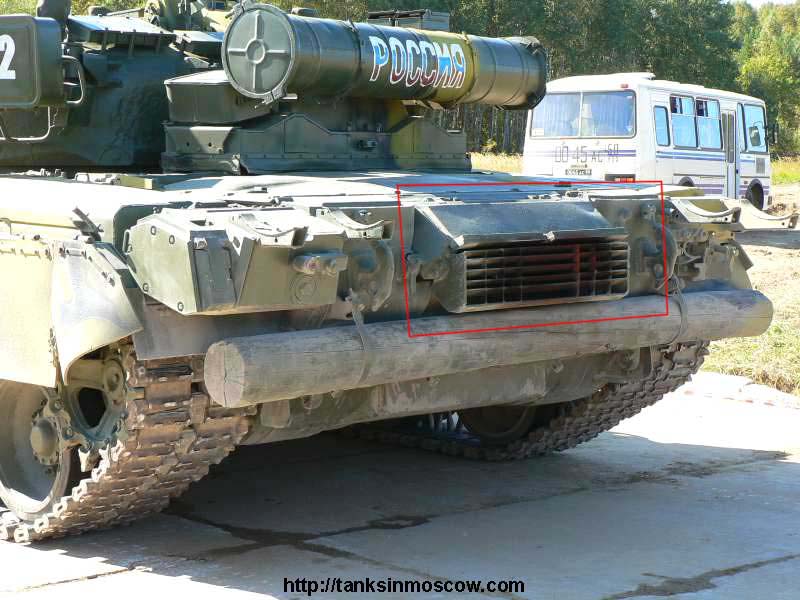
I also did some reworking of the APU, adding the exposed venting after drilling out the resin area. I wanted to replace the vehicle position light but accidentally cut off the whoel mounting. i replaced it with evergreen strip and a spare DML light. Finally, I am trying to adapt as much of the Eduard PE I have to this build and so I worked on adding the external fuel tank mount to the APU, which involved openeing up the cast "slot" larger to accept the PE part. Putty was used to fill in around it.

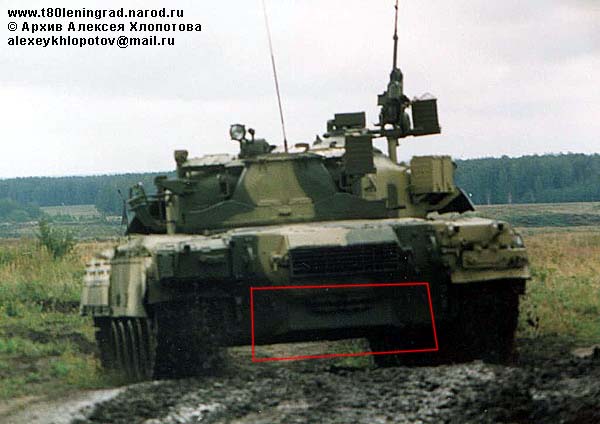
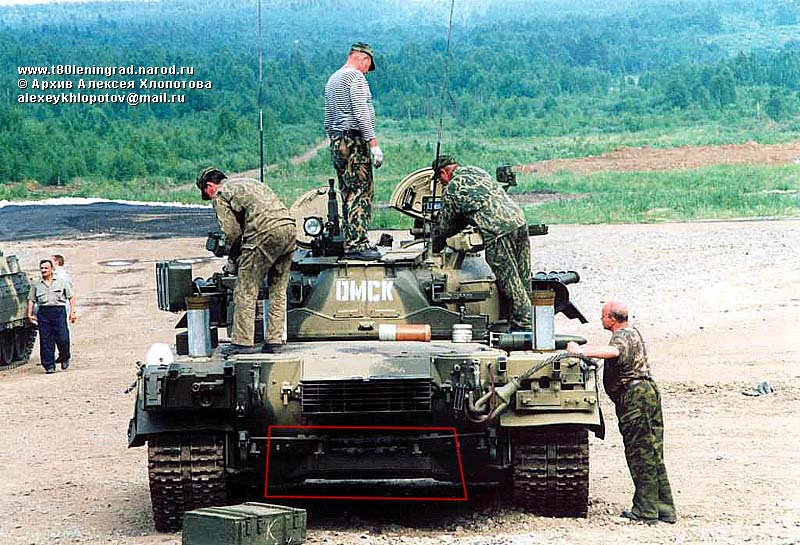
I also hollowed out the ends of th K-5 ERA to look like the prototype.


Back to the bench...
Jacques
Visit this Community
Minnesota, United States
Joined: March 04, 2003
KitMaker: 4,630 posts
Armorama: 4,498 posts
Posted: Sunday, May 18, 2008 - 05:38 AM UTC
Finally, I have the "perfect storm" of time and access to add this update. (I have been trying to do this since 5/15... ).

First off, I wanted to state that the SP Designs kits I build are usually the poorer kits in inventory. Rather than rummaging through all the kits to get the best pieces, I try to find the lower end pieces. That way what customers get should be better quality than what I show. But I wanted that made clear because the pinhole problem I have had with this older casting is not what is currently being sold (although there may be a "leaker" from time to time.)

Ok, that aside, I have been working diligently if somewhat slowly. Here is the hull with more pieces added.


One piece I am annoyed with is the gunner's side stowage rack. It is just a pain to deal with. Although i cannot honetly think of a better way for it to have been cast up...it is just a "box of bars" and to cast it up in resin you need a load inside. I think I will use some of my new-found talent in sculpting to fix this up better.


And the work on the turret:


Lots of little detail work here. I added some more bracework behind the K-5 ERA blocks and redid the bolted on cover pieces. New wiring (partial) for the SGL's, some new junction boxes for the wiring, and Eduard PE wherever I feel I can use it (storage box detail, main gun sight, etc...). Added new bolt heads to most of the brick ERA and also added detail to the crosswind sensor. I drilled out several places that needed holes (BROD-M support) or just some depth.

Biggest change was the new mantlet cover I sculpted from Aves Epoxy putty. First time I have ever done any sculpting, so I thought it came out pretty good.


Finally, a comparison with the DML T-80 SMT m1989 turret, for perspective.


Back to the old grind.
bison126
Visit this Community
Correze, France
Joined: June 10, 2004
KitMaker: 5,329 posts
Armorama: 5,204 posts
Posted: Sunday, May 18, 2008 - 08:58 PM UTC
Really interesting build log Jacques.
Building a SP kit is always a bit challenging but in the end, I'm often happy with the result notwithstanding the fact that my wallet is not as flat as if I had bought anything from Miniarm

Keep on the good work.
Olivier
Jacques
Visit this Community
Minnesota, United States
Joined: March 04, 2003
KitMaker: 4,630 posts
Armorama: 4,498 posts
Posted: Monday, May 19, 2008 - 03:22 AM UTC
Hey Olivier,

At least Sergej keeps trying to improve his molding and casting abilities. The T-80U upper hull is VERY nice compared to the older turret casting I am working with. At least I can show that there is a somewhat easy way to fill pinholes!

Also, it is nice that there is even this conversion available. I have always like the look of the T-80 tank, both the B and the U. Since noone else has wanted to do a kit or conversion of the T-80 series, I am not going to be too harsh on having to do some extra work. Besides, then it gives you bragging rights over those who took the "easy" way with Miniarm!

Off to the bench.
Nito74
Visit this Community
Lisboa, Portugal
Joined: March 04, 2008
KitMaker: 5,386 posts
Armorama: 4,727 posts
Posted: Monday, May 19, 2008 - 03:49 AM UTC
Wonderful work Jacques !

That's terrific ... that level of detail is amazing...i wish i had half the patience..
guni-kid
Visit this Community
Nordrhein-Westfalen, Germany
Joined: July 21, 2007
KitMaker: 521 posts
Armorama: 514 posts
Posted: Monday, May 19, 2008 - 09:17 PM UTC
Thank you very much for this little help with the pinholes As you know I've got the same problem currently with my P50 Trailer. And I'm definately trying to go for your method over all the kit once again...
 _GOTOTOP