_GOTOBOTTOM
Armor/AFV
For discussions on tanks, artillery, jeeps, etc.
PHOTOS: MODEL
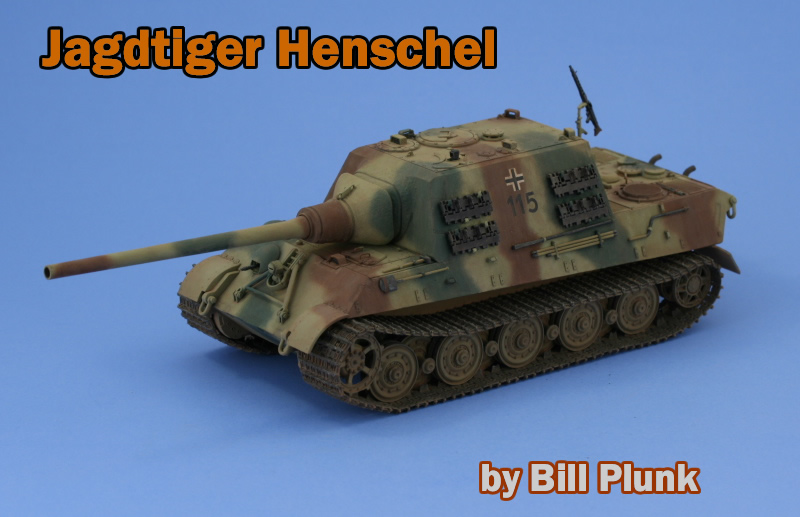
Jagdtiger Henschel
Henk
Visit this Community
England - South West, United Kingdom
Joined: August 07, 2004
KitMaker: 6,391 posts
Armorama: 4,258 posts
Posted: Tuesday, July 08, 2008 - 01:15 AM UTC
Bill Plunk''s Jagdtiger Henschel with Armorscale barrel and Model Kasten tracks has been added to the On Display gallery.


If you have comments or questions please post them here.

Thanks!
hackman
Visit this Community
Sweden
Joined: June 23, 2008
KitMaker: 130 posts
Armorama: 120 posts
Posted: Tuesday, July 08, 2008 - 01:52 AM UTC
Very good and nice shades, it's look mean.
whittman181
Visit this Community
Massachusetts, United States
Joined: December 30, 2006
KitMaker: 646 posts
Armorama: 473 posts
Posted: Tuesday, July 08, 2008 - 08:16 AM UTC
I watched the build and it came out fabulous as usual.Thanks Bill Bob
wbill76
Visit this Community
Texas, United States
Joined: May 02, 2006
KitMaker: 5,425 posts
Armorama: 4,659 posts
Posted: Tuesday, July 08, 2008 - 11:40 AM UTC
Jan, Bob, appreciate the comments, thanks for looking.
milvehfan
Visit this Community
North Carolina, United States
Joined: June 26, 2007
KitMaker: 2,116 posts
Armorama: 1,080 posts
Posted: Wednesday, July 09, 2008 - 07:27 PM UTC
Looks great, like the the camo job..milvehfan
SGTJKJ
#041
Visit this Community
Kobenhavn, Denmark
Joined: July 20, 2006
KitMaker: 10,069 posts
Armorama: 4,677 posts
Posted: Wednesday, July 09, 2008 - 10:44 PM UTC
Looks great. I am preparing to build this model myself and has researched "Black 115". You captured the look of the real thing very well.

Thanks for sharing
wbill76
Visit this Community
Texas, United States
Joined: May 02, 2006
KitMaker: 5,425 posts
Armorama: 4,659 posts
Posted: Thursday, July 10, 2008 - 07:19 AM UTC
Milvehfan, appreciate the comments!

Jesper,

The kit stands up well for the most part, I enjoyed building. Thanks for your comments and look forward to seeing what you do with yours.
210cav
Visit this Community
Virginia, United States
Joined: February 05, 2002
KitMaker: 6,149 posts
Armorama: 4,573 posts
Posted: Thursday, July 10, 2008 - 08:19 AM UTC
Bill--can you review your technique for toning down the original camo job? I recall you apply various dots of paint and then blend them in with a wide brush and turpenoid...if I recall correctly.
thanks
DJ
wbill76
Visit this Community
Texas, United States
Joined: May 02, 2006
KitMaker: 5,425 posts
Armorama: 4,659 posts
Posted: Thursday, July 10, 2008 - 04:29 PM UTC
DJ,

The full details are here in the build log thread: https://armorama.kitmaker.net/forums/118784&page=2

In this particular case I used a combination of dot filters and a Mig pigment "dust coat" to produce the final finish. For the dots I use enamel paints and ordinary enamel thinner vs. oils and turpenoid. Both types of paint can be used, I use the enamels out of expediency and the fact that they dry faster than standard oil paints but still produce the desired result. It's also worth noting that I use enamels for the base coat vs. acrylics and that in turn drives the need to have a Future barrier coat between the base coat and the weathering.
c5flies
Visit this Community
California, United States
Joined: October 21, 2007
KitMaker: 3,684 posts
Armorama: 2,938 posts
Posted: Thursday, July 10, 2008 - 05:04 PM UTC
Bill, your Mig pigment dust coat, is that sprayed on, brushed on, using your 'addition by subtraction' method, or how? Did I miss this in your build log, or is this a 'trade secret'? The weathering finish on this is fantastic.
whittman181
Visit this Community
Massachusetts, United States
Joined: December 30, 2006
KitMaker: 646 posts
Armorama: 473 posts
Posted: Thursday, July 10, 2008 - 05:33 PM UTC
Thats what I love about Armorama so much , everyone sharing techniques. I learn so much practical things to put to use. Thanks , to everyone Bob
wbill76
Visit this Community
Texas, United States
Joined: May 02, 2006
KitMaker: 5,425 posts
Armorama: 4,659 posts
Posted: Friday, July 11, 2008 - 02:41 AM UTC

Quoted Text

Bill, your Mig pigment dust coat, is that sprayed on, brushed on, using your 'addition by subtraction' method, or how? Did I miss this in your build log, or is this a 'trade secret'? The weathering finish on this is fantastic.


James,

Definitely not a "trade secret", I don't have any of those! The bottom of the hull, tracks, etc. is done with the 'addition by subtraction' approach (adding a heavy coat and then removing excess and adjusting until the looks is right). The top hull and other surfaces get their dust coat as a very thin mix of water and pigment applied by brush so it has good control and can pool a bit where desired. For the streaking, I used a slightly dampened round 1 sable brush and drew it down in vertical strokes. The bristles then collect the pigment together and produce streaks once it air dries and this allows for some variety in the dust coat as well so it doesn't look like it just got pigment/dust blown over it uniformly.

Bob,

That's what the forums are all about! Knowledge that isn't shared is useless IMHO.
210cav
Visit this Community
Virginia, United States
Joined: February 05, 2002
KitMaker: 6,149 posts
Armorama: 4,573 posts
Posted: Friday, July 11, 2008 - 03:49 AM UTC
Bill thanks for the feedback
DJ
 _GOTOTOP