_GOTOBOTTOM
Armor/AFV
For discussions on tanks, artillery, jeeps, etc.
FEATURE
Hide and seek
Henk
Visit this Community
England - South West, United Kingdom
Joined: August 07, 2004
KitMaker: 6,391 posts
Armorama: 4,258 posts
Posted: Thursday, July 10, 2008 - 01:40 AM UTC
Mike Walsh shows his Panther Ausf. G, as it might have appeared in the last months of the war.


If you have comments or questions please post them here.

Thanks!
Tarok
Visit this Community
Victoria, Australia
Joined: July 28, 2004
KitMaker: 10,889 posts
Armorama: 3,245 posts
Posted: Thursday, July 10, 2008 - 01:52 AM UTC
Nice work Mike!

Great to see that set of Alpine figures used so effectively

Rudi
youngc
Visit this Community
Western Australia, Australia
Joined: June 05, 2007
KitMaker: 2,166 posts
Armorama: 1,080 posts
Posted: Thursday, July 10, 2008 - 06:26 AM UTC
Hi Mike,

Great looking model and presentation.

But isn't the feature a little ...err.....brief? I would sure love to learn all about the groundwork.

Chas
jcourtot
Visit this Community
Indiana, United States
Joined: June 06, 2008
KitMaker: 344 posts
Armorama: 251 posts
Posted: Thursday, July 10, 2008 - 09:53 AM UTC
Great job!! How did you do the branches. I have been trying to find a good way to do it.
Again Great Job!

thxs,
John
airborne1
Visit this Community
Queensland, Australia
Joined: April 15, 2006
KitMaker: 915 posts
Armorama: 797 posts
Posted: Thursday, July 10, 2008 - 03:30 PM UTC
Thanks for your kind words.

Rudi,
The figure review you did was a ripper.
I'd seen the previous reviews on the Alpine products and had all been nothing but positives
The poses from these 2 figures just add to the scene .Thanks

Chas,
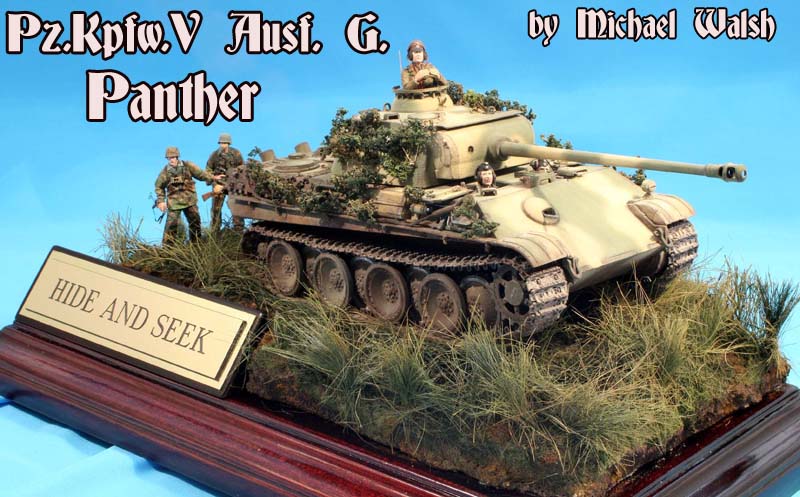
I always seem to skip over the groundwork but basically I started from a
styrofoam base .The base is covered with a base in a mixture of wall filler ,black and brown acylic paint mixed with the wall filler to tone the filler down when it drys.
The filler always dries light so the darker you go the mixture the better it is.
Its better to work from a darker shade and go lighter to create depth .

Once dried after a few hours I used white glue and water thinned down in an atomiser and
sprayed lightly onto the base.I then sprinked fine grass from Heki,hudson and Allen ...etc and let dry for a day.
Its at this stage I used florists strands and hudsen and allen tall grass .
I made small clumps and dipped into white glue and pressed into the base .
Once dried I airbrushed the whole base with Tamiya JA green and let dry for a few hours.
finally ,I airbrushed a fine mist coat of yellow .MIG Pigments had also been used by feathering the dust onto the base .FEATHERING:"light dust"pigment was placed into a bottle lid
the lid was placed just above the groundwork and a large brush was pushed into the lid and vigourously moved around the lid to create a dust effect.
PHEW!!! what a mouthfull

Johnathon,
I was going to use photetch from scale link but found it was'nt to scale for the vehicle.
HEKI tree covererage which is supplied in a box with plastic trees is what I used.
I cannot recall the name but I've had it for years .
White glue again mixed in an atomiser with water on a 50/50 consistency was used to spray on the heki tree piece .tea leaves then had been sprinked over the fine tree piece and after dried I used hairspray to bond the tea leaves
Last process ;Sprayed Tamiya JA green and lightened up with yellow .
I always work with the darkest colour on the groundwork and trees and lighten out .

I hope this helps with your future projects .

Michael


Plasticbattle
#003
Visit this Community
Donegal, Ireland
Joined: May 14, 2002
KitMaker: 9,763 posts
Armorama: 7,444 posts
Posted: Thursday, July 10, 2008 - 04:08 PM UTC

Quoted Text

Great to see that set of Alpine figures used so effectively


First thing I noticed as well, was how perfect their pose and positioning was.
Really nice display Michael. Love the long grass and how the panther sits on the base. Very natural. The colouring/tones also are very well tied together, and make for an excellent visual display. Nice one.
milvehfan
Visit this Community
North Carolina, United States
Joined: June 26, 2007
KitMaker: 2,116 posts
Armorama: 1,080 posts
Posted: Thursday, July 10, 2008 - 05:04 PM UTC
Great Build and the figures fit in nicely, wish my builds were half as good. A very natural dio. milvehfan
whittman181
Visit this Community
Massachusetts, United States
Joined: December 30, 2006
KitMaker: 646 posts
Armorama: 473 posts
Posted: Thursday, July 10, 2008 - 05:19 PM UTC
Mike , a really top notch diorama Everything fits together perfectly and your painting skills are fantastic. Thanks for sharing Bob
SGTJKJ
#041
Visit this Community
Kobenhavn, Denmark
Joined: July 20, 2006
KitMaker: 10,069 posts
Armorama: 4,677 posts
Posted: Thursday, July 10, 2008 - 06:37 PM UTC
Excellent job, Mike. Love the way the Panther and figures are tided in with the groundwork and foliage.

Thanks for sharing
youngc
Visit this Community
Western Australia, Australia
Joined: June 05, 2007
KitMaker: 2,166 posts
Armorama: 1,080 posts
Posted: Thursday, July 10, 2008 - 08:49 PM UTC
Thanks for sharing your groundwork methods.

Looking forward to seeing more of your work.


Chas
210cav
Visit this Community
Virginia, United States
Joined: February 05, 2002
KitMaker: 6,149 posts
Armorama: 4,573 posts
Posted: Friday, July 11, 2008 - 12:29 AM UTC
Great job, well done
airborne1
Visit this Community
Queensland, Australia
Joined: April 15, 2006
KitMaker: 915 posts
Armorama: 797 posts
Posted: Saturday, July 12, 2008 - 12:04 AM UTC

Thanks

The dragon models being released nowadays need very little refining.

Extremely well detailed and they are a great out of the box build .

I appreciate your comments .

Michael
rchristenson
Visit this Community
Alberta, Canada
Joined: June 13, 2008
KitMaker: 47 posts
Armorama: 35 posts
Posted: Wednesday, December 24, 2008 - 06:30 PM UTC
i'd never thought of tea leaves before. Are they pre- or post brew? i assume you airbrushed them...?
 _GOTOTOP