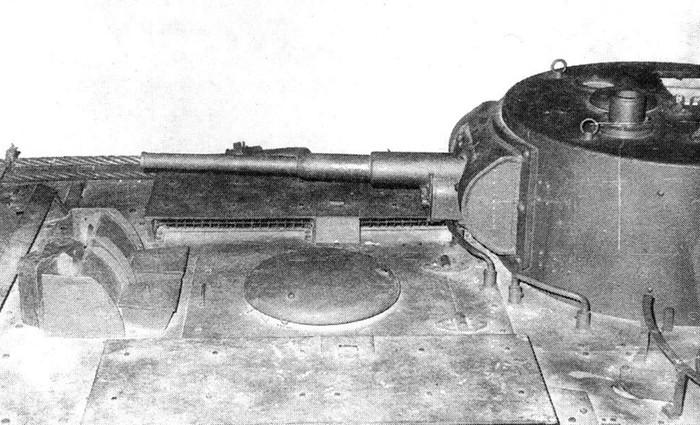
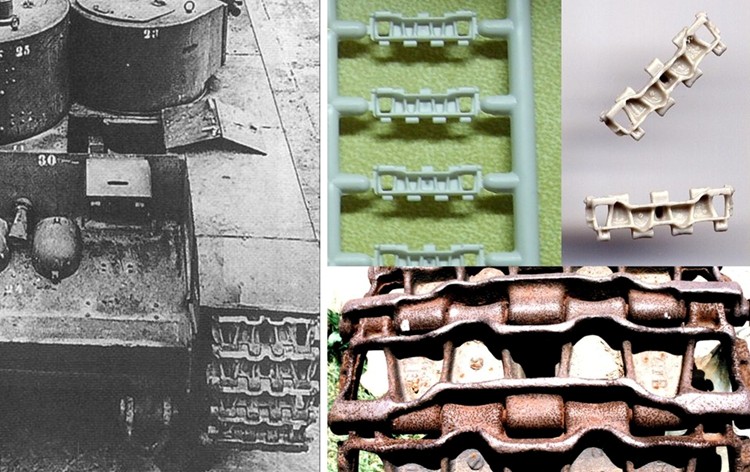
Decided to share one of my builds - ICM's T-35. Taking it slow with this tank - little bit at a time. With this one want to go with historical accuracy. Unfortunately, there are no reliable blueprints, so I have to go by photos. Lots of changes need to be done, including finding new tracks, since those supplied in the kit are actually T-55 tracks. I am also looking to replace machine gun barrels: to buy metal ones or scratchbuild. Found really nice barrels on Model Point, but price is way too high, if you think that I need 5-6 of them.
This is some of my progress up to this day.
The machine gun turrets went together pretty easy. But as you can see, machine guns themselves are pretty lame and need an "upgrade".
45-mm gun turrets were little bit tougher to put together. Plus PE hatches are of exact size and were little bit hard to put on. As far as barrels - they are obviously need to be replaced (and gun mantlets too).
Main turret - lots of work. If anybody interested, I will make a list of corrections. If not - I won't.
As far as the bottom hull - not everything will be visible after side skirts are placed, so I will be making only stuff that you can see.
I am also making main tower wider by adding 1.5 mm behind gun turrets and 1mm behind MG turrets.
Hosted by Jacques Duquette
T-35 slow build
Minsk94
Wisconsin, United States
Joined: June 16, 2008
KitMaker: 418 posts
Armorama: 408 posts
Joined: June 16, 2008
KitMaker: 418 posts
Armorama: 408 posts
Posted: Monday, July 14, 2008 - 05:56 AM UTC
djohannsen
Virginia, United States
Joined: June 24, 2005
KitMaker: 364 posts
Armorama: 355 posts
Joined: June 24, 2005
KitMaker: 364 posts
Armorama: 355 posts
Posted: Monday, July 14, 2008 - 06:30 AM UTC
I have just started playing with this kit... Mine has some real problems with "short shots" during molding (for example, I have several half-formed road wheels). The periscopes are also really rough on my kit (with all the flash, it's very hard to tell what the apperature is supposed to look like). Getting the halves of the 45 mm turrets to join smoothly without showing a vertical seam has taken lots of filling and sanding. Also, bad fit on some of the bogie units (thank heaven that the bogies are hidden, so I didn't have to try to do anything there).
So far, it looks like you're doing a bang-up job. May I ask what PE set you're using? Also, I see that you've removed most of the rivet detail from the top of the 45 mm turret, are you planning to replace it? Anyway, good luck with the build, I will surely be watching your progress.
Dave
So far, it looks like you're doing a bang-up job. May I ask what PE set you're using? Also, I see that you've removed most of the rivet detail from the top of the 45 mm turret, are you planning to replace it? Anyway, good luck with the build, I will surely be watching your progress.
Dave
Minsk94
Wisconsin, United States
Joined: June 16, 2008
KitMaker: 418 posts
Armorama: 408 posts
Joined: June 16, 2008
KitMaker: 418 posts
Armorama: 408 posts
Posted: Monday, July 14, 2008 - 07:18 AM UTC
Quoted Text
... what PE set you're using? Also, I see that you've removed most of the rivet detail from the top of the 45 mm turret, are you planning to replace it? Anyway, good luck with the build...
Thanks, Dave.
The PE is from Eduard (#35316). But they did this PE long time ago, so not everything can be used. Some of the details are out of scale, plus all the metal of a same thickness. Use your judgement here.
The mount for DT machine gun is from Verlinden set for KV.
About 45-mm turrets: I didn't have any rivets on their roof. As far as I know the rivets around hatches were only on the first several tanks produced. Otherwise I know only about four (arranged in a square) rivets holding something inside the turret. Yes, I will be placing those.
Also the vent cover was not flat like in my kit, it was sphere-shaped (or whatever it called in English ). And the little hatch (located opposite to the periscope) was closing from the inside, and not from outside like in the kit. I replaced it already on the main turret.
And one more thing about medium turrets. Gun ports did not have plugs. They had little doors on inside. But the main turret had plugs. My kit had it other way around.
Keep in mind, though, I have ICM. If you are using Alanger kit, there are some little differences from ICM.
Alex
jjumbo
British Columbia, Canada
Joined: August 27, 2006
KitMaker: 2,012 posts
Armorama: 1,949 posts
Joined: August 27, 2006
KitMaker: 2,012 posts
Armorama: 1,949 posts
Posted: Monday, July 14, 2008 - 07:20 AM UTC
Quoted Text
Lots of changes need to be done, including finding new tracks, since those supplied in the kit are actually T-55 tracks.
Hey Alex,
I've never heard that one before, where did you hear that they were T-55 tracks
Other than missing the lightening holes, the kit tracks look very much like the ones in photos I've seen.
Cheers
jjumbo
Minsk94
Wisconsin, United States
Joined: June 16, 2008
KitMaker: 418 posts
Armorama: 408 posts
Joined: June 16, 2008
KitMaker: 418 posts
Armorama: 408 posts
Posted: Monday, July 14, 2008 - 07:33 AM UTC
Hey, John
Tracks for T-35 had 5 "sections". Tracks for T-55 - seven. I made this picture a little while ago to show the difference. Left - actual T-35. Top right - tracks from ICM T-35 kit on a sprue and tracks for T-55 from some other kit (don't remember which one now). Bottom right actual tracks from T-55.
I hope it helps, and sorry if I "ruined" your day
djohannsen
Virginia, United States
Joined: June 24, 2005
KitMaker: 364 posts
Armorama: 355 posts
Joined: June 24, 2005
KitMaker: 364 posts
Armorama: 355 posts
Posted: Monday, July 14, 2008 - 07:38 AM UTC
Quoted Text
About 45-mm turrets: I didn't have any rivets on their roof. As far as I know the rivets around hatches were only on the first several tanks produced.
It was the row of rivets along the edge of the hatch that I was referring to - I didn't know that those were short-lived. I have to confess that I was a bit put-off by all the flash and molding problems, so I haven't spent too much time with this kit or my sole reference ("Land Battleship").
As for the tracks, I haven't even looked at them yet... I was so dejected by the molding that I've seen so far on parts that I'm actually a bit afraid of what I'll see if I look at the track sprues.
Anyway, I really like what you've done so far. I will keep watching and hope to get remotivated on my build.
Dave
Minsk94
Wisconsin, United States
Joined: June 16, 2008
KitMaker: 418 posts
Armorama: 408 posts
Joined: June 16, 2008
KitMaker: 418 posts
Armorama: 408 posts
Posted: Monday, July 14, 2008 - 08:07 AM UTC
Quoted Text
It was the row of rivets along the edge of the hatch that I was referring to - I didn't know that those were short-lived.
Just to be sure, I will check with my friend, who was in Kubinka recently. Will get back to you on that.
Alex
P.S. There is a row of rivets around hatches on my model. But they are so tiny, that I didn't even remember. But I will check with him anyway.
spongya
Associate Editor
Budapest, Hungary
Joined: February 01, 2005
KitMaker: 2,365 posts
Armorama: 1,709 posts
Joined: February 01, 2005
KitMaker: 2,365 posts
Armorama: 1,709 posts
Posted: Tuesday, July 15, 2008 - 06:38 AM UTC
Great work. Amazing work, rather.
"Main turret - lots of work. If anybody interested, I will make a list of corrections. If not - I won't. "
I'd be interested. I have the kit in my stash, and can hardly wait to build it. But I can't promise I'll will take your advices I think I'll go for a fast build with that one...
(I wonder when DML will come out a 3-in-1 version.)
Minsk94
Wisconsin, United States
Joined: June 16, 2008
KitMaker: 418 posts
Armorama: 408 posts
Joined: June 16, 2008
KitMaker: 418 posts
Armorama: 408 posts
Posted: Tuesday, July 15, 2008 - 07:04 AM UTC
Quoted Text
Great work. Amazing work, rather.
I'd be interested. I have the kit in my stash, and can hardly wait to build it. But I can't promise I'll will take your advices I think I'll go for a fast build with that one...
(I wonder when DML will come out a 3-in-1 version.)
Thank you!
I will try to put it (the list) together one of these days.
Actually, I started building it as a "fast" build, but eventually started fixing all mistakes, and ...still working on it.
DML? Sounds great, but I can only imagine how much that baby would cost.
210cav
Virginia, United States
Joined: February 05, 2002
KitMaker: 6,149 posts
Armorama: 4,573 posts
Joined: February 05, 2002
KitMaker: 6,149 posts
Armorama: 4,573 posts
Posted: Tuesday, July 15, 2008 - 07:53 AM UTC
Marvelous job!
whittman181
Massachusetts, United States
Joined: December 30, 2006
KitMaker: 646 posts
Armorama: 473 posts
Joined: December 30, 2006
KitMaker: 646 posts
Armorama: 473 posts
Posted: Tuesday, July 15, 2008 - 08:17 AM UTC
Your very talented , can't wait to see you finish this one Bob
yrq_ekb
Sverdlovsk, Russia
Joined: July 15, 2008
KitMaker: 12 posts
Armorama: 11 posts
Joined: July 15, 2008
KitMaker: 12 posts
Armorama: 11 posts
Posted: Tuesday, July 15, 2008 - 04:04 PM UTC
Quoted Text
It was the row of rivets along the edge of the hatch that I was referring to - I didn't know that those were short-lived. I have to confess that I was a bit put-off by all the flash and molding problems, so I haven't spent too much time with this kit or my sole reference ("Land Battleship").
We don`t know something about rivets on roof of any turret.
Because only photos is a proof but no one has plain (clear? sharpen?) photos of turrets roof.
Sorry for my english.
P.S.
walkaround of T-35 in Kubinka
Minsk94
Wisconsin, United States
Joined: June 16, 2008
KitMaker: 418 posts
Armorama: 408 posts
Joined: June 16, 2008
KitMaker: 418 posts
Armorama: 408 posts
Posted: Tuesday, July 15, 2008 - 06:53 PM UTC
Quoted Text
We don`t know something about rivets on roof of any turret.
Because only photos is a proof but no one has plain (clear? sharpen?) photos of turrets roof.
Sorry for my english.
P.S.
walkaround of T-35 in Kubinka
This is just the person I wanted to see!!! (I have mention him before!)
The one who actually been in Kubinka just recently and have seen the real THING! I wouldn't be able to make all corrections to the kit without his help.
dsfraser
Alberta, Canada
Joined: October 01, 2007
KitMaker: 172 posts
Armorama: 168 posts
Joined: October 01, 2007
KitMaker: 172 posts
Armorama: 168 posts
Posted: Saturday, July 19, 2008 - 02:07 PM UTC
Quoted Text
We don`t know something about rivets on roof of any turret.
Because only photos is a proof but no one has plain (clear? sharpen?) photos of turrets roof.
Sorry for my english.
Не надо извиниться. Мы не можем по-русски, как ты по-английски! Волее важно участвовать. Спасибо за помощь.
Scott из Канады.
Minsk94
Wisconsin, United States
Joined: June 16, 2008
KitMaker: 418 posts
Armorama: 408 posts
Joined: June 16, 2008
KitMaker: 418 posts
Armorama: 408 posts
Posted: Saturday, July 19, 2008 - 06:35 PM UTC
Now as promised - changes done to the main turret. Did it with the help of yrq_ekb. Without him I would miss lots of stuff.I recomend to visit his site. As I mentioned above he recently took some pictures of actual T-35.
So, here it goes:
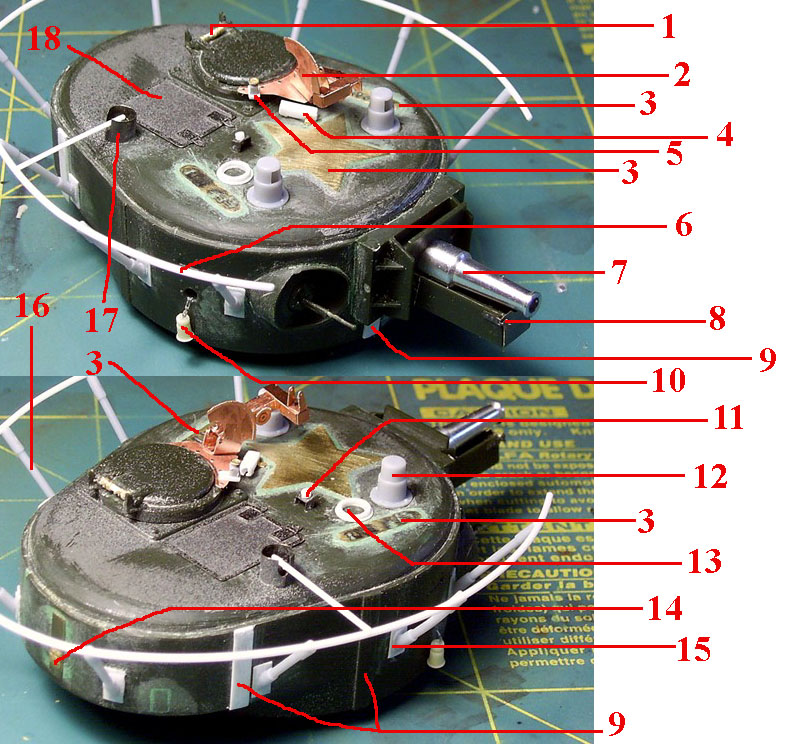
1) Spring made from a thin wire.
2) The mount of the anti-aircraft machine gun. At first I made it from Eduard PE (set for T-35), but later replaced it with one from Verlinden (set for KV). Scale is under big question in both of them, but I think, Verlinden is closer, and quality is outstanding. You can compare them in this next pic.
3) These are reinforcements for the roof. Eduard provides only the one shaped like a star, but it is not a big deal. The other two are easy to make. Alanger kit has them already in a kit. ICM doesn't.
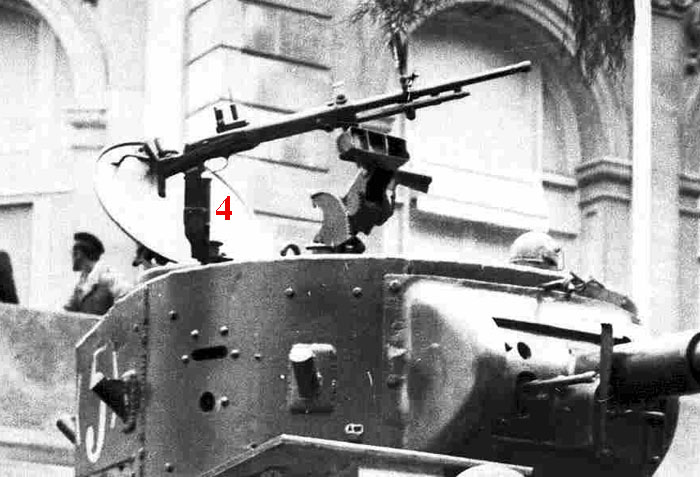
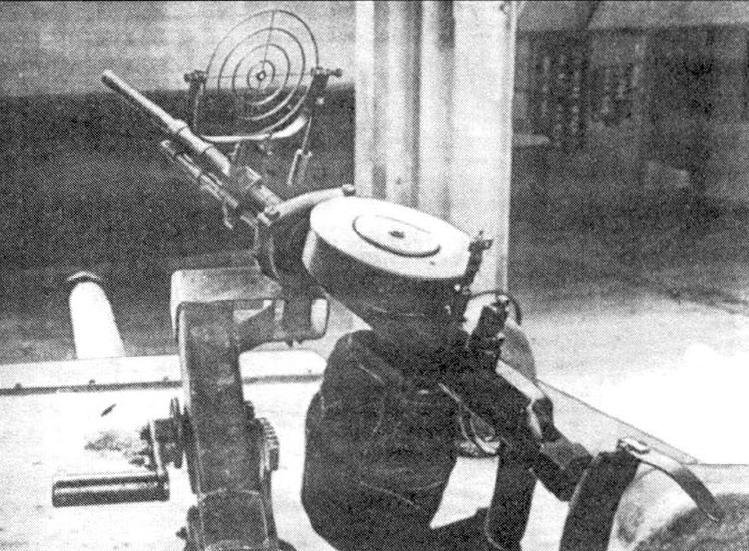
4) This thing (whatever it called in English ) has a purpose to secure the handle of a machine gun, so it does not bounce on the roof. Scratchbuilt. Below is a pic of what it looked like and how it worked.
5) This handle was used (in my understanding) to turn the whole "ring" (machine gun+hatch) around. Scratchbuilt from a photo taken by yrq_ekb. You can see it better on the 5-th pic from the top in my first post.
6) Antenna was made new from a scratch because I had to move supports (16). Spots where supports are connected to antenna are marked. After moving supports the spots were off, so I replaced the whole thing. Why did I move I will explain below.
7) Barrel from J. Rubio.
8) PE from Eduard. More detail that was left out in the kit.
9) Side reinforcements. This planks were welded on, not riveted like in the kit. Also: kit has one of them on each side. On a real tank there was two on each side plus two under the gun mantlet. And speaking of the gun, if you want to make it raised up, there are some details that are not in the kit.
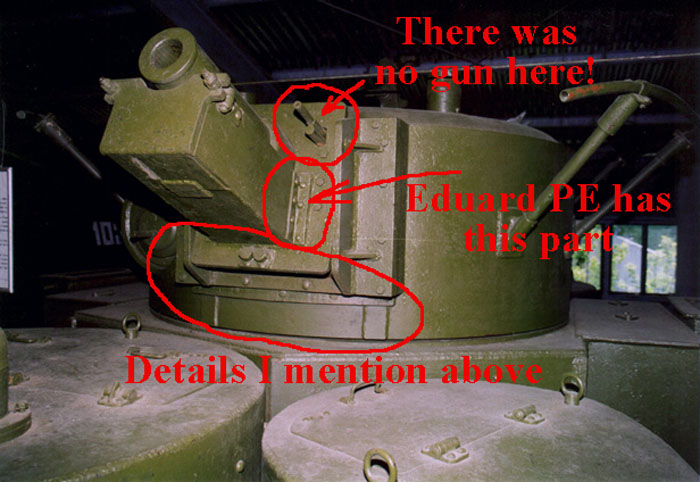
10) Plugs for gun ports. These gun ports had plugs to close them, and not little "doors", as it made in the kit.
11) That was pretty much just a "door stop" for a hatch. Kit has it like some box. PE got it simple enough. I just added slice of sprue on top to imitate a rubber.
12) Periscopes. I took them from T-28 kit. Ddidn't like the way original were molded. But I think it should be easy to build them from scratch.
13) This is the communication hatch for those little flags. (Scratchbuilt) This hatch could be opened or closed from inside only, not from outside like it made in the kit. It was also located in the wrong spot - right where the roof reinforcement should be. The kit from Alanger has it right on the reinforcement and should be moved too.
14) Gun port for a rear machine gun. As far as I know only first several T-35 had this part as in the kit (if any at all). The rest of them had this little hatch opening outside. Apparently, this machine gun was the one also used as an anti-aircraft.
15) This is the plates to which supports for antenna were welded on. From the photos of actual tanks you can see they were way bigger and thicker than in the kit.
16) Supports for antenna were moved. In the kit they are located symmetrical, but if you look at the photos of actual tanks you can see that they were located assymmetrical. To find where to place them is not too hard using ref. photos.
17) Whatever this thing called surrounding the connector for antenna. Eduard PE has it. As for connector itself I made the new one. You can also add a little "touch" by placing "a screw" where it connects to the ball. But did it after I took this pic.
18) Second hatch. Eduard PE.
Besides all that I would recomend (going to do it myself) to replace machine gun barrels. The guns from the kit are pretty crappy. Shouldn't be too hard to make new. They seem pretty simple,
P.S. English is not my first or even the second language, so be patient with me I will appreciate, if, when you notice some cruel language screw up, you will let me know by PM. I will fix it, and try to learn for a next time.
So, here it goes:
1) Spring made from a thin wire.
2) The mount of the anti-aircraft machine gun. At first I made it from Eduard PE (set for T-35), but later replaced it with one from Verlinden (set for KV). Scale is under big question in both of them, but I think, Verlinden is closer, and quality is outstanding. You can compare them in this next pic.
3) These are reinforcements for the roof. Eduard provides only the one shaped like a star, but it is not a big deal. The other two are easy to make. Alanger kit has them already in a kit. ICM doesn't.
4) This thing (whatever it called in English ) has a purpose to secure the handle of a machine gun, so it does not bounce on the roof. Scratchbuilt. Below is a pic of what it looked like and how it worked.
5) This handle was used (in my understanding) to turn the whole "ring" (machine gun+hatch) around. Scratchbuilt from a photo taken by yrq_ekb. You can see it better on the 5-th pic from the top in my first post.
6) Antenna was made new from a scratch because I had to move supports (16). Spots where supports are connected to antenna are marked. After moving supports the spots were off, so I replaced the whole thing. Why did I move I will explain below.
7) Barrel from J. Rubio.
8) PE from Eduard. More detail that was left out in the kit.
9) Side reinforcements. This planks were welded on, not riveted like in the kit. Also: kit has one of them on each side. On a real tank there was two on each side plus two under the gun mantlet. And speaking of the gun, if you want to make it raised up, there are some details that are not in the kit.
10) Plugs for gun ports. These gun ports had plugs to close them, and not little "doors", as it made in the kit.
11) That was pretty much just a "door stop" for a hatch. Kit has it like some box. PE got it simple enough. I just added slice of sprue on top to imitate a rubber.
12) Periscopes. I took them from T-28 kit. Ddidn't like the way original were molded. But I think it should be easy to build them from scratch.
13) This is the communication hatch for those little flags. (Scratchbuilt) This hatch could be opened or closed from inside only, not from outside like it made in the kit. It was also located in the wrong spot - right where the roof reinforcement should be. The kit from Alanger has it right on the reinforcement and should be moved too.
14) Gun port for a rear machine gun. As far as I know only first several T-35 had this part as in the kit (if any at all). The rest of them had this little hatch opening outside. Apparently, this machine gun was the one also used as an anti-aircraft.
15) This is the plates to which supports for antenna were welded on. From the photos of actual tanks you can see they were way bigger and thicker than in the kit.
16) Supports for antenna were moved. In the kit they are located symmetrical, but if you look at the photos of actual tanks you can see that they were located assymmetrical. To find where to place them is not too hard using ref. photos.
17) Whatever this thing called surrounding the connector for antenna. Eduard PE has it. As for connector itself I made the new one. You can also add a little "touch" by placing "a screw" where it connects to the ball. But did it after I took this pic.
18) Second hatch. Eduard PE.
Besides all that I would recomend (going to do it myself) to replace machine gun barrels. The guns from the kit are pretty crappy. Shouldn't be too hard to make new. They seem pretty simple,
P.S. English is not my first or even the second language, so be patient with me I will appreciate, if, when you notice some cruel language screw up, you will let me know by PM. I will fix it, and try to learn for a next time.
dsfraser
Alberta, Canada
Joined: October 01, 2007
KitMaker: 172 posts
Armorama: 168 posts
Joined: October 01, 2007
KitMaker: 172 posts
Armorama: 168 posts
Posted: Saturday, July 19, 2008 - 07:06 PM UTC
Do you know this site?
http://grayknight.narod.ru/T-35/T-35.htm
http://grayknight.narod.ru/T-35_info/T-35_info.htm
I had forgotten about it until just now.
http://grayknight.narod.ru/T-35/T-35.htm
http://grayknight.narod.ru/T-35_info/T-35_info.htm
I had forgotten about it until just now.
Minsk94
Wisconsin, United States
Joined: June 16, 2008
KitMaker: 418 posts
Armorama: 408 posts
Joined: June 16, 2008
KitMaker: 418 posts
Armorama: 408 posts
Posted: Saturday, July 19, 2008 - 07:35 PM UTC
Quoted Text
Do you know this site?
http://grayknight.narod.ru/T-35/T-35.htm
http://grayknight.narod.ru/T-35_info/T-35_info.htm
I had forgotten about it until just now.
Yes, that is where I got most of my ref.
yrq_ekb
Sverdlovsk, Russia
Joined: July 15, 2008
KitMaker: 12 posts
Armorama: 11 posts
Joined: July 15, 2008
KitMaker: 12 posts
Armorama: 11 posts
Posted: Sunday, July 20, 2008 - 06:39 AM UTC
http://www.asahi-net.or.jp/~pc6m-wkn/Kubinka2.htm
Only six but very usefull photos of T-35 in Kubinka by our Japanese colleague.
May be MOST useful pfotos.
Only six but very usefull photos of T-35 in Kubinka by our Japanese colleague.
May be MOST useful pfotos.
dsfraser
Alberta, Canada
Joined: October 01, 2007
KitMaker: 172 posts
Armorama: 168 posts
Joined: October 01, 2007
KitMaker: 172 posts
Armorama: 168 posts
Posted: Sunday, July 20, 2008 - 08:30 AM UTC
The Bronekollektsiya issue on th eT-35 is online, too:
http://www.mk-armour.narod.ru/1995/No2.htm
I would also recommend Frontovaya Illyustratsiya 2000 - 05 "T-35, CMK, T-100". There are the usual photos, but there are also some excellent drawings made with the modeller in mind. I can post it if you do not have it. I have another book on the T-35 from someone else, but cannot find it just now.
ModelKasten made an excellent white metal Degtyarev DT for the upper turret some years ago --- I don't know if it is still available, but it is nicely done.
Cheers
Scott Fraser
Canada
Minsk94
Wisconsin, United States
Joined: June 16, 2008
KitMaker: 418 posts
Armorama: 408 posts
Joined: June 16, 2008
KitMaker: 418 posts
Armorama: 408 posts
Posted: Monday, July 21, 2008 - 07:06 AM UTC
Quoted Text
The Bronekollektsiya issue on th eT-35 is online, too:
http://www.mk-armour.narod.ru/1995/No2.htm
I would also recommend Frontovaya Illyustratsiya 2000 - 05 "T-35, CMK, T-100". There are the usual photos, but there are also some excellent drawings made with the modeller in mind. I can post it if you do not have it. I have another book on the T-35 from someone else, but cannot find it just now.
ModelKasten made an excellent white metal Degtyarev DT for the upper turret some years ago --- I don't know if it is still available, but it is nicely done.
Cheers
Scott Fraser
Canada
Yes, I know this site.
About Frontovaja Illustratsiya - it would be interesting to see those drawings. Even if I have them, somebody else may not. So, I am sure, they could be useful.
I will need to check about those DT from MK. Maybe they are still available.
Thanks,
Alex
dsfraser
Alberta, Canada
Joined: October 01, 2007
KitMaker: 172 posts
Armorama: 168 posts
Joined: October 01, 2007
KitMaker: 172 posts
Armorama: 168 posts
Posted: Monday, July 21, 2008 - 11:49 PM UTC
PM sent.
Minsk94
Wisconsin, United States
Joined: June 16, 2008
KitMaker: 418 posts
Armorama: 408 posts
Joined: June 16, 2008
KitMaker: 418 posts
Armorama: 408 posts
Posted: Monday, August 18, 2008 - 02:35 PM UTC
Little update about the rivets around the hatches of medium turrets. Those are not rivets but screws. They do not stick out like in the kit, but actualy level with the roof.
Kuno-Von-Dodenburg
England - North, United Kingdom
Joined: February 20, 2007
KitMaker: 1,453 posts
Armorama: 1,319 posts
Joined: February 20, 2007
KitMaker: 1,453 posts
Armorama: 1,319 posts
Posted: Monday, September 05, 2011 - 10:01 PM UTC
Any more progress on this (and yes I know it's an ancient thread!).
- Steve
- Steve
Minsk94
Wisconsin, United States
Joined: June 16, 2008
KitMaker: 418 posts
Armorama: 408 posts
Joined: June 16, 2008
KitMaker: 418 posts
Armorama: 408 posts
Posted: Wednesday, September 07, 2011 - 06:35 AM UTC
No, Steve
That model required so many corrections done to it, so I decided to put it aside until I get more experience. But I had to many other project ideas since.
And to build another OOB "toy" out of this T-35... I am just not up for it. I see enough of them [toys out of the box] on modeling shows.
That model required so many corrections done to it, so I decided to put it aside until I get more experience. But I had to many other project ideas since.
And to build another OOB "toy" out of this T-35... I am just not up for it. I see enough of them [toys out of the box] on modeling shows.